Al--The water is clear. The outside of the cast iron cylinder is rusty, and the inside of the aluminum reservoir is shiny.--That makes the water look orange, but it really isn't. I caution against coating the inside of the water reservoir or outside of the cylinder with anything, because it interferes with the heat transfer to the water.---Brian
You are using an out of date browser. It may not display this or other websites correctly.
You should upgrade or use an alternative browser.
You should upgrade or use an alternative browser.
Rupnow i.c. Engine with governor
- Thread starter Brian Rupnow
- Start date

Help Support Home Model Engine Machinist Forum:
This site may earn a commission from merchant affiliate
links, including eBay, Amazon, and others.
Cogsy
Well-Known Member
Thanks for the explanation Brian. I agree with what you're saying about the heat transfer, it's not something I'd given any thought to at all. Having said that, I doubt I'll ever be really 'working' the engine and I want to avoid corrosion, so I might do it anyway. The beauty of using clear nail polish is that I can tip in a $3 bottle of nail polish remover and get rid of the coating easily if I ever need to. I originally was going to slosh some thick paint around in there as a coating - I'm sure glad I didn't do that!
Cogsy--When I built the Kerzel hit and miss engine, I used a cylinder made from 316 stainless steel. That stuff doesn't rust EVER, but it costs a fortune. I was given a left over piece just big enough to make the cylinder from one of the "real" engineering jobs I put through the local machine shops in Barrie.
I made a mistake.---Back when I calculated the engine compression ratio as being 12.5:1 I forgot to include the volume of the "cave" that the sparkplug sets in in my calculation.--When it is taken into consideration, the compression ratio drops to 7.65:1, which sounds a heck of a lot more reasonable. I haven't made any allowance for the thickness of the headgasket, nor the tip of the sparkplug extending into the combustion chamber, but they won't have any significant effect, in fact one probably comes close to cancelling the other. This makes me a lot more comfortable.---At least, now when I pull up to the gas pumps with my engine, I won't have to select "Hi-Test" gas!!!

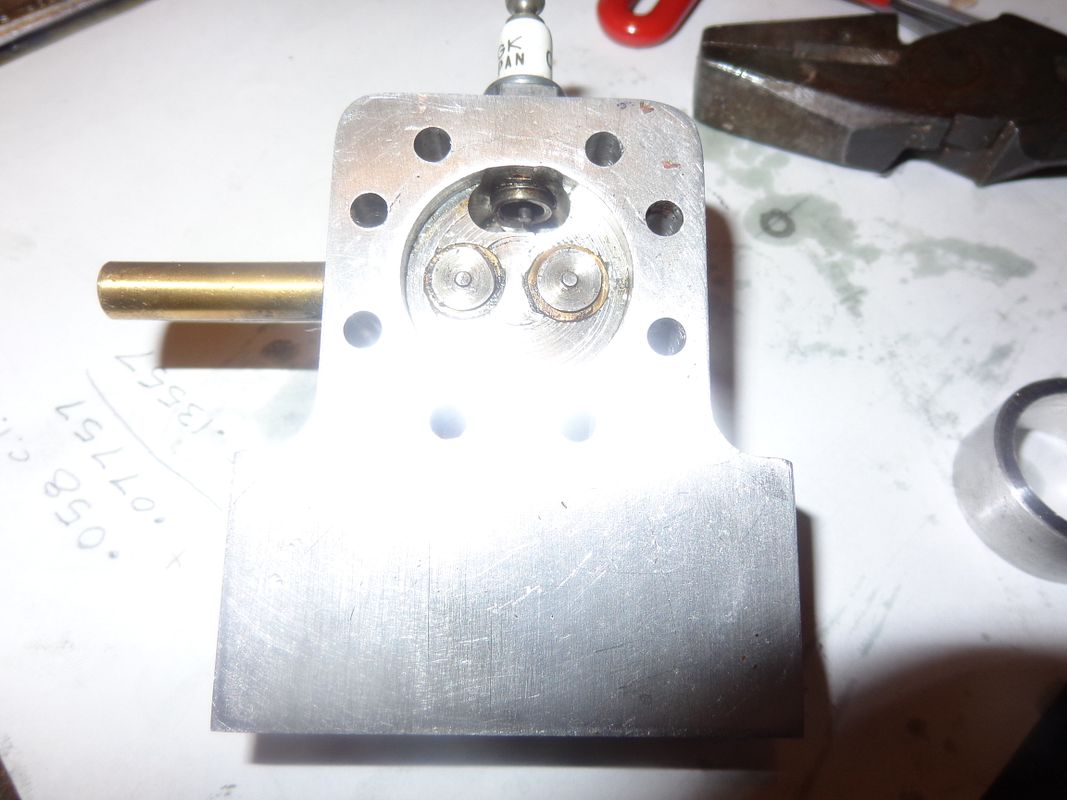
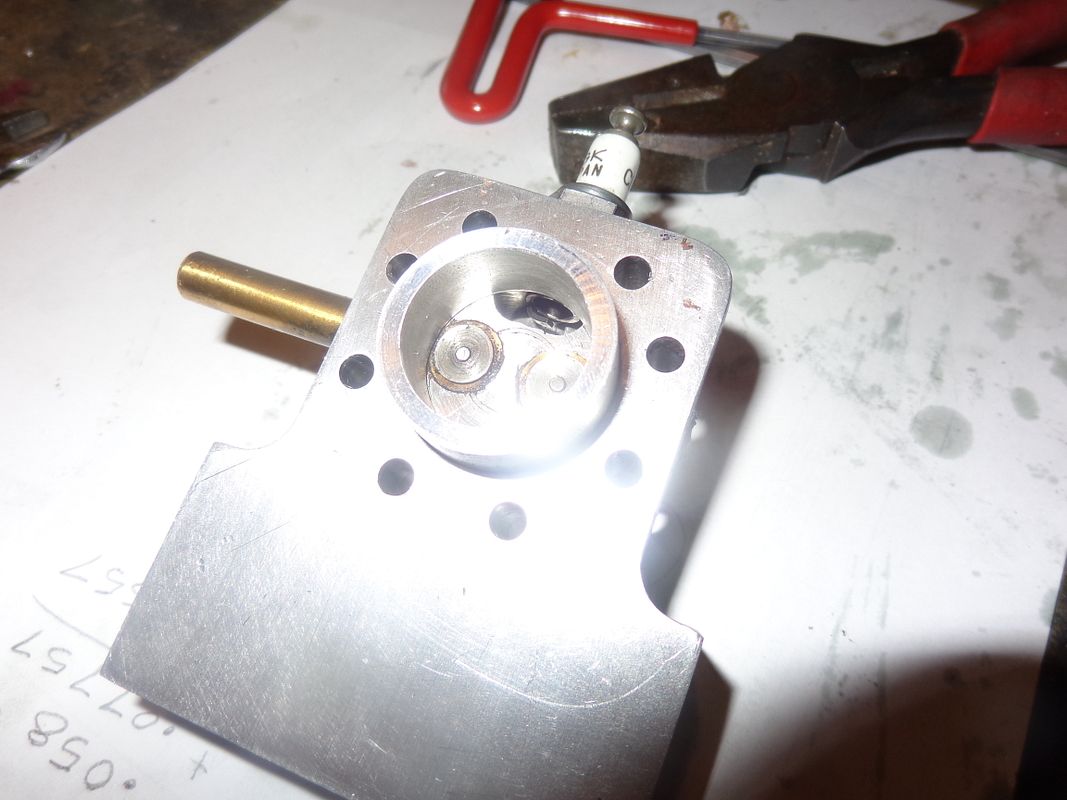
Ever since I finished the "Rupnow Engine", it has ran well, but been prone to flooding on first start up. Flooding so badly that it won't clear itself, and requires that the sparkplug be removed and dried off, then reinstalled. I have fiddled and adjusted the timing and the carburetor (which are really the only two adjustments available) until I have decided that the answer to this problem lies elsewhere. The only thing that comes to mind, is that when I designed the cylinder head, due to space constraints, I put a fairly deep pocket in the cylinder head, and installed the sparkplug so that the end of the plug protrudes into the pocket. Now this was fine, as you see in the first picture. What I kind of forgot as I designed this pocket, is that the cylinder will actually cover almost half of it, as seen in the second picture. (I machined up a ring to represent the i.d. and o.d. of the cylinder, to show what I am talking about.)--Today I am going to machine away as much material as is possible from the cylinder head, to try and "unshroud" the end of the sparkplug, in hopes that this will lead to better initial combustion, and get away from the flooding situation. For anyone who is currently building this engine, I don't recommend that you make this change. Let me make the change first on my engine, and see if it improves the situation. If it does, I will post a drawing of how I did the modification to the cylinder head. If it doesn't---well---Perhaps I will take a second look at the gas tank I am using.


$39.58
$49.99
Becker CAD 12 3D - professional CAD software for 2D + 3D design and modelling - for 3 PCs - 100% compatible with AutoCAD
momox Shop

$519.19
$699.00
FoxAlien Masuter Pro CNC Router Machine, Upgraded 3-Axis Engraving All-Metal Milling Machine for Wood Acrylic MDF Nylon Carving Cutting
FoxAlien Official
![DreamPlan Home Design and Landscaping Software Free for Windows [PC Download]](https://m.media-amazon.com/images/I/51kvZH2dVLL._SL500_.jpg)
$0.00
DreamPlan Home Design and Landscaping Software Free for Windows [PC Download]
Amazon.com Services LLC

$99.99
AHS Outdoor Wood Boiler Yearly Maintenance Kit with Water Treatment - ProTech 300 & Test Kit
Alternative Heating & Supplies

$17.90
$24.95
Backyard Building: Treehouses, Sheds, Arbors, Gates, and Other Garden Projects (Countryman Know How)
Amazon.com

$45.99
Sunnytech Mini Hot Air Stirling Engine Motor Model Educational Toy Kits Electricity HA001
stirlingtechonline

$39.99
$49.99
Sunnytech Low Temperature Stirling Engine Motor Steam Heat Education Model Toy Kit For mechanical skills (LT001)
stirlingtechonline

$94.99
$109.99
AHS Woodmaster 4400 Maintenance Kit for Outdoor Wood Boiler Treatment
Alternative Heating & Supplies

$180.50
$190.00
Genmitsu CNC 3018-PRO Router Kit GRBL Control 3 Axis Plastic Acrylic PCB PVC Wood Carving Milling Engraving Machine, XYZ Working Area 300x180x45mm
SainSmart Official

$25.34
$34.99
Bowl Sander Tool Kit w/Dual Bearing Head & Hardwood Handle | 42PC Wood Sander Set | 2" Hook & Loop Sanding Disc Sandpaper Assortment | 1/4" Mandrel Bowl Sander for Woodturning | Wood Lathe Tools
Peachtree Woodworking Supply Inc

$89.99
Outdoor Wood Boiler Water Treatment Rust Inhibitor- AmTech 300 & Test Kit
Alternative Heating & Supplies

$29.95
Competition Engine Building: Advanced Engine Design and Assembly Techniques (Pro Series)
Amazon.com Services LLC
So here we are with the modification made to the head. I used a 1/4" dia. endmill, offset .045" from the vertical centerline of the cyl head and plunge cut to the bottom of the sparkplug pocket. Then I moved over to center and plunge cut again, then .045" to the other side of center and plunge cut again. The cyl. head was mounted at an angle of 12* off horizontal. I tried to leave about .030" of material between the edge of the valve cages and the new hole being plunge cut. Then I used a 3/16" endmill for a final plunge cut on center, to get down a bit farther between the valve cages and give the triangular shape you see. The internal edges of the newly plunged holes were then blended with a Dremel tool and a small stone. It actually opens things up quite a bit. Of course, I won't know until reassembly if this makes any difference to my engine flooding problem or not.
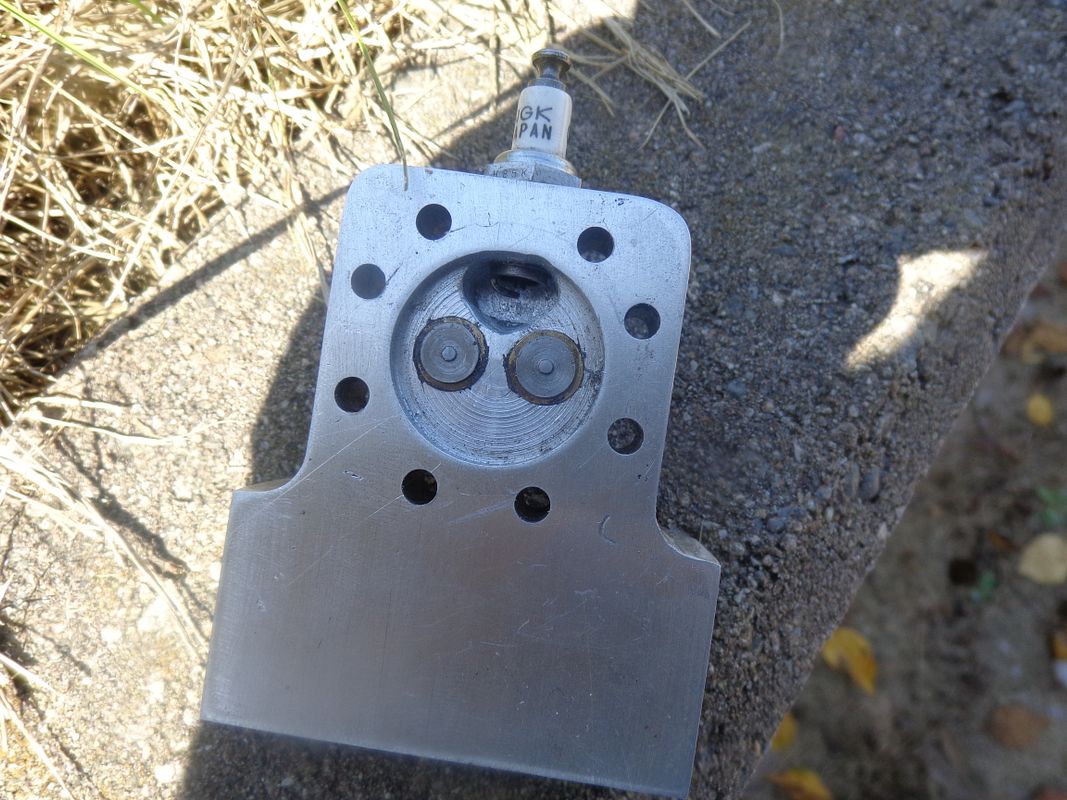
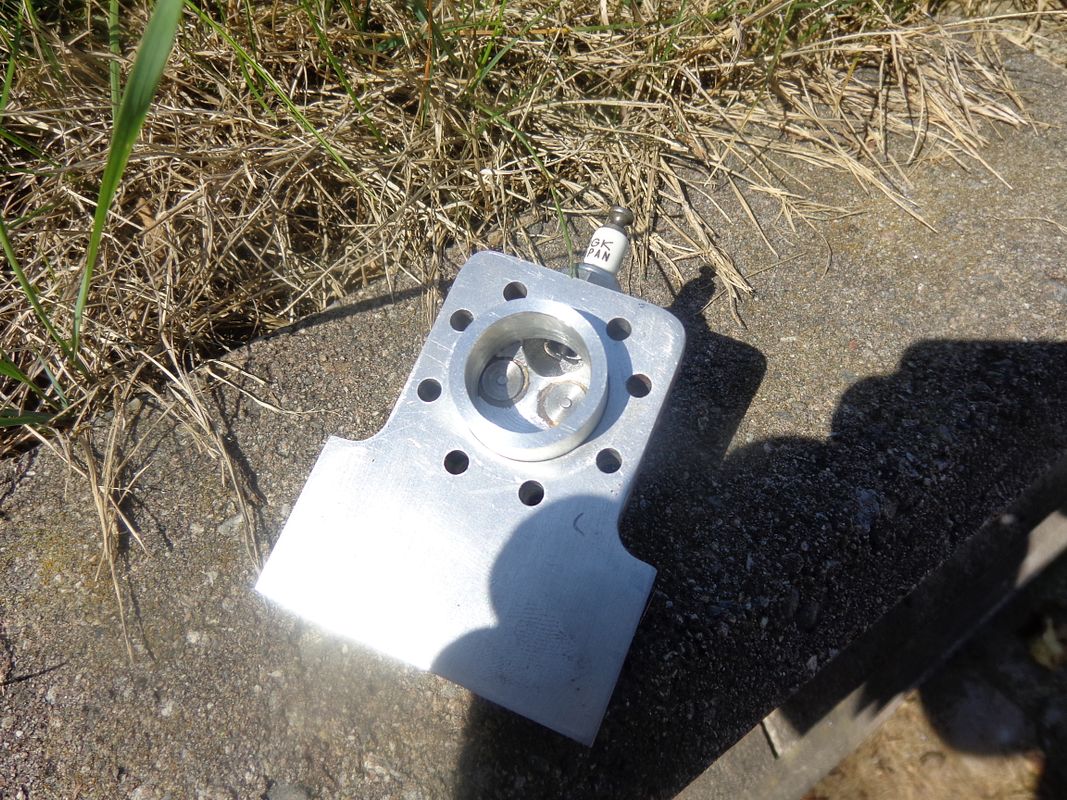


I am VERY pleased to say that the unshrouding of the sparkplug as outlined in the previous posts seems to have made a remarkable difference!!! The engine no longer floods when trying to start it, and the engine runs a lot more evenly and consistently now. I also advanced the spark considerably more than I ever thought I would have to. This is GOOD!!! One more step in Brian's education as regards small i.c. engines. Chuck Fellows--You were right.---What can I say!! So---Anybody out there who is building or considering building this engine, pay heed.---This is a pretty important modification. I am anxious to put this engine in its new "Transportation and Display" case, and take it around to many of the places that have asked me to bring one of my i.c. engines around and demonstrate it running for them, and I really hate being humiliated when one of my creations refuses to perform for me.---Brian
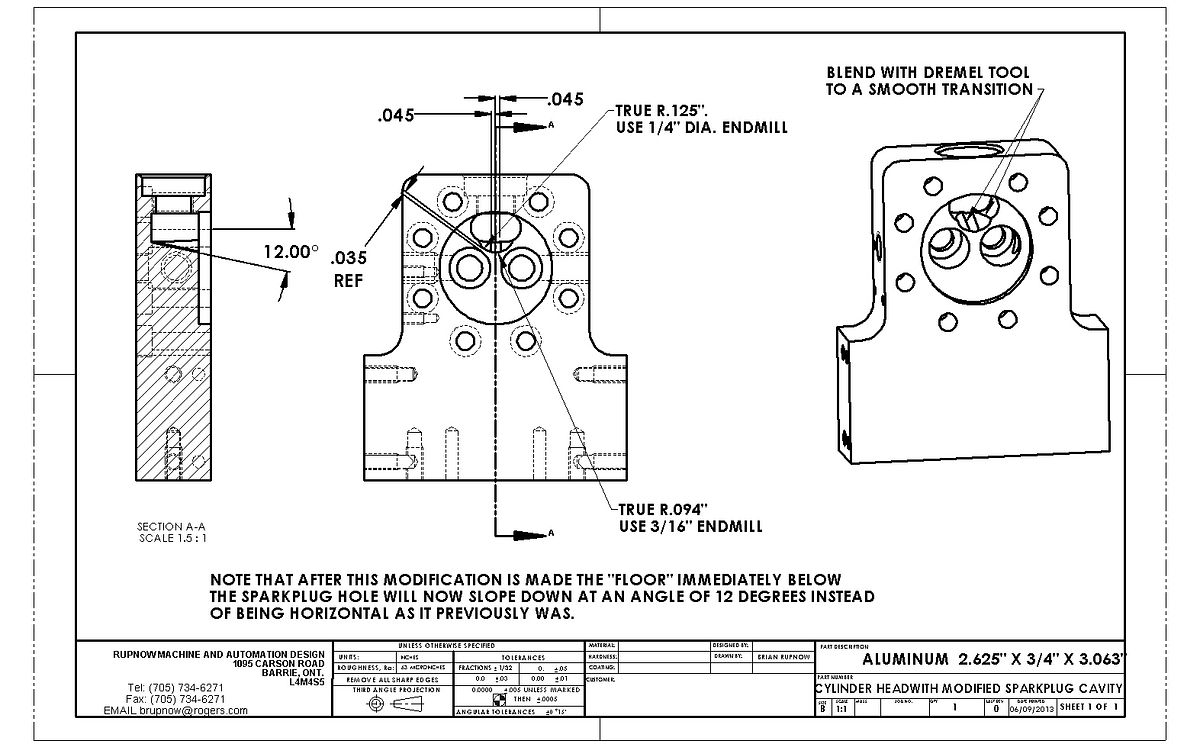
View attachment CYLINDER HEADWITH MODIFIED SPARKPLUG CAVITY.PDF

View attachment CYLINDER HEADWITH MODIFIED SPARKPLUG CAVITY.PDF
Last edited:
Swifty
Well-Known Member
Hi Brian, how much advance have you given the spark?
Paul.
Paul.
Well Done Brian! Nothing better than thinking through an idea and actually have it work!
Do you think this modification would help the engine run better on the original ignition system?
I downloaded and printed out the plans today and I am thinking of starting an air cooled version when I get back from my vacation in England.
Cheers,
Tom
Do you think this modification would help the engine run better on the original ignition system?
I downloaded and printed out the plans today and I am thinking of starting an air cooled version when I get back from my vacation in England.
Cheers,
Tom
This modification will make the engine run better on any version, air cooled, water cooled, points ignition or electronic ignition. A quick and dirty measurement shows about 20 degrees of advance. Wagonmkr--It would be great if you decide to build the engine. We seem to have lost Smithers, out of Tasmania.---He hasn't posted anything since the 20th of July.--Brian
Last edited:
As I said in the other thread, Glad to have you back Smithers. I thought we had lost you.---Brian
Hi Brian;
I just looked the movie & see that brown water you was talking about.
I got the same problem with my Little Wonder engine. But now I use coolant for cars & don't have that problem anymore. Is is slightly greasy that product.
You can try it if you want.
Barry
I just looked the movie & see that brown water you was talking about.
I got the same problem with my Little Wonder engine. But now I use coolant for cars & don't have that problem anymore. Is is slightly greasy that product.
You can try it if you want.
Barry
See post #481Hi Brian;
I just looked the movie & see that brown water you was talking about.
I got the same problem with my Little Wonder engine. But now I use coolant for cars & don't have that problem anymore. Is is slightly greasy that product.
You can try it if you want.
Barry
Yes Brian , I read that post. I read in fact you topic very much. Maybe I will try this engine also. But with one hand it is impossible to do machining.
But the coolant for cars provide rusting the cilinder. That is why i replied.
Barry
But the coolant for cars provide rusting the cilinder. That is why i replied.
Barry
Today we are going to build a muffler. Why?--Just because we can, for one reason. A second good reason is that I now have two or three shirts with circles of sooty oil residue just to the left of my belly button, where the exhaust points directly at me when I am playing with the engine. Mrs. Rupnow is not amused!! Why do all of the holes exit in one 120 degree segment of the circle?--Because that way you can position them so they are all pointed down away from your face. And yes, I did a calculation, and the cross sectional area of the 8 holes is equal to the cross sectional area of the exhaust pipe which the muffler screws onto.--Speaking of that exhaust pipe---the detail drawing only shows a thread on one end, where it screws into the cylinder head. If you do make this muffler, you will have to thread the other end as well.----Brian
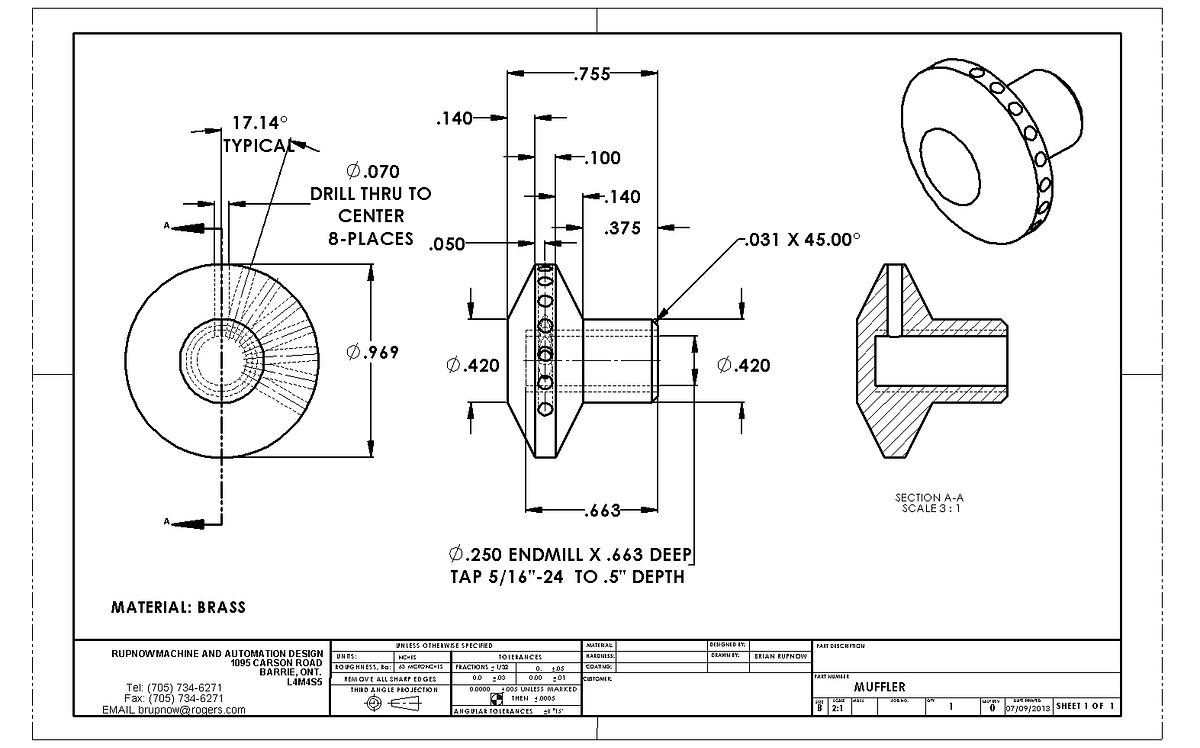
View attachment MUFFLER.PDF

View attachment MUFFLER.PDF
Okay Barry--thanks for the information. I didn't know you only had one hand.Yes Brian , I read that post. I read in fact you topic very much. Maybe I will try this engine also. But with one hand it is impossible to do machining.
But the coolant for cars provide rusting the cilinder. That is why i replied.
Barry
Swifty
Well-Known Member
Hi Brian, I recall that Barry had a shoulder operation, that's what makes him one handed at the moment.
Paul.
Paul.
Similar threads
- Replies
- 95
- Views
- 12K
- Replies
- 28
- Views
- 7K


