Yes thomo, a complete plan set will cost $25 Canadian funds.
You are using an out of date browser. It may not display this or other websites correctly.
You should upgrade or use an alternative browser.
You should upgrade or use an alternative browser.
T head engine by Brian
- Thread starter Brian Rupnow
- Start date

Help Support Home Model Engine Machinist Forum:
This site may earn a commission from merchant affiliate
links, including eBay, Amazon, and others.
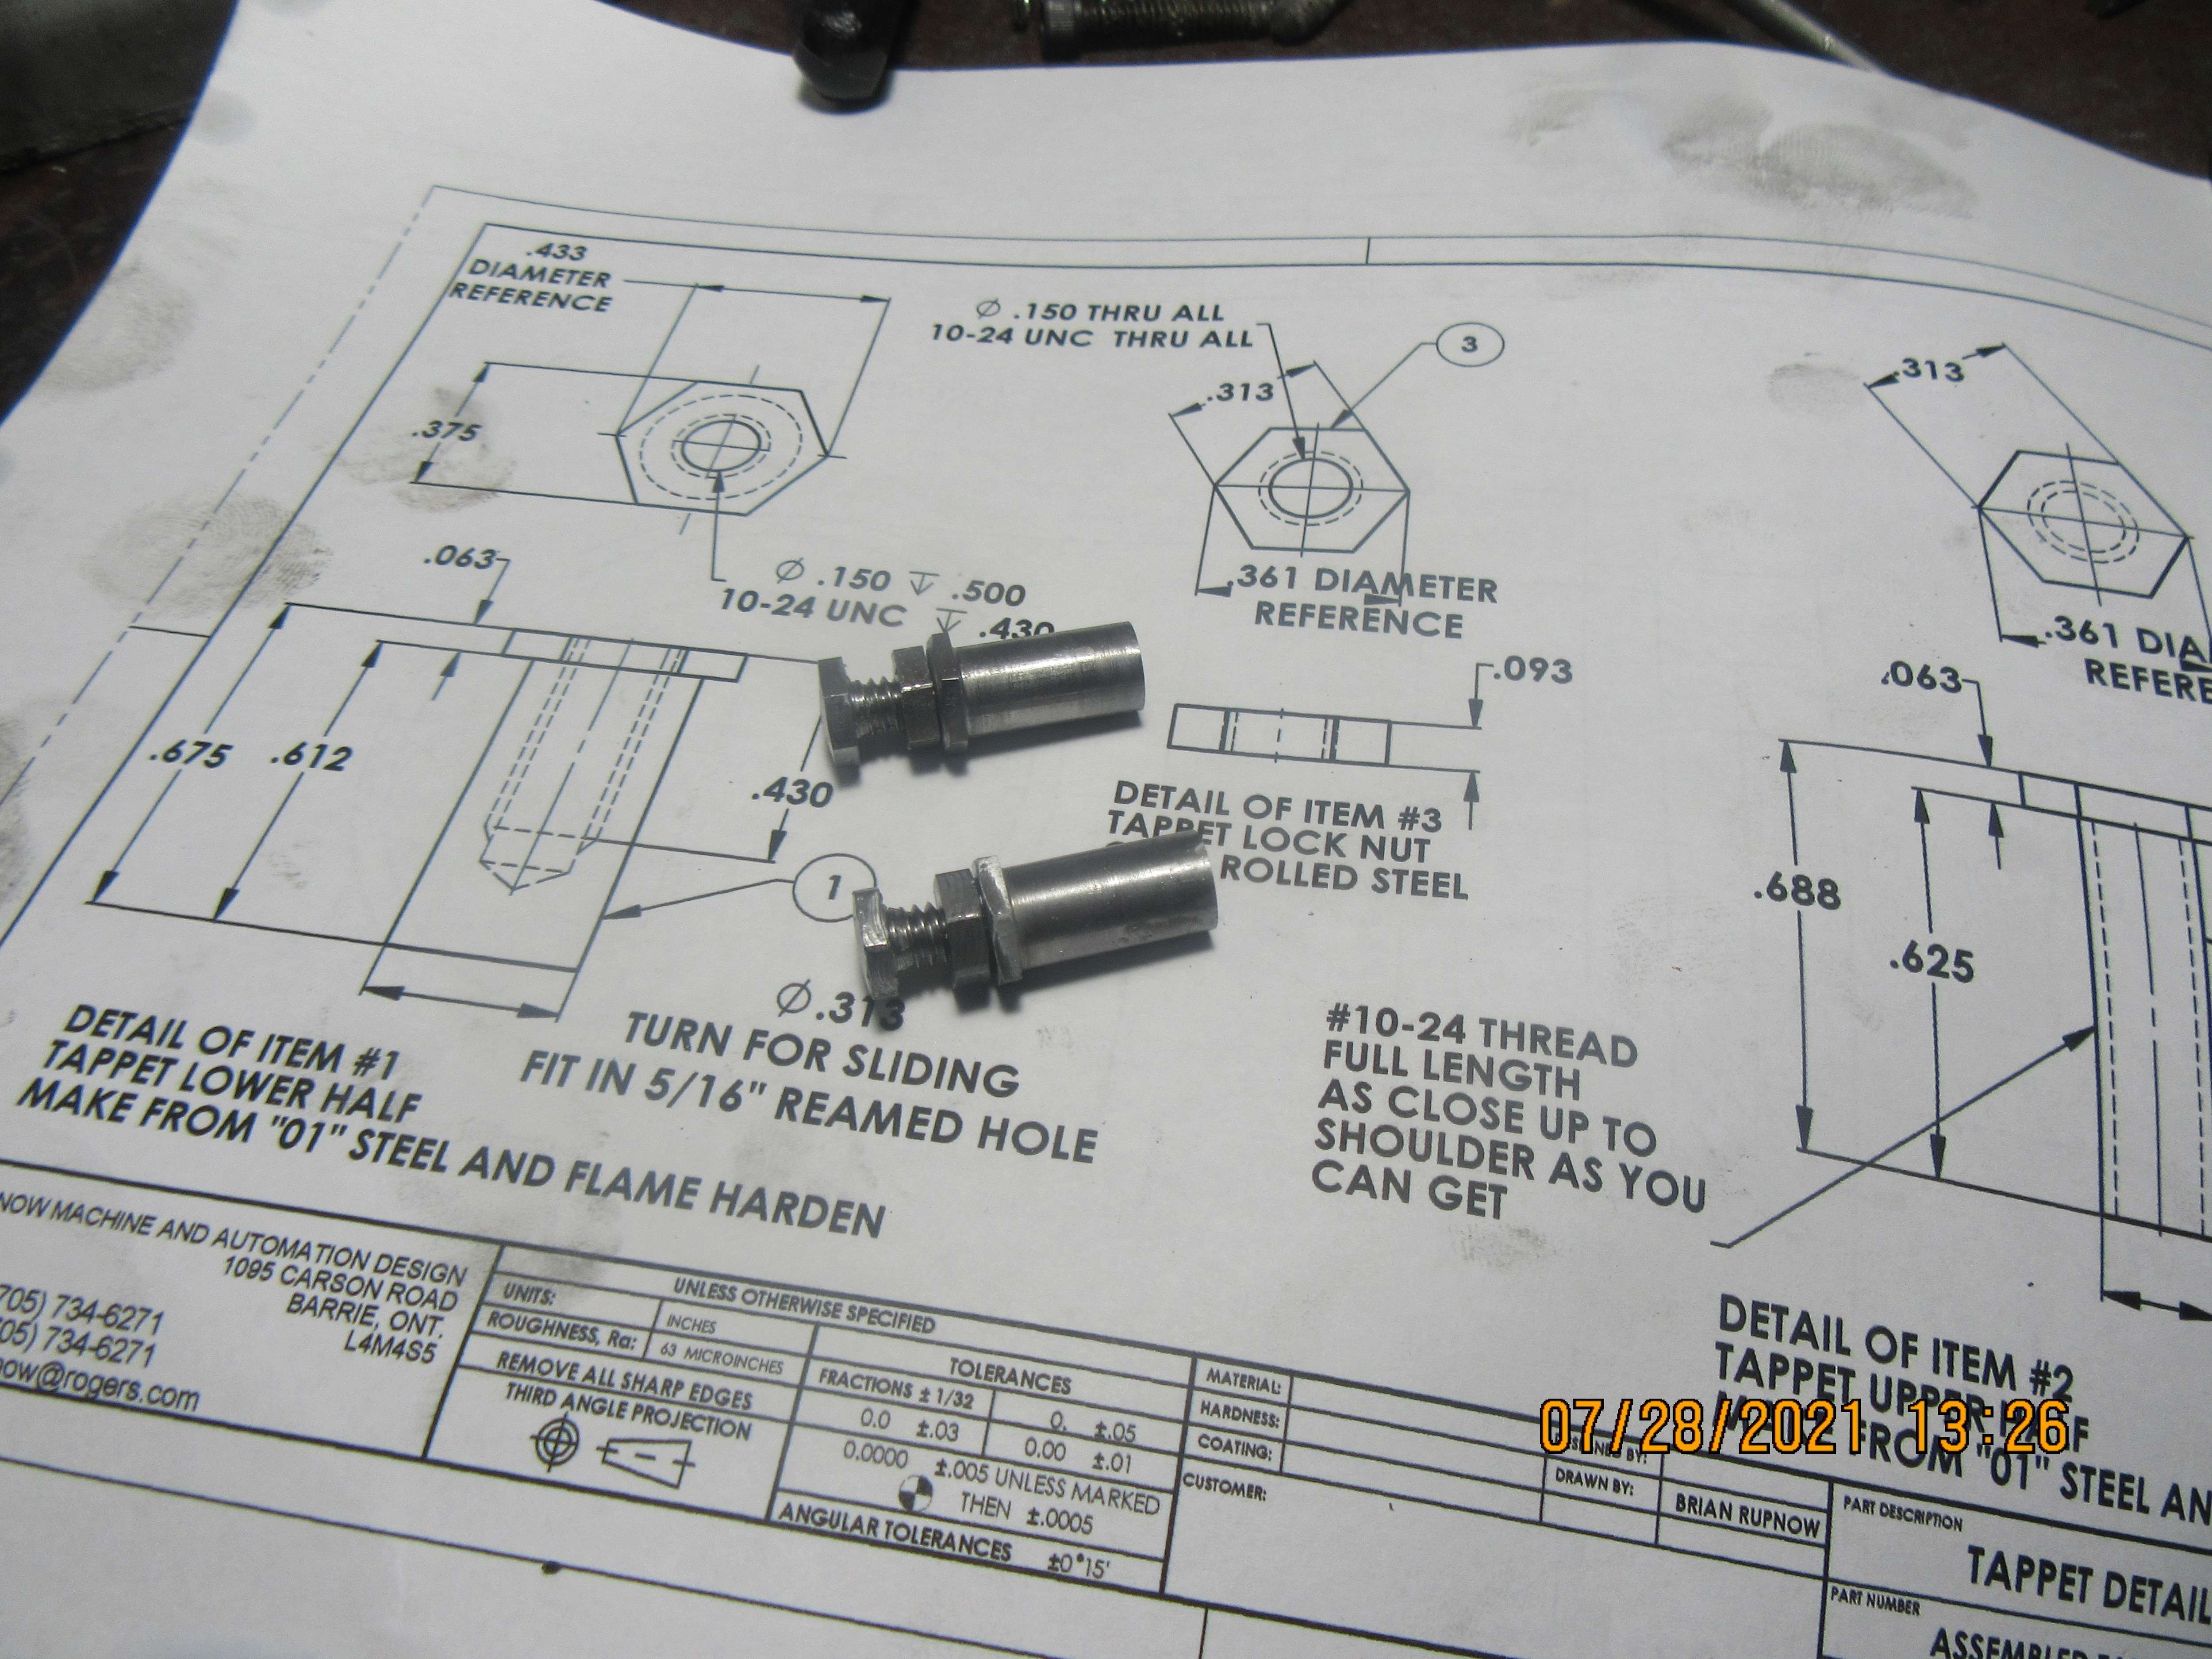
Today was tappet day. Doesn't look like much, but these were all machined from a length of 3/4" diameter 01 steel. They will be flame hardened and quenched in oil, as will the cams when I make them. The cams are almost the only remaining part of the valve train to be machined.

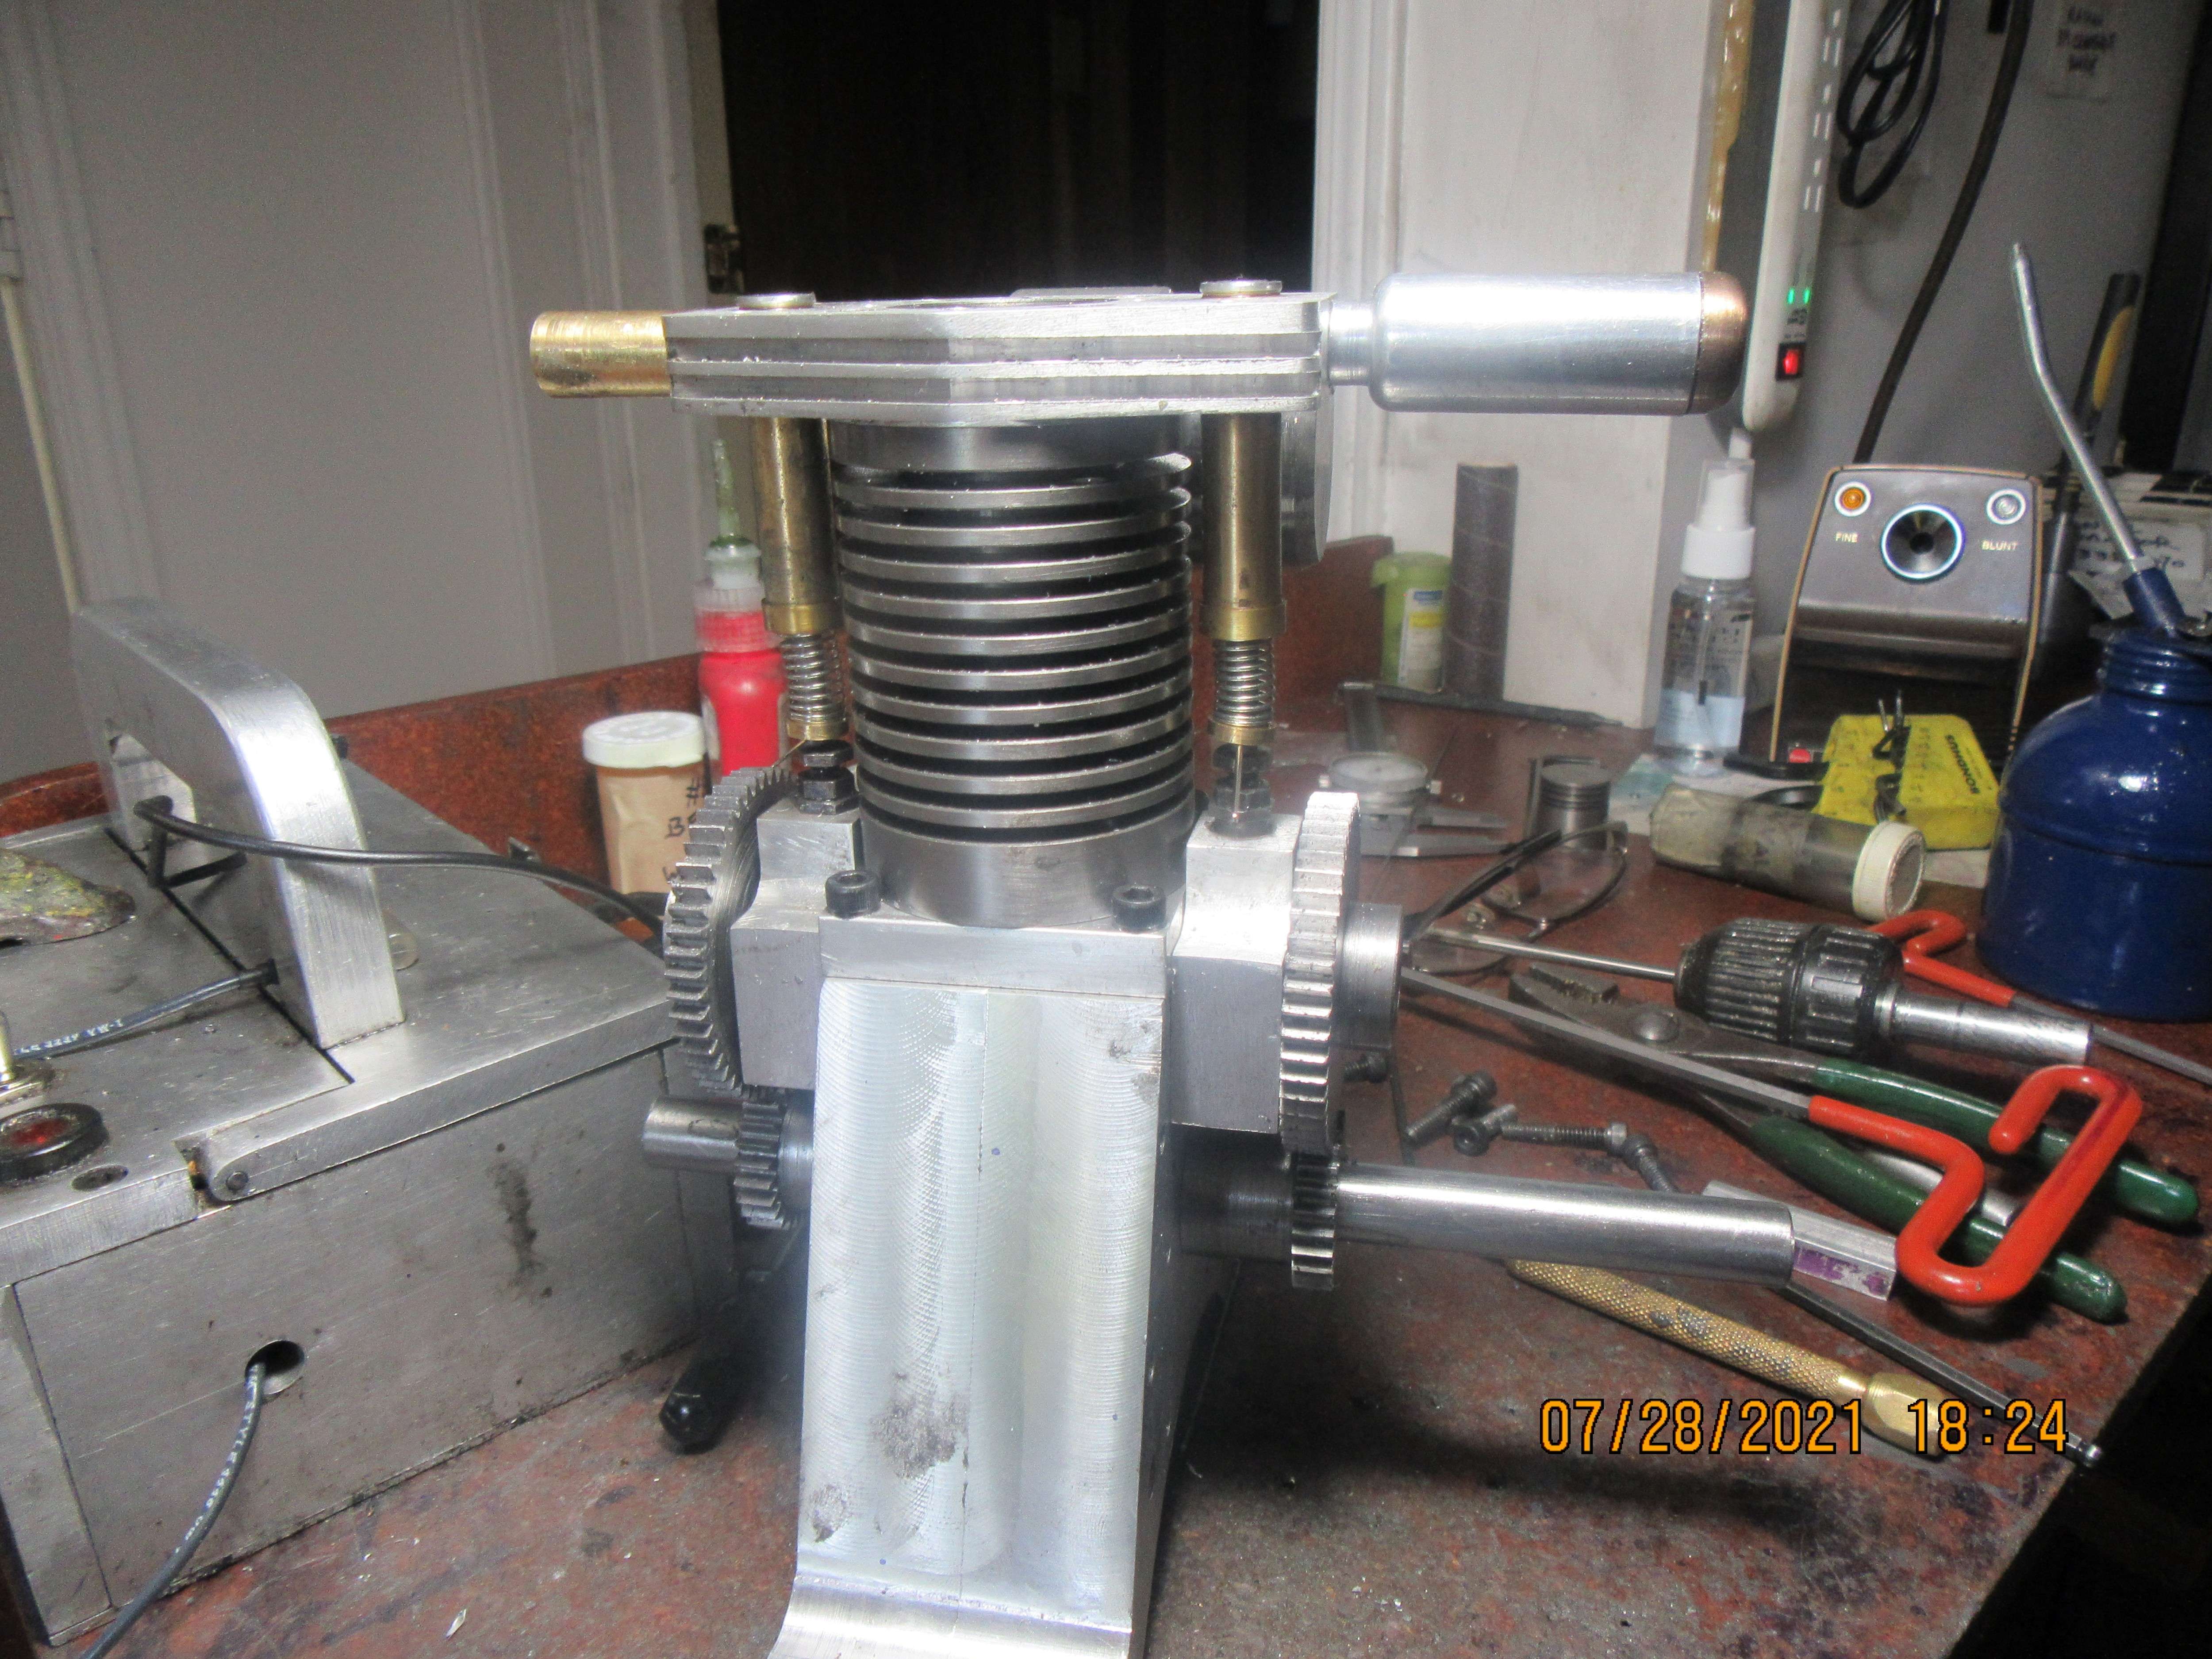
The tappets have been heat treated and assembled and installed in the bushings in the tappet guides. The valves are ground and cut to length, assembled with springs and keepers. I have a couple of sewing needles installed as temporary cross-pins, until I see how everything fits together. I may have to cut one coil from the springs, but I won't hurry to do that. They can always be shortened later. I'm very happy to see that the valve stems line up properly with the tappets.

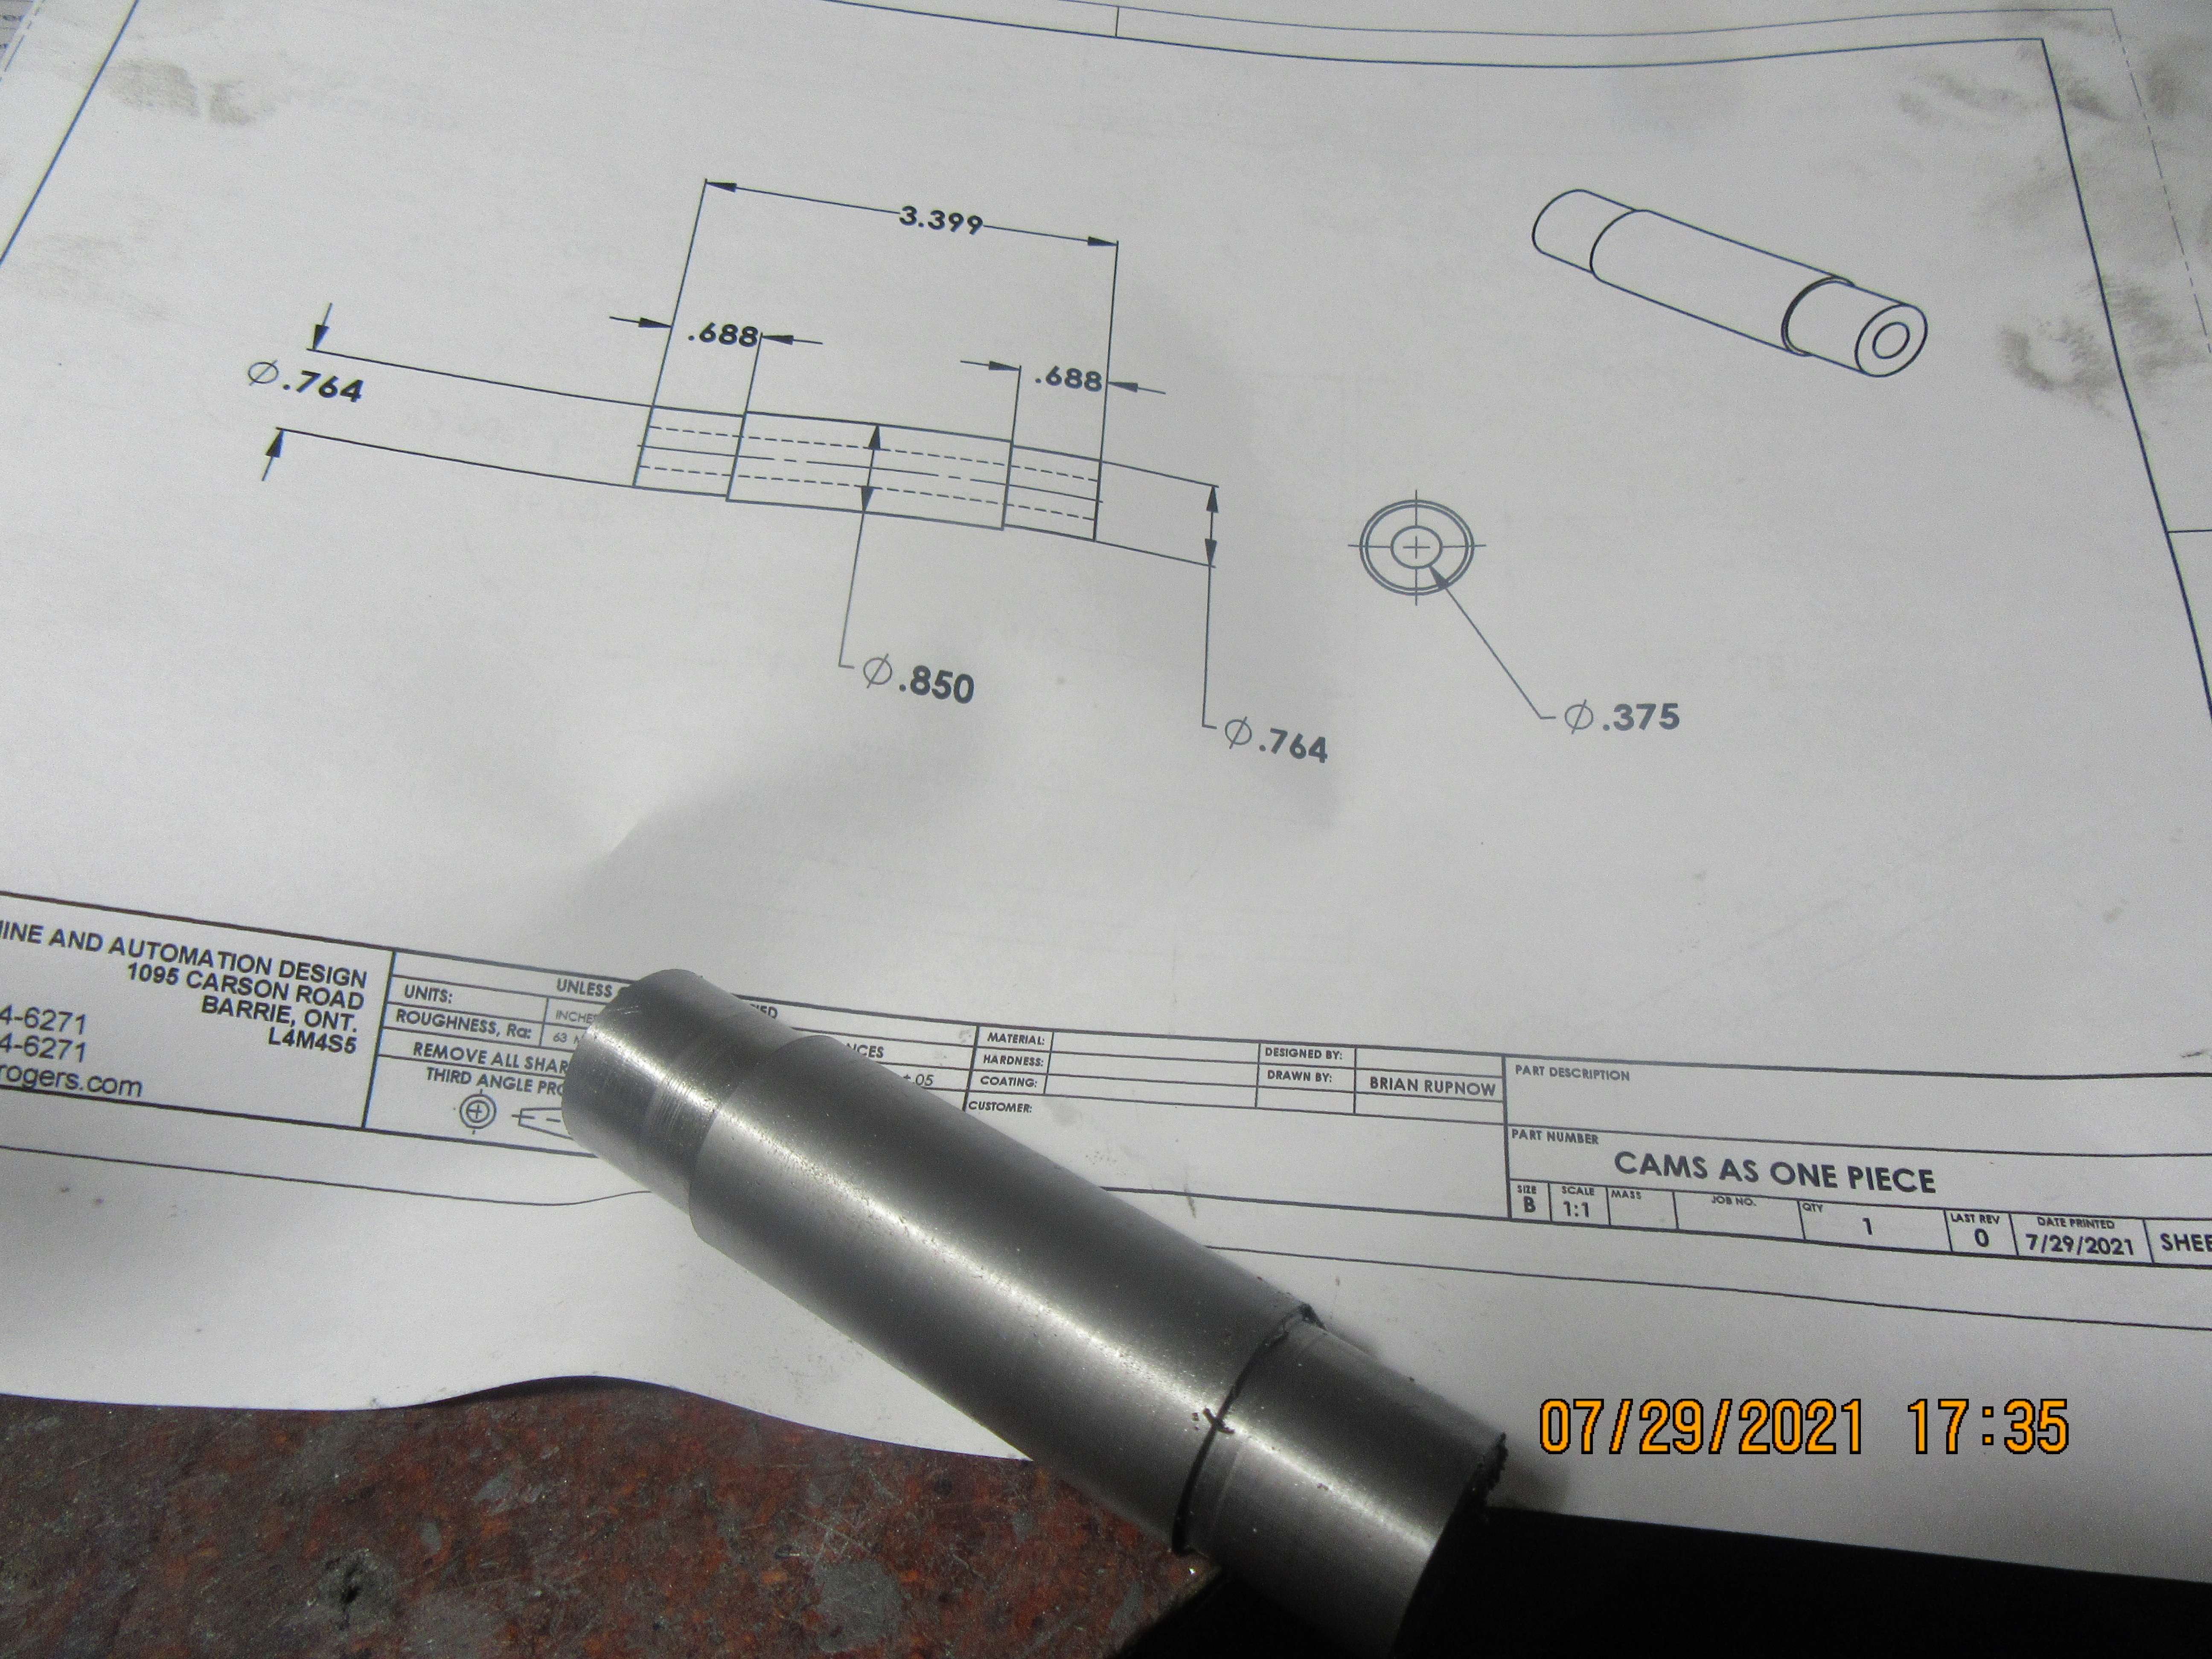
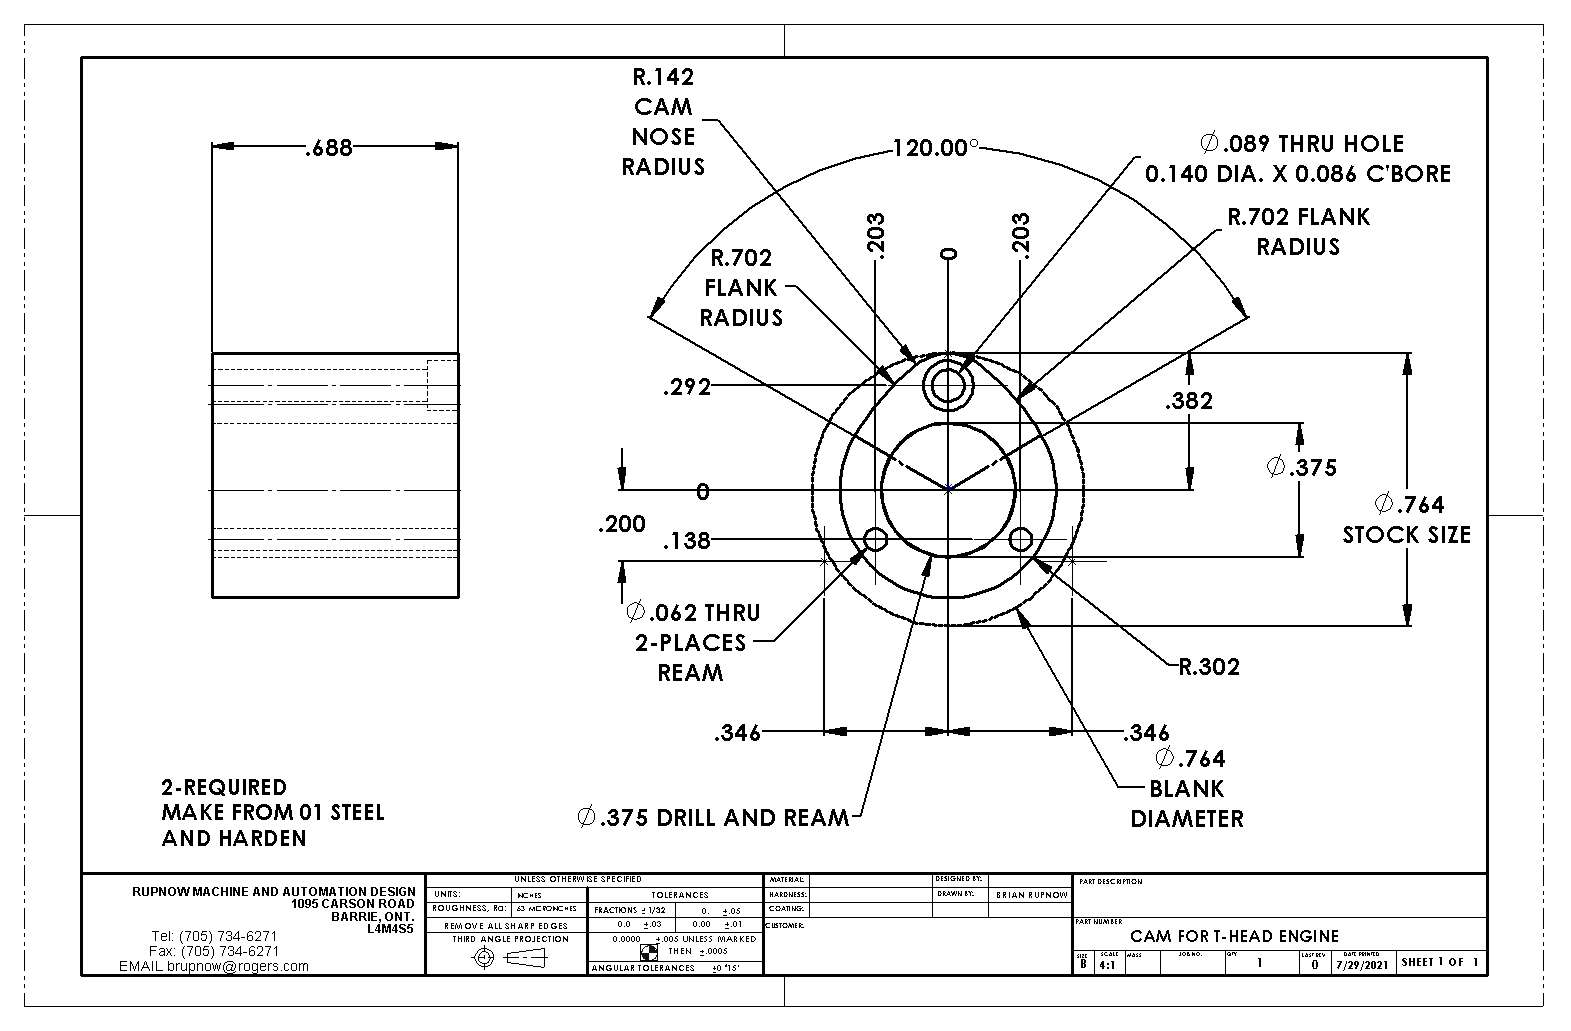
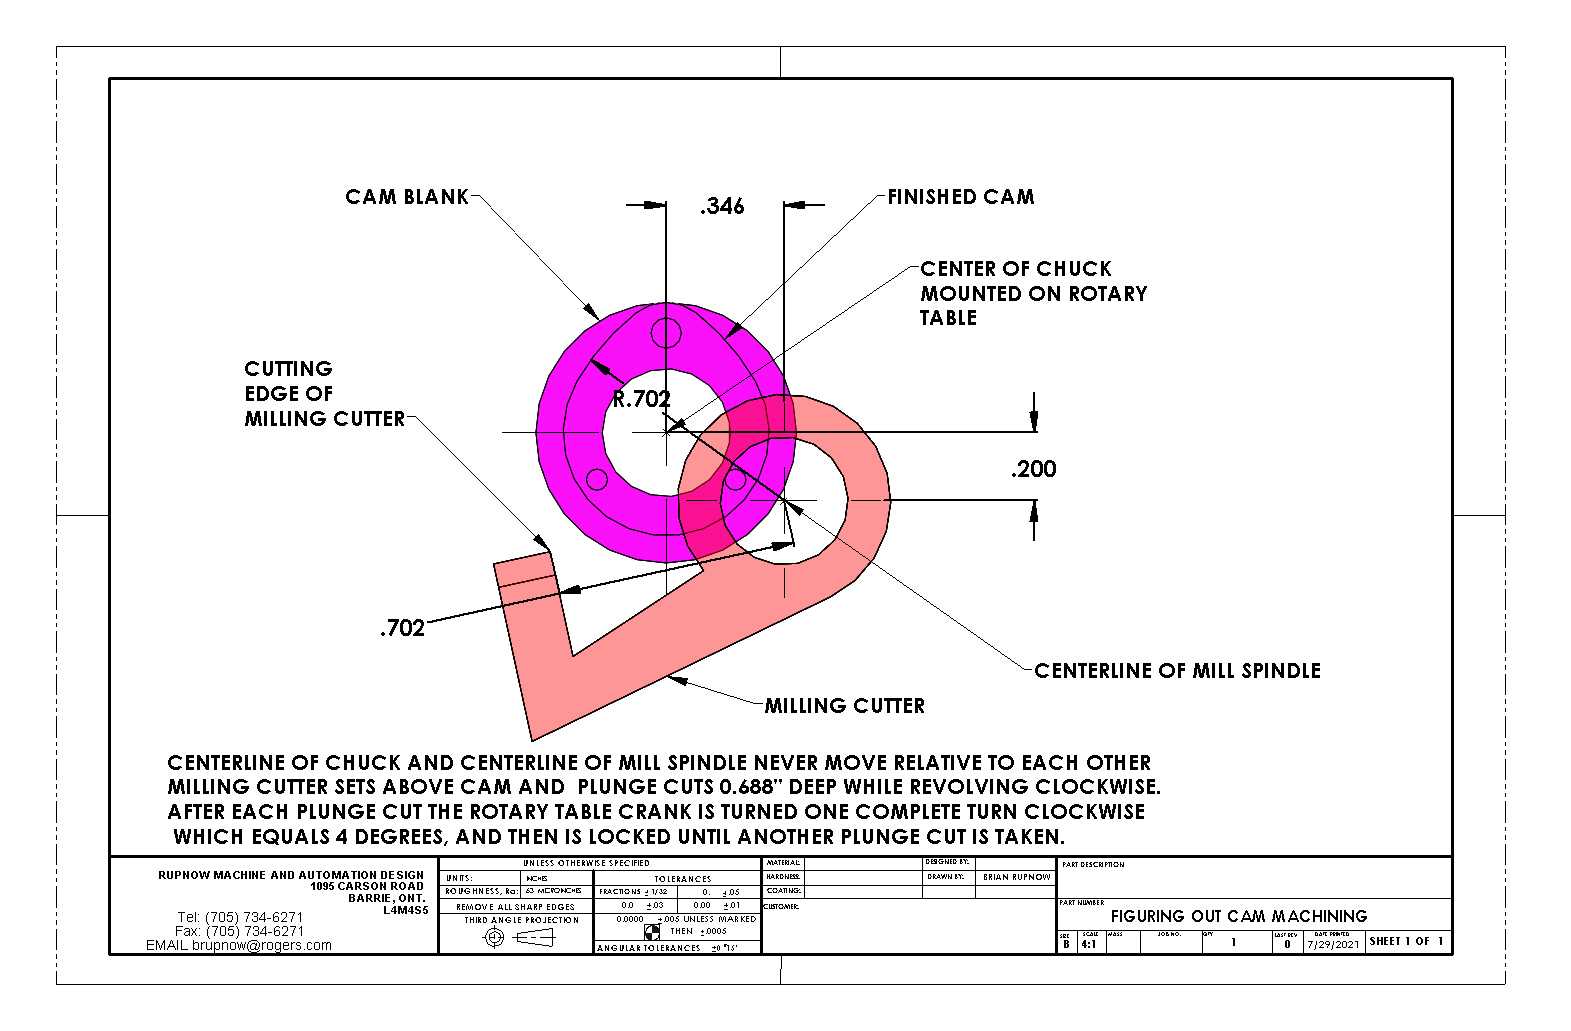
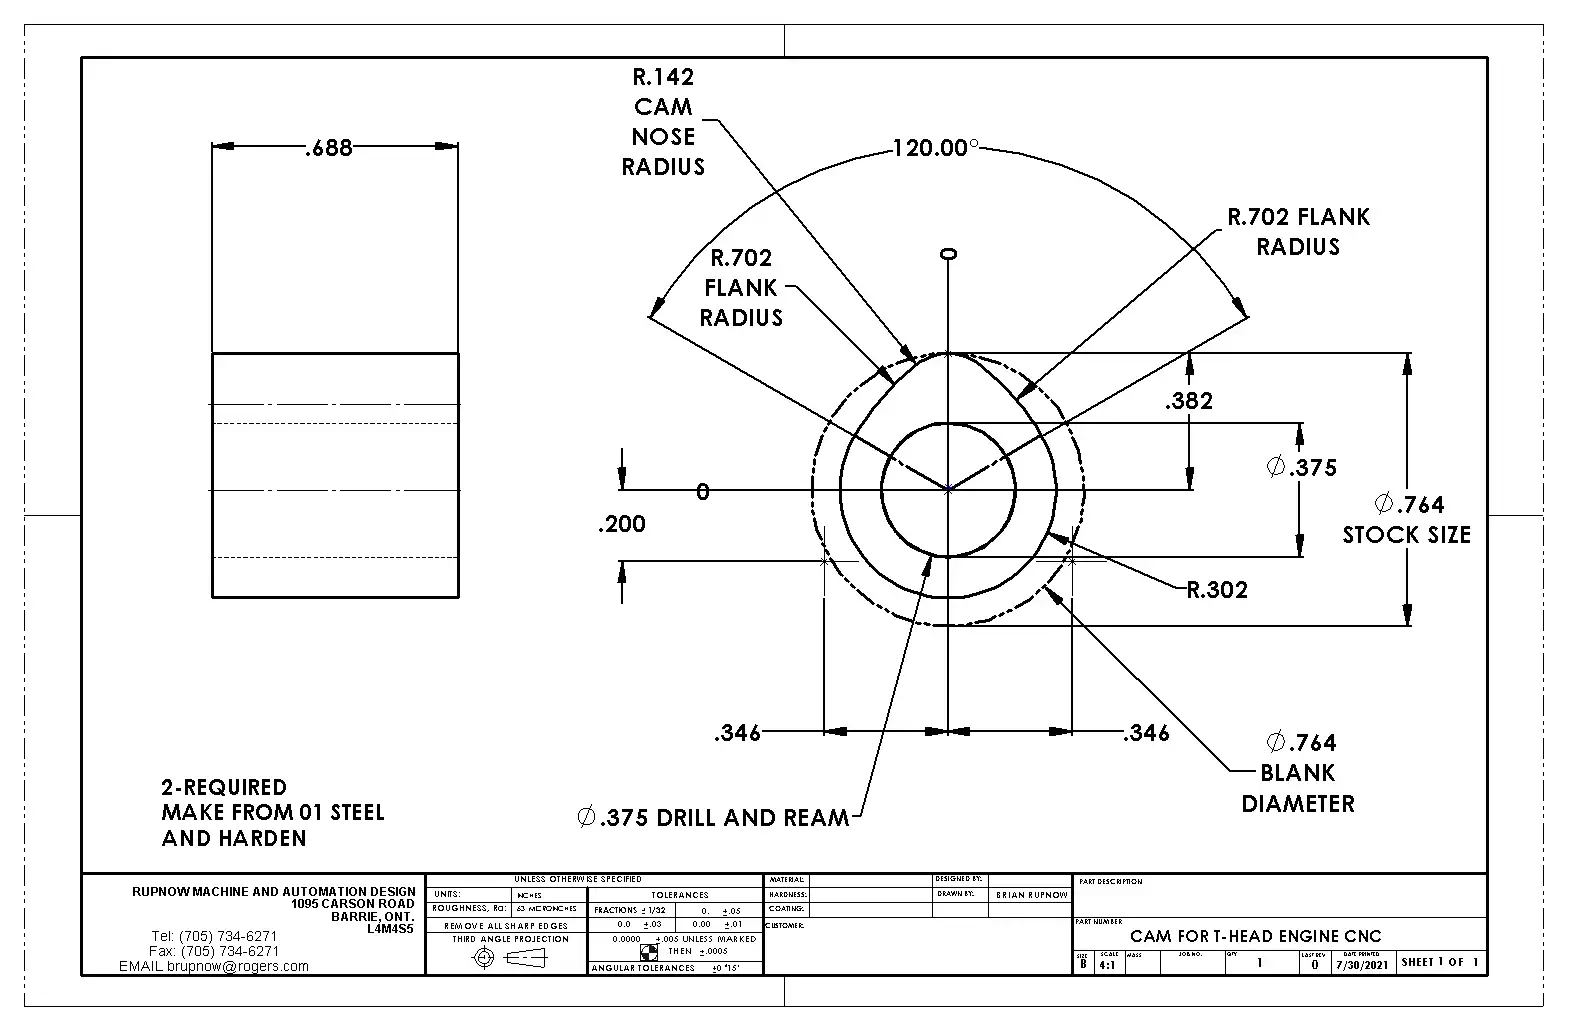
Today I have prepared a piece of 01 material to make two cams from. The length of the piece is determined by the depth available in the three jaw chuck which is attached to my rotary table. The center diameter is determined by the maximum bore inside the chuck. The diameters at the ends are equal to twice the 0.382" dimension on the drawing, which determines the size of blank to cut the cam from. The material is just long enough to grip in the three jaw chuck with 3/4" of material stuck up above the chuck jaws. The cams will be .688" long, which should keep the cutter above the chuck jaws. I go a little bit crazy every time I make a cam, because I don't do it often enough to remember all the set-up steps. Attached are the picture of the prepared stock, a drawing of the cam, and a model of the milling machine cutter and the cam in their relative positions on the milling machine. The milling cutter will be turning clockwise, and the center of the mill spindle will be offset from the centerline of the rotary table chuck by 0.346" and 0.200" which, as you will notice on the drawing is the centerline of the flank radius. This should give the cams being cut a 99% chance of matching the drawing. Every time I do this, I write myself a bunch of notes on how to do the set-up, and then read thru all of my notes before I do it again.


Brian,
Have you got a picture of the milling cutter? Side view preferably, I'm having a little trouble visualizing this.
Thanks
Doug
Have you got a picture of the milling cutter? Side view preferably, I'm having a little trouble visualizing this.
Thanks
Doug
The length of the piece is determined by the depth available in the three jaw chuck which is attached to my rotary table.
Brian, are you using a tailstock to support the piece? If so, that should let you use a longer piece. If particularly long, you can support the middle (or near where you are going to cut) with a machinist jack. And apologies if I am telling you what you already know!

$599.00
$649.00
FoxAlien Masuter Pro CNC Router Machine, Upgraded 3-Axis Engraving All-Metal Milling Machine for Wood Acrylic MDF Nylon Carving Cutting
FoxAlien Official
![DreamPlan Home Design and Landscaping Software Free for Windows [PC Download]](https://m.media-amazon.com/images/I/51kvZH2dVLL._SL500_.jpg)
$0.00
DreamPlan Home Design and Landscaping Software Free for Windows [PC Download]
Amazon.com Services LLC

$26.89
$34.99
Peachtree Woodworking Supply Bowl Sander Tool Kit w/Dual Bearing Head & Hardwood Handle, 42 Pieces Wood Sander Set, 2 Hook & Loop Sanding Disc Sandpaper Assortment, 1/4 Mandrel Bowl Sander
Peachtree Woodworking Supply Inc

$38.70
$49.99
Becker CAD 12 3D - professional CAD software for 2D + 3D design and modelling - for 3 PCs - 100% compatible with AutoCAD
momox Shop

$45.99
Sunnytech Mini Hot Air Stirling Engine Motor Model Educational Toy Kits Electricity HA001
stirlingtechonline

$9.99 ($1.00 / Count)
$13.99 ($1.40 / Count)
10 Pcs Carbide Burr Set Bits 1/8" Shank Compatible with Dremel Milwaukee Rotary Grinder Tool Kit Accessories Drill Rasp File Attachment Wood Metal Stone Carve Grind Cut Sand Engrave Polish Porting
SworkerDirect

$49.95
$55.99
DjuiinoStar Hot Air Stirling Engine Assembly Kit: Spend 30 Minutes to Build Your Own Stirling Engine
djuiinostar

$99.99
AHS Outdoor Wood Boiler Yearly Maintenance Kit with Water Treatment - ProTech 300 & Test Kit
Alternative Heating & Supplies

$19.15
$29.95
Competition Engine Building: Advanced Engine Design and Assembly Techniques (Pro Series)
MBC Inc.

$171.00
$190.00
Genmitsu CNC 3018-PRO Router Kit GRBL Control 3 Axis Plastic Acrylic PCB PVC Wood Carving Milling Engraving Machine, XYZ Working Area 300x180x45mm
SainSmart Official
Awake---You're teaching your granny to suck eggs. The axis of the workpiece is vertical.
Today was not a good day. I fought the cams and the cams won. The cutting tool slipped in the holder. The stock slipped in the chuck.
I was overwhelmed by a hoard of zombies. I was bitten by a rabid bat. I was stung by a murder hornet. My day has turned to crap. Perhaps a different approach to making cams will be investigated.
I was overwhelmed by a hoard of zombies. I was bitten by a rabid bat. I was stung by a murder hornet. My day has turned to crap. Perhaps a different approach to making cams will be investigated.
Richard Hed
Well-Known Member
- Joined
- Nov 23, 2018
- Messages
- 2,799
- Reaction score
- 757
But did you die? If not, then how would you know if you had fun?Today was not a good day. I fought the cams and the cams won. The cutting tool slipped in the holder. The stock slipped in the chuck.
I was overwhelmed by a hoard of zombies. I was bitten by a rabid bat. I was stung by a murder hornet. My day has turned to crap. Perhaps a different approach to making cams will be investigated.
Sproket, this is the type of setup

As the blank is moved around the base diameter if formed by a series of 4 deg facets ( or however much you turn the table)


As the blank is moved around the base diameter if formed by a series of 4 deg facets ( or however much you turn the table)

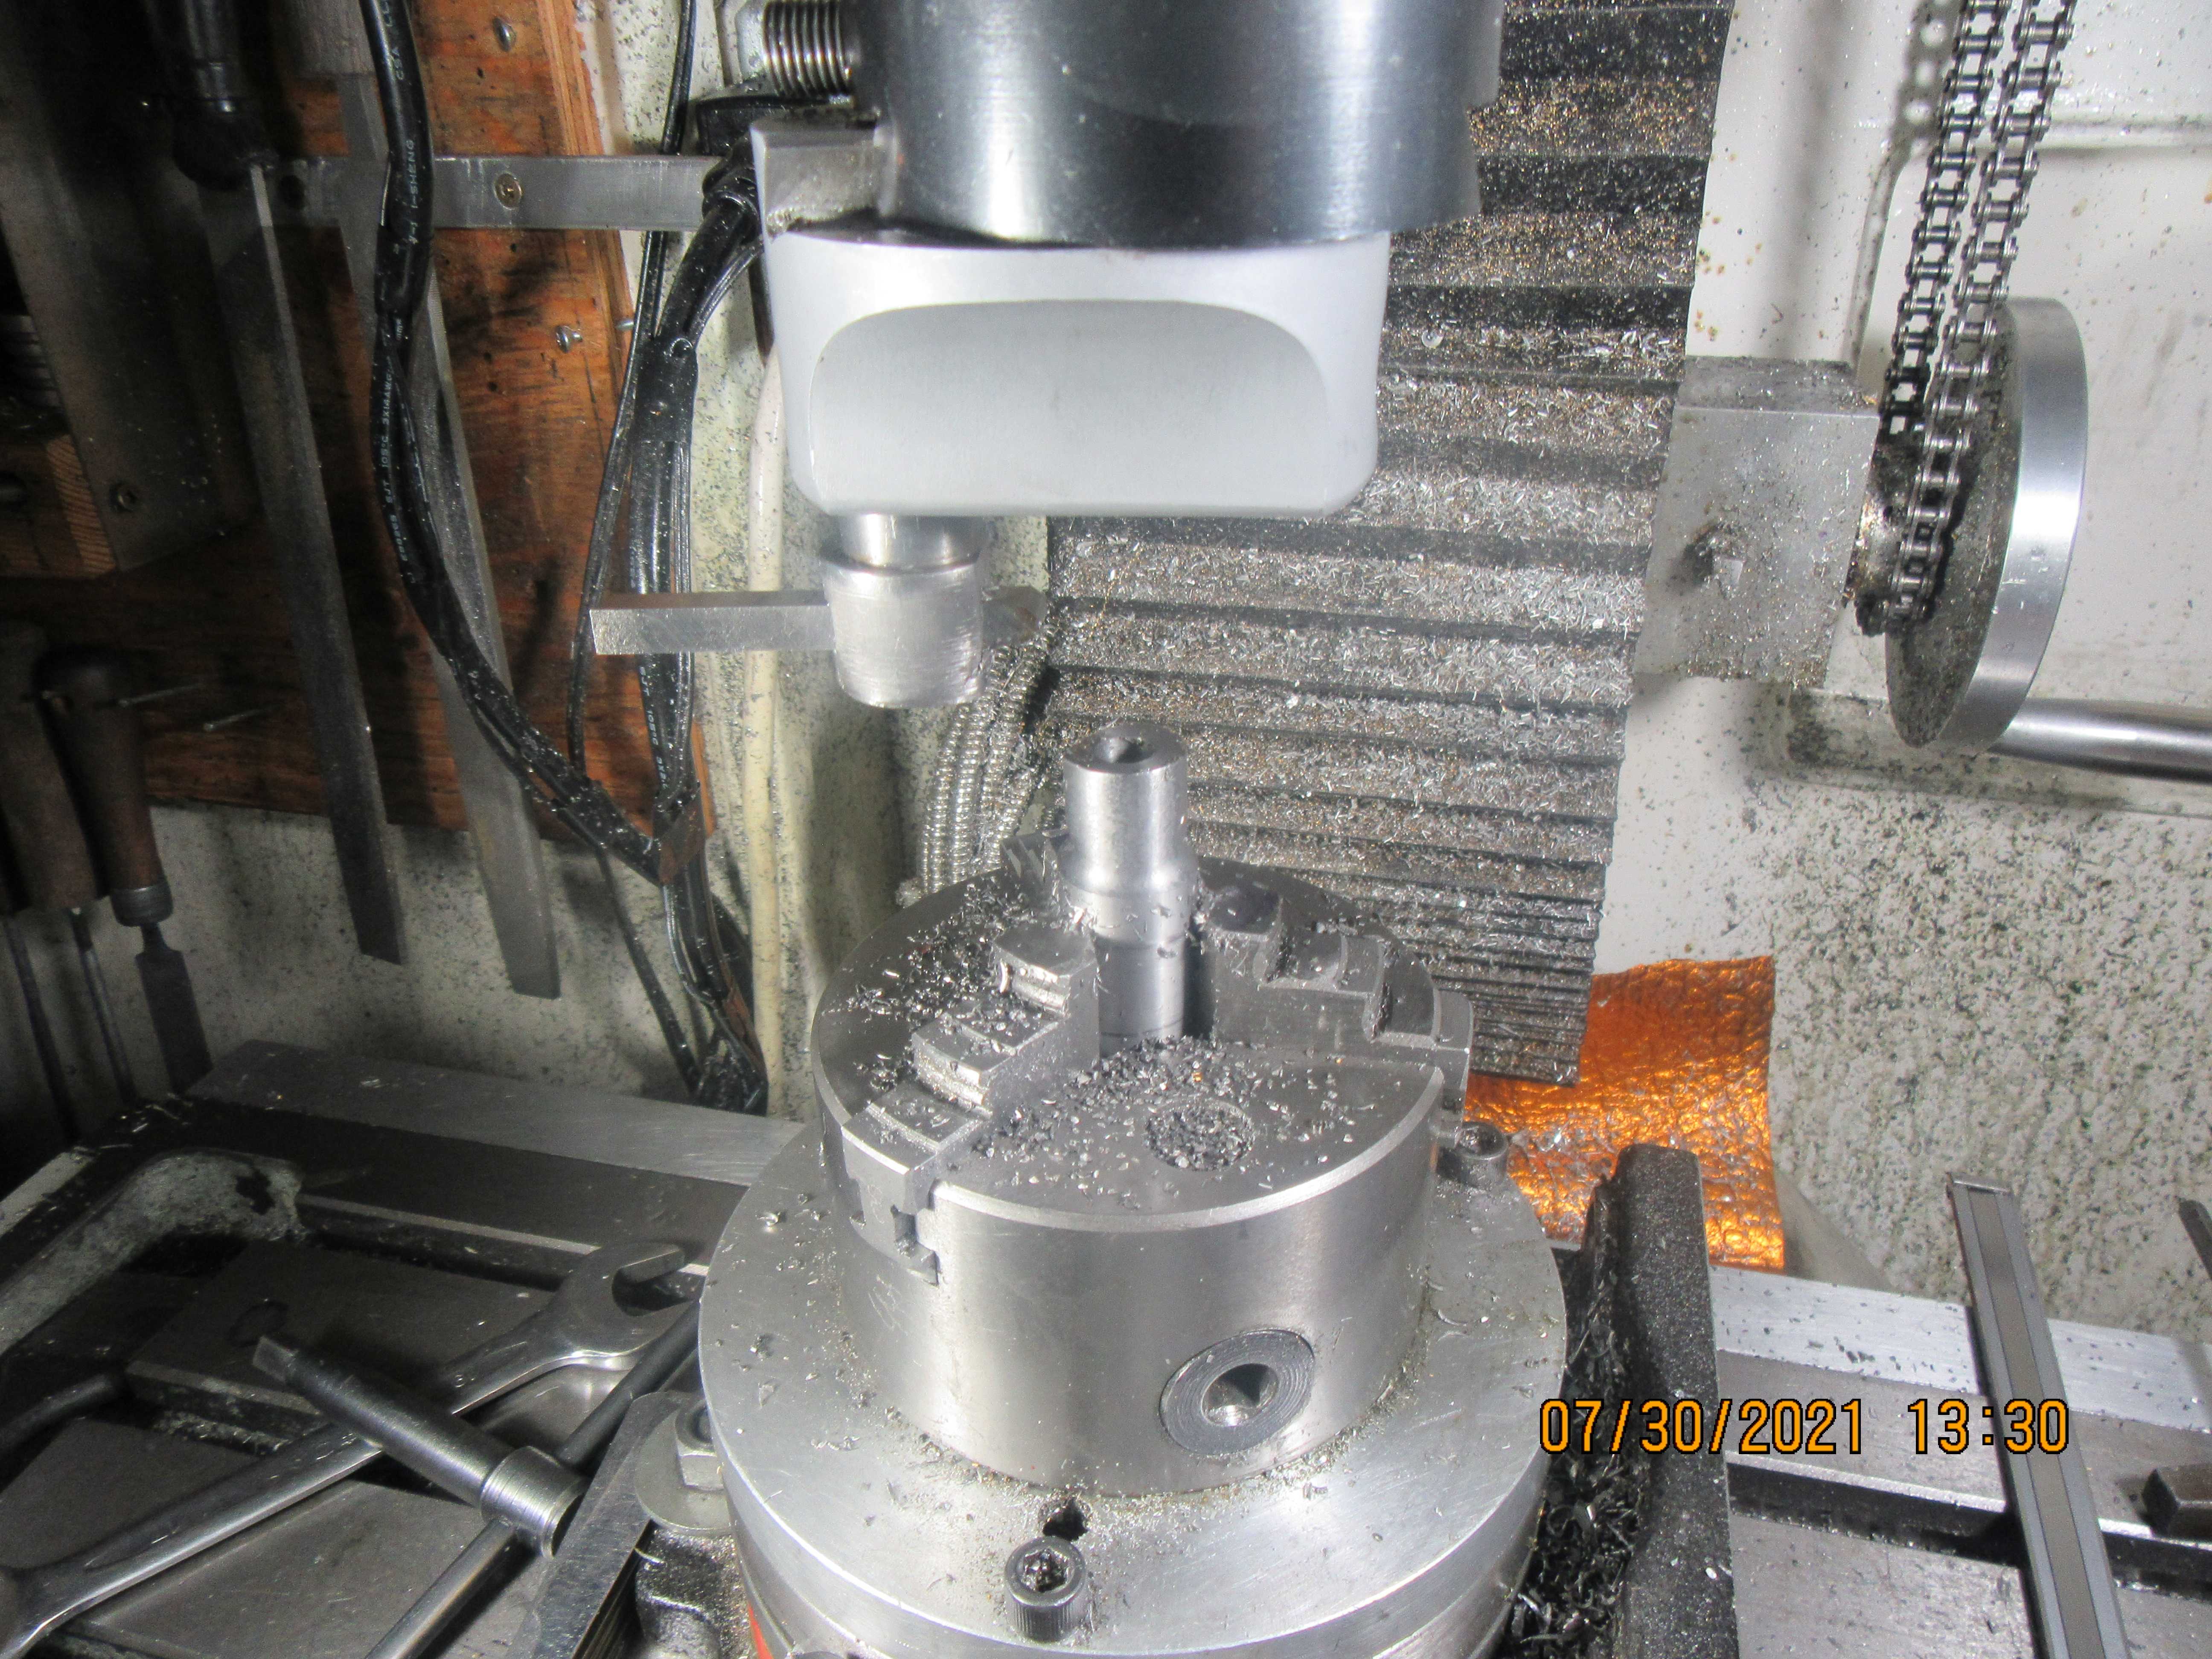
My theory was great. My practical application, not so much. The cutting tool shown in that layout was absolute nonsense. All that is important there is the centerline of the spindle and the cutting edge of the tool. In reality, the cutting edge of the tool faces in towards the center. Here is a picture of the set-up.

Okay, maybe it's time for some wheeling and dealing. Any of you CNC guys out there want to make me a couple of cams as shown? Surface around outside has to be good quality finish and 3/8" center-hole must be reamed to 3/8" finished size. There are other holes to go in but I can do them later, and I can do the hardening later. In return, I will send you a complete set of detail drawings to build this engine.----Brian

- Joined
- Sep 2, 2011
- Messages
- 1,407
- Reaction score
- 415
Brian, i have always like your drawings because you always add extra mesurements from different points of view whreas alot of drawings make you have to calculate from one point only and add or subtract to get what you should have if you decide to come at it from a different way.
that said im just curious what the 2 - .346 numbers are?

that said im just curious what the 2 - .346 numbers are?

Werowance---the .346 and the .200 are the centerline of the flank radii.
oldengineguy
Well-Known Member
Brian Is a short video tutorial possible? I'm sure this works as you have made many engines, but I can't figure out how to do this . Thanks Colin
Oldengineguy---This is very difficult stuff to get your head around. I don't have a video tutorial, but there is a video tutorial by our departed friend Chuck Fellows. Be aware that Chuck is running his mill in reverse. This is dangerous if your boring head has a screw on shank, because it may unscrew itself in the middle of the job. I do this job by running my mill clockwise and you can see from my previous picture what the tool in the boring head looks like. To do this job correctly, the mill spindle must be offset from the chuck holding the part by an amount equal to the offsets given in the cam drawing for the centers of the flank radii.---Brian
A kind gentleman in the USA has volunteered to cnc the cams for me. I am moving ahead working on the crankshaft.---Brian
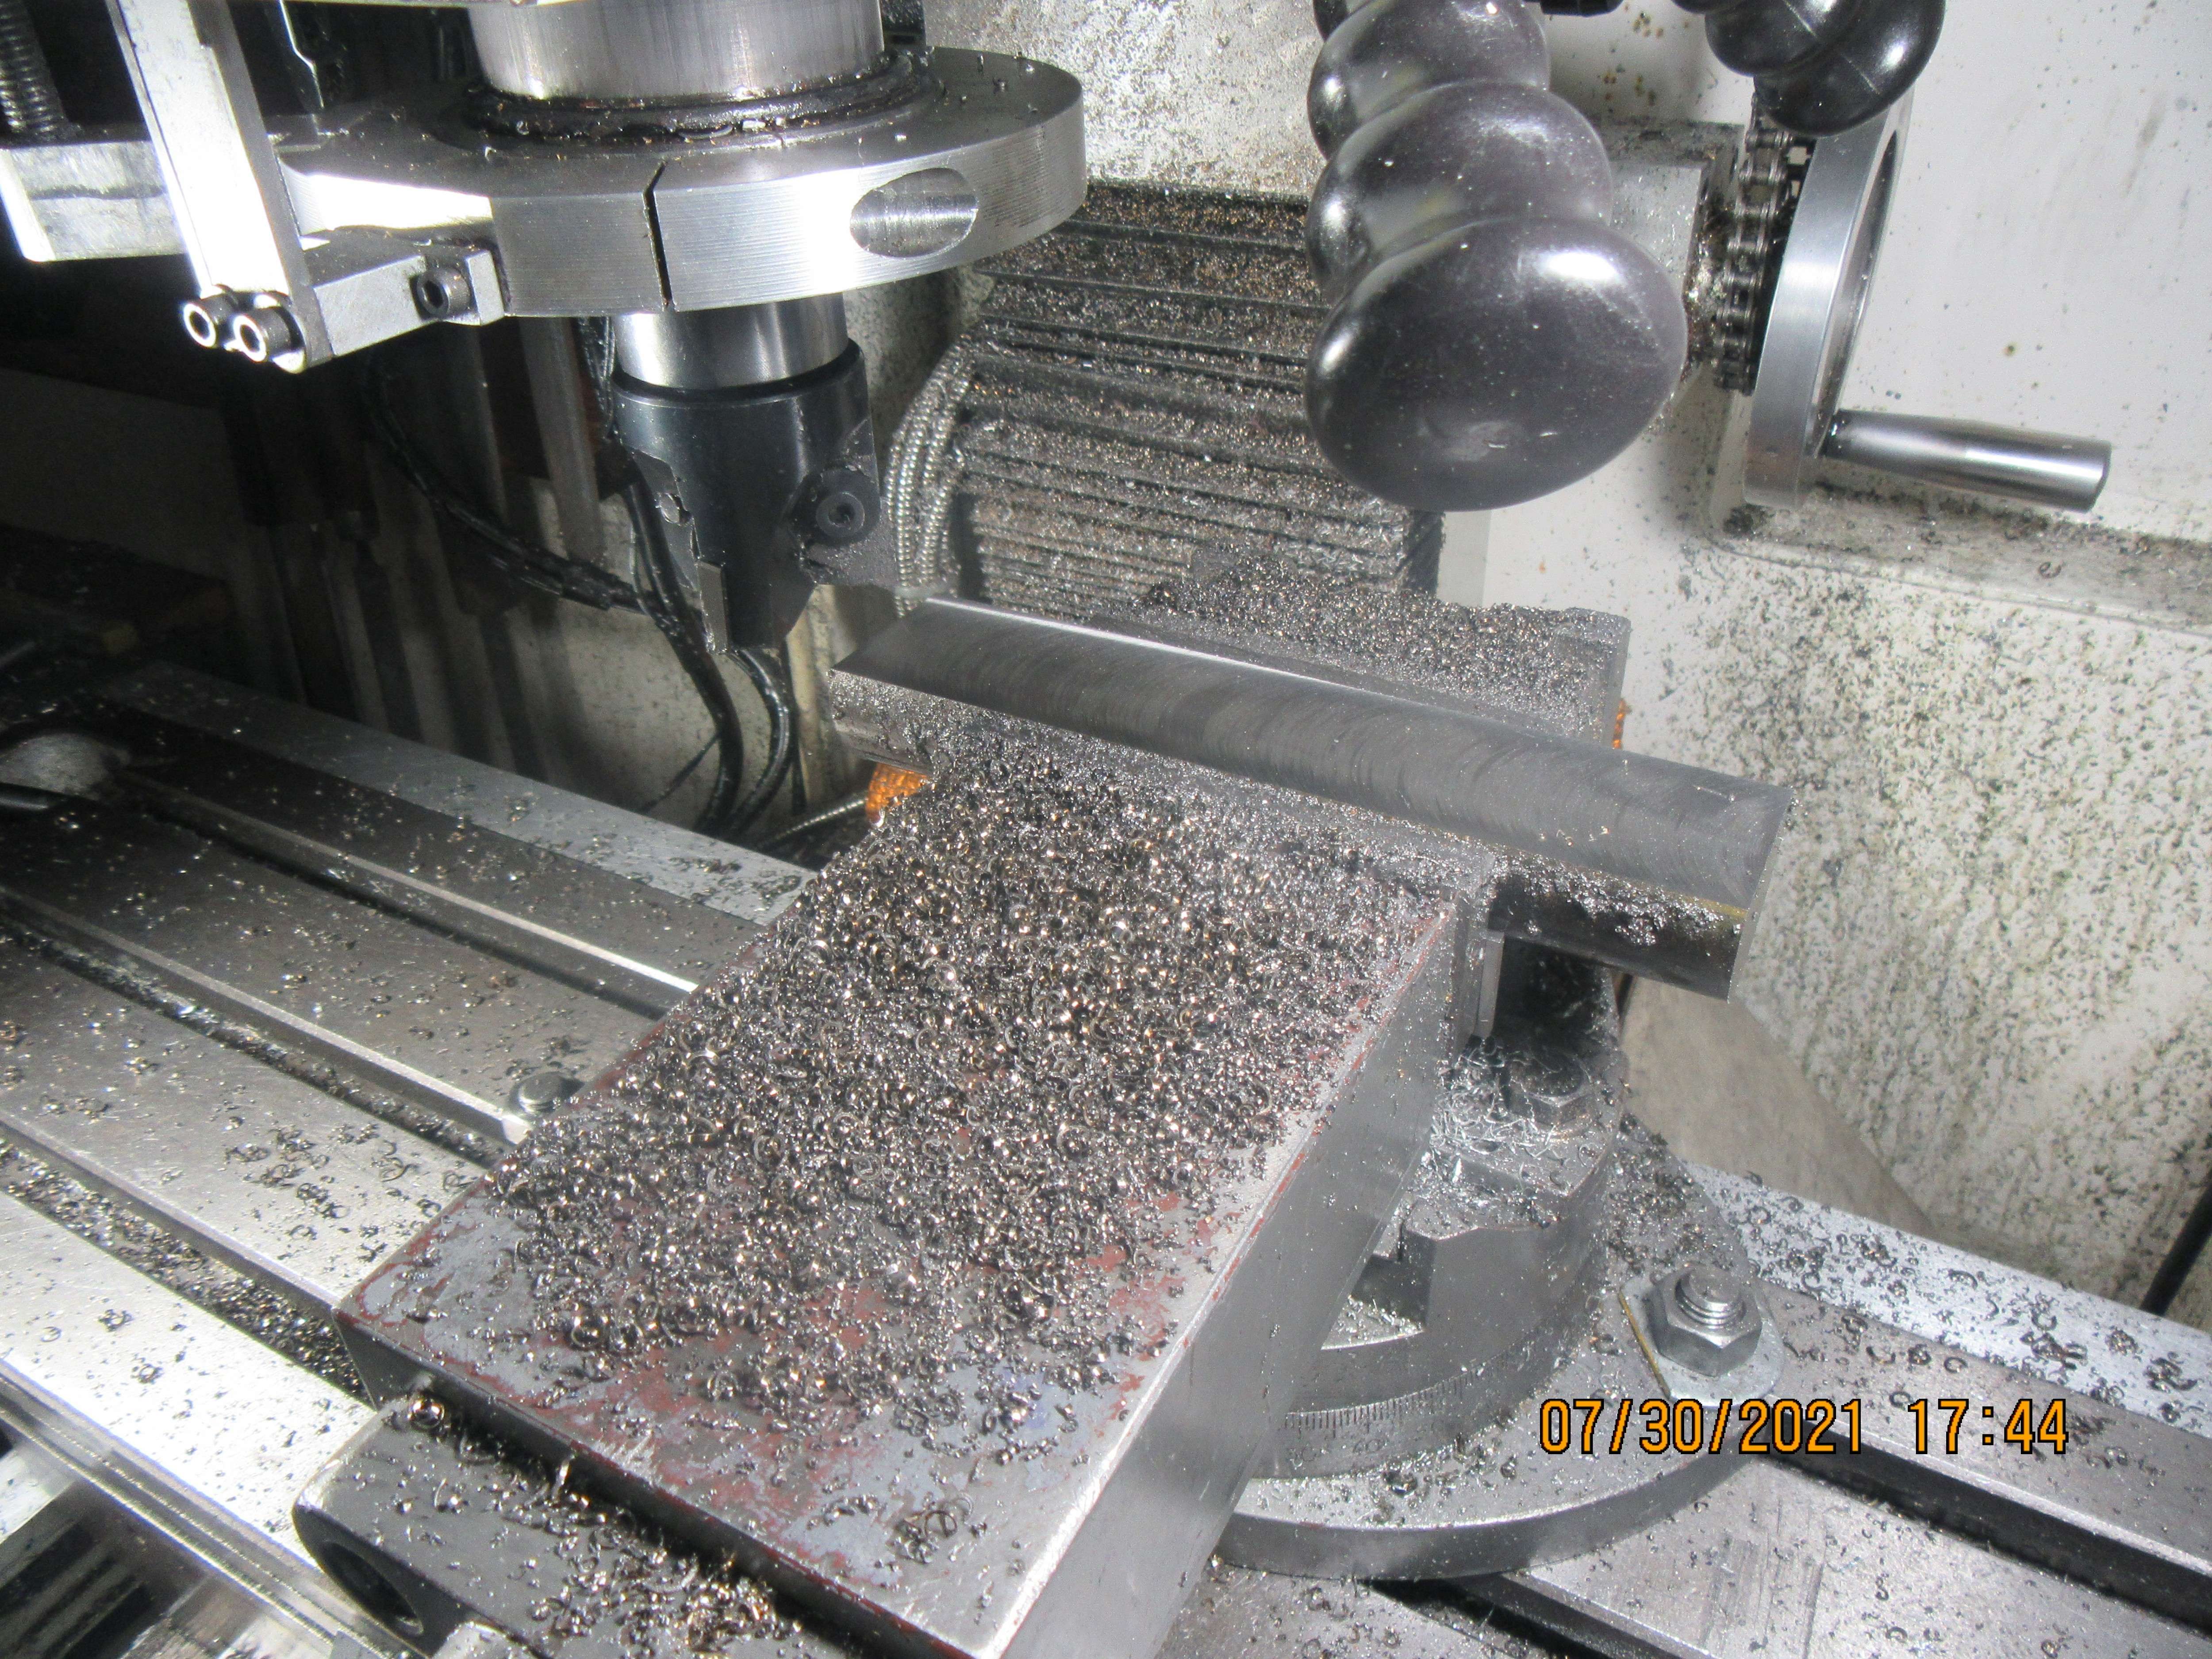
I like to make my one piece crankshafts from 1144 stress proof steel. It moves very little while machining, far less than mild steel or cold rolled steel. The only catch is, it is not available in flat-bar. This means that you buy a round piece and machine a flat-bar from it, before you can actually start to machine the crankshaft. I always start by machining one side off in the milling machine, so you have a flat reference to machine or saw away the other side. In this case, I had to machine to a depth of 0.531". Next step will be to saw off the other flat, or flip it over in the milling vice and machine away the other side. Milling is probably as fast as sawing, because my sawblades are always a bit dull, and you end up having to machine that sawed side anyways to get it flat. My mill seems comfortable with 0.015" depth of cut, so that is a lot of cranking back and forth to take off 0.531".

Jasonb,
Thanks. That makes sense now.
Doug
Thanks. That makes sense now.
Doug
- Joined
- Jan 4, 2011
- Messages
- 1,442
- Reaction score
- 403
I have always just centered the cam on the rotary table and used an end mill. Move the spindle .302 radius plus 1/2 the cutter dia and turned the table through a 240° arc. (360-120) Then moved the mill table .346X and -.200Y plus half the cutter dia and start cutting at where the 240° arc stopped. Obviously done is steps, not all in one cut.Today was not a good day. I fought the cams and the cams won. The cutting tool slipped in the holder. The stock slipped in the chuck.
I was overwhelmed by a hoard of zombies. I was bitten by a rabid bat. I was stung by a murder hornet. My day has turned to crap. Perhaps a different approach to making cams will be investigated.
I will have to study the other method.
Last edited:
Similar threads
- Replies
- 11
- Views
- 1K
- Replies
- 413
- Views
- 68K
- Replies
- 148
- Views
- 27K


![MeshMagic 3D Free 3D Modeling Software [Download]](https://m.media-amazon.com/images/I/B1U+p8ewjGS._SL500_.png)


