Small V8

Home Model Engine Machinist Forum

Help Support Home Model Engine Machinist Forum:

This site may earn a commission from merchant affiliate links, including eBay, Amazon, and others.
stevehuckss396 said:
. Speedy metals is 5 miles from my house. I also have Metal Mart, Metal Express, and Industrial Metal all within 8 miles.

Wow, you live in a metal wonderland.

When I go the the steelyard they look at me funny when I ask, What type of steel is this? It's like they only know steel or stainless steel, I ask for leaded steel and they say what is leaded steel. Forget about brass or anything "Exotic" like bronze, but the do have a limited selection of aluminum. Horay!

Lucky, Lucky you.

Kel
 
putputman said:
Steve, I think once you try 1144 you will really like it. It machines a little like cast iron. It is especially nice when using a parting tool as the swarf comes off in small chips rather than long cures.

The only negative I have heard about it is that it does not weld very well. Not a problem for model builders.

I have decided to put the crank on hold. There is a model engine show coming up and i think talking to some of the builders will give better methods. I think the one i was working on might have been ok but after seeing G's fixturing, i might try to come up with something along those lines.

I think I might move forward with the valve cages and valves. Or something!

ONWARD!!
 
HI I can not Waite to see them all finished brill work
from bob
 
kcmillin said:
Wow, you live in a metal wonderland.

When I go the the steelyard they look at me funny when I ask, What type of steel is this? It's like they only know steel or stainless steel, I ask for leaded steel and they say what is leaded steel. Forget about brass or anything "Exotic" like bronze, but the do have a limited selection of aluminum. Horay!

Lucky, Lucky you.

Kel

Since the economy has tanked so bad here in Detroit, I am not sure how many will be left in a short while. :'(
 
stevehuckss396 said:
I just need one!! I am so sick of paying more for shipping than the material.

Steve

I couldn't agree with you more. It used to be you looked at the cost of the item and didn't worry about the shipping. Now you look at the cost of shipping more than the cost of the item.

As bad as that all is, imagine if you had to ship that 3 foot bar to Australia or even Canada for that matter. You would have to take out a 2nd mortgage.

You're doing a fine job on these engines. I'm not commenting much but I am watching.

Cheers :)

Don
 
dsquire said:
I couldn't agree with you more. It used to be you looked at the cost of the item and didn't worry about the shipping.

I'm not commenting much but I am watching.


Thank you Don!


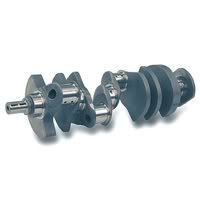
I think I may change things up a bit and consider a built up crankshaft. The idea behind this project was to come out of it with something alot of people wouldn't be afraid to build. I have designed a 4 piece crankshaft that might make things easier for everybody. With a 4 piece crank it will be possible for someone with lesser skill to still pull it off (including myself). The pieces will be indexable as a square hole will be milled into the pieces. If a mistake is made, only 25% of the shaft will have to be scrapped. The bad part is the pieces will need to be assembled, indicated in, and pinned together. I think the best thing to do would be to include the drawings for both and let the builder decide.


Like Don, im not saying much but this is the thread to watch when I log on, the rest are wonderful, this is inspirational....

My thoughts (as one who is doing a crank right now for the first time), for what they are worth, which is not much....

A v8 crank can have the same number of journals as a four cylinder crank Right? But where it differs is that four cyl crank can work on only 2 planes (can be cut from flat bar) where as a v8 needs to be on 4 planes and requires indexing during maching which can simply take this beyond the abilities of your average aspiring home machinist, or make it seem so, which is really the same thing.

Covering both build styles make very good sense to me and if I where to attempt this I would go built up crank (as I have in my current build) for exactly the reasons you mention...

In fact thinking about it further.. take a round piece of stock, drill a centre hole and then an off centre hole and then part off segments, use bar for journals and assemble...sounds easy right? ::)

Doing great man, I just want a cyl block to sit on my desk ...... 8)

Rob T
 
I just did it again. Stuck my foot in my mouth while trying to help and make things easier. I seem to have everybody upset over the project of the month.

I just want to apologise to everybody. This was not my intention and I could not feel worse.

Sorry!

Steve

 
Steve you had a great idea.No Need to apologise. This site if founded on giving your Ideas and also Questions.

Dave
 
I thought most American V8's had single plane cranks up until the last decade or so? Of course, that doesn't quite sound like a dual plane crank.
 
dieselpilot said:
I thought most American V8's had single plane cranks up until the last decade or so? Of course, that doesn't quite sound like a dual plane crank.

Small block chevy crank (350).

Smallblockchevycrank.jpg
 
Hi Steve,
I started out making steam engines, most notably Stuart engines. These came with a forged blank for the crank. I also purchased a book on how to machine the Stuart engines which explained how to machine the crank. I have done single and double throw Stuart cranks.

With this in mind when I started building hit & miss engines I made one piece cranks. Usually they were made from CRS. The all warped to some degree but usually with small repetitive cuts I could get them trued up. One particular crank just wouldn't cooperate so I made a segmented crank. I made the two cheeks and drilled and reamed them at the same time so the center distances would be identical. I then slid the drill rod pieces through the holes (.0005-.001 clearance) enough gap to get the silver solder to fill in. After it was soldered I cut out the center bar, mounted the crank between centers and indicated it. It was close and saveable but not perfect out of the box.

When I made the crank for my V-8 I was initially daunted by the idea of having to turn the offset throws so I went for a built up crank. Because of the configuration I made the mains with their corresponding web pieces out of one piece of stock. When I got them turned I made up a jig so that all the throw holes would be identical. I then made up shouldered crank pins and started assembling the crank. I then made up a fixture to mount the crank into for soldering. It resembled the bottom of the block with clamps to hold the mains in place. I also used this fixture to true up the crank as I was assembling it. I would rotate the crank and indicate it, pull it out twist and tweak, put it back in and re-indicate. After much time of adjusting, twisting and indicating I got it to where I thought it should be, clamped it down and silver soldered it. When I unbolted it and re-indicated it it was close, farthest dimension was .004 as I recall. Having spent hours and hours of making the parts, assembling, indicating, adjusting and what-have-you I was bent on making this thing work so I started tweaking and bending it between centers countless times to get it true. I believe I ended up with .0015 overall.

At the time I only had my small lathe, 6 incher, so this was pretty much my only option. After that I got a 9 inch South Bend and remade the crank as a one piece unit. When I turned it I left a little bit of stock on the mains and throws, .002, and I made up a toolpost grinder to finish them off. That crank finished up at around .0005 overall.

So to get to the point of my story, I realize that everyone has different skill levels and equipment options but if I had my druthers I would make a one piece crank every time. Don't get me wrong, I'm not saying that a multi-piece crank can't work it's just that the amount of time that goes into it can far exceed the time it takes to make a solid crank.

George
 
gbritnell said:
and remade the crank as a one piece unit. When I turned it I left a little bit of stock on the mains and throws, .002, and I made up a toolpost grinder to finish them off. That crank finished up at around .0005 overall.

So to get to the point of my story, I realize that everyone has different skill levels and equipment options but if I had my druthers I would make a one piece crank every time.

I have to agree that a one piece crankshaft is best but i'm not sure I have the skills to pull it off. I think the extra time spent will give me the best chance for a useable piece. I haven't been doing this long and still struggle with some things.
 
stevehuckss396 said:
I just need one!! I am so sick of paying more for shipping than the material.

I have learned to "batch" my orders. By adding 1 or 2 items to the cart at a time, you can see the shipping price jump when you cross a threshold. So I maximize the number of pieces I can get for a given shipping cost.

Chuck
 
Hi Steve,

I will vouch for 1144 too. Once you use it and machine it you won't want 1018 in your shop anymore.....I try to use it everywhere I can.

Stable, machines well and has great properties.

Metal Express is a good source....can't help with the shipping costs though....

by all accounts thus far that I have read, roughing out the crank on the mill is the way to go ( Duclos, Colonna, Britnell)

Do what makes you happy my friend...I'll be watching regardless... :)

Dave
 
Hello all!

Had the chance to start on a 4 piece crankshaft. The plan is to make 4 pieces that lock together with a square end and socket. The square will allow me to index the crank arms in 90 degree increments. The design will also allow all the main bearings to be ball bearings.

The 2 center sections and the rear section all have one of the ends the same. So i spent the day turning the same end on 9 pieces. I made enough pieces for 3 shafts hoping for enough to make 2 when I'm done. The tip of this end will be milled square.

DSCN0523s.jpg


The front piece is different so I turned the front shaft. All 3 have a real tight slip fit. I'm real happy with the fit of the bearing.

DSCN0528s.jpg


Then the front pieces were rotated around and chucked into a collet. The rear of the piece was then finished. The rear of this piece will have a square milled into it to accept the piece behind it.

DSCN0530s.jpg


This should all become a little clearer as the pieces progress.


DSCN0532s.jpg
 
Looking forward to seeing how the crank comes together, Steve.

While a 1 piece V8 crankshaft would be a machining holy grail for me, at this stage I would prefer to spend 3 times longer doing a 4 piece than scrapping a 1 piece 3 or more (er, many more) times.

I might try a stand-alone 1 piece out of aluminium just to help visualise the process, but will want to DRO my lathe first.
 
T70MkIII said:
I would prefer to spend 3 times longer doing a 4 piece than scrapping a 1 piece 3 or more (er, many more) times.

I'm going to try both ways. I think the 4 piece will be easier but take longer because I will need to fixture some things/steps. With this 1144SP metal, the one piece seems more within my reach.

 
1144SP sounds great. Unfortunately, I can't seem to find any listed in Australia (at least on Google) or reference to a local moniker for the same material. I'll make some phonecalls during business hours to see if I can track some down.
 
Back
Top