3 Cylinder Swash Plate Engne

Home Model Engine Machinist Forum

Help Support Home Model Engine Machinist Forum:

This site may earn a commission from merchant affiliate links, including eBay, Amazon, and others.
You just started this a couple of weeks ago!
Nicely done. An unusual engine that will get a lot of attention.
Thanks for posting it.
 
Jerry

Congratulations :bow: You've got "Proof of Concept", the rest is decorational! Thanks for this one, I really had no idea how the swashplate worked.

Cheers, Joe
 
Congrats on a job well done. It runs and that is a major accomplishment on a new design, first run. :bow: :bow: :bow:

Ron

 
I'm still working on this. Its getting a lot better and I am learning a lot. I really wanted this engine to run smoothly at low rpm and to be reliably self starting. To this end, I designed a different type of valve and so far I am very happy with it. This valve isolates the intake and exhaust from the rotating shaft which allows proper sealing. It exceeds my expectation. Simple O-ring seals are effective and after lapping the valve surfaces and a little running in, it show very little pressure loss or leaks. The engine now runs on very low pressure (2 - 3 psi) and is reliable self starting at low or high speed. At some point in the future I will experiment further with valve timing and overlap but for now the overlap is set at about 15 degrees and the eccentric preceeds the piston by 90 degrees.

I have not setup any torque test yet but applying finger pressure to the rotating shaft makes me think it is substantial.

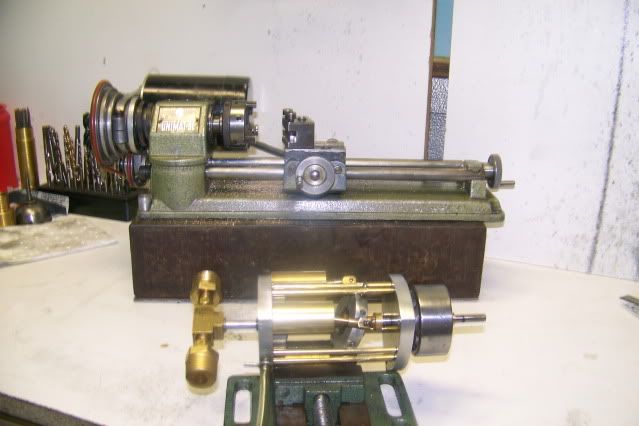
The picture below shows the engine sitting in front of the little Unimat with which it was built. I think that this is about as big an engine as I can build on the Unimat so if all goes well my new 9x20 will arrive tomorrow. This will allow me to complete the engine with a proper mounting and to experiment with reversing valve design.

The video shows the engine running slowly but the frame rate may not show that very well but it can be made to run smoothly at less than 60 rpm on 1 or 2 psi. It shows self starting at all positions of the shaft and at 30 - 40 psi it is very fast and smooth.

The pics also show all the scars and scabs of design and dimension changes so before going any further, I'M STARTING OVER. Every part will be remade so when I start over, I will attempt to document each step and to present dimensioned drawings.

Here's the pics and vid.

Jerry


threecylindersII038.jpg


Nice work Jerry!! Looking forward to the build log.

Steve
 
Good going Jerry Thm: - looking forward to the build log!

Regards, Arnold
 
compliments for a well made and nice running engine!

and if you have built it with that little lathe, your work has to be still more appreciated :bow:
 
Beautiful runner Jerry! :bow:

Rick
 
There will be a small delay in this post as I move to a different world.

REAL LATHE!!

On Monday, I picked up a lightly used HF 9x20 and spent all day yesterday getting to know it. For you guys that are used to real machines, this might seem silly, but having been limited to a Unimat SL1000 this is a real eye opener! I bought the lathe from a guy that has lots of other goodies in his shop and needed to unload this machine to make room.

He was interested when I told him I was building steam engines and I will try to get him to join this group and show some of his work. He builds [size=14pt]JET ENGINES[size=10pt].

Anyway, I'm going to take a couple of days to translate my methods and thinking from Unimat to 9x20. I've been reading all the 9x20 mod sites that I can find but I'm not going to get bogged down in modifing this machine until I get used to it.

Question for those of you with 9x20 class machines. This has the standard toolpost which wants 1/2 " bits and I want to stick with HSS. Short of going to a QCTP, do you recommend 1/2" square HSS blanks or some kind of holder for 1/4" bits?

Off to the shop. I'm pumped!

Jerry
 
Jerry & Brian and the other fellow that post what you make I want to say that I am another one who looks and a lot of the times does not comment until a project is done, I start my day with the cup of coffee in the morning reading the post and pics and end the day with the same, I love this group and what it has to offer everyone who wants to learn you fellow put lot of hours on there projects and share with us what you have done and the way you go about doing it, the play by play is what needed for at least me, I am not good at all of that yet but am the king of copy and paste, maybe this winter projects, again worth repeating, your are being notice and appreciated, Lathe Nut
 
Jerry you will find that 9 X 20 to be a very capable little machine.
If the previous owner had not replaced the 2 bolt compound clamp
with a 4 bolt modification, you will want to do that first.
It is a simple mod to make. Here is my thread on it from our very
early days.
http://www.homemodelenginemachinist.com/index.php?topic=805.msg5261#msg5261

The tool post is actually made to hold a 10MM tool bit.
A 3/8" bit with a .020" shim under it will put the tip almost
dead nuts center.

Rick
 
Rick:

Thanks for the response. I have ordered material for the 4 bolt clamp and a couple of belts, but I am puzzled by the tool holder. I did not get any tool bits from the previous owner so when I got it set up I searched around my box of bits and by laying a 1/16" parting tool on it's side, and stacking two 1/4" bit on top, the tip of the topmost bit was on center. That is a total of .5625 in. A 3/8" bit would need a 1/8" shim. What am I missing? Do I have an oddball tool post?

By the way, you are right about this machine being a heavy beast. I had to get my wife to help me get it off of the pickup truck and up the ramp to my shop. (I'm 71, she's 69)

Jerry
 
Your wife is only 69 and you had to help her unload the lathe? ;)

When I brought mine home I had my 25 year old son here to help
unload it. We got it to the basement, set it on the bench and I marked out
where the mounting holes should drilled. When I told him that we needed to
lift it off the bench so I could drill the holes, then lift it back onto the bench...
His reply was "You gotta be ****** kidding me!"
My memory fails me at the moment as to what that missing word was.
Rof}

You may not be missing anything on the tool post center.
The standard Sieg 9 X 20 is made to center a 10MM tool however
every vendor selling that lathe makes adjustments to make it
"Their Own" machine. The only way to find the absolute center is
to chuck up a scrap piece of stock and face it to center.
Half the diameter of the nub left in the center is the amount of
shim required for that tool bit size.

Rick
 
Hi "Y'all

The continuation of this saga appears in a new thread, "3 Cylinder Spider". This was a first effort at a new design and the revisions are numerous. The valve remains the same and the mechanism is mostly the same but the treatment is very different.

Thanks for you interest in my offbeat creations.

Jerry
 
Very cool little engine!

I've always been fascinated by swashplates. Apparently they were used in torpedos because they fit the slender profile and produce a lot of power.

Cheers,

BW
 
actually the early torpedoes had compressed air engines
Tin
 
The English 21" torpedo was powered by a diesel engine, the compressed air in these torpedoes supplied the oxygen for the engine. When a practice warhead was fitted, (i.e. one filled with water instead of explosive), the exhaust from the diesel was used to pump out the water allowing the torpedo to float at the end of its' run and be recovered. Oddly enough these test shots were mostly recovered by a TRV, (Torpedo Recovery Vessel), from the test range.

TRV2.jpg


Best Regards
Bob
 

Latest posts

Back
Top