Horizontal Mill Engine From Kit

Home Model Engine Machinist Forum

Help Support Home Model Engine Machinist Forum:

This site may earn a commission from merchant affiliate links, including eBay, Amazon, and others.
Zee, I'd be happy with that finish. Aluminium can be a bugger to get a nice finish on - even bits of swarf coming off the primary cutting face and getting trapped in the rear cutting face can cause the finish to be destroyed.

Have a look at the cutting tip on the flycutter - if there is a bit of aluminium "welded" on there, you definitely need to use some form of lubricating coolant, or reduce speed.

From your photo, the machining marks will be easy to clean off - a couple of rubs over 320 grid emery with oil, then over some 800 grid, then a bit more over 1200grid, and a quick burnish with metal polish on a clean cloth & you'll have a real mirror finish.

Regards, Arnold
 
the edges are pretty rough. I don't know what that means.

Most metals will form a burr at the edges. You need a deburring tool to clean them up (and to prevent cutting yourself when hendling the parts).

 
Thanks Vernon. Site requires me to sign up and give info. I'll check around some more first.

Thanks Arnold. No 'weld' on the tool..thanks for reminding me.
It's a play piece (learning piece) so I'm not so worried about removing tool marks. So long as they're 'supposed to be there' and 'will clean up'...then I'm happy too.

Thanks kvom. I guess I just hadn't noticed the burrs before...or they were smaller.

 
Ha, was that penny in the photo last night? Ok, I saw it, but I didn't even think about the scale of the photo.
Thanks Vernon. Site requires me to sign up and give info. I'll check around some more first.

Fine, I requested a chart. I'll mail it, ( or one of my old grubby ones), to you when it arrives.

Just one. A chart. Not MANY charts. I'm not getting into the Guinness trouble again. ;D
 
Hm yeah...I hadn't realized how the scale looks. The penny was up close so I'm thinking it's making the part look smaller than it is. It's the same part from the other night. Still...I should use a bigger part for this.

One grubby chart is fine.
That's probably more than the promised beerS I'll ever see. ;D
 
Managed to get in the shop and stay there long enough to do something.
Not much...but something.
Went better than I'd expected...

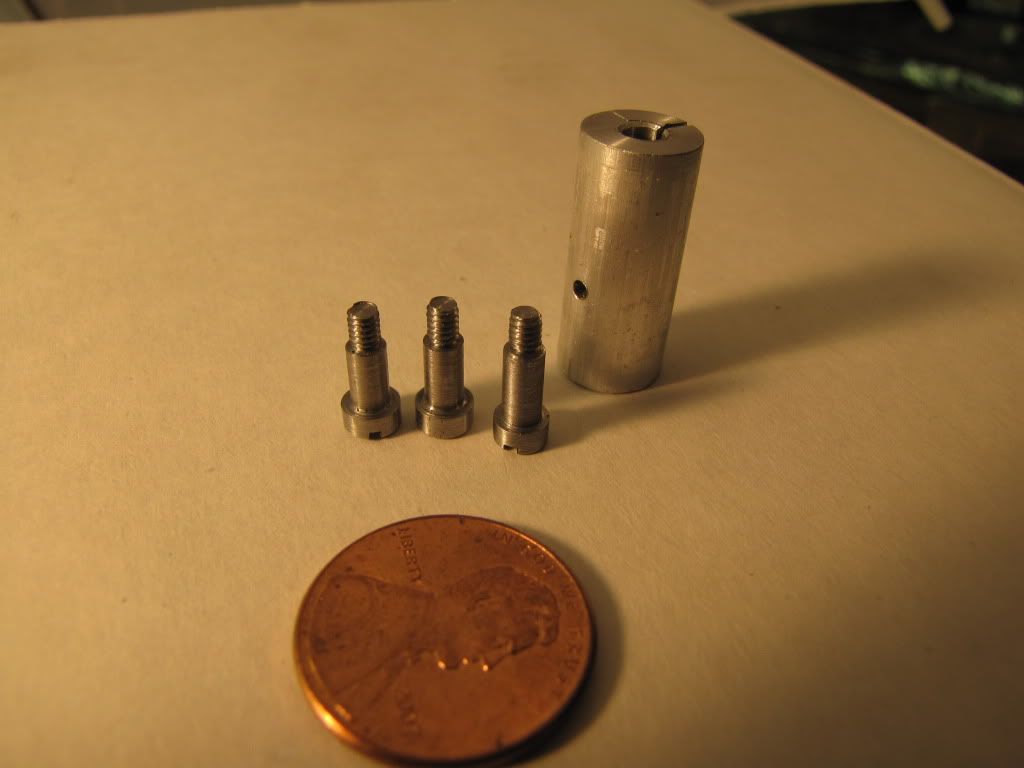
Three pivot pins for 'Isabella'. Each has (and is supposed to have :)) a slightly different length 'shank'.
I'd like a better finish...but I'm pretty happy with this.
Only one screw-up (pun). Was threading one and it twisted off.
Real happy with the slots.
In the back you see a collet I made to hold the pins for the slit saw.
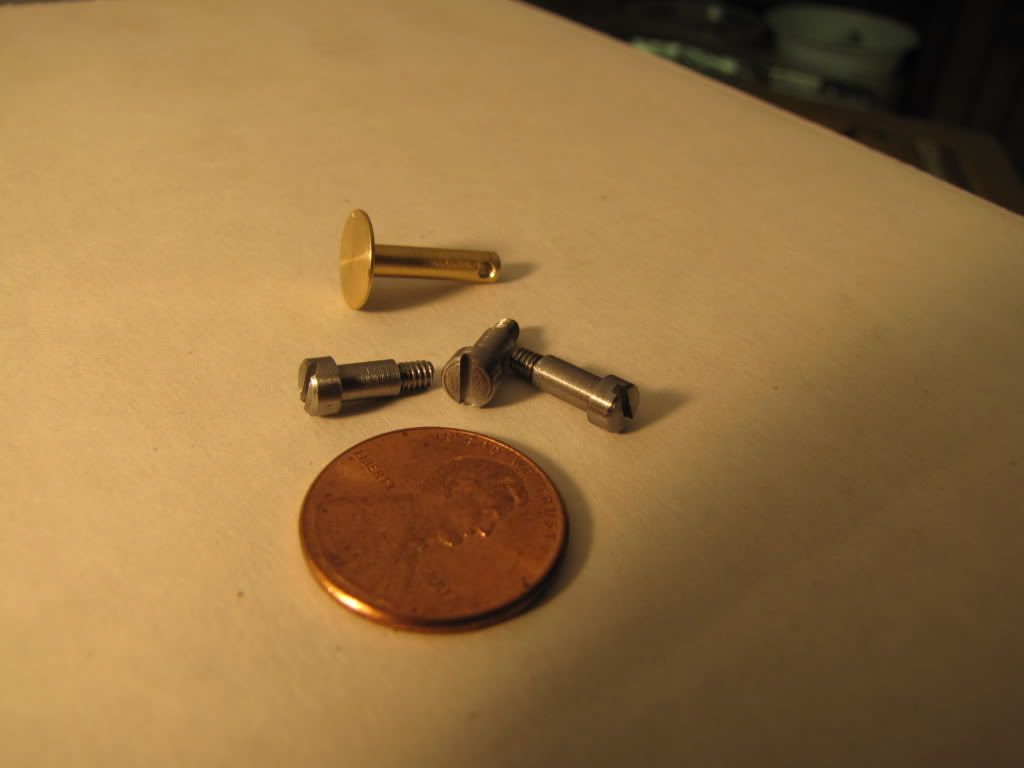
That was according to instructions.
However, instructions also used this in the lathe to put a radius on the screw head.
That's the second time I've tried that. Doesn't work. At least not in a 3 jaw. The collet doesn't close enough.

Don't know why there's a 1/16 hole in the side of the collet.

IMG_0475.jpg


Here's another shot of the pins. Oh...and another mystery part! And look...it has a 1/16 hole in it. Hm.

IMG_0476.jpg


Wife goes on a short trip in a week or two. I hope to modify the Spindex while she's gone. I'd rather not have any interruptions or distractions while I do that with the angle grinder. Never used one. Got ear plugs, full face shield, gloves, and so on.

So that was fun. Success is fun. So is failure learning.
 
??? It's a mystery. ??? And what's a Rocker? ;D
No no...don't trouble yourselves guessing.
I'm the only one guessing here. ::)
 
Ha, nice work, even the mystery part... and the worm hole in the side of the collet...which, if my eyecrometer is calibrated, looks to be .517" from the end... strange.
 
Zee, didn't you know you were supposed to thread that hole for a teeny grub screw to help overcome problems with the screws turning in the collet when machining their heads ??? ;)
:big: :big:

Looking good

Arnold
 
Robert...yeah that's it...a vent hole...yeah. :)
Vernon...almost...but it is 0.537 from where I referenced. Which is almost 0.02 from end of collet. :)
Arnold...I can't see grub screws that small. :)

So anyway...crumbs... :(

Was looking at the drawings to see what to do next...
Hopefully something a bit more interesting.

Had an issue earlier when milling out a hole and my 'drinking' partner (that is...very dry drinking partner - okay, he's not a drinking partner...just some guy) mentioned the possibility that the tailstock was off true from the headstock. I remembered a post that showed two centers nose to nose.

So I tried it. As I said...crumbs.

1) My 2nd live center (to replace the damaged 1st center)...is damaged. The tip is slightly chipped from an earlier fiasco with a crankshaft. For those of you with short memories...don't bother yourself. (Should still be usable though.)
2) Even so...I could see the tailstock is a bit higher. So drilled/reamed/milled holes are coming out bigger than desired.

Mini-lathe 5278 from ToolsNow...just like the one from Harbor Freight or Grizzly.
[EDIT: I mention that because I see no way to shim the headstock. That, and the hope that someone will say..."No problem...all you gots to do is...". But with my luck...it'll involve making a tool or using flames.]

How to fix? Or drill/ream/mill smaller?

(The real answer...for me...is a better lathe...but that's in the future.)

Crumbs.
 
No, you don't wanna shim the headstock, and it's better that your tailstock is too high, than too low. It's always easier to REMOVE material... Actually I seem to remember a recent post on here about tailstock adjustments.

...and after a quick check, the opinion there was the opposite of mine. So, don't listen to me, take off your tailstock and look at it.

mystery 004.JPG


mystery 004.JPG
 
Ah you lost me Vernon. I'll check the recent post...I remember it...but it seemed like shimming the headstock was a no go because it couldn't be done.

I won't comment on whether I should listen to you or not ;D.

Okay...looked at my tailstock. Looks like a tailstock. Feels like a tailstock. Smells like a tailstock. Must be a tailstock...that sits too high.

Mystery parts showing up at your place too huh? Ah ha ha ha ha ha. Ah ha ha ha.

 
Haven't managed anything worthwhile on the mill engine...but another mystery part showed up...this time with a note!

IMG_0537.jpg


Crummy note...some apology about having to work on an ill-adjusted mis-treated lathe.

Said something about lousy tool bits too. Warned me the tool would dig in. Pointed out the little 'gutter' at the inside corner of the top 'ring'. Said the part got knocked out of true and had to hack-saw it off the parent stock.

Crummy note writing, mystery part making, jerk. He should've fixed the lathe rather than make mystery parts.

I threw the note away before I could take a pic of it and show you all. Sorry. Sort of glad I didn't...people might think the handwriting was familiar and accuse me of something...like making trouble.
 
zeeprogrammer said:
I threw the note away before I could take a pic of it and show you all. Sorry.

My, my... You are certainly a very cleaver and sneaky fellow, Zee. Yes you are.
No wonder you have such a notorious reputation.

DW
 
Deanofid said:
My, my... You are certainly a very cleaver and sneaky fellow, Zee. Yes you are.
No wonder you have such a notorious reputation.

What?
Wait!
It's the truth!
It wasn't me!
It wasn't.
I can explain.

Okay then...soon as I get my camera back...I'll set a trap and catch the villain.
 
zeeprogrammer said:
Haven't managed anything worthwhile on the mill engine...but another mystery part showed up...this time with a note!

A step pulley for a miniature lathe? :D


zeeprogrammer said:
...People might...accuse me of something...like making trouble.

 
Now that the lathe is cleaned up and adjusted and I have a workable Spindex (he says)...I can get back to the horizontal mill engine.

Naturally, I had to add to my wall of learnings...

IMG_4338.jpg


Sorry for the blurry picture...as I mentioned on another thread...wife stole my camera and gave me her old one...she didn't bother to give me any manuals and I haven't found the macro setting yet.

If all goes well, the item on the left will be the tilting slide. First steps are done in the lathe...now it's time for the Spindex. Lathe work was straight-foward...well it would have been had it not been for me.

The item on the right was the first try. I stupidly followed the directions before thinking it through. Instructions said to face both ends and trim to length. Then turn down to diameter. Well, bringing it to length would leave maybe a 1/4 inch to hold in the chuck. That won't do (and I don't have anything else to try). So I hacked off a piece of 12L14 a bit longer than the one that came in the kit. Faced and turned then faced the other end to length.

No mystery part showed up. I guess the guy was busy doing other things.

I hope to get to the Spindex work soon.
 

Latest posts

Back
Top