
You are using an out of date browser. It may not display this or other websites correctly.
You should upgrade or use an alternative browser.
You should upgrade or use an alternative browser.
Horizontal Mill Engine From Kit
- Thread starter zeeprogrammer
- Start date


Help Support Home Model Engine Machinist Forum:
This site may earn a commission from merchant affiliate
links, including eBay, Amazon, and others.
Check out Bogstandard's drilled pliers tip. Most excellent devices for holding/bending round stock.zeeprogrammer said:I was thinking about bending it while it was hot...using some pliers or needle nose...any suggestions how I might do that without putting marks on the part? I'm going to look for some pliers that don't have the ridges on the end.
zeeprogrammer
Well-Known Member
- Joined
- Mar 14, 2009
- Messages
- 3,362
- Reaction score
- 13
Vernon and Rick...
Well it looks like brass, feels like brass, tastes and smells like brass...but what do I know?
360 Half Hard Brass is what's on the part's list. That's also what I ordered. (I can't remember if I used the part from the kit...or the part I ordered.)
Thanks for the tip.
Shred: Thanks very much. I'll look for them.
zeeprogrammer said:Did you heat, cool, and then bend?
Or, did you heat and bend while hot?
I was thinking about bending it while it was hot...using some pliers or needle nose...any suggestions how I might do that without putting marks on the part? I'm going to look for some pliers that don't have the ridges on the end.
Need to cut the thread on the ram piece and do have most of the change gears, so of course the one I need is the one I dont have. Waiting for the E Flay delivery.
Got the bend. Used a 1/8 drill bit, snapped it in 2 and ground down the end at an angle. Feed that into the shoulder portion of the handle to form a radius between the shank the section that would have the screw thread. Left a portion of the shank (about 0.130) at the 0.080 dia. Thinking is, the material to be bent is trapped within that section, no hard corners for the material draw to pull upon. sanded it smooth to avoid the "Scratch to Crack" bit which the first attempts did crack at.
Held one end with needle nose and stuck piece in flame till section to be bent was dull red, another pair of needle nose used to bend the piece slightly. The pliers draw the heat away from the part quickly so it was heat to dull red bend a tad and reheat. About 5-6 bend sequences and POOF!
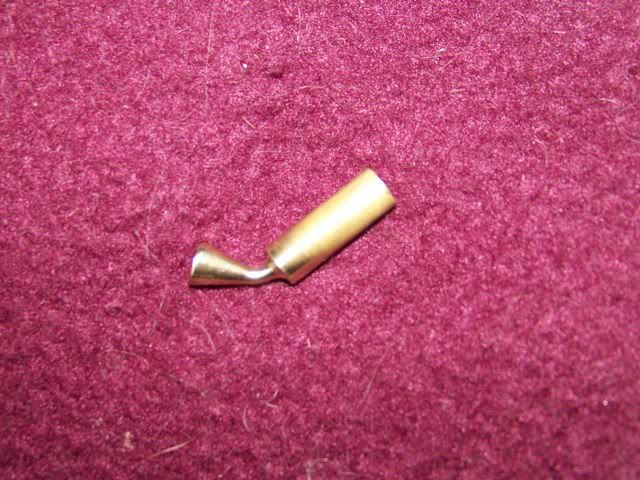
Only took 5 tries to get one piece bent >)
Robert
arnoldb
Well-Known Member
- Joined
- Apr 8, 2009
- Messages
- 1,792
- Reaction score
- 12
Zee,it would appear that this piece presents a bit of a challenge ") - the last post from Robert might be spot on on how to do it
- the last post from Robert might be spot on on how to do it
Also try to get the finish on the section that have to bend as good as you can - any score mark on that, and that's a weak point where it will snap.
If you don't have the pliers with the holes as suggested, a piece of pipe that just slides over the "handle" part can help to give you a better "handle" on things.
Shucks, you guys on the other side of the world get to play while I have to sleep....
Regards, Arnold
Edited to add: Welcome to HSS usage - now you also need a good oilstone, or even better, a couple of diamond laps to get those edges honed
- the last post from Robert might be spot on on how to do it Also try to get the finish on the section that have to bend as good as you can - any score mark on that, and that's a weak point where it will snap.
If you don't have the pliers with the holes as suggested, a piece of pipe that just slides over the "handle" part can help to give you a better "handle" on things.
Shucks, you guys on the other side of the world get to play while I have to sleep....
Regards, Arnold
Edited to add: Welcome to HSS usage - now you also need a good oilstone, or even better, a couple of diamond laps to get those edges honed
zeeprogrammer
Well-Known Member
- Joined
- Mar 14, 2009
- Messages
- 3,362
- Reaction score
- 13
Robert...thanks for the experiments. As Arnold said...looks like a challenge. Very good tip about removing scratches.
Arnold...good tip on using a tube. I'll have to hunt around and see what I have. I suspect I need to be careful about placement of the edges.
I have diamond laps...whether they are good or not...the right type or not...well we'll see.
Arnold...good tip on using a tube. I'll have to hunt around and see what I have. I suspect I need to be careful about placement of the edges.
I have diamond laps...whether they are good or not...the right type or not...well we'll see.


$39.99
$49.99
Sunnytech Low Temperature Stirling Engine Motor Steam Heat Education Model Toy Kit For mechanical skills (LT001)
stirlingtechonline

![MeshMagic 3D Free 3D Modeling Software [Download]](https://m.media-amazon.com/images/I/B1U+p8ewjGS._SL500_.png)

$24.99
$34.99
Bowl Sander Tool Kit w/Dual Bearing Head & Hardwood Handle | 42PC Wood Sander Set | 2" Hook & Loop Sanding Disc Sandpaper Assortment | 1/4" Mandrel Bowl Sander for Woodturning | Wood Lathe Tools
Peachtree Woodworking Supply Inc
![DreamPlan Home Design and Landscaping Software Free for Windows [PC Download]](https://m.media-amazon.com/images/I/51kvZH2dVLL._SL500_.jpg)
$0.00
DreamPlan Home Design and Landscaping Software Free for Windows [PC Download]
Amazon.com Services LLC


$519.19
$699.00
FoxAlien Masuter Pro CNC Router Machine, Upgraded 3-Axis Engraving All-Metal Milling Machine for Wood Acrylic MDF Nylon Carving Cutting
FoxAlien Official


$29.95
Competition Engine Building: Advanced Engine Design and Assembly Techniques (Pro Series)
Amazon.com Services LLC


$12.56
$39.95
Complete Plans for Building Horse Barns Big and Small(3rd Edition)
ThriftBooks-Atlanta

$40.02
$49.99
Becker CAD 12 3D - professional CAD software for 2D + 3D design and modelling - for 3 PCs - 100% compatible with AutoCAD
momox Shop


$24.99
$27.99
HOZLY 5PCS/Lot ISO30 Tool Holder Clamp Flame Proof Rubber Claw CNC Machines Automatic Tool Changer
HOZLY


$94.99
$109.99
AHS Woodmaster 4400 Maintenance Kit for Outdoor Wood Boiler Treatment
Alternative Heating & Supplies


$99.99
AHS Outdoor Wood Boiler Yearly Maintenance Kit with Water Treatment - ProTech 300 & Test Kit
Alternative Heating & Supplies


$89.99
Outdoor Wood Boiler Water Treatment Rust Inhibitor- AmTech 300 & Test Kit
Alternative Heating & Supplies


mklotz
Well-Known Member
If it still breaks when you attempt to hot bend it, you might want to consider making the part from steel instead of brass - more strength and less work hardening.
If you insist on brass, then it might be easier to make the thing in two parts. A tapered handle with a thin skinny projection that can be bent easily and soldered into a hole in the part that has the 5-40 (?) thread.
Harbor Freight pliers are mostly junk but they do have the advantage of being cheap. When you have a discount coupon pick up a couple pair of their bottom-of-the-line needle nose and keep them for hot work and customization - grinding the tips for specific applications. I have a pair of their extra long (~10") needle nose that have totally annealed tips now. Add a coil spring around the handles so they'll grip a part on their own if you relax your grip.
zeeprogrammer
Well-Known Member
- Joined
- Mar 14, 2009
- Messages
- 3,362
- Reaction score
- 13
Thanks Marv. Good tips re pliers.
I'll probably take a run at heating and bending in brass. (Not because of 'instructions'...but I think there's more to learn and I don't think I've taken it far enough to convince myself it can't be done.)
From what Robert has found and my little experiment, I'm pretty suspicious that a scratch allows the brass to part more easily. So I'll be careful on the finish.
Then if that fails (aw now don't think like that :big, it'll probably be a two-parter.
I'll probably take a run at heating and bending in brass. (Not because of 'instructions'...but I think there's more to learn and I don't think I've taken it far enough to convince myself it can't be done.)
From what Robert has found and my little experiment, I'm pretty suspicious that a scratch allows the brass to part more easily. So I'll be careful on the finish.
Then if that fails (aw now don't think like that :big
, it'll probably be a two-parter.zeeprogrammer said:I'll probably take a run at heating and bending in brass. (Not because of 'instructions'...but I think there's more to learn and I don't think I've taken it far enough to convince myself it can't be done.)
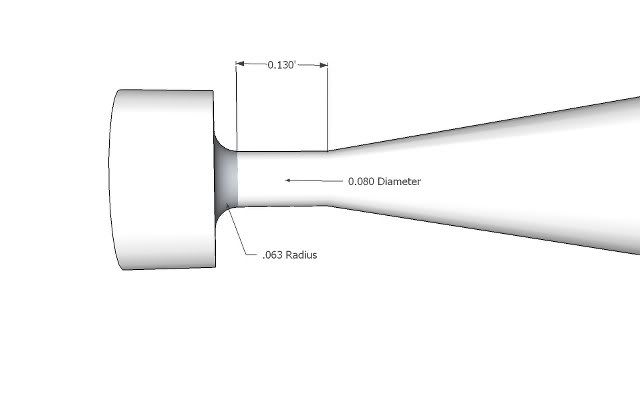
Quick drawing of the shape that got me a good bend. The radius, short extension of material and a smooth surface (and I know better ) gave the best result.
Bend er a little at a time. Takes longer to fab up a new piece than the few minutes the bend takes.
Many shall be awaiting your results
Robert
zeeprogrammer
Well-Known Member
- Joined
- Mar 14, 2009
- Messages
- 3,362
- Reaction score
- 13
The results... :rant:
Well that's just lousy. I've snapped three now. Robert - a few more than that.
Heated heated heated. Never got cherry red. Maybe my propane torch isn't big enough.
Aw c'mon...the part is only 1/8 by 3/4.
Got maybe 35 degrees...then came apart.
I wonder how many newbies have tried this engine, failed, and given up the hobby?
I detest crap. :rant:
I don't like buying it.
It stinks. Rof}
No...I'm not going to make it a 2-piece. It's just a nut to keep the forward/reverse lever from moving around. I'm just going to take a piece of 1/4"...turn down one end and thread for 5-40 and knurl the other end.
And yes...I'm pretty :redface2:. Stinking crap.
Robert...I appreciate the experiments...but the likelihood that the part will break again...after much work...isn't worth it.
Oh...and I did slit the bit of rod I used to hold the handle while I filed and sanded it. That was worthless too. Kept trying to unscrew itself. I'm thinking the direction of forces weren't in the directions needed to close it.
Dad blasted @#@$%%@# and @^&#$.
zeeprogrammer
Well-Known Member
- Joined
- Mar 14, 2009
- Messages
- 3,362
- Reaction score
- 13
It's the morning now. Cruised the forum. Soothed the soul.
In reviewing all this I realized it was a mistake to try bending the handle now anyway. The handle is used to tighten down the forward/reverse lever. The threaded portion goes through the lever and into a tapped hole on the column. You want to wait until the thing is put together and the handle tightened down. Then bend it. If you bend it first, it may end up sticking up rather than down. So the sad part is going to be...you build this engine and at the very very last...the very last...the very last operation...you break the last part. We'd be talking bummer then.
In further reviewing this...I had great success bending the handle after turning it down. No filing. So I'm thinking I'll try that. (Not now. When it comes time.) Then just file the end to crown a little. I think it would be a more appropriate fit/style than a knurled nut.
On a side note...I found out what that symbol was in the drawing in reply #73. I'll edit that reply and attached is the drawing.
The slanted lines indicate the points on the part where the dimension is taken from. (Keep your 'well yeaaah' to yourselves please. ;D).
Having said that...0.13 can't be right. That, or the 0.15 can't be right.
View attachment handle0001.bmp
mklotz
Well-Known Member
A knurled lock nut wouldn't look right. Knurling is mainly for finger-sized things. Some sort of lever arrangement would be prototypical.
I made this engine as my maybe third or fourth. I knew I didn't have the skills then to bend that damn thing so I just made a lock nut with a 1/16" drill rod cross-bar. You can see it in the picture below.

I made this engine as my maybe third or fourth. I knew I didn't have the skills then to bend that damn thing so I just made a lock nut with a 1/16" drill rod cross-bar. You can see it in the picture below.
vlmarshall
Well-Known Member
- Joined
- Dec 28, 2008
- Messages
- 1,138
- Reaction score
- 1
Well, if it's just a lock, make it a nut.
Screw a threaded stud into the frame. Turn another handle, but instead of the cylindrical and threaded bits at the bottom, make a spherical section. Then, chucking on the handle, set up at whatever angle you want this thing, mill two flats, and thread a hole through the spherical bit. You'll end up with what I think looks like a tiny cast part.
Screw a threaded stud into the frame. Turn another handle, but instead of the cylindrical and threaded bits at the bottom, make a spherical section. Then, chucking on the handle, set up at whatever angle you want this thing, mill two flats, and thread a hole through the spherical bit. You'll end up with what I think looks like a tiny cast part.
zeeprogrammer
Well-Known Member
- Joined
- Mar 14, 2009
- Messages
- 3,362
- Reaction score
- 13
mklotz said:A knurled lock nut wouldn't look right. Knurling is mainly for finger-sized things. Some sort of lever arrangement would be prototypical.
You can see it in the picture below.
I agree. See previous post. And thanks for the pic. Nice to see the actual thing rather than a drawing.
Vernon: I'm just no good at visualizing from text. Maybe show me next time on YIM?
So one approach is as I said in previous reply....just turn it down, bend it, crown it.
Second approach...two piece job. Stud (nut) with thread in one end...goes into column to tighten lever. Put a threaded hole in the stud at angle. Thread one end of second piece (handle)...and screw it in. Is a 1/4" diameter stud big enough? Is 5-40 thread strong enough?
Third approach...use cross-bar per Marv's engine.
For all approaches...wait until engine is down so I can see how far the stud turns when tightened..then mark where bend, tapped hole, or hole is made so handle is down rather than up.
Thanks all.
zeeprogrammer said:The results... :rant:
Well that's just lousy. I've snapped three now. Robert - a few more than that.
Heated heated heated. Never got cherry red. Maybe my propane torch isn't big enough.
Robert...I appreciate the experiments...but the likelihood that the part will break again...after much work...isn't worth it.
Was fun on my part, bending round stock is one thing bending a formed piece, quite another. Dull red is about as hot as I got it with propane. Will try another but will add more to the shank portion to be bent. Material has to stretch and any change in diameter at the bend seems to trap the stretch within the narrow section. Exceed the elasticity of the material and she breaks. Had good luck with heat and bend a few degrees 5 or so. Heat again and bend 5 or so, maybe 10. But little by little it got there.
I can use the practice, I'm sure this type of operation will come up again in the future, Plus the failures give me something to launch into the neighbors yard
Robert
mklotz
Well-Known Member
For all approaches...wait until engine is down [sic] so I can see how far the stud turns when tightened..then mark where bend, tapped hole, or hole is made so handle is down rather than up.
Just a little preemptory hint here. You can alter the angle at which the handle reposes by calculating how much to take off the shoulder that seats when the handle is locked down.
Assume a 40 tpi thread. In one revolution it moves one thread pitch, 1/40 = 0.025". Say I want to move the handle through 30 deg. I need to shave off
(30/360)*0.025 = 0.025/12 ~= 0.002"
You can use washers too but that's just plain tacky. No self-respecting model engineer would do something like that.
mklotz
Well-Known Member
Another nuance...
I wanted to use this engine as a demo when I lecture to young people about how steam engines work. One of the hardest things for them to understand from drawings or animations is how a slide valve works.
In addition to the brass steam chest cover called out in the plans, I made one of 1/16" plexiglas - you can see it in the photo. That way the valve motion is visible. I find that people, even the adults, are really intrigued by this bit of demonstration.
When you make the brass cover (you'll need that when you run the engine on steam), think about making a plexi cover at the same time, thus capitalizing on your setups.
zeeprogrammer
Well-Known Member
- Joined
- Mar 14, 2009
- Messages
- 3,362
- Reaction score
- 13
Thanks Robert.
That would be 'two' preemptory hints :big:. Thanks Marv.
I thought I saw something 'odd' about the steam chest cover. Great idea! Thanks.
mklotz said:Just a little preemptory hint here. You can alter the angle at which the handle reposes by calculating how much to take off the shoulder that seats when the handle is locked down.
You can use washers too but that's just plain tacky. No self-respecting model engineer would do something like that.
That would be 'two' preemptory hints :big:. Thanks Marv.
I thought I saw something 'odd' about the steam chest cover. Great idea! Thanks.
zee your posts are usually long, and I'm not an english language man, so it is difficult for me to follow all of them
but sometimes I read them, and I wish to compliment with you for your perseverance. it will be rewarded finally
I also see that sometimes you want to verify an approach, instead to follow the experienced man that give their suggestions... I too do the same :
in my case, it is for laziness: I search a shorter way to do something, but results are always negative
now I have almost learnt that there aren't advantages in doing so ;D
but I'm going out the thread, these are only thoughts in a late night, I apologize
zeeprogrammer
Well-Known Member
- Joined
- Mar 14, 2009
- Messages
- 3,362
- Reaction score
- 13
ariz said:zee your posts are usually long...
;D yeah...I get that at design reviews at work too... ;D
ariz said:but sometimes I read them, and I wish to compliment with you for your perseverance
Thank you. That means a lot to me.
ariz said:but I'm going out the thread, these are only thoughts in a late night, I apologize
No need. Your post means a lot to me. Thanks again.
Similar threads
- Replies
- 17
- Views
- 4K