Horizontal Mill Engine From Kit

Home Model Engine Machinist Forum

Help Support Home Model Engine Machinist Forum:

This site may earn a commission from merchant affiliate links, including eBay, Amazon, and others.
zeeprogrammer said:
So I looked at the assembly drawing for the piston and rod. Yep...there's the grooves. (And an outer dimension of 0.563...even bigger than the drawing for the piston by itself!! Ha!)
Well, there ya go, they included .003" ridges left by machining the grooves last. :D
 
Vernon said:
I'm glad I'm not the only one with that song in my head. ;D

Been stuck there ever since some bugger first mentioned roofs.
 
Machinist jacks are indeed handy little things. They needn't be anything fancy. When your parent stock scraps (mentioned above) get really short, face them and drill through and tap for some convenient size screw* and, voila, little jacks.

For such support tasks, adjustable parallels are also very handy. They shouldn't be used to support really heavy loads but, for the sort of stuff we do, they work just fine.

--
* With self-made tooling, it's a good idea to settle on two or three sizes of screws and use those wherever possible in the stuff you make to increase the chances of fortuitous serendipity. Having two bits you never considered connecting screw together neatly when the need arises is a real spirit lifter. Plus, if you have guests in your shop when it happens, you can say you planned that out years ago and they'll think you're some kind of prescient genius.
 
Piston.

That went surprisingly well and quickly in my little world.
And I just now realized...I only made it once!

IMG_4469.jpg


I just kept sanding and cleaning until it fit into the cylinder easily enough. But boy do you need to be careful. Brass sands pretty easily and you can make it too small real quick.

Drilled for 5-40 thread, then drilled halfway through at .125. Then tapped it the 5-40.

I also remembered to file a radius after parting down enough to get at it.

Having said that...the fit is a little 'rough'. I don't know what that means...but I probably needed to do a better job of cleaning out and sanding the cylinder bore.

I need to get a better countersink too. The one I use has bounced around my tool box for some 30 years. I did it by hand and you can see the chatter.

Still...pretty satisfied with today.
Would have been perfect had I some M&Ms. Wait...I think I do!
 
Well, you sure got a lot done Zee, and the assembled bits looks extra good, aliquot or not. You really are getting close. It's so exciting, even without M&M's!

These instructions are just too bad, though. Not only the parts that have the builder making scrap, but the writer leads the builder into unsafe situations. Good thing you have a head on your shoulders.
 
Thanks Marv.
Thanks Dean.

Well...the instructions are not conducive to a successful build. While better than nothing...I suspect most newbies trying to do this would give up. I'm not saying I'm any better than them (I'm not immune to questioning this hobby myself) but this is my chance to fulfill a number of 50 year old dreams. (And I seem to be developing another hobby of making people cringe ;D ).

Anyway...I'm trying to make the valve stem. Instructions have you set it in the lathe and sticking out by about 1.5". Then you turn it down to 0.095. Well most of you know what this means....the deflection is so very obvious. Following the instructions will give you an unusable valve stem...and therefore no chance of a running engine.

If you want to build this engine (and the one before it) using only the instructions...you're wasting your money. Again...I'm so very glad to have this forum and to have met these wonderful people.

I might be able to salvage this piece with a file and sandpaper (although the diameter at the headstock end is a bit small now). But there are two more rods to make using similar methods.

Well I'm not. I think a live center is in order here...and a bit longer length of material so I can have a sacrificial end at the center and not worry about having my brains eaten (by a half-dead...zombie...center). ;D

Today has been mostly frustration...it didn't help that I had to replace the faucet in the bathroom and this old body just can't bend like that anymore...however good it might look.

I made the piston rod earlier today. No pics. Not a proud moment. The milling of the piston rod guide haunted me most of the day...because of the bulges. Two lessons here...one was that it takes time...don't rush it...it was a lot of handwork filing and sanding...but it did turn out good...unfortunately I hadn't learned lesson two yet...take care of the first problem and the second problem is easier to solve. So the piston rod looks kind of ugly. What I mean is that I was going back and forth between the piston rod and the piston rod guide...filing and sanding trying to make them fit. I should've concentrated on the piston rod guide first.

P.S. Be careful up on that roof...I didn't build it to code...the instructions I had...well...

Good weekend though! Wife is home. Saw my granddaughter after two weeks of loneliness, great stuff on the forum, good time with a good friend....and the faucet didn't leak. Nice. :big:
 
Making the valve stem...

Whenever you need to turn a thin piece like this and can't conveniently support the free end with the TS, consider turning it in sections. Chuck it with, say, 3/8" sticking out of the collet, turn that down to 0.070. Now pull a bit more out of the collet, say, 1/2". Turn down to 0.095. Repeat in ~ 1/2" sections until you have the full length turned. Thread for the valve nut with a die immediately after the section to be threaded has been turned to size. Any minor irregularities at the turning junctions are soon dealt with using fine emery or a fine cut jeweler's file.

Now, if you turned the part from 3/16" square stock held in a square collet, all you need to do is part off, face and drill the cross hole in the square section.

The piston rod is best made as a piece of 1/8" rod soldered/Loctited into a separately milled guide. Time for an all caps generalization...

WHENEVER A PART CALLS FOR A LONG, SMALL DIAMETER SECTION OF ALIQUOT DIAMETER, INSTEAD OF TURNING, THINK OF FABRICATING.

I contend that it's not possible to write good instructions for building a model engine.

If you presume some level of machining skill in the builder, you exclude all the newbies who haven't reached that level yet.

If you attempt to describe every operation in sufficient detail to include the newbies, you'll bore the more skilled to death. Plus, given the range of tooling the newbie may or may not have and the multitude of ways a given operation may be accomplished, the resulting comprehensive instructions would require a forklift for delivery.

Good instructions, like good taxes and good wars, is a figment of the imagination of someone who has never actually dealt with the subject.
 
zeeprogrammer said:
Anyway...I'm trying to make the valve stem. Instructions have you set it in the lathe and sticking out by about 1.5". Then you turn it down to 0.095.

There is a pretty well known way to do this, if you start with a piece of stock that is large enough. I'm sure the ding bat material supplier sent you something ridiculous to use for it, like 1/8" rod, though.
If you need to make a small diameter shaft, start with a much larger diameter piece, and let the piece itself become it's own work holder.

For instance, if you want that .095" piece, say 1.5" long, start with stock that will normally be safe for turning at that length. For 1.5" of length sticking out of the chuck, you need it to be no less than 1/2" diameter, and larger would be better. Then you can cut short steps down to the diameter you need, and the parent stock, (that word, again) provides support as you actually cut it away.
Cut the first bit on the end for a length of about 3/8", in this example, and down to your finished diameter, and note your dial setting. Then continue to cut short bits until you have your piece finished.

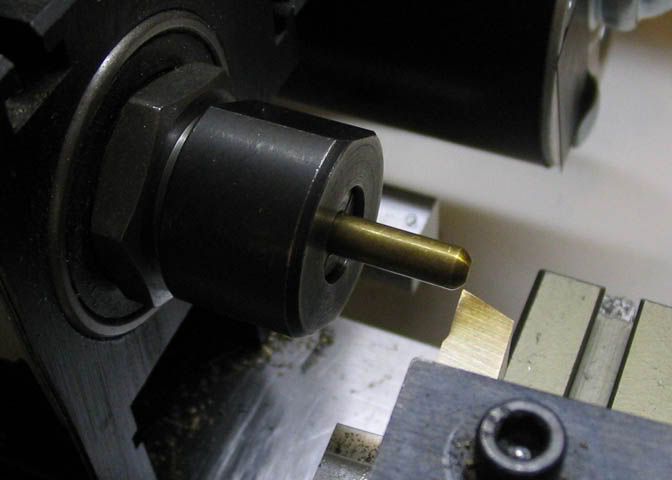
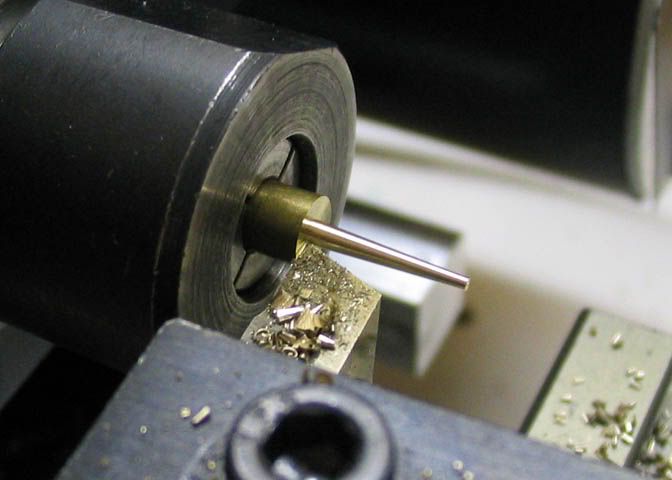
Following is a sequence I did for a fellow who needed to know how to turn tiny cannon barrels for a ship model. He was having trouble with tiny stock bending. It shows cutting a taper, but works the same for cutting straight shafting.

t1.jpg


The piece starts out as 3/16 round stock.


t2.jpg


First cut was just to get the right taper. This step not needed in your case.


t3.jpg


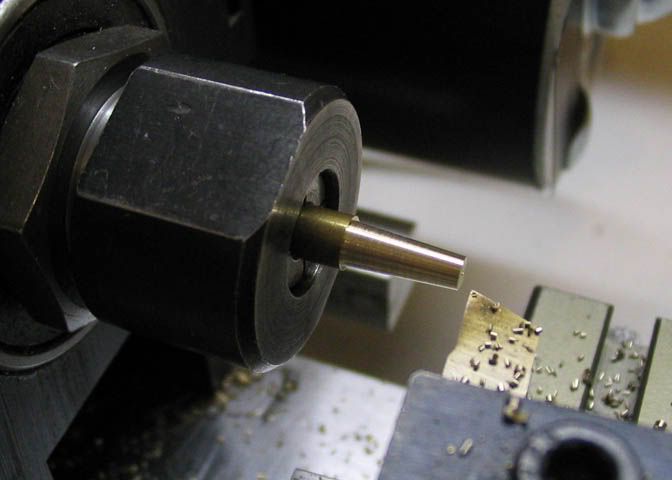
Start of cut, and check end diameter.


t4.jpg


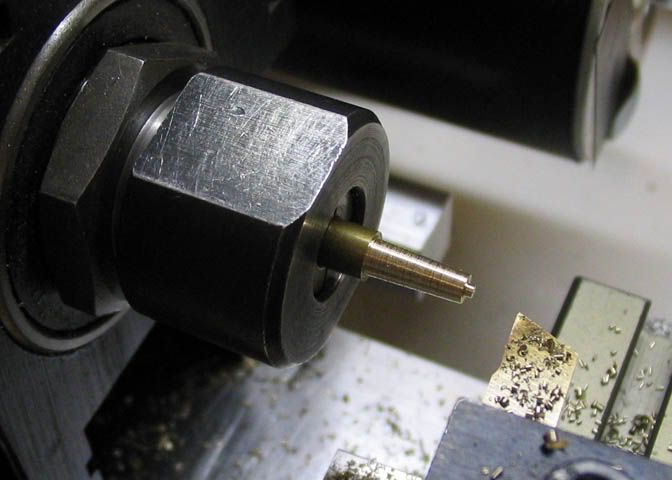
Keep going. Just stopped here to take the pic.


t5.jpg


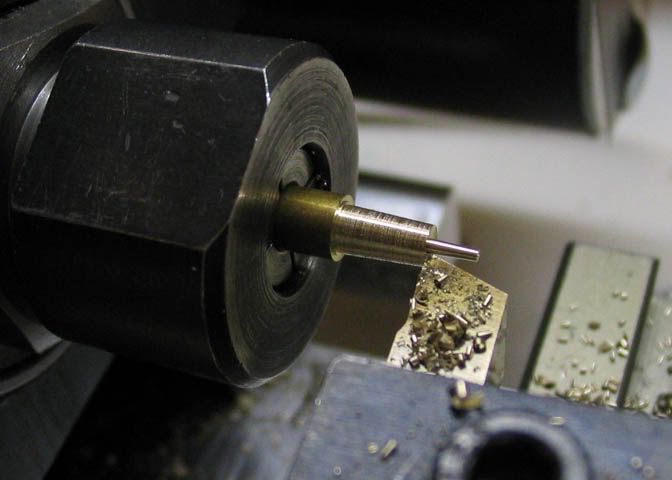
Finished. All one cut from one end to the other. The small end is .030", the larger is .050". The work piece is effectively it's own work holder.
For a larger piece than shown in the pictures, you cut a bunch of steps, each one ending up at the finished diameter. You have to keep a sharp eye on your cross feed dial!

This method will work for any practical length you need, but the longer the piece is, the larger the diameter of the parent metal has to be.
You might not need this right now, but it's a way of doing things that might come in handy.

If you want to the piece you are talking about with a center, make sure it is all the way dead. You do not want a half dead center in your shop!

Kidding aside, I really would use a dead center for this as a good option. With it, and light cuts, you can make a pretty darn straight shaft. Just get your tool good and sharp so it shaves the material nice, (doesn't grab, and cause the work to ride up over it).

If you have a live center that is not so big on the bearing end that it interferes with your work, it will work, too. Live centers are not as accurate as dead centers, generally. That may not matter for this piece.

Glad you had a good weekend. You're headed in the right direction to becoming a good hand at this machinist stuff. You're not dumb, and you have a good attitude. Good attributes for guys in this hobby.

Dean

 
I see Marv was going at a similar direction while I was typing. There's another way for you, Zee.
 
Thanks Marv and Dean. Funny that...I was thinking along those lines...was wondering why it wouldn't work. Even better was Dean's photos showing how. My first thought was doing it in steps...but I can see the advantage of the taper...keeping as much strength as possible until the last moment.

mklotz said:
I contend that it's not possible to write good instructions for building a model engine.
I contend that that is garbage. ;D It depends on the assumptions provided in the instructions and the engine.

mklotz said:
If you presume some level of machining skill in the builder, you exclude all the newbies who haven't reached that level yet.
Absolutely true...comes back to assumptions provided in the instructions. These kits SAID they were for the person who was new to machining. Assumption is..."I know nothing...teach me".

mklotz said:
If you attempt to describe every operation in sufficient detail to include the newbies, you'll bore the more skilled to death. Plus, given the range of tooling the newbie may or may not have and the multitude of ways a given operation may be accomplished, the resulting comprehensive instructions would require a forklift for delivery.
Assumption provided was that this is a kit for newbies...hence the more skilled SHOULD be bored to death. As for tooling...this goes back to an earlier complaint...a kit of this sort should include a section on 'tools needed to complete this kit'.

mklotz said:
Good instructions, like good taxes and good wars, is a figment of the imagination of someone who has never actually dealt with the subject.
True again. But if you HAVE dealt with the subject and purport to know the subject and intend to teach the subject...then it can/should be good. If you intend to advertise as such and sell the material...then it darn well better be good.

Let's remember that this is the 2nd in a series of kits that (as they said) is intended for the newbie with little if any experience. I bought it with that assumption and with the assumption that they would help me successfully build an engine. Did they false advertise or lie (is there a difference)? Or is it just a case of someone forgetting what they didn't know. Most likely it's a case of someone wanting to make a buck and either not knowing how to put together such a type of kit or not interested enough in putting in the quality. It irks me even more that it's been out a for a few years and they haven't even corrected the simplest of errors.

I think a good instruction manual for building an engine can be done. Absolutely. But I think this is a poor engine choice as a second in a series for 'no-nothings' like me.

This is the kind of thing that gets newbies to buy into a hobby, get disappointed, and give up. If you (the kit) say you can teach me...then teach me.

I feel I have every right to complain about this kit. It is not as advertised. And if anyone thinks of saying "I should have known better"...then I'll remind them that no one knows better when they're taking their first step onto a road never traveled by them.

Violent agreement?

Rats...I didn't listen to my own advice...my rooftop just gave way....

 
Carl,

I have to agree with you here. While I am not totally new to machining I am a relatively inexperienced metal monkey. If the vendor is going to advertise a product to a specific market, in this case new machinist wannabees, then the documentation should be relatively comprehensive and the materials cut in such a way to aide the new(ish) wannabee along the road to success.

Now help me up off this workbench. And tell Dean to move his elbow....
 
mklotz said:
If you attempt to describe every operation in sufficient detail to include the newbies, you'll bore the more skilled to death. Plus, given the range of tooling the newbie may or may not have and the multitude of ways a given operation may be accomplished, the resulting comprehensive instructions would require a forklift for delivery.

Well, I disagree with this, Marv. Too many instructions never hurt, if they are relevant. What seems like too much detail to me, or you, will not hinder us. We can just skip the boring or redundant (to us) parts and go on to the prints. That doesn't work in reverse. Nothing can be gleaned from what is not there. If tools need to be made that will only used for the particular project at hand, like a jig, or special cutter, they should be described too.


zeeprogrammer said:
My first thought was doing it in steps...but I can see the advantage of the taper...keeping as much strength as possible until the last moment.

Zee, I didn't mean for you to use the taper. These pictures just happened to be made when explaining to someone wanting to do a similar operation that also needed a taper. If your shaft needs to be straight, forget the taper part, but use the same method. It is actually more rigid without the taper, having the full support of the parent diameter.


twmaster said:
Now help me up off this workbench. And tell Dean to move his elbow....

A 747 moment for me, Mike. This went right over my head.
Whoosh..

Dean


Deanofid said:
A 747 moment for me, Mike. This went right over my head.
Whoosh..

Sheesh.. You guys forget stuff real quick like. I thought we were all up on Carl's roof. It collapsed. Now get yer elbow outta my ribs! :)
 
Sorry Mike. Didn't even know about it. I must have died in the fall.
 
Thanks Dean. Yeah...I had reread your post late last night and realized that. And thanks again for the tips.


I hope no one got hurt. I landed on my rear...so I'm okay.
 
Zee,

I think we're going to have to agree to disagree on this one. That's fine with me. We agree on the essentials - that writing good instructions is very difficult - and differ only on the level of difficulty - I think it's impossible and you think it can be done, albeit with a goodly investment of time and effort.

What is clear is that the instructions you have fall into the "destroy before reading" security classification that was so popular when I was working.

Thinking a bit more about your valve rod...

You can't use a center, zombie or otherwise, on a 0.070 shaft (maybe the watchmakers could) but you can still use it to provide some support while turning the 0.093 section. Before starting on the valve rod, stick a short length of brass in your TS drill chuck and, using the headstock, drill it with a #50 drill to a depth of 0.5. Now turn your 0.070 section on the valve rod. Polish it down until it's a running fit in the hole in your bit of scrap in the TS chuck (which is aligned with the spindle axis because of the way it was drilled).

Now lather up the 0.070 shaft with some good oil, stick it in the hole, and voila, TS support for your rod as you turn the rest of the shaft.
 
I just want to throw my 2 cents in here. I am enjoying this thread immensely. Not only for the good-natured banter, which is nice, but also because of the methods and hints all are throwing out there. I am not making this particular engine, but I am working on another one which has enough similarities for this topic to be germaine.

Keep it up guys!
 
mklotz said:
Before starting on the valve rod, stick a short length of brass in your TS drill chuck and, using the headstock, drill it with a #50 drill to a depth of 0.5. Now turn your 0.070 section on the valve rod. Polish it down until it's a running fit in the hole in your bit of scrap in the TS chuck (which is aligned with the spindle axis because of the way it was drilled).

Now lather up the 0.070 shaft with some good oil, stick it in the hole, and voila, TS support for your rod as you turn the rest of the shaft.

That is a great tip Marv. Thanks. It also points out (again) how, when you come up against a tree, one should step back and look around. There's usually another one you can make for.


Thanks rleete. Very much appreciated. It's a lot of fun.
 
I'm glad you liked it. It's not a trick you'll use often but it has its moments.

You may need to grind a skinny tool to get into the rather restricted working area that will be available.

There's usually another one you can make for.

Hunh? Methinks you've been around the Pennsylvania Dutch too much. Next thing you know you'll be using expressions like, "Come ahead back."

Before anyone gets his hackles up let me say that I'm a recovering Pennsylvania Dutchman.
It took years to get rid of the accent and the grammar butchery but it was worth it. After nearly 50 years on the left coast, I've gotten to the point that virtually no one can detect my origins from my speech or writing.

 
Back
Top