Horizontal Mill Engine From Kit

Home Model Engine Machinist Forum

Help Support Home Model Engine Machinist Forum:

This site may earn a commission from merchant affiliate links, including eBay, Amazon, and others.
Zee

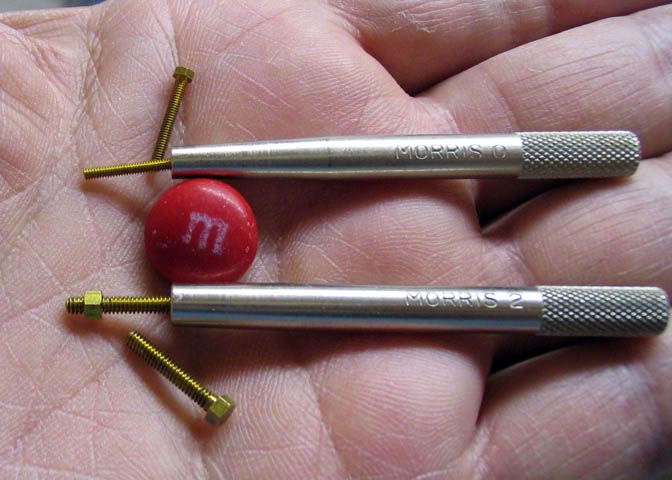
Looking good! You can get socket drivers for very small hex heads from Micro fasteners for $4.50.

Keep it up, you're almost done! Some feller will have to send you a beer to go with that bottle cap :big:

Cheers, Joe
 
Zee, that's really looking fantastic! It's like you're a machinist or something, man..

You can get little finger wrenches at a hobby shop, (the kind that sells RC planes & cars). They're a few bucks apiece and looks like this:

tinywrench1.jpg


Keep going at it. You'll have another runner soon, the way it's coming along now.

Dean
 
Zee
That little rascal is looking good. I hadn't realized just how small you were working, but you certainly win kudos for the challenge. Check out www.micromark.com . They specialize in miniature tools. You'll find several types of wrenches for small hardware. I've got finger wrenches, driver type and even spanner style which are all used often, depending on a given need. Handy, they are..... yes.

Steve

 
BAH101 said:
I saw an article somewhere, and the author used the head of a socket head capscrew. He welded or silver soldered it to a bar and then ground off the threaded portion macking a small wrench. Looked like a great idea for those little hex bolts.
Bryan

I've made miniature socket wrenches this way. There's no need to weld or silver solder for these small sizes. Simply drill and tap the handle to match the bolt and secure the bolt with Loctite.

Wiha are the Cadillac of miniature nut drivers...

http://www.smallparts.com/Wiha-Pico...&pf_rd_i=0&pf_rd_p=467590031&pf_rd_s=center-3

but they're pricey. Moody makes a less expensive set that I can recommend from personal use...

http://www.smallparts.com/Moody-Acu...&pf_rd_i=0&pf_rd_p=467590031&pf_rd_s=center-3

 
mklotz said:
Wiha are the Cadillac of miniature nut drivers...

Wiha are very nice tools. Their screwdrivers are all I use in my repair work. You only have to buy them once...

Dean
 
Thanks Rob, CC, Bryan, Joe, Steve (Yoda?), and Marv.
Vernon...that 'a' was Joe's typo...not yours ;D.

Dean! Two in one post..."like you're a machinist or something" and an M&M!

Well I may be 'something' but the M&M was low. Low I say. What's the problem? Can't find a tan M&M? :big:

In the meantime...the kit provides a hunk of 1" round by 1.38" long steel to make the cylinder guide. I have to turn it down over a length of 1.13. That leaves 0.25 to hold onto. Are you kidding? I'm tired of the crumbs of metal that you can barely hold onto. I have more metal (and it's going to be 12L14 and not the 1018 that comes with kit)..but the bandsaw blade has now broken...so I must order new.
 
Carl...

I think I've got a bar of 1144 Stress proof in 1" diameter. This stuff cuts like butter also. Want me to hack off a suitable size piece and drop it in the mail? I'm just two hours down the road from you....
 
zeeprogrammer said:
..but the bandsaw blade has now broken...so I must order new.

C'mon, Zee. Two words; hack saw.
Okay, that's only one word, but use a hacksaw!

You can still cut that little piece, (but a pox on the people who sold you this kit of scrap parts!)

Put it in the three jaw, face it, and center drill one end. Use a block to set it out in the chuck far enough to take the cut you need. (Take the block out before you start the lathe) Or, if you have a spider, use that. Put a center in the tail stock, run the ram out, and use it to steady the end of the piece while you cut. Close quarters working that way, but sometimes you have to work close. Keep the tool out of the chuck jaws..

What's wrong with red M&M's?

Dean

 
BAH101 said:
I saw an article somewhere, and the author used the head of a socket head capscrew. He welded or silver soldered it to a bar and then ground off the threaded portion macking a small wrench. Looked like a great idea for those little hex bolts.
Bryan

Might have been one of mine? I had a short article on making these published in MEW, about issue 60 from memory.
 
I appreciate the offer Mike but I have the metal. It was poor wording on my part when I said I must 'order new'...I meant bandsaw blades.

Dean...nothing wrong with red...but people with discerning taste know that the tan ones are better by far. ;D

Yeah I'm thinking of hacksaw...actually did that to get the little hunk for the cylinder cover I just did. As for the short chunk...I'm going to set it aside and save it for something else. (Maybe for that door that keeps swinging closed ;D). Holding onto .2" and turning down from 1" to 0.44 doesn't appeal to me. I'd rather use the 12L14 I have anyway.

Tel...if it talked about silver soldering then it probably was yours. ;D Yeah the idea was suggested to me but none of my socket head capscrews fit the bolt.

Thanks all.
 
Pedantic note... What you're calling the "cylinder guide" is usually called the crosshead. Its function is to resist the side forces on the piston rod due to the oscillations of the connecting rod. This minimizes the wear on the seal where the piston rod enters the cylinder. Put more simply ... we want the piston rod moving in a straight line despite that connecting rod that's flailing about.

If you had a longer piece of 1" stock, would you be any better off? Is the spindle bore on your lathe larger than 1"? I'm with Dean - you need the practice with supporting work with the tailstock - for those times when you have no choice and must do it.
 
Thats really looking nice when put together Zee :bow:

And like Dean & Marv said ;)

Regards, Arnold
 
Hi Carl I was looking at your post as follows.
In the meantime...the kit provides a hunk of 1" round by 1.38" long steel to make the cylinder guide. I have to turn it down over a length of 1.13. That leaves 0.25 to hold onto. Are you kidding? I'm tired of the crumbs of metal that you can barely hold onto.
Here is a tip that might help. The key to this is being able to make a center hole on one end. Face cut just enough to clean and c-drill. Turn the piece around in the chuck and cut a 1/8 step by about a .625 diameter. Hold the .625 diameter in your 3 jaw chuck close the jaws and press it with your tail stock center. When finished turning the OD put it in the chuck and face off the extra length of stock. I hope this helps. Jack
 
Marv, I had it wrong anyway. The drawing calls it a 'piston rod guide'. Thanks also for explaining the function of the 'crosshead'.

As for the part...it's worse than I'd said. The 0.25 available for holding onto is closer to 0.1. I'm supposed to clean up some of the outer diameter in order to indicate on it in a later step.

Thanks Arnold. And thanks Dean, Jack, and Marv for the ideas.

In the meantime, I did use a hacksaw and got a longer chunk of 12L14. Sorry for the lack of pics.

After turning the smaller OD I drilled and reamed a 1/8 hole for about 1.25". (More about that later.) I followed this with drilling and reaming a larger hole behind it for 1". The instructions talked about using a boring bar between drilling and reaming the larger hole but I have no boring bar small enough to fit. [...this spot reserved for suggested D-reamers and/or home made boring bars...].

After cleaning up the end I flipped the part in the 3-jaw (using some aluminum strip to grip onto) and indicated off the larger turned end to see if things were still true. The instructions had you go to a 4-jaw but I wanted to see if that was necessary.

I was lucky...the indicator barely moved so I went ahead and trimmed up, faced, and carved the pilot.

Next step is the mill to square the flange and drill the mounting holes...then the windows.

The instructions called for using the Spin Index. But whether Spin Index or collet block, it's a no go. The drawing called for a .44 OD...now had it said, or had I more experience, I might have realized this was .4375 and my collet would fit. So it's going to be V-blocks and light cuts to ensure the part doesn't twist on me.

Now...back to the 1/8 hole. Am I wrong to think that that hole should have been done from the other end? After I flipped the part? It just seems chancy that it would remain concentric after drilling for 1.25.
 
Well, "piston rod guide" is at least descriptive of the function (which crosshead isn't) so I won't fault them on that one.

Your instincts on the 1/8" hole were spot on. While a pilot hole for the larger hole is ok, the 1/8" hole should have been drilled while holding on to the turned down diameter into which the slots are cut. You want the 1/8" hole parallel and coaxial with the larger hole through the guide.

As to holding it and indexing it to cut the square mount... Please don't tell me you've already cut the part from the parent stock. If it were still attached to the parent, which is presumably of aliquot size, you could simply hold the parent in a collet in the Spindex.
 
Thanks Marv.

mklotz said:
Please don't tell me you've already cut the part from the parent stock. If it were still attached to the parent, which is presumably of aliquot size, you could simply hold the parent in a collet in the Spindex.

Well of course I did. ;D

However, had I squared off the bigger end first, then there would have been no outer OD to indicate on and ensure the pilot was concentric. At which point, someone (maybe even you Marv ;D) would have pointed out that the pilot needed to be turned before moving to the mill. (And we haven't talked about the 4 mounting holes.)

Ah well...for me the big lesson here was seeing that the smaller diameter was going into a collet. (I knew it was going into the Spin Index but I haven't built up the forethought to realize that meant a collet). I should have checked that before taking the part out of the lathe.

I am starting to build a healthy fear of parent stock separation. :big:
 
I am starting to build a healthy fear of parent stock separation.

Be afraid. Be very afraid. :)

I've said it before but it bears repeating. Before you make the first cut on any part, you should have fixed (on paper or in your mind) exactly how every step in the machining of the part will be carried out - workholding, alignments, cutting tool, etc.. Part of that machining sequence will include when and how to separate from the parent.
 
Oh HEAR HEAR HEAR HEAR HEAR!!!! cut from the stock only at the last possible moment, even if the 'parent stock' is just an over length (for the part) piece of material cut from the 'grandparent stock'. The other thing, Zee, is in regard to your collet size woes - even if the trunk diameter had been spec'ed at the 0.44" od, turning it down to fit the nearest available collet (in your case 0.4375") is just plain common sense, and becomes almost automatic after a while.

That said, these off-size specs are a really annoying facet of the modern form of our art, fuelled by the 'automatic' dimensioning of parts in CAD drawings, and the seeming inability of a lot of plan makers to reset the parameters from the (default?) two decimal place resolution to 3 or even 4 decimal places. When. f'rinstance, I'm looking at a plan that calls for a diameter (or length) to be 3/8" then I want to see 0.375 written there, not .38" as is becoming more and more prevalent. PLAN MAKERS PLEASE NOTE!!!!
 
Oh HEAR HEAR HEAR HEAR HEAR!!!! cut from the stock only at the last possible moment, even if the 'parent stock' is just an over length (for the part) piece of material cut from the 'grandparent stock'.

I'm pleased to see that I'm not the only old fart preaching this bit of acquired wisdom. Good onya, Tel. Shout it from the rooftops.
 

Latest posts

Back
Top