Horizontal Mill Engine From Kit

Home Model Engine Machinist Forum

Help Support Home Model Engine Machinist Forum:

This site may earn a commission from merchant affiliate links, including eBay, Amazon, and others.
Zee, Well done Thm:

Hope the fairy cured you of the rocking ailment :big: - did you find out where the little monster got piano wire from :big: :big:

And don't be too critical on the fairy; there are many more positives than negatives to it; after all, your Rockeritus seems to be cured (for now ;D)

Kind regards, Arnold
 
Congratulations Zee ;D :D ;D

Now you can spend a bit of time on the day job ::)

so ..................... what's next
whistle.gif


CC ;)
 
Congrats, Zeep! I'm glad to see all of your ( shop elves', rocker fairies', whichever ) hard work paying off.

I'll echo CrewCab's question, which loco project is next? ;D
 
I'm with them, what's next Zee.
By the way, how long is the cylinder on that engine, my plans are a bit bland.
I have 1.020 but that sounds odd.
They dont directly have the length, you have to do a little math to get the total
-B-
 
Tony, Robert, Arnold, CC, Vernon, and -B-....thanks very much.

Arnold...the crumb took one of my old 1/16 drill bits and snapped off a piece in a vise for the pin. I found the remains on my desk!

What's next you all ask? Why I'm still working on the 'Horizontal Mill Engine From Kit'!

I was just reporting the interruptions from that crumb. ;D

-B-...the overall length of the part on the drawing is 1.02". The crumb made it a little longer so he could add the 'rings' on the tail. The actual length of the 'cylinder' is 0.4". (And thanks for reminding Marv that I subtracted 0.4 from 0.87 and got 0.37! :big:).

 
Thanks Zee
I have all the materials and going to start on it tomorrow to cure the "rockeritis".
I have hit a design issue on my build and need a break from it.
The last thing I built to get a break, broke my lathe.
I will get to use it on the rocker since I have no square stock. (it makes me feel better to use it since it broke my lathe, maybe it will pay for itself)
sorry it is a stainless fly cutter if you havent gathered that.
-B-
 
While waiting for some goodies to arrive...I thought I could do the base...

This will be my first go at flycutting (other than the trial after I trammed the mill).
Naturally, I must include a boo-boo...er lesson.

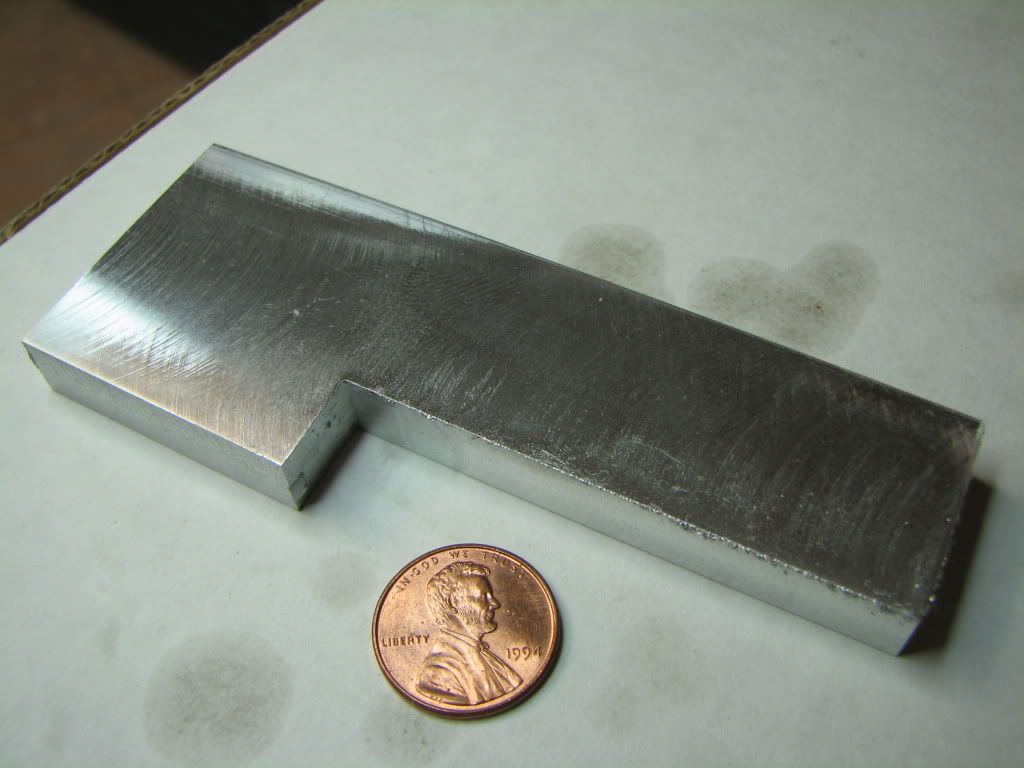
1: I milled the edges.
2: Milled the notch.
3: Flycut.
4: Drilled and counterbored the holes.

I suspect the order of operations is wrong. In particular, drilling the holes was hampered by having the notch. I should have drilled, then flycut, then notched. If that is still wrong...please feel free to throw a tomato (or two...or three...).

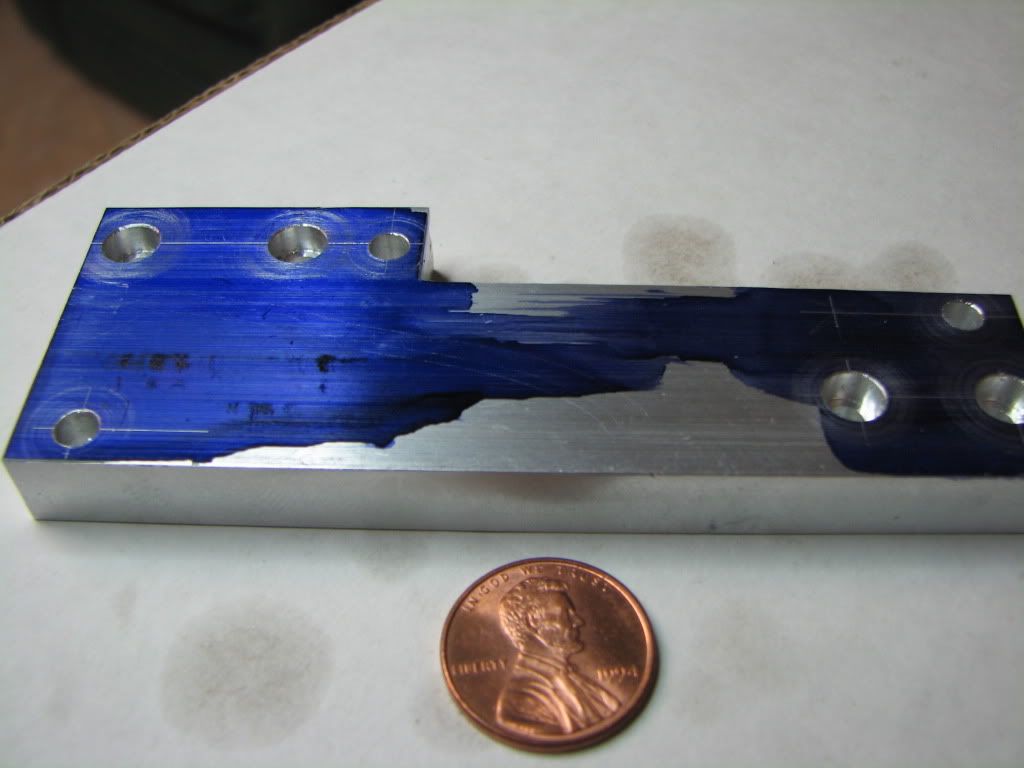
Here it is after flycutting. At first I was worried because the cutter was cutting on only one side. But then I noticed that the whole part was not being cut because it wasn't yet perfectly flat. This is after the 2nd pass and I think I'm happy with the tram.

IMG_4366.jpg


Here it is after drilling. 4 of the holes are counterbored. (Thanks Marv for the reference to the Enco counterbores.) I used layout dye and eye-balled with the center drill.

IMG_4367.jpg


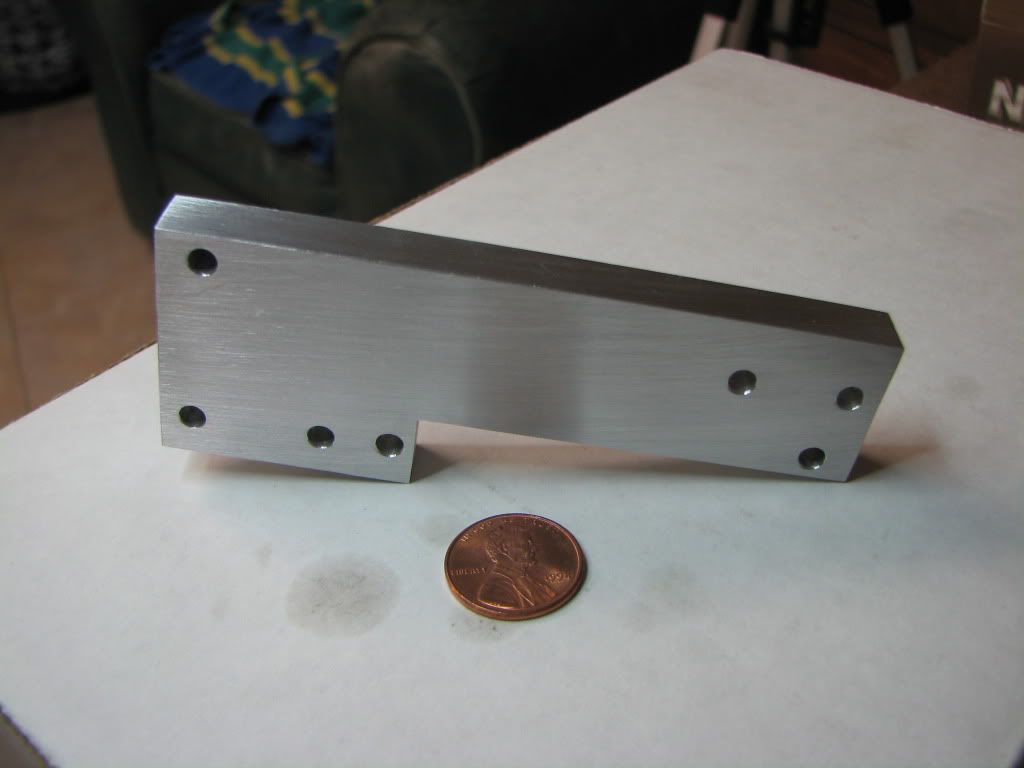
Here is is after sanding. I get somewhat impatient with sanding so it could have been better. On the other hand...I can't help but play with it so it's going to get dinged anyway. I have some polishing wheels for a drill and will try that later.

IMG_4369.jpg


Overall...I'm pretty happy. Looking forward to the next 'lesson'.
 
Excellent. Congrats, Zeep! I'm glad to see more Mill Engine parts, especially when you churn them out as effortlessly as you did this one. You'll be running this engine and building a locomotive before you know it. ;D
 
Well done Zee. Sometimes a "brushed" finish has advantages, and can look good on a finished engine, so leaving it with the brushed finish is an option as well.

Kind regards, Arnold
 
Thanks Vernon...but I wouldn't say effortlessly (as you're about to see). Yep...a locomotive is certainly in my future (unless wife gets tired of washing my pants) :big:

Thanks Arnold. Good tip. I haven't looked yet. but would anyone suggest a way to get an even brushed finish?

Thanks kvom. Yes it matters. As I mentioned, I should have flycut first, but the additional reason to minimize interrupted cut is good.

And now...

Poop.
And we all know what that means.

Sorry for the lack of pics...I guess I was optimistic.
I was working on the column.

Flycut both sides, then milled the edges to square the thing up.

Then drilled the hole for the bearing.
My mill is too short (or the reamer is too long) to ream so I first drilled one size under and then drilled to size. The bearing fits very well. Happy.

Then drilled the hole for the tilting slide.
Again, drilled one size under and then drilled to size. The tilting slide fits very well. Happy.

Then drilled and tapped the 5-40 hole for the infamous and evil crank handle. Happy again.

Now for the two 6-32 mounting holes in the bottom.
Drilled the first one...happy.
Drilled the second one...uh..no, didn't...part way through snap. I have a bad habit of going to fast too hard.

It's late so I'm stopping but I think it's salvageable. I can move the hole over (and on the base) and make another.

Overall balance is on my side..mainly because of the success with the bearing and tilting slide holes...(not to mention the finishes on the column)...so I'm going to bed happy.

Yep. The poop didn't stick.
 
Darn. At least it's repairable. Sounds like everything else went well.

zeeprogrammer said:
Yep...a locomotive is certainly in my future (unless wife gets tired of washing my pants) :big:

Building an elevated track will help you avoid those grass-stained knees. ;D
 
Hey Zee,
The only way I han think of for an even finish is sand blasting.
Use glass bead for a light matte, white playground sand for a little more texture.
I use both all the time, use a respirator on the white sand its very bad to breath the dust.
-B-
 
I have used fine grit sandpaper in a random orbit sander on aluminum and brass before. The aluminum looked marvelous this way under lights. The tiny circular marks overlap, and would give the surface a three dimensional depth and sparkle too.


Have to do this on a flat surface and tape it up if you bend it to a shape.
 
Now for the two 6-32 mounting holes in the bottom.
Drilled the first one...happy.
Drilled the second one...uh..no, didn't...part way through snap. I have a bad habit of going to fast too hard.

Time for another one of my all caps dicta for your shop notebook...

YOUR WORKING SPEED SHOULD BE INVERSELY PROPORTIONAL TO THE TIME NEEDED TO REMAKE THE PART.

You've discovered another one on your own... Make the most complex part first so that any errors you make can *perhaps* be accommodated in the part to which it mates. Can't make that one all caps since there are many, many cases where other considerations will override it, e.g., sequencing dictated by a requirement to have holes align.

One of the hardest things for any of us - not just novices - to learn is planning the order in which parts are manufactured. There are a wealth of things to consider and not all of them are strictly mechanical. Your personal psychology plays a strong part in the process.
 
Zee, for an "even brushed" finish: if the part is flat, some coarse (180 grit?) emery paper on a flat surface, with some even strokes in one direction, without turning the part. For aluminium, scotch brite works well. Then there is also "tank turning" - many methods for that. For round pieces, sometimes the "finish" turning is fine for concentric brush effect. For longitudinal effect, some effort is needed, but a lot less than to polish a piece.
I like things very nice and shiny, but have had more comments on brushed finishes than I thought - mostly related to the fact that finger marks and tiny scratches does not show up so easily on the surfaces.

One of the hardest things for any of us - not just novices - to learn is planning the order in which parts are manufactured. There are a wealth of things to consider and not all of them are strictly mechanical. Your personal psychology plays a strong part in the process.
Marv, that is the truth portrayed in vivid living colour!
 
Vernon:..."Quiet you!"

-B-:... Thanks. I've come across a few references to 'sand blasting' on this forum. I'm thinking it's another area to investigate.

Kermit:...Looks like some experimentation is in my future. No surprise there.

Marv:...Thank you. Good reminder for the next poor fellow (in addition to me). Can you imagine? The instructions have the base first and then the more complex part! Well we've had that discussion about these manuals before...but I'll remind the next poor soul..."just cause the instructions say to do it one way doesn't necessarily mean it's the way to do it". (And not being able to help myself... ;D...the same is true when listening to the advice of any teacher.)

Arnold:...Thanks. Like Kermit's suggestion...I need to do some experimentation.

Robert:...Actually, I didn't name it the 'Evil Crank Handle'....to protect the guilty, I won't say who did. Yeah...you had better luck with it than I did.

Wife got home today...so not much time. Over lunch (hee hee) I managed to move the hole and tap it. But I won't modify the base until I finish the column. I need to mill some angles. If successful...then I'll redo the base. If not...well after a good cry...I'll redo the column.

Thanks very much all.
 
Yep. Poop.

While I managed to drill and tap a new hole...I messed up the next operation.
Simple mistake...I mixed up the cut and the dimension. (No no no...not an error in measuring this time...the cut was exactly right...just in the wrong place. :big:)

Although I can probably make the column work...it just doesn't look right.
So it's a do-over. But that's the only down-side.
Too bad too. That was the first time I used the angle blocks to get a 45 degree angle...and it looked good!

Upsides include...
a) I'll make it better.
b) I won't (hopefully) have to drill a new hole in the base.
c) I maintain my ratio of good/bad parts at near 50%.
d) I'll learn more.
e) It builds character.

I can only hope that I keep fooling myself into believing those last two up-sides. :big:

I will say too...I seem to be getting better at using the mill...and enjoying it more as a result.


Latest posts

Back
Top