


Cedge
Well-Known Member
- Joined
- Jul 12, 2007
- Messages
- 1,727
- Reaction score
- 28
For those of you who have been following this thread with such enthusiasm, I've got a bit of sad news. The build is at an end. I know... I'll miss it too, but when the last part is bolted on, the build phase is pretty much at an end. There are two small 2-56 holes left to drill and tap and then all the construction is completed. I'm waiting to take those on until I'm sure a specific adjustment is in the right spot and only a running machine will tell me if it's correctly positioned.
The additions I've made since the last post haven't been large enough to warrant their own postings and the pump is due to have its own short thread, so I decided to concentrate on finishing things up. That required reworking a couple of pieces to add strength and correct a couple of items I didn't like the Duclos solutions for.
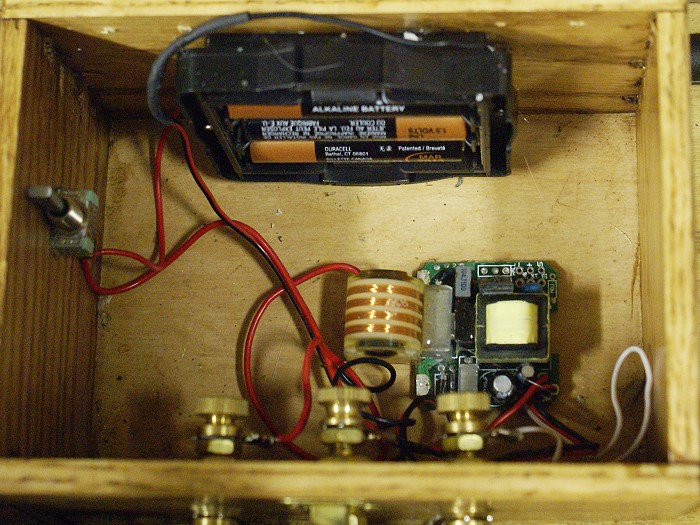
It also required a bit of wiring to incorporate a bit of modern electronics into an old style design. Below is the ignition box for the engine. John Ernhardt kindly contributed the beautifully made Amish made oak box to the project. I almost hated to put holes in it, but the electrons needed a way to get to the little engine and old style brass lug type terminals seemed a good way to let them travel.

Here are the internals of the system. They consist of 3 AA 1.5 volt alkaline batteries, a small on / off switch for them and an ignition module complete with coil from www.cncengines.com . Roy Sholl is the proprietor and I can tell you that he couldn't possibly have been more helpful. He was available for questions and patiently answered each one even when I must have sounded like a total rube. The kit was easy to work with and the instructions were quite clear and left no room for confusion. This little module is one powerful little trick and will throw an amazing spark, as I learned while tracking down a arcing short to ground, caused by me. Even though I've not quite gotten the engine running as of yet, it certainly isn't due to a lack of fire.
The other item that was added since last was the cooling system. Since this is a water cooled engine some method of delivering coolant was required. The original design called for a modified cat food can which was elevated to cylinder level. I didn't think that idea would quite match where I've tried to take this project, so a whole new means of delivery was in order. I went through numerous mental designs before finally deciding to keep the pump dead simple as possible. Out the window went all kinds of ideas for eccentric straps, lever actions and such.
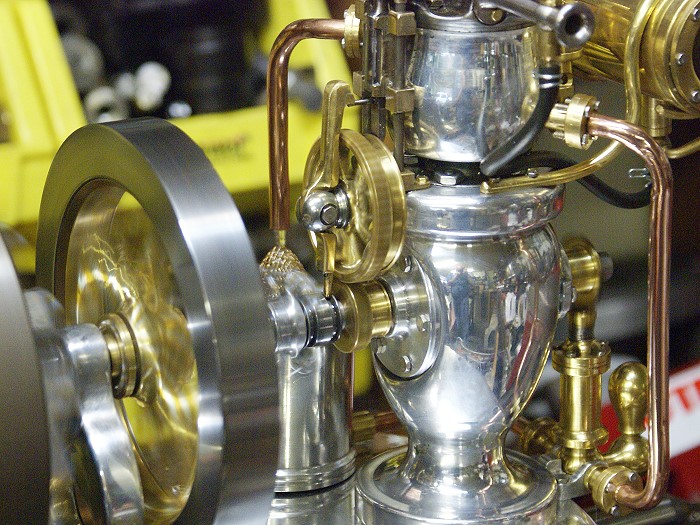
The winning design wound up being a spring loaded pump shaft driven by direct contact with an eccentric. The flow was a wild estimate since the darned thing still had to fit beneath the rear shaft. This space limitation finally lead me to a Hobson's choice of a 3/8 bore 3/8 stroke. You'll notice that this item was held until very late in the project, giving you some idea of how long and how many times the idea was changed, altered re-modified and scrapped resurrected and generally over cogitated. Here is a photo of what I finally did.

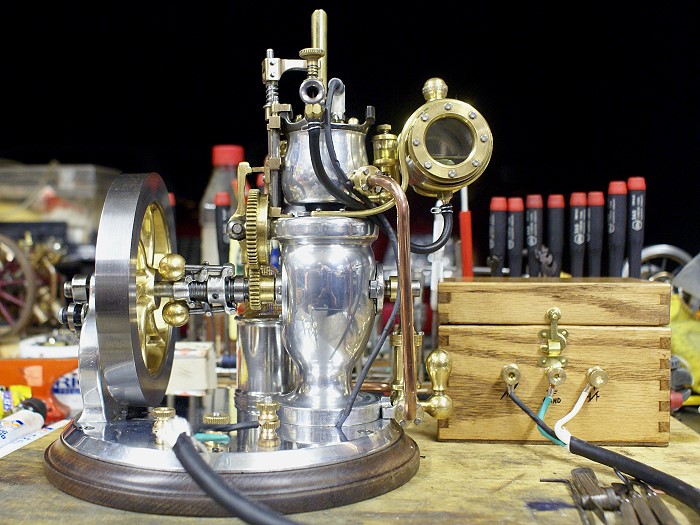
The "balloon" shaped dome is a water hammer column which was added to give the rigid pluming a bit of added protection from vibration. I can't stop the engine from shaking the pipes, but I didn't want the pump adding to it. The flanges are machined fit and required no gaskets although the threads going into the pump and the water jacket are treaded and required a bit of blue loctite to stop a couple of very persistent leaks..... 6 complete plumbing tear downs worth....LOL.
The brass mesh in the small tank serves as a cooling screen where water trickles down the sides and is exposed to ambient air temperatures to cool it. It is then recirculated to the pump. The copper lines were bent and shaped and then threaded with a 1/4- 28. Soft copper is an interesting metal to work with since it is soft and gummy but tends to work harden very quickly when you begin to torture it. What felt like metaling chewing gum can very suddenly become quite brittle and hard to thread.
Here is the result of the first successful test of the cooling system. I say first successful because it took a bit of trial and error to get the right design for the check (clack) valves it required. I even managed to hide them inline using the same designs as I used in the flanged joints. Once valve is locate at the tank base and the other is inside the flange that screws into the water jacket. Look closely and you can see the water flowing onto the screen mesh.
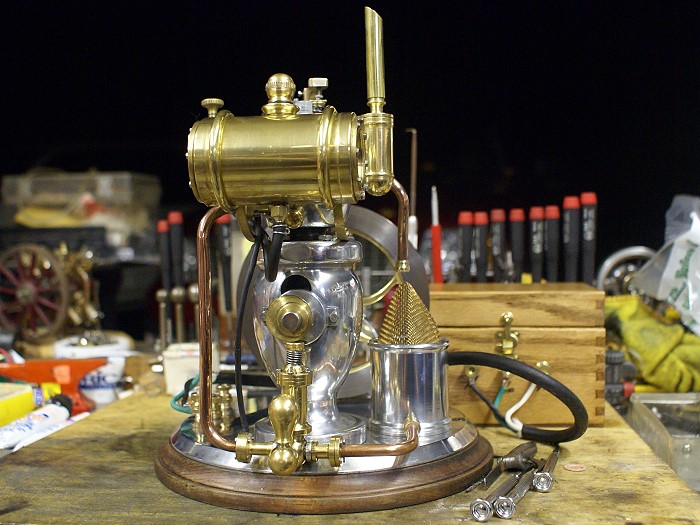
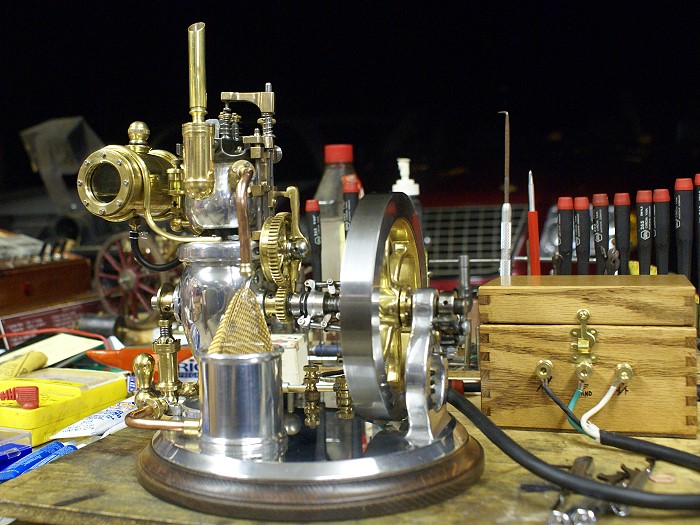
The rest of the photos are of different angles of the engine.
I've already begun the effort to get it dialed in and early indications are that it will eventually run. I've managed to get it to produce a bit of smoke and at one point had it giving me a bit of a popping from the exhaust. I've got to get he timing and fuel mixture sorted out, but I have some local help lined up should it prove to be beyond my kin.
This has been a marvelous project and sharing it has been pure joy. You've all been extremely supportive and the enthusiasm has been gratifying. The next time you see this engine will be in the video section, once it is up and running. Thank you all for taking this trip with me. Without you peering over my shoulder there were a couple of times I might have shelved the project. The fact that you were here kept things moving along, and for that I am very appreciative.
Until the next build....
Steve
The additions I've made since the last post haven't been large enough to warrant their own postings and the pump is due to have its own short thread, so I decided to concentrate on finishing things up. That required reworking a couple of pieces to add strength and correct a couple of items I didn't like the Duclos solutions for.
It also required a bit of wiring to incorporate a bit of modern electronics into an old style design. Below is the ignition box for the engine. John Ernhardt kindly contributed the beautifully made Amish made oak box to the project. I almost hated to put holes in it, but the electrons needed a way to get to the little engine and old style brass lug type terminals seemed a good way to let them travel.
Here are the internals of the system. They consist of 3 AA 1.5 volt alkaline batteries, a small on / off switch for them and an ignition module complete with coil from www.cncengines.com . Roy Sholl is the proprietor and I can tell you that he couldn't possibly have been more helpful. He was available for questions and patiently answered each one even when I must have sounded like a total rube. The kit was easy to work with and the instructions were quite clear and left no room for confusion. This little module is one powerful little trick and will throw an amazing spark, as I learned while tracking down a arcing short to ground, caused by me. Even though I've not quite gotten the engine running as of yet, it certainly isn't due to a lack of fire.
The other item that was added since last was the cooling system. Since this is a water cooled engine some method of delivering coolant was required. The original design called for a modified cat food can which was elevated to cylinder level. I didn't think that idea would quite match where I've tried to take this project, so a whole new means of delivery was in order. I went through numerous mental designs before finally deciding to keep the pump dead simple as possible. Out the window went all kinds of ideas for eccentric straps, lever actions and such.
The winning design wound up being a spring loaded pump shaft driven by direct contact with an eccentric. The flow was a wild estimate since the darned thing still had to fit beneath the rear shaft. This space limitation finally lead me to a Hobson's choice of a 3/8 bore 3/8 stroke. You'll notice that this item was held until very late in the project, giving you some idea of how long and how many times the idea was changed, altered re-modified and scrapped resurrected and generally over cogitated. Here is a photo of what I finally did.
The "balloon" shaped dome is a water hammer column which was added to give the rigid pluming a bit of added protection from vibration. I can't stop the engine from shaking the pipes, but I didn't want the pump adding to it. The flanges are machined fit and required no gaskets although the threads going into the pump and the water jacket are treaded and required a bit of blue loctite to stop a couple of very persistent leaks..... 6 complete plumbing tear downs worth....LOL.
The brass mesh in the small tank serves as a cooling screen where water trickles down the sides and is exposed to ambient air temperatures to cool it. It is then recirculated to the pump. The copper lines were bent and shaped and then threaded with a 1/4- 28. Soft copper is an interesting metal to work with since it is soft and gummy but tends to work harden very quickly when you begin to torture it. What felt like metaling chewing gum can very suddenly become quite brittle and hard to thread.
Here is the result of the first successful test of the cooling system. I say first successful because it took a bit of trial and error to get the right design for the check (clack) valves it required. I even managed to hide them inline using the same designs as I used in the flanged joints. Once valve is locate at the tank base and the other is inside the flange that screws into the water jacket. Look closely and you can see the water flowing onto the screen mesh.
The rest of the photos are of different angles of the engine.
I've already begun the effort to get it dialed in and early indications are that it will eventually run. I've managed to get it to produce a bit of smoke and at one point had it giving me a bit of a popping from the exhaust. I've got to get he timing and fuel mixture sorted out, but I have some local help lined up should it prove to be beyond my kin.
This has been a marvelous project and sharing it has been pure joy. You've all been extremely supportive and the enthusiasm has been gratifying. The next time you see this engine will be in the video section, once it is up and running. Thank you all for taking this trip with me. Without you peering over my shoulder there were a couple of times I might have shelved the project. The fact that you were here kept things moving along, and for that I am very appreciative.
Until the next build....
Steve


![DreamPlan Home Design and Landscaping Software Free for Windows [PC Download]](https://m.media-amazon.com/images/I/51kvZH2dVLL._SL500_.jpg)


