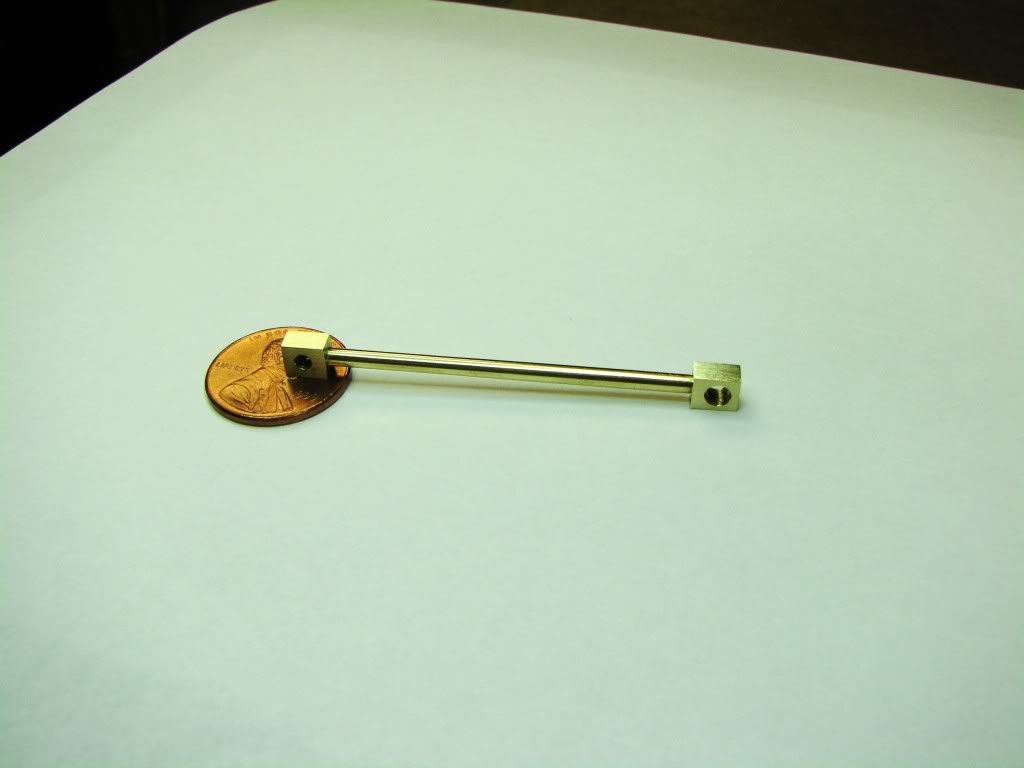
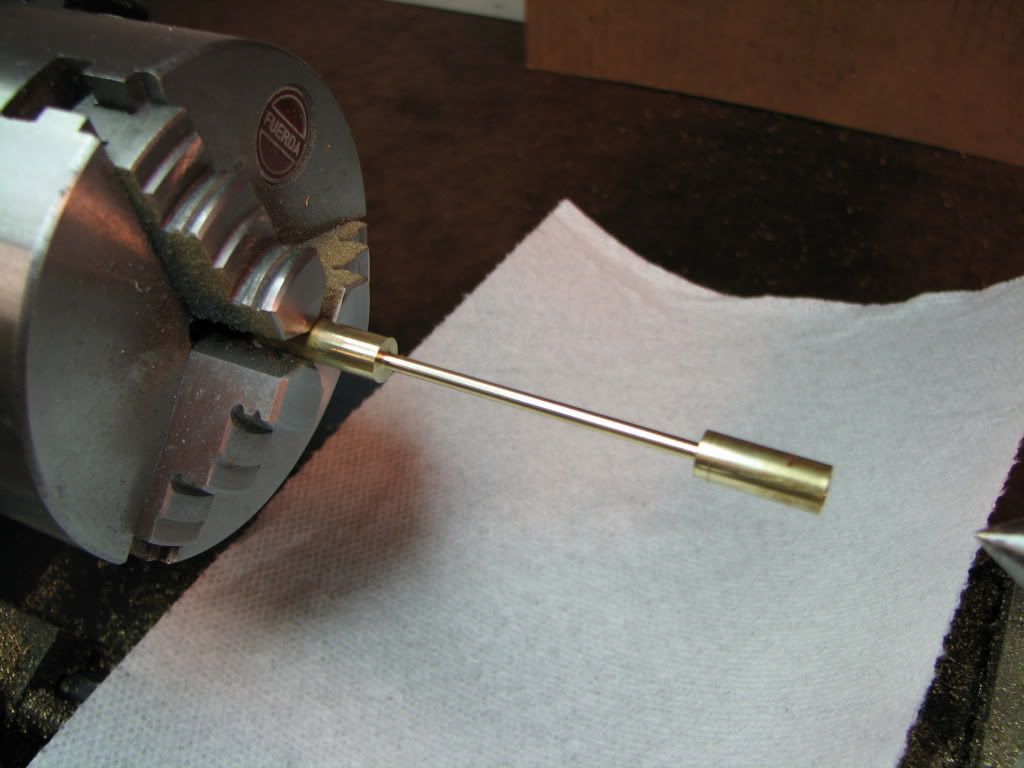
Horizontal Mill Engine From Kit

Home Model Engine Machinist Forum

Help Support Home Model Engine Machinist Forum:

This site may earn a commission from merchant affiliate links, including eBay, Amazon, and others.
zeeprogrammer said:
I've started with the eccentric rod. But I took some longer stock, drilled one end, and mounted it in the lathe with a live center.

Centers = Good

Hi Zee;
I would do this similar to how MB describes, using flat stock. You can do almost the entire piece in one setup in the lathe this way. All you need to do to finish it is drill the holes in the ends and cut off the excess left over on the ends where the holes were for your centers.

If you only have round stock, you can turn it into flat stock on the milling machine, (best this way), or you can cut the profile of the piece from the round stock on the lathe and then mill the flat sides. If you do it this way, you can chuck one end, but still need the center in the tail stock end.

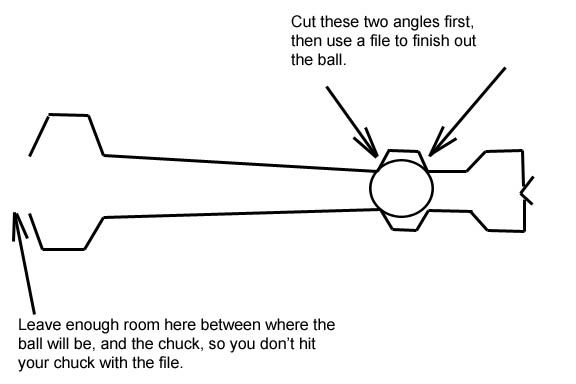
Start by turning a ball on each end, the basic size of the small and large end of the crankshaft. You don't need a ball turner. With the tail stock center in the end that will be the small end, start by making a couple of 45 deg tapers, one on each side of what will become the ball. Then file the corners off of the 45 deg tapers to form the ball. If you draw the piece out, you will find that you can make a whole bunch of tapers instead of just the two 45's, and get closer to the ball shape. Brass is very easy to file in the lathe, though, and even with only two tapers, it won't take long.

Crankshaftonlathe.jpg


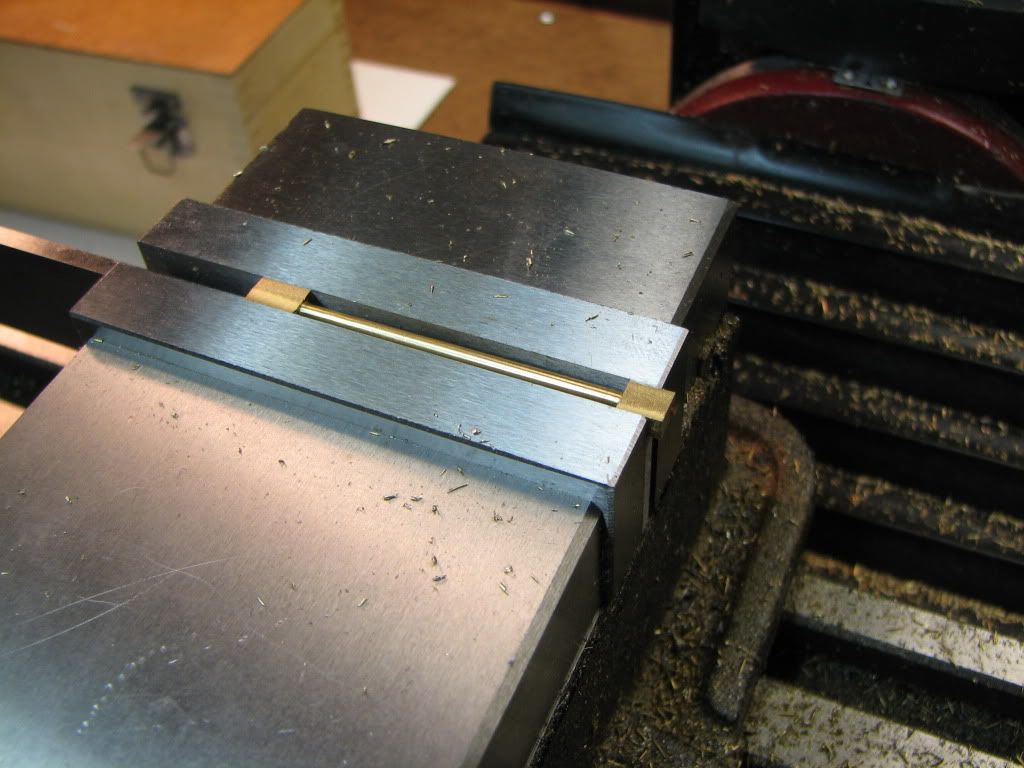
For the taper between the ends, you would be okay to turn it taking light cuts. I doubt your compound slide will do that in one cut, or that it will even fit with the tail stock there at the end of the piece, but if it does, great. Otherwise, take light cuts and make two diameters on the shaft part of the crankshaft, and file it in the lathe with a fairly fine cut file. Just don't push hard, and you won't bend the piece.

The thing about starting with round stock, for this piece, is that you still have to make it flat in the milling machine after you have the shaft part done, so really, you might as well go ahead and make a piece of flat stock from your round to begin with.

For a tool, try HSS ground something like this, and used at this approximate angle in your tool post. Leave the tool flat on top for brass cutting. Put a very small radius or facet on the very end to get a nice cut.

tool.jpg


Hope this stuff makes sense. Sorry the "drawings" look like a six year old did them. I'm not much good without paper and pencil.

Dean


Plan B-2. Cut a 1/8" thick flat stock 3/16" wide (plus about .050) 1-1/2 longer than the overall finished length of the eccentric rod. In the mill trim off the rough cut side and size the work piece down to 3/16". The 3/16" x 1/8" dimensions need to be identical from end to end. Lay out the four scribed lines centered on the over size (in length) workpiece to define the two outer ends. Lay out and scribe the intersecting lines for the drilled and reamed 1/16" pivot hole, and the 3-48 tapped hole. After one end is reamed and the other tapped, remove the piece from the mill vice and transfer it to a four jaw chuck on your lathe.

Accurately center the slightly protruding work piece in the four jaw. Mark two adjacent jaws with a removable marker or crayon. These will be the two working (movable jaws). Check the accuracy of the centering on the work piece by chucking, and re-chucking, and checking to be sure the work piece is precisely centered using only the two working jaws. If necessary re-adjust all four jaws till the piece is accurately centered.

Center drill the slightly protruding end with a #1 center drill. Open the two working jaws and slide the work piece out just past the outer line that defines the square area on the end still in the chuck. This exposes the entire central area between the drilled and tapped ends that is to be turned down to 3/32". Bring up the tail stock center to the center drilled end hole. Turn down the area between the two inner scribed lines that define the drilled and tapped ends.

Return the work piece back to the mill vise. Clamp it in the vice with one end protruding just past one of the the scribed outer lines. Hack off the majority of the excess with a jewelers or fine tooth saw. Slowly side mill to the scribed line with small advances of the end mill. Reverse the work piece and repeat on the opposite end.

I woke up this morning thinking about your project.
I think its time for me to get back down to the shop and start my own project! :big:

-MB
 
Thanks MB and Dean.

I had wondered about starting out with flat stock instead of the round. I haven't looked yet but is there a significant difference in cost between round, square, or flat stock? I've been leaning towards using round when I can thinking (perhaps mistakenly) that I want to keep my other stock as long as possible.

I had gone ahead last night (twas Friday and I get to stay up like I'm a kid)...

I started with the round, center drilled the end, and put up a live center. Then I used the parting tool to define the ends of the round center. Then I kept switching between a left and right cutter and brought the center part to near diameter. Occasionally I could see the center bow a little. More concerning was that, a couple of times, I had to bring the tailstock in a bit. I don't know what was causing it to become loose. Everything was clamped. I didn't put a lot of pressure on the part for fear of bowing the center.

A light filing, some sanding, and then brasso and I was pretty satisfied with the center. I could have done a better job sanding.

IMG_4491.jpg


Then I went to the mill. I mounted it on top of a parallel and squared it up. This went well until I needed to trim one dimension down to 0.125. For that I used shims to raise the parallel and another parallel from the side (a la tel) so there would be room for the shims. Took the part out once or twice to measure. Anytime I had more to do, I halved it, moved, shaved, and then rotated the part 180 before moving and cutting again.

Now I'm using the distance of the center to trim the ends. Next pic shows one end trimmed (the side parallel and shims are no longer needed).

IMG_4492.jpg


Although I may be doing some things differently or possibly not good practice, I'm getting through the part.

In reading your guys' posts...I seem to be close. ??? Thanks also for the tips on rounding the ends. I probably won't do that in this engine...mainly because it's a cosmetic change and I haven't thought about how it would look in relationship to the rest of engine. Something to remember for future builds.

Vernon is talking about my drawings. ;D The other day he complimented me that my lines were getting straighter!

Thanks again for the replies...if anybody cringed at my method...please let me know so I can improve.
 
Zee, the method deanfold described is also a very good way to finish the rounded end and taper on the connecting rod. I use filling to round corners and cut down set up and machining time.
However with all due respect to Deanfold, its best for you to learn machining methods first, so that filling doesn't become the only method at your disposal.
Use my plan B-2 and make the eccentric rod first.
The method I propose for the E- rod could also be used on the Con-rod with the small rounded end finished using a fine double cut burr by rotating the work piece on a 1/16 pin pressed into a block of scrap mounted in the mill vise. The taper should be turned by offsetting the top slide on your lathe. These areas could be filled by an experienced hand, but practicing proper machine techniques is a good way to face thees seemingly difficult parts. Face this and get it out of your way! :)

-MB
 
Zee, I'm glade your were able to make you part. That's also a way to make this type of part but accuracy (centering) could suffer during the milling down process.

Zee, I mean no disrespect, but why did you ask for help if you new of a method, and quickly made the part?

-MB
 
I'm the one worried about having asked and going ahead. I should have at least told everyone I was. My apologies if anyone thinks they wasted their time. Be assured the replies are very very helpful and worthwhile.

I did not 'know' of a method. That is to say, I did not know if it would be a good or a best approach. Your point about accuracy is exactly what I was thinking about.

As for quickly making the part...my (poor) thinking was this...I had two similar parts to make and I didn't want to go to bed (I wanted to machine)...so at worst I could have a go and learn and at best I'd have one part and could do a better part using the good advice that was coming (and was provided by you and Dean).

I see that you must have been making your previous post while I made my previous post. I really hope you don't feel like you wasted time...you didn't...this is very valuable information.

My apologies to all and thanks.
 
Zee, replies to posted questions are on a voluntary basis. Therefor, I don't feel you wasted my time. I'm glade you managed a satisfactory part with the method you chose to use. But as we both said its a method that could produce inconsistent results. Additionally, any future attempt of the use of this method could be useless if the length of the part exceeds the width of you mill vice.
I think you can see the reason I posted my proposed method for making these parts. To recommend any other, or short-cut methods that could work would leave you in the same position you were in when you originally asked for help.

I look forward to seeing your successfully completed project. ;D

-MB
 
Almost inevitably, these parts that look like a long slender bit with a feature at one or both ends are seldom under any serious stress so little is gained by turning/milling them from the solid. I fabricated the valve rod on my engine.

Round the ends over. It'll look too "chunky" if you don't.
 
Thanks MB. Very much appreciated.

Marv, I imagine rounding over could be done any time? So maybe after I get the thing together and running I can see how it looks. (Maybe I'm just getting too impatient to get this together.)

On that note however...rounding it over will make the faces that much smaller. I've had trouble sanding such small faces. Invariably it gets faceted if it's not exactly flat. I can only think of putting the part in some kind of tool that can be held parallel to the sanding surface. Any other suggestions?

Thanks.
 
Rounding after assembly is fine.

However, beware the Jabberwock of rushing to get something assembled and see it running. This is ripe territory for making really big screwups. DAMHIKT.

The rod has square sections at either end, the faces of which should be in the same planes. Lay some emery grit up on a flat plate (surface plate, float glass, etc.) and rub the part on it so its supported by the flats at both ends. Sometimes, using a block of wood to push the part back and forth will help to keep both ends in contact with the emery.

Another possibility (note, I've never tried this) is to set it up in the mill vise, supported by a parallel, and use a Dremel sanding disk as the tool to address the flat surfaces. I would try this on scrap before committing the part.
 
Thanks Marv. You're right...a very real possibility when rushing...so I'm being careful.

Actually...had a screw-up in reverse. The slot for the piston rod was made too big. I was going to make the one end of the connecting rod bigger to compensate. Instead, I was trying to be so careful, I forgot and made it to plan. ;D

So now I'll be doing the piston rod over. Actually not too sad about this. The piston rod looks lousy because of the way I was trying to fit it to the guide. ;D

Good point on sanding these particular parts...the other end will help.
 
I don't see anything wrong with the way you did it, Zee. I had showed making a ball shape on the ends of the piece because I assumed the small and large ends had some kind contour. I've never seen the part, or the print, so don't know what it's supposed to look like.

MB, I mentioned filing the ball ends in lieu of a ball turner, which I expect he didn't have. It's not an easy way out. It's a way to do things if you don't have accessories like the ball turner, or profile cutters. And, filing is a machining method. It's all moot though, if the ends weren't to have some kind of contour in the profile, anyway.

As far as the taper goes, I noted that making a proper taper with the compound was the way to go, if it would fit in the job. If you don't have a taper attachment, and the compound will not accommodate the job, you can also set over the tail stock to cut the taper.

Dean
 
Thanks Dean.

You're right, I don't have a ball turner or profile cutter. (I hope to address this sometime after this project.)

I've experimented with tapering using the compound slide some months ago with mixed success. Or, rather, failure. But certainly a big part of that was due to lack of experience, poor tools, and a lathe that needed trimming.

I think I'll give it a try. Good practice and learning.

Both you and MB have suggested starting with flat or square stock. For the flat/square stock I have though, it either doesn't fit (too small) or I would have to waste quite a bit of it. I'm in good shape with round.

The other possibility, as suggested, is to square up the round first. But I'm not clear why (or if) starting with flat is better. I still have to turn the center and that seems less hard on the machine than the interrupted cutting. And whether flat or round...it goes to the mill for drilling etc.

MB made the point about accuracy...what other considerations go into this?

Thanks.

 
Here's the connecting rod...

IMG_4493.jpg


I'm pretty happy with the dimensions. A little less happy with the sanding/polishing job. I know I'm developing a better feel for it...probably need to spend more time during the various stages. I've also found that I have to be careful with lighting. Looking at the part one way...it may look good enough to go to the next stage...but turn it a little...and discover valleys not yet touched.
 
Well, I think it looks good, Zee.
There are only a few aspects to accuracy on a part like this. The hole centers need to be correct as to distance, and on the center line of the shaft. They also have to be parallel to each other.
The ends themselves can be just about any shape you like as long as it doesn't interfere with the operation of the engine.
Same for the shaft part. It has to be a certain length to make the hole centers the correct distance, but other than that, it could be straight, tapered, or the shape of an hour glass, for that matter. You can work your own personal tastes around the base dimensions for a piece like this.

Dean
 
Thanks Dean!

I was looking at the parts and realized I got mixed up. This isn't the connecting rod...it's the eccentric rod.

Which means I haven't done the connecting rod yet. Which means I don't have to redo the piston rod if I compensate for it with the connecting rod.

Hmmm.

I'm thinking I'll go ahead and redo the piston rod. Not only will it look better, but I suspect it will work better. And so far I'm batting 100% that my do-overs are better than the original. :big:
 
Zee, That's a beautiful connecting eccentric rod - very well done indeed :bow:
Should look stunning with the rounding over :)
 
Very nice Carl. I'm almost as eager to see this run as you are.
 
Deanofid said:
MB, I mentioned filing the ball ends in lieu of a ball turner, which I expect he didn't have. It's not an easy way out. It's a way to do things if you don't have accessories like the ball turner, or profile cutters. And, filing is a machining method. It's all moot though, if the ends weren't to have some kind of contour in the profile, anyway.
Dean
I tried to describe the proper machining methods to help Zee understand an learn good shop practices, and I hoped that he would appreciate it for the reasons I had. I Think he did, but he is a free thinking person like most of us and can choose whatever path he likes.

In my opinion the use of a file where a proper cutting tool or attachment such a ball cutter could be made or used, is simply a "short cut method". I personally use short cut methods all the time. Nothing wrong with being a little lazy. As a hobby machinist It would be wise to take the time to take whatever steps are need to fill a gap that will soon return to be faced again, and again.

I still feel that the use a file were an accurate and repeatable cutting tool or fixture such as a ball turning tool could be made or used, is to me nothing more than a short cut method. And I find my self occasionally using a file on a spinning work piece. I believe that this is not a safe practice, and I would NOT suggest it to anyone.

Sorry but I respectfully disagree With you saying, "And filing IS a machining method"
I never considered it so, and I looked for solid proof of my belief in the event that I've been wrong all along. Maybe I'm still wrong.

Here's what I found: http://en.wikipedia.org/wiki/Machining


Latest posts

Back
Top