You are using an out of date browser. It may not display this or other websites correctly.
You should upgrade or use an alternative browser.
You should upgrade or use an alternative browser.
British 0-4-0 Toy Locomotive: he said
- Thread starter zeeprogrammer
- Start date

Help Support Home Model Engine Machinist Forum:
This site may earn a commission from merchant affiliate
links, including eBay, Amazon, and others.
zeeprogrammer
Well-Known Member
- Joined
- Mar 14, 2009
- Messages
- 3,362
- Reaction score
- 13
Philjoe5 said:The bolts Zee, the bolts
Maryak said:Bolt back to HF......... 7 times........... (1/4 of 28).
Rats Rats and Rats
zeeprogrammer
Well-Known Member
- Joined
- Mar 14, 2009
- Messages
- 3,362
- Reaction score
- 13
Got the 1/4-28 bolts!!
Hm.
Nuts
Hm.
Nuts
zeeprogrammer said:Got the 1/4-28 bolts!!
Hm.
Nuts
Washers?
zeeprogrammer
Well-Known Member
- Joined
- Mar 14, 2009
- Messages
- 3,362
- Reaction score
- 13
Another of my feeble attempts to keep my thread alive...
Not a lot of progress lately. Got the Hardibacker board. I'm a little surprised. It cut like wallboard. A quick slice down the center, a dowel underneath, and snap. I'm hoping to cut pieces to size this weekend...but T may have other ideas.
In the meantime I made up one of the jigs for soldering...
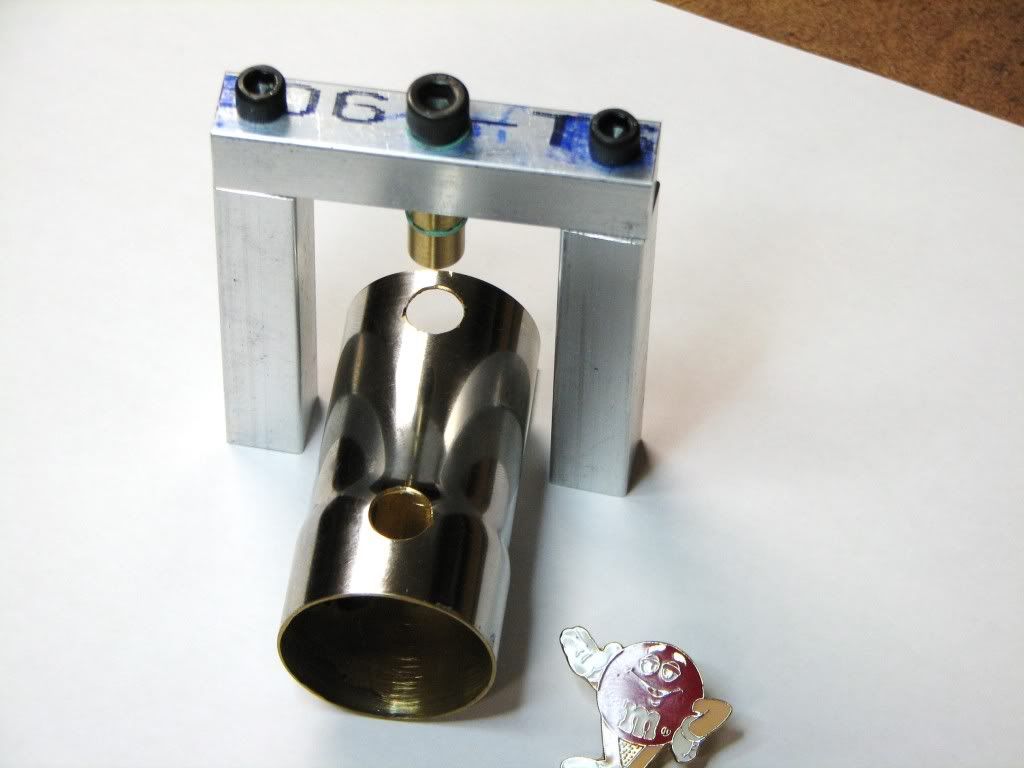
(The boiler isn't completely prepped yet. I have to sand the edges down and remove the chrome.)
The instructions had a 'U' shaped piece. Instead, I cut some 1/2" square stock and put it together. The legs may be a bit long but I don't know yet. The idea is to strap the boiler down onto some scrap board...and then strap (wire) the jig over that. I'll try to remember to take pictures of the setup before I burn the house down successfully solder.
Oh...and no...things did not go as hoped even when making the jig. The 1/4-28 bolt? The only one I needed is the bolt in the middle for holding the bushings. The others are 10-24 for holding the legs. Naturally, I drilled all 3 holes for a 10-24 and had to go back to redo the middle hole.
But they look good.
You can't see them...cause of the bolts.
But they look good.
Incredibly good.
;D
The only other jig I'll need is something to solder the pipe to the ports.
Speaking of which...I still need to test whether I got the holes in the ports (or cylinders) right. While eyeballing it seems to indicate everything is in the right place, I tried blowing into the cylinder and rotating the ports and listening or feeling for air. Not sure I got it right. Having smoked for 30+ years didn't help. (2 days ago was my 2nd anniversary of quitting.) Neither does the tinnitus. Maybe I should turn down Spongebob.
I'll figure something out to test it. No point soldering the thing up if the holes don't line up.
Practice on scrap? Nah. I've done similar soldering...I say let's go for it.
Not a lot of progress lately. Got the Hardibacker board. I'm a little surprised. It cut like wallboard. A quick slice down the center, a dowel underneath, and snap. I'm hoping to cut pieces to size this weekend...but T may have other ideas.
In the meantime I made up one of the jigs for soldering...

(The boiler isn't completely prepped yet. I have to sand the edges down and remove the chrome.)
The instructions had a 'U' shaped piece. Instead, I cut some 1/2" square stock and put it together. The legs may be a bit long but I don't know yet. The idea is to strap the boiler down onto some scrap board...and then strap (wire) the jig over that. I'll try to remember to take pictures of the setup before I burn the house down successfully solder.
Oh...and no...things did not go as hoped even when making the jig. The 1/4-28 bolt? The only one I needed is the bolt in the middle for holding the bushings. The others are 10-24 for holding the legs. Naturally, I drilled all 3 holes for a 10-24 and had to go back to redo the middle hole.
But they look good.
You can't see them...cause of the bolts.
But they look good.
Incredibly good.
;D
The only other jig I'll need is something to solder the pipe to the ports.
Speaking of which...I still need to test whether I got the holes in the ports (or cylinders) right. While eyeballing it seems to indicate everything is in the right place, I tried blowing into the cylinder and rotating the ports and listening or feeling for air. Not sure I got it right. Having smoked for 30+ years didn't help. (2 days ago was my 2nd anniversary of quitting.) Neither does the tinnitus. Maybe I should turn down Spongebob.
I'll figure something out to test it. No point soldering the thing up if the holes don't line up.
Practice on scrap? Nah. I've done similar soldering...I say let's go for it.

$29.95
Competition Engine Building: Advanced Engine Design and Assembly Techniques (Pro Series)
Amazon.com Services LLC
![DreamPlan Home Design and Landscaping Software Free for Windows [PC Download]](https://m.media-amazon.com/images/I/51kvZH2dVLL._SL500_.jpg)
$0.00
DreamPlan Home Design and Landscaping Software Free for Windows [PC Download]
Amazon.com Services LLC

$99.99
AHS Outdoor Wood Boiler Yearly Maintenance Kit with Water Treatment - ProTech 300 & Test Kit
Alternative Heating & Supplies

$45.99
Sunnytech Mini Hot Air Stirling Engine Motor Model Educational Toy Kits Electricity HA001
stirlingtechonline

$89.99
Outdoor Wood Boiler Water Treatment Rust Inhibitor- AmTech 300 & Test Kit
Alternative Heating & Supplies

$40.02
$49.99
Becker CAD 12 3D - professional CAD software for 2D + 3D design and modelling - for 3 PCs - 100% compatible with AutoCAD
momox Shop

$519.19
$699.00
FoxAlien Masuter Pro CNC Router Machine, Upgraded 3-Axis Engraving All-Metal Milling Machine for Wood Acrylic MDF Nylon Carving Cutting
FoxAlien Official

$94.99
$109.99
AHS Woodmaster 4400 Maintenance Kit for Outdoor Wood Boiler Treatment
Alternative Heating & Supplies

$39.99
$49.99
Sunnytech Low Temperature Stirling Engine Motor Steam Heat Education Model Toy Kit For mechanical skills (LT001)
stirlingtechonline

$24.99
$34.99
Bowl Sander Tool Kit w/Dual Bearing Head & Hardwood Handle | 42PC Wood Sander Set | 2" Hook & Loop Sanding Disc Sandpaper Assortment | 1/4" Mandrel Bowl Sander for Woodturning | Wood Lathe Tools
Peachtree Woodworking Supply Inc
- Joined
- Jan 3, 2008
- Messages
- 2,085
- Reaction score
- 17
Hmmmmm....how much you charging now Dean? :big: I need to get my a$$ back in gear before I fall off the cliff completely.
Zee, maybe you can get HF to start making a daily run to your house. ;D The little fixture looks good though and I feel sure the soldelring job will be successful too.
Bill
Zee, maybe you can get HF to start making a daily run to your house. ;D The little fixture looks good though and I feel sure the soldelring job will be successful too.
Bill
zeeprogrammer
Well-Known Member
- Joined
- Mar 14, 2009
- Messages
- 3,362
- Reaction score
- 13
Thanks Dean and Bill.
Dean...didn't you look under the porch mat?
....
and so it begins...sort of...maybe...well something did...
I broke up the Hardibacker board into some manageable pieces and cobbled together a small hearth held together by brick. Some day I'll figure out how to get a proper one made with some sheetmetal backing. But this should work for the the little jobs this loco needs.
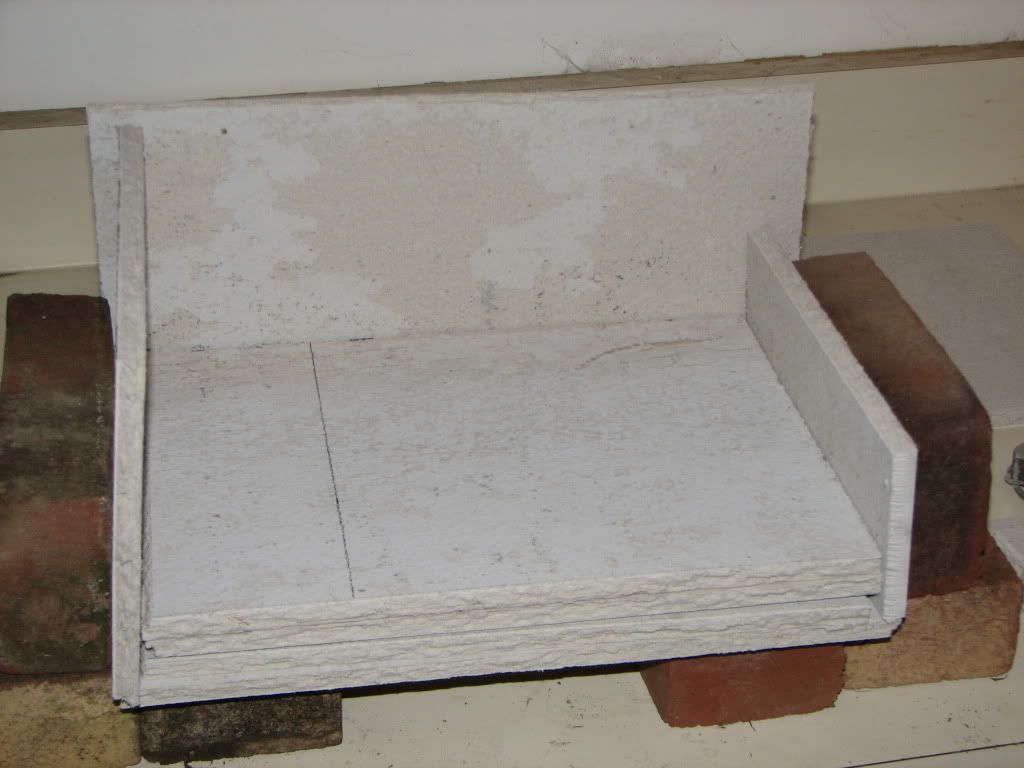
As my 'practice' piece I decided to solder the boiler mount stud to the rear boiler sheet. (Don't get too excited about the terms...I looked them up from the drawings.)
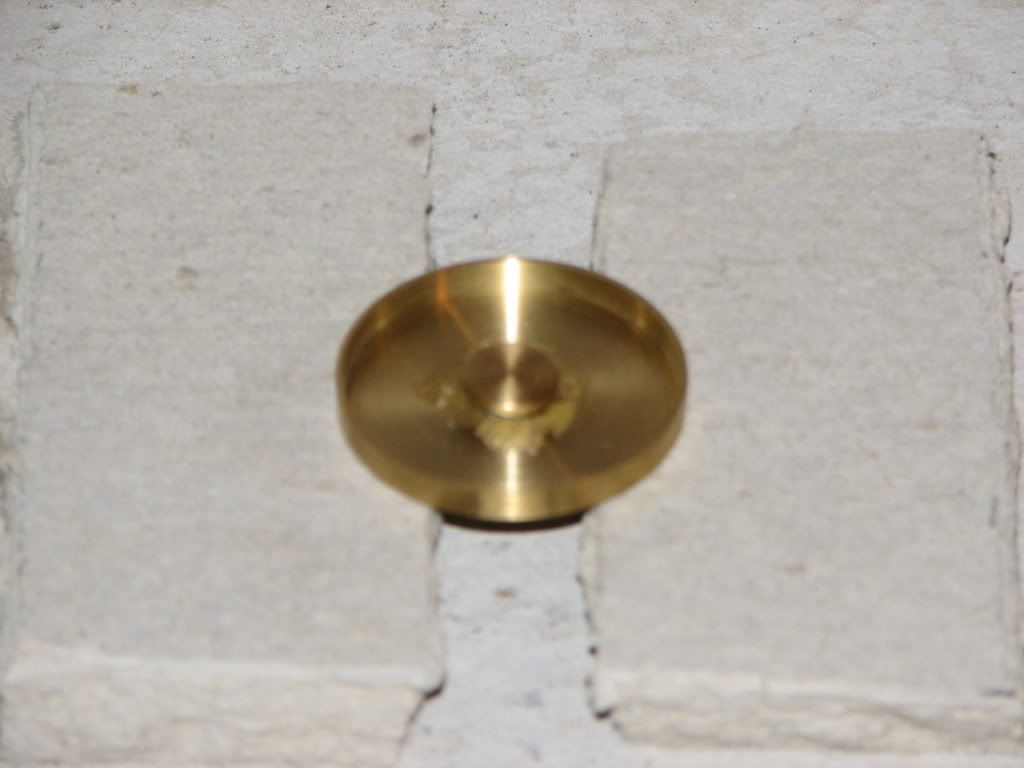
I took some HD silver solder...(bigger than 1/16...measures .08)...hammered a bit flat, sliced it in half, and wrapped it around the stud along with some flux.
Then used the MAPP burner.
Then the surprises began. I grabbed the flame lighter thingy - the thingy you squeezy to make sparky. I didn't realize the torch had a built-in piezo. So I had flame-age before I was ready. I hopped a little but my feet stayed on the ground.
Then I was looking for the flame adjusty thingy. I don't see one. But the flame looked good as is, and I was 'ready' to go anyway.
So I grabbed a bit of hanger wire so I could push the stud down as the solder melted and applied the flame.
Well that was quick. Job was done nearly quick as a blink.
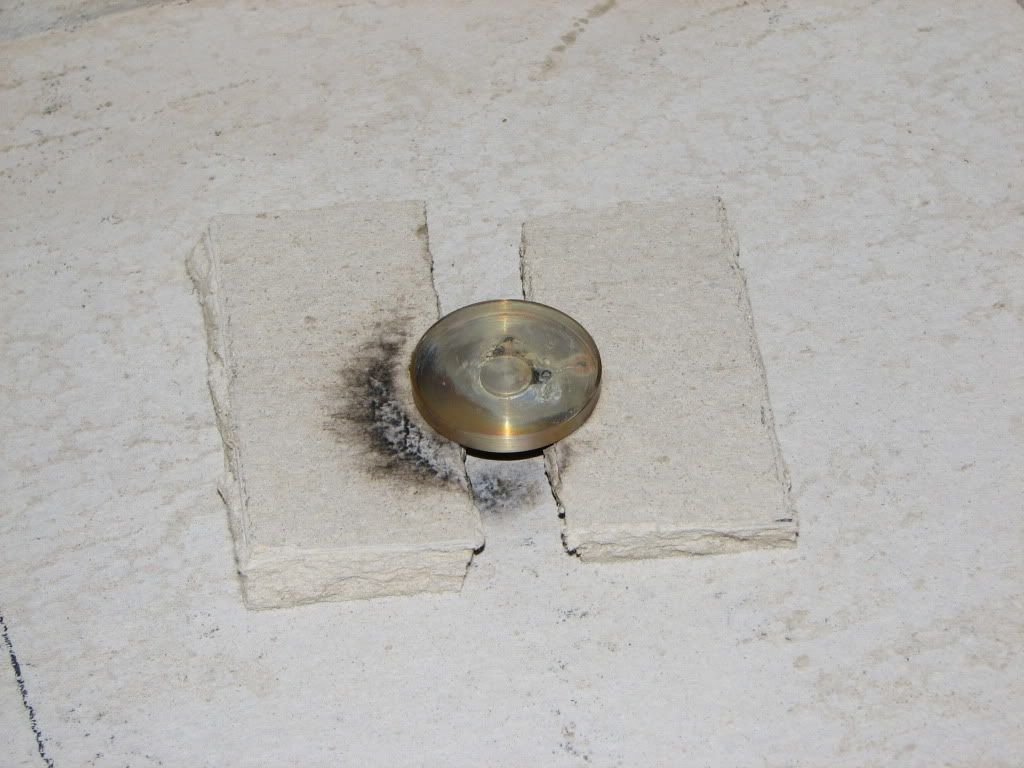
The solder moved out quite a bit. Is it possible the flame pushed it?
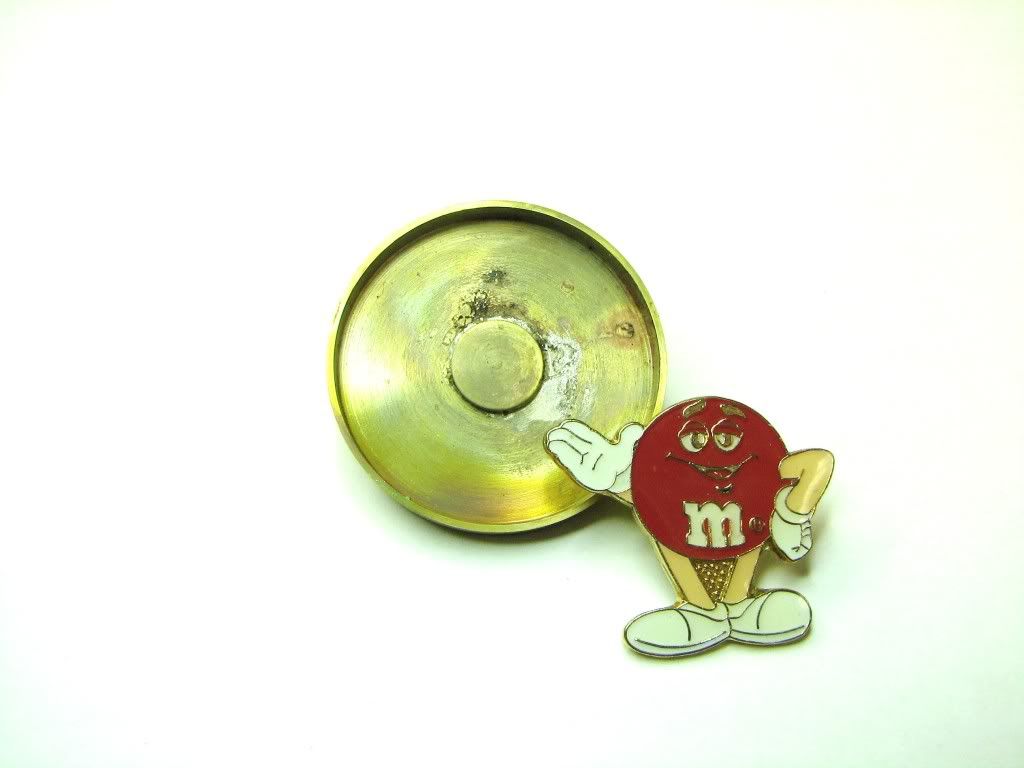
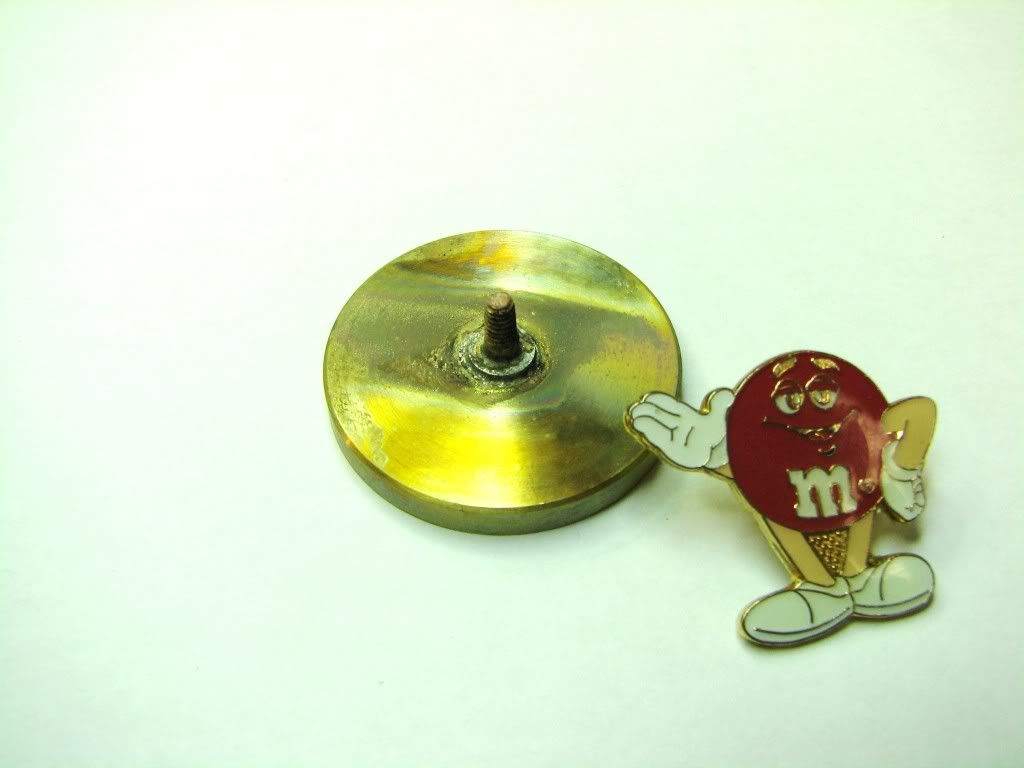
I haven't gotten the citric acid yet. I'll be interested to see how this cleans up. Part of the reason I chose it is that the only part you'll see is the outer edge.
Clearly though I need smaller diameter wire. This stuff will be way to big.
The torch was way hotter than I expected. I've used propane before and don't remember that. But then...I've never soldered something this small using a torch. I probably need to approach it a little slower too.
I also prepped the boiler. I put the boiler sheets on, placed masking tape on the boiler, removed the sheets and put the boiler back on the dowel in the lathe. Then sanded down the edges.
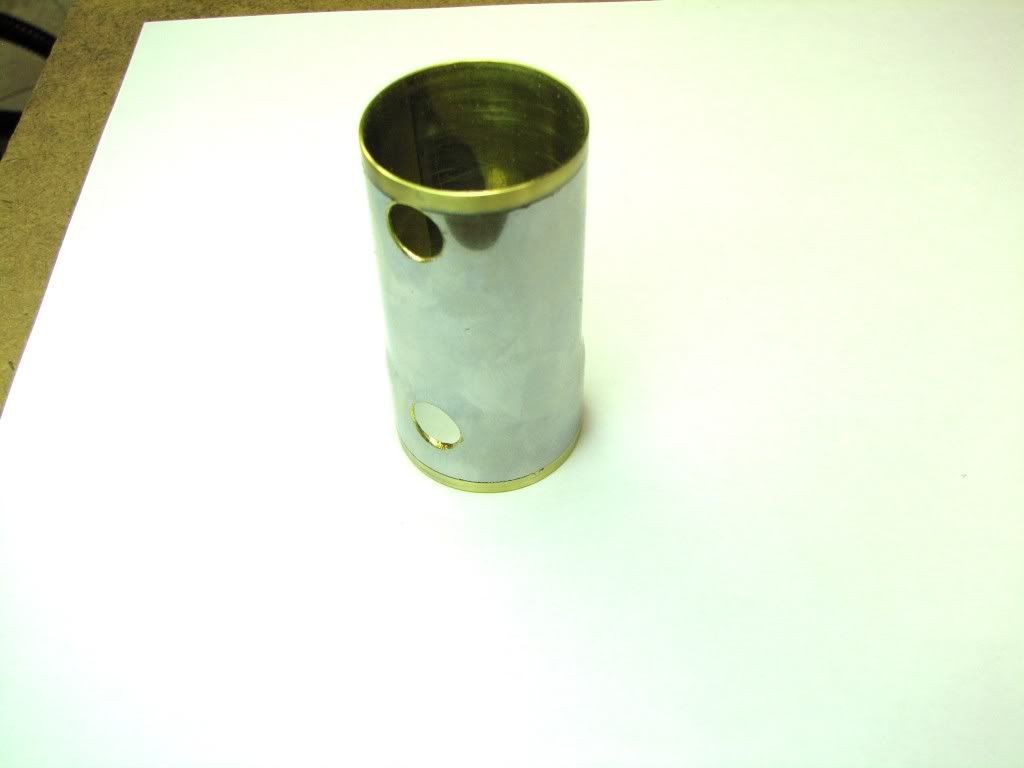
That one bushing a hole is right up against the one boiler sheet. Should be okay though. (I'm hoping.)
Very slow going this time of year with everyone home. But progress is progress.
Thanks for hanging in there with me.
Dean...didn't you look under the porch mat?
....
and so it begins...sort of...maybe...well something did...
I broke up the Hardibacker board into some manageable pieces and cobbled together a small hearth held together by brick. Some day I'll figure out how to get a proper one made with some sheetmetal backing. But this should work for the the little jobs this loco needs.

As my 'practice' piece I decided to solder the boiler mount stud to the rear boiler sheet. (Don't get too excited about the terms...I looked them up from the drawings.)

I took some HD silver solder...(bigger than 1/16...measures .08)...hammered a bit flat, sliced it in half, and wrapped it around the stud along with some flux.
Then used the MAPP burner.
Then the surprises began. I grabbed the flame lighter thingy - the thingy you squeezy to make sparky. I didn't realize the torch had a built-in piezo. So I had flame-age before I was ready. I hopped a little but my feet stayed on the ground.
Then I was looking for the flame adjusty thingy. I don't see one. But the flame looked good as is, and I was 'ready' to go anyway.
So I grabbed a bit of hanger wire so I could push the stud down as the solder melted and applied the flame.
Well that was quick. Job was done nearly quick as a blink.

The solder moved out quite a bit. Is it possible the flame pushed it?


I haven't gotten the citric acid yet. I'll be interested to see how this cleans up. Part of the reason I chose it is that the only part you'll see is the outer edge.
Clearly though I need smaller diameter wire. This stuff will be way to big.
The torch was way hotter than I expected. I've used propane before and don't remember that. But then...I've never soldered something this small using a torch. I probably need to approach it a little slower too.
I also prepped the boiler. I put the boiler sheets on, placed masking tape on the boiler, removed the sheets and put the boiler back on the dowel in the lathe. Then sanded down the edges.

That one bushing a hole is right up against the one boiler sheet. Should be okay though. (I'm hoping.)
Very slow going this time of year with everyone home. But progress is progress.
Thanks for hanging in there with me.
Sounds like you bought the cheaper of the two MAPP gas burners.
I did the same but exchanged mine.
There is another model up that costs just a few dollars more that lets you control the flame.
Its well worth the extra $20 or so as you can turn down the torch and o soft soldering with it too then.
A little trick to stop the solder going where you don't want to is to draw a line with lead pencil. The solder won't cross that line
steamboatmodel
Well-Known Member
- Joined
- Sep 7, 2008
- Messages
- 303
- Reaction score
- 7
"The torch was way hotter than I expected."
Did it bring the parts up to a nice cherry red?
Where did you have the flame aimed?
Regards,
Gerald.
Did it bring the parts up to a nice cherry red?
Where did you have the flame aimed?
Regards,
Gerald.
zeeprogrammer
Well-Known Member
- Joined
- Mar 14, 2009
- Messages
- 3,362
- Reaction score
- 13
Thanks tmuir. I'll look for that (the burner). I knew about the lead pencil trick but didn't think it was needed for this since this is the inside of the boiler. Now I wish I'd done it just to see the result.
Thanks Gerald. I don't recollect perfectly...but I do remember it changing colors. Even got some hot spots of bright red. It's just surprising because it took no time at all. I brought the flame in from the outside up to the stud. Kind of quickly. The solder was already in place and ready...it wasn't a matter of heating up and touching solder to it.
I'm kind of happy with the result...it's my first time not counting plumbing...so I have to be. ;D
Just found out from daughter that citric acid is also used to set dye in yarn. She enjoys spinning.
I'm 'this' close to convincing T that we should put off that home improvement project till next year. Wish me luck. It needs to be done...but it conflicts with shop time.
Good luck, Zee. Good luck!!
I'm sure T will believe you when you tell her that next year will be much better for home
improvement projects. I sure hope so, for you!
Out of curiosity, which wire did you use for this? 45%, 56%, etc?
Can we see a pic of your torch sometime? I might want one..
Dean
I'm sure T will believe you when you tell her that next year will be much better for home
improvement projects. I sure hope so, for you!
Out of curiosity, which wire did you use for this? 45%, 56%, etc?
Can we see a pic of your torch sometime? I might want one..
Dean
zeeprogrammer
Well-Known Member
- Joined
- Mar 14, 2009
- Messages
- 3,362
- Reaction score
- 13
Thanks Dean.
Here's a pic of the torch. I think I got it at Lowe's. Included is the solder. I picked that up at Home Depot. I looked for the silver content but it wasn't clear. I think it's on the order of 4%...if that makes sense. It's plumber's silver solder.
For this project I don't think the harder stuff is necessary...but I didn't want something as soft as electronic solder either. The instructions weren't clear other than they mentioned 1/32 wire.
Having said that...I'm going to order 1/32 or smaller (if there's such a thing) and get whatever I can find that's at least as hard as the plumber's stuff.
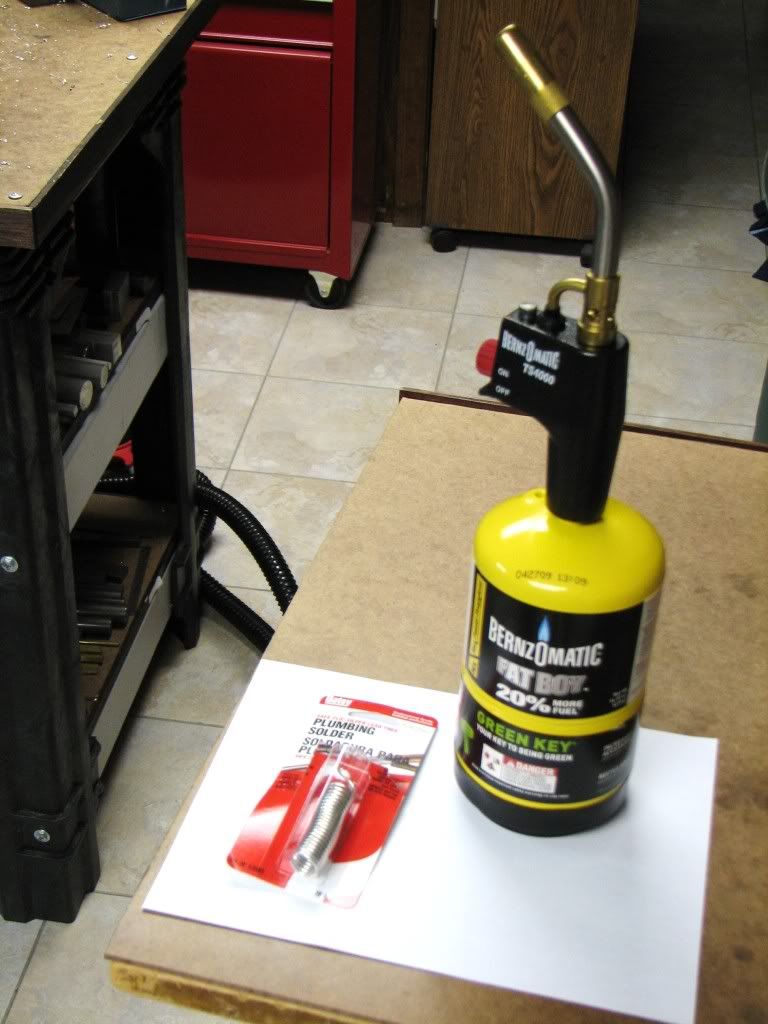

Hey, the fuel cylinder has my name on it..
See, I'd forgotten which way you were going with the solder. Regular solder melts very fast, and you could hold the torch quit a way from the piece, especially with MAPP.
That's a good torch, and will do hard silver on things that aren't too big, when you need to.
Dean
See, I'd forgotten which way you were going with the solder. Regular solder melts very fast, and you could hold the torch quit a way from the piece, especially with MAPP.
That's a good torch, and will do hard silver on things that aren't too big, when you need to.
Dean
- Joined
- Mar 1, 2010
- Messages
- 866
- Reaction score
- 82
Carl
I still suggest you practice on some scrap before you turn all your good work into scrap. You'll learn what works an what doesn't and have less of a "what the....?" moments on the parts that matter. When it goes right its quite a nice feeling when it goes wrong you'll hate yourself.
Pete
I still suggest you practice on some scrap before you turn all your good work into scrap. You'll learn what works an what doesn't and have less of a "what the....?" moments on the parts that matter. When it goes right its quite a nice feeling when it goes wrong you'll hate yourself.
Pete
zeeprogrammer
Well-Known Member
- Joined
- Mar 14, 2009
- Messages
- 3,362
- Reaction score
- 13
Thanks BMyers.
Thanks Dean.
Thanks Pete. You're quite right.
Ordered some .025 silver solder. That should be small enough. If not, I also got some .031...mainly for comparison sake.
A bright note...you may recall I worried about the port holes matching up...
Tonight I put the cylinder/port assembly under a faucet so that the water would hit the port block's exhaust and inlet holes. I was pleased to see water coming up out of the cylinder when I twisted the block either way to align the holes and the water would stop otherwise.
So I'm good.
I mean the part is good.
I mean it looks good so far.
;D
The only downside was that T was trying to make dinner at the same time and I delayed her. It's the weekly roast chicken...a favorite. Now I have to wait.
zeeprogrammer
Well-Known Member
- Joined
- Mar 14, 2009
- Messages
- 3,362
- Reaction score
- 13
Hm. Would I be jinxing things if I went ahead and started breaking down my mini-lathe for a good clean before the project is done?
Maryak
Well-Known Member
- Joined
- Sep 12, 2008
- Messages
- 4,990
- Reaction score
- 77
zeeprogrammer said:Hm. Would I be jinxing things if I went ahead and started breaking down my mini-lathe for a good clean before the project is done?
Not that I'm superstitious .................AAAGH don't clean nothing till you've finished.
Best Regards
Bob
You've got it, Zee. You're good, like you say.
Leave the lathe setup for a few days. If you tear it down, the dumbest thing is sure to happen.
I don't mean you will make a mistake. I mean, you will drop a small part into the nethers during
assembly, and need to make again.
If you leave the lathe ready to work, there will be no mistakes... It's a proven fact, mostly.
Dean
Similar threads
- Replies
- 44
- Views
- 12K
- Replies
- 3
- Views
- 2K


