Tel--I don't always agree with our neighbours to the south. Their foreign policy and Imperialism is downright scary. However, they are our neighbour, a very BIG neighbour, and all in all they have been a very good neighbour. Speaking for myself, the Americans I have met and dealt with on an individual basis are great people, who I would be glad to have live next door. As soon as you bring government policy into any discussion, it often seems that governments elected by the people, for the people suddenly take on policies representing the people that have very little to do with what the average people really want. USA is our longest contiguous border, our major trading partner, and as I said, they have been/are a very good neighbour. That being said, I'm not about to dash out and trade in my Canadian citizenship.
You are using an out of date browser. It may not display this or other websites correctly.
You should upgrade or use an alternative browser.
You should upgrade or use an alternative browser.
Brian Builds the Kerzel Hit and Miss I.C.
- Thread starter Brian Rupnow
- Start date

Help Support Home Model Engine Machinist Forum:
This site may earn a commission from merchant affiliate
links, including eBay, Amazon, and others.
Brian Rupnow said:it often seems that governments elected by the people, for the people suddenly take on policies representing the people that have very little to do with what the average people really want.
Pretty much true for all gov'ts, for as far back as you care to take it.
Back to the engine: what's left to do on this one?
Rleete--I have to finish the sparkplug and build a carburetor. I will fabricate a one peice muffler from a peice of brass. All of the other parts are finished. I am still not happy with the lack of compression this engine has, and that is going to drive me to taking a closer look at the valve sealing and piston sealing. I am going to make an inlet air tube with the same threads as the sparkplug, screw it into the cylinder head and make sure it is sealed where it seats, then apply air pressure to the cylinder so I can make independent checks of the valves and the piston sealing. At worst, I may have to make a new piston, which is not really a big deal, or I may have to remachine the valve seats in the head. I am happy with all of the other parts.---Brian
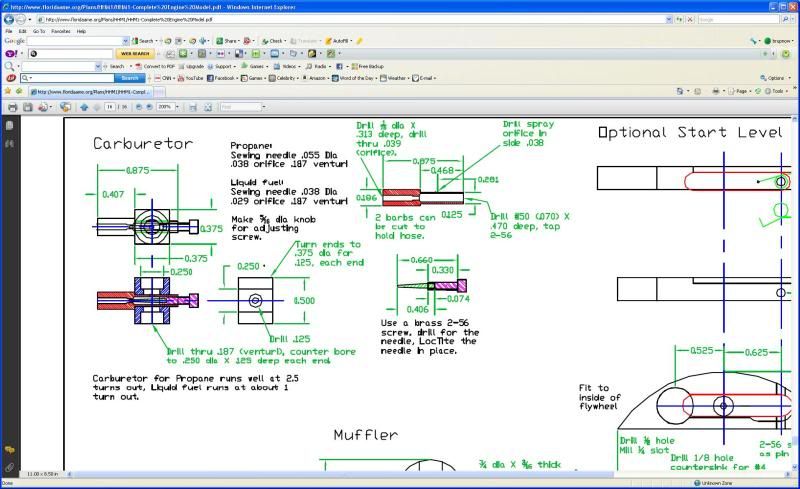
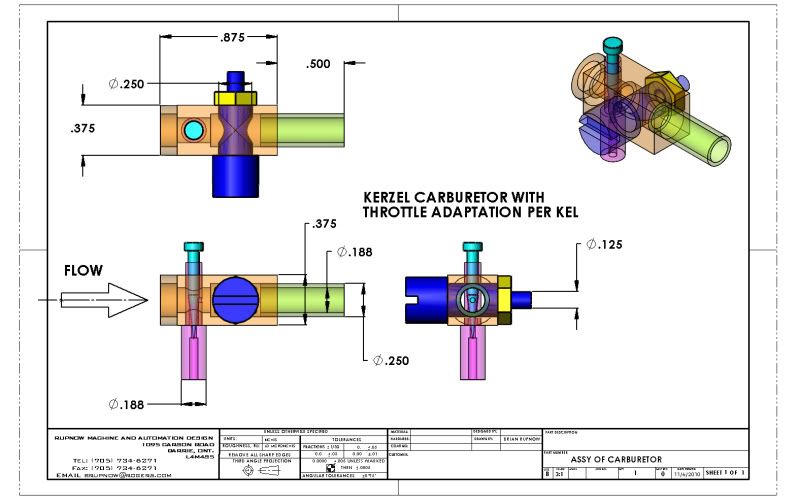
This is the Kerzel Karburetor. All in all, I like the design because it is simple and requires a bare minimum of silver soldering. I will be building this. However----Last week I read on a post on this forum (I can't find it now) about someone who had added a butterfly valve type throttle to a similar carb, and they gave a link to the post where that was done. Can someone please point me in the right direction to find that link. Since I have to build the carb anyways, I wouldn't mind incorporating a throttle into it. Even if a throttle is redundant on a hit and miss engine, this may not be the last carburetor I undertake to build.----Brian --(if the picture is too small to see, hold down the Ctrl button on your keyboard and hit the plus sign on your keyboard at the same time)

Tel---I told you a big fat lie last week!!! I looked at the rocker arm plans today, and it only uses one 1/8" steel ball inset into the rocker dirrectly above the valve stem. I bought a bag of 100. As luck would have it, when I tore apart my old battery powered drill to salvage the chuck yesterday, about a dozen 0.115" diameter steel bearing balls fell out into my lap!!!
- Joined
- Feb 17, 2008
- Messages
- 2,330
- Reaction score
- 446
Brian,
Looking good.
The throttle you may have been thing of is Kel's butterfly on his "Tiny".
Starts at:
http://www.homemodelenginemachinist.com/index.php?topic=8096.msg115971#msg115971
Gail in NM
Looking good.
The throttle you may have been thing of is Kel's butterfly on his "Tiny".
Starts at:
http://www.homemodelenginemachinist.com/index.php?topic=8096.msg115971#msg115971
Gail in NM

$40.02
$49.99
Becker CAD 12 3D - professional CAD software for 2D + 3D design and modelling - for 3 PCs - 100% compatible with AutoCAD
momox Shop

$99.99
AHS Outdoor Wood Boiler Yearly Maintenance Kit with Water Treatment - ProTech 300 & Test Kit
Alternative Heating & Supplies

$45.99
Sunnytech Mini Hot Air Stirling Engine Motor Model Educational Toy Kits Electricity HA001
stirlingtechonline

$2.08
$19.95
Sheds & Garages: Building Ideas and Plans for Every Shape of Storage Structure
goodwill_ind_of_mid_tn

$171.00
$190.00
Genmitsu CNC 3018-PRO Router Kit GRBL Control 3 Axis Plastic Acrylic PCB PVC Wood Carving Milling Engraving Machine, XYZ Working Area 300x180x45mm
SainSmart Official
![DreamPlan Home Design and Landscaping Software Free for Windows [PC Download]](https://m.media-amazon.com/images/I/51kvZH2dVLL._SL500_.jpg)
$0.00
DreamPlan Home Design and Landscaping Software Free for Windows [PC Download]
Amazon.com Services LLC

$599.00
$649.00
FoxAlien Masuter Pro CNC Router Machine, Upgraded 3-Axis Engraving All-Metal Milling Machine for Wood Acrylic MDF Nylon Carving Cutting
FoxAlien Official
Thanks Gail---Thats it.---Brian
- Joined
- Jan 19, 2010
- Messages
- 1,193
- Reaction score
- 41
Brian, I am not sure if you are talking about my mod to the "Tiny IC" carb, but....
Here is the link to page 9 of the Tiny IC.
http://www.homemodelenginemachinist.com/index.php?topic=8096.120
Kel
ooops, I meant to cancle this post, Gail beat me to it.
Thanks and sorry
Here is the link to page 9 of the Tiny IC.
http://www.homemodelenginemachinist.com/index.php?topic=8096.120
Kel
ooops, I meant to cancle this post, Gail beat me to it.
Thanks and sorry
tel
Well-Known Member
- Joined
- Feb 8, 2008
- Messages
- 3,293
- Reaction score
- 45
Brian Rupnow said:Tel---I told you a big fat lie last week!!! I looked at the rocker arm plans today, and it only uses one 1/8" steel ball inset into the rocker dirrectly above the valve stem. I bought a bag of 100. As luck would have it, when I tore apart my old battery powered drill to salvage the chuck yesterday, about a dozen 0.115" diameter steel bearing balls fell out into my lap!!!
That's usually the way of it, either a feast or a famine. What now, 111 more Kerzels on the bench?
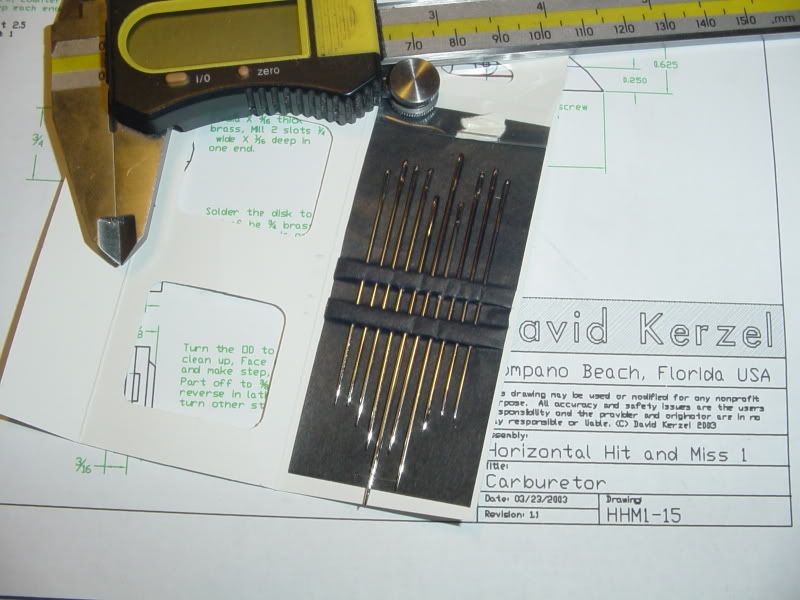
No real work accomplished today, however if I get tired of friggin with small engines, I can become a Seamster (Thats the male equivalent of Seamstress). I caused quite a stir at the local Sewing supply shop. The lady said that today was the first time ever that someone has showed up with a micrometer wanting to measure the needles. Kerzels carburetor plan calls for a 0.038" diameter sewing needle. and a 0.038" cross drilled hole for the spray orifice. I have to buy a .039" drill (1 mm) anyways to redrill the sparkplug. I don't think the carburetor will care that much about a .001" difference in size. I spent the lions share of today helping my wife pick out new office furniture. She retired after 36 years with the federal government 2 weeks ago, then last week became an employment councilor/consultant for the YMCA and will be doing about half her work from home. Damn, its nice to be married to a woman that looks good and makes more money than I do!!!!--And no, thats not the micrometer in the picture---I know the difference. The caliper is laying there to hold the needle package open for the picture.

tel said:;D Or you could become a 'Teamster' and needle everybody!
*groan* :
BC1
Jim
Carburetor dreaming---

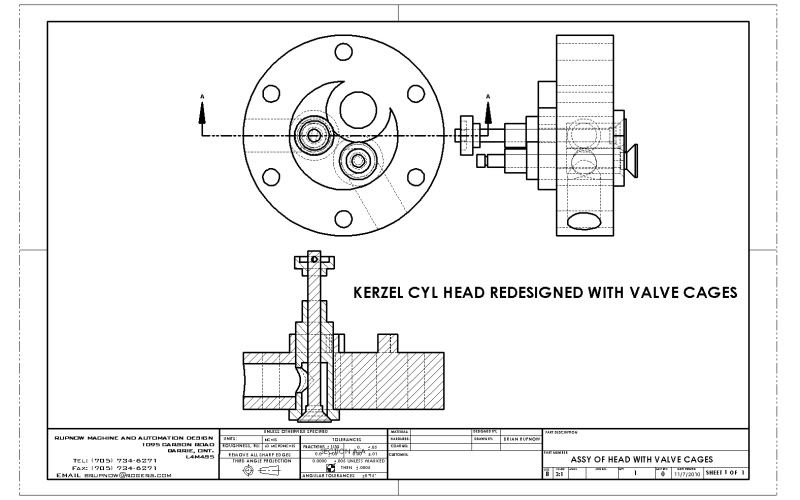
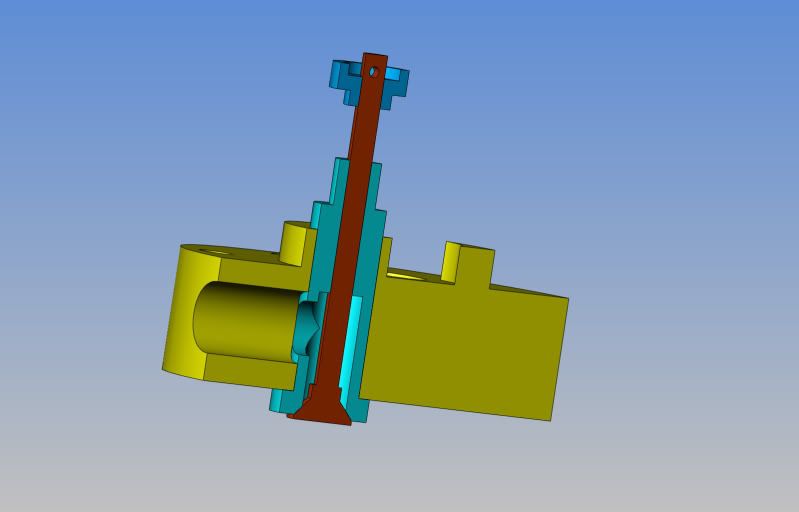
Well, for the moment, I am pooched. I can not get the valves to stop leaking, and consequently have no compression. I took the cylinder head off and held my thumb over the top of the cylinder while turning the engine over by hand.---Compression and "suckability" were great so it isn't the rings nor piston. The intake valve seems to be considerably worse than the exhaust. While I had the head off I remachined the valve seats with my 45 degree chamfering tool and relapped them, both by hand and with a very slow "power lap", but no dice!!! It looks like I now have two or three choices. #1--redo the the guides as "valve cages" which are machined to match and mate with the valve off the engine, then loctited into the head and the port drilled after the fact. I kind of like this, because the valve is steel while the seat of the guide/cage is brass, so being a little softer will more readily take the shape of the valve when lapping. #2--I am kind of intrigued by a post Chuck made a while back about his Henry Ford clone, where he couldn't effect a perfect seal on the intake valve stem so instead put in a ball bearing and made the intake into a ball valve type arrangement.-(Chuck---Can you supply me with that link please). #3--Set the engine up on a high shelf and take up drinking instead!!
Brian could you not re-make the valves, but make a third to the same compound settings and then mill it to create a single-flute valve seat cutter? You could then use the cutter to cut the seats to exactly the right angle for the valves and the single flute cutter should give you a good finish.
Peter. said:Brian could you not re-make the valves, but make a third to the same compound settings and then mill it to create a single-flute valve seat cutter? You could then use the cutter to cut the seats to exactly the right angle for the valves and the single flute cutter should give you a good finish.
Peter---Its just too small to do something like that. The head of the valve is only 1/4" in diameter --the stem is 3/32". I can hardly see the damn thing as it is without trying to mill a cutting edge on it anywhere.---Brian
crankshafter
Well-Known Member
- Joined
- Jul 17, 2007
- Messages
- 367
- Reaction score
- 24
Hi Brian.
Have been follwing your Kerzel from you started the topic. Nice engine/work.
I see you have problem with having the valves seal good. The cages will get you there. But one thing to mention, do not make the seats so wide,methink 0.3-0.4mm will do the trick.
Best ......
CS
Have been follwing your Kerzel from you started the topic. Nice engine/work.
I see you have problem with having the valves seal good. The cages will get you there. But one thing to mention, do not make the seats so wide,methink 0.3-0.4mm will do the trick.
Best ......
CS
- Joined
- Aug 25, 2007
- Messages
- 3,890
- Reaction score
- 715
So, Brian, I've reassembled my engine, including rocker arms, push rods, etc., so all the moving parts are together and working. Then, I spun the engine over at around 1,000 RPM with my electric drill for a total of probably 4 or 5 minutes. I first squirted oil in both the cylinders, then oiled the crank, connecting rods and everything else that moves. Then I would spin the engine for up to a minute, stop for a while (had to rest my hand holding the drill), then spin another minute, etc.
After doing that, the engine has loosened up nicely, and the viton rings are sliding nicely in the cylinder now. And, I have great compression on the one cylinder and I think pretty good compression on the second cylinder. So, now, I'm hopeful that I can continue to break it in a bit and the valve sealing problem will be solved.
You might want to try the same thing on your engine to see how it works.
Chuck
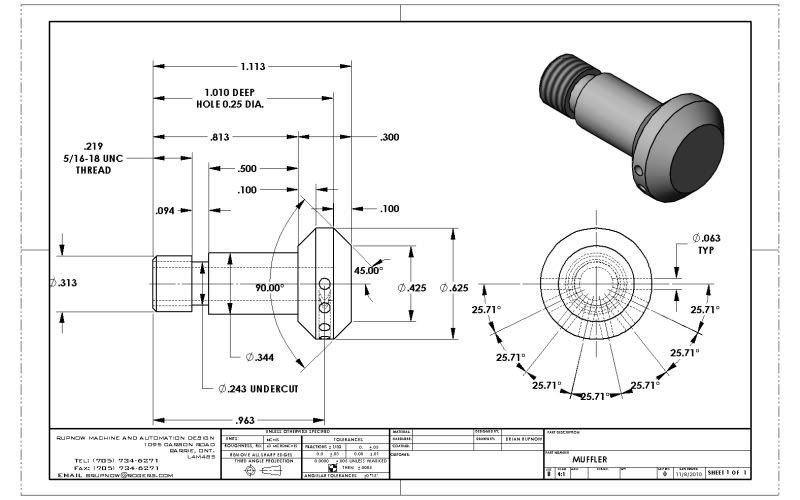
I'm back on a "real" job and I'm tired this evening-----don't feel much like messing with valve cages. One thing I lack is a muffler, so I quickly designed one and will now atempt to whittle it out of a peice of brass.---Oh yeah---I tapped the ports in the Kerzel head to 5/16"-18 unc, as I didn't want to depend on loctite to hold the carb and muffler. They were already drilled to 1/4" as per Kerzel, so I just ran the tap into them. I kept all the 1/16" exhaust holes on one side of the muffler so I can point them downwards and not have it exhausting into my face if I ever get it to run.
View attachment MUFFLER.PDF

View attachment MUFFLER.PDF
Similar threads
- Replies
- 413
- Views
- 67K
- Replies
- 356
- Views
- 67K


![MeshMagic 3D Free 3D Modeling Software [Download]](https://m.media-amazon.com/images/I/B1U+p8ewjGS._SL500_.png)


