Yet Another Webster Begins

Home Model Engine Machinist Forum

Help Support Home Model Engine Machinist Forum:

This site may earn a commission from merchant affiliate links, including eBay, Amazon, and others.
Drilling on the mill table is conceivable, because that's how I drilled the holes they go in. A 3/32" carbide bit might be tricky to come up with, but I've never looked. BUT, the pin is at angle to the vertical so the other side, with the pin leaning in toward the flywheel center, has worse access.

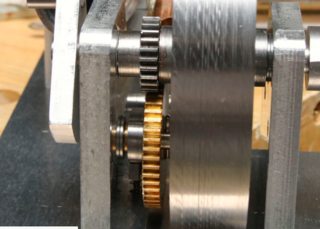
I don't have a good picture, but it's to fix this:

View attachment 120803

You can kind of see how the steel gear is offset from the brass gear to the right. It's about 1/4 of the width of the teeth off. You can see the pin, at an angle to the vertical.

Plan B might be "live and learn." Ignore it and do better next time.

Bob, I'd start with Brian's idea - wish I had thought of that. But if that doesn't work, keep in mind that drilling from the back side only has to create a path for a drive pin. IOW, you don't have to match the path of the spring pin exactly, and you don't need to drill the same diameter. You may be able to drill a 1/16" hole that intersects with the spring pin, and use that to drive it out. Or you may have to drill a larger hole - 1/8" or so - to expose enough of the spring pin.
 
Sacrifice a pair of toe nail cutters, they don't have bevels on the cutting edges. It will ruin them for their proper use but will allow you to grip the roll pin and with the help of a screw driver blade between the cutter and the flywheel boss enable you to lever it out. Next time, make a through hole!
 
bob, i may have missed this so if you said so disreuard. but do you have a pencil butaine torch? like the cheap ones you can use for soldering? if so you mght be able to heat that pin which will remove the springiness (technical term) and possibly while its hot dikes, end cutters or toe nail clipers might be able to pull it. i know the cheap roll pins just loose all their outer compression force (spinginess) after heat and are trash once they have been hot. aka - harbor freight roll pin kits.

but on the other side, i dont know how heat spread may creap up into your other parts and cause problems

I do have a small Blazer butane torch, but I really cringe about the effects of the heat on the rest of the parts. While I got the box of assorted pins from Amazon, I'm sure it's the fine, high-quality, Chinesium of Horrible Freight pins, so heating it will turn the pin back into whatever kind of cheese it's made from. After it sets fire to the light coat of oil on everything.

I have a pair of dikes I was going to grind and now I can't find them. Likewise, I'm reluctant to sacrifice the toe nail cutters until I have a replacement, so I mostly look at it and put off deciding whether or not I want to mess with it, or be willing to attack it figuring I'm going to have to make a new crankshaft and rebuild it.
 
Hi Bob !
Has your problem been resolved?

Hi, Minh Thanh,

No, it's not. I have three pins I'd like to pull, one pin broke off, the second pin broke the nail clippers, and I can't get access to the third with a tool. I still can't find the junky diagonal cutters I've been looking for but right now, it's still like it was.

I had to order some things and now I'm building up something to hold the plastic gas tank.
 
If keep everything the same, will it have any effect?
otherwise, no change is required
If there is an influence, you can change the other part accordingly
Not necessarily the same as the plan 100%
 
I think the important part is no, it won't have any effect, it's just not as nice-looking as I'd like. So I'm pretty sure I'm leaving it as is.
Your solution is to move the brass gear into alignment with the crankshaft gear. I understand with a press fit or Locktite of the crank throw to the crankshaft, removal of the crank/ flywheel out of the frame is an issue. This crank throw should be set screwed to a flat on the end of the crank for ease of removal and servicing then.
7mH7WuMm.png


On your carb rotating in the manifold, larger diameter round stock (5/8in) bored 10mm for your Traxxas carb will give you enough wall thickness for a 6-32 set screw to lock carb in any position to the manifold.
 
yeah, from that point of view, it looks like you have a bit of room to move the brass cam gear over a bit. would it interfear with the cam rocker arm to much that a little fling would be a problem? i know that the striker pad from rocker to valve - for my engine was a bit oversized anyway so i could put a knurled edge on it. so maybe increasing the rocker pad if need be would give you the room to move the bass gear and cam over a tad bit. just a tad shim.

BUT looking at it im not sure you can get the gear off without removing the flywheel which is your problem you are working on. so if that is for sure the case, then what abut a machined c clip brass spacer so to speak and a drop of lock tight? slip it in and put a drop on - go eat some dinner and it will be spaced right for you.? would that work? take a washer to the right thickness and cut out an end so it will go over the shaft?
 
I ordered points on Saturday from AutoZone, and got a call they were in. There's something clearly wrong here and I need something else, but I'm not sure what. Has anybody built the Webster with the points and capacitor that Joe Webster called out?

My engine:
MissingSomething.jpg


You can see the sheet metal spring hanging off to the lower right around the black SHCS, and to the lower left of the screw is the contact.

Sheet 15 of the plans seems to show something hanging off the sheet metal piece the points are backed by. The metal spring appears attached to that.
Webster_points_connection.png


Edit after hitting "Post" instead of "Full image."

First off, it's possible they sent the wrong set of points, or that I ordered the wrong set. Since I'm using a CDI, there's no capacitor (condensor) there mounted to the base. I could make a little piece of aluminum to mount to the base. A place to attach that spring steel on top and then a way to attach to the base on the bottom.

While, I'm here, I built a little holder and base for my fuel tank. That's visible on the right edge of the photo. This was a test fit that I'll take apart so I can do some finish work on the base.
 
Last edited:
Either you have the wrong point set, or your point set is incomplete. the points are #018-4126-8 A110P
 
Last edited:
Yeah, those point are clearly missing the threaded stud and nut which would hold the spring in position. It looks like there were a couple of options for the mopars of that era, maybe a couple of different distributors were used. It may be possible to use them, but it may not be the cleanest looking.

Search "Contact Set Standard CH14VT" on EBAY, that is what I used.
 
Either you have the wrong point set, or your point set is incomplete. the points are #018-4126-8 A110P

Thanks for that part number. There's no such thing as too much information.

I went to AutoZone using the info that Joe has on the Webster prints. "1969 DODGE CHARGER, 383, 4BL, W/SINGLE POINT DIST" AutoZone returns one thing, Duralast AL1023MV
https://www.autozone.com/external-engine/point-set/duralast-point-set-al1023mv/760181_447028_0
They don't have a cross reference for the 018-4126-8 number.

Pardon if this is stream of consciousness and not very edited, but I just checked Advance Auto Parts, and they have a set of points with the threaded stud and nut.
https://shop.advanceautoparts.com/p/bwd-ignition-contact-set-a110p/18250068-Pand they do cross reference those points to your number.
I'll give them a call and see what it takes to get a set. At AutoZone I had to buy the points in advance and get them shipped over from Orlando (nearest big city).
 
Last edited:
hi bob, i used the doge points myself, they worked ok for me. here are some pics i have on my pc of my points, im not allowed to go in my office for a few days due to covid but when i get back in ill take some better pics if you need/if it will help

1606271557556.png


1606272014693.png


1606272221797.png
 
and the advance auto parts set looks correct. probably doesnt have the condensor with it as its usually sold seperately

Thanks. Looking at your picture made me think their's look like the right points. I'll give Advance Auto a call in the morning and see if they have them, or if I have to order for pickup on Friday or something.

If you are using a CDI, do you need points? Wouldn’t you use a magnet and Hall effect trigger?

I ordered the CDI from Roy Sholl and the way he explained it was the CDI replaces the coil and cap. I could use a hall effect switch and magnet, but points work fine, too. He said it makes the ignition cam simpler.

The last car I worked on that had points and a coil was a 1972 Ford Pinto, back when CDI was exotic and expensive. I sold that car in 1982 and haven't touched a manual ignition system since then, so I'm real hazy on how we made them work.
 
I used a set of Lucas points and condenser £2.95 on eBay and the coil from a scrap yard as you can see in the pics the coil and condenser are mounted underneath inside the box.
 

Attachments

  • Points.jpg
    Points.jpg
    324.4 KB
  • Coil.jpg
    Coil.jpg
    301.2 KB

Latest posts

Back
Top