Brian, I admire your persistence. I would have long ago abandoned this project as a lost cause. Your will to continue will inspire me to do likewise. LorenTonight everything is back together. Ignition timing has been reset, Cylinders have again been pressure tested, and gaskets are all in place, nothing leaking that I can see. Liquid dish soap has been flowed around the cylinder heads while under pressure, and we have no bubbles to contend with, which pretty well assures no leaking head gaskets. Valve lash has again been adjusted. While I had the intake manifold off I gave it the old "Blow your guts out test" just to make sure there wasn't a big blob of gunk in one of the legs blocking the flow. Did I really see anything that would have prevented the engine from firing or running?--No, not really. Tomorrow we will try to start this thing again.
You are using an out of date browser. It may not display this or other websites correctly.
You should upgrade or use an alternative browser.
You should upgrade or use an alternative browser.
Throttle governed engine
- Thread starter Brian Rupnow
- Start date

Help Support Home Model Engine Machinist Forum:
This site may earn a commission from merchant affiliate
links, including eBay, Amazon, and others.
Loren--I try to "Never give up." It takes me to some strange places, but I solve a few mysteries. It makes me crazy when things defy logic and reason. I may have discovered something this evening. On a conventional 12 volt coil and points, it doesn't matter which way you hook up to a 12 volt battery, it will still work. This dual output snowmobile coil I'm using may possibly be different. I decided to put the charger on my 12 volt battery tonight, and discovered that I had the battery hooked up backwards. I wasn't really happy with the size and strength of the spark the coil was giving. Instead of a fat blue spark at the plugs, it was giving rather anemic yellow sparks. Tomorrow I will hook the battery up correctly and see if the spark quality improves.
- Joined
- Dec 31, 2010
- Messages
- 822
- Reaction score
- 220
Brian:
You might consider a different approach to observing your valve timing.
With your cad program make yourself a paper strip with numbers from 0 to 360 around the circumference of your flywheel (length pi x D) (marking each degree).
Fasten it around the flywheel with zero across from a stationary line on the block at TDC.
Apply a few pounds of air pressure into the spark plug hole with a hose and screw in adapter.
Rotate the flywheel around until you hear the air start to leak from the intake or exhaust as the case may be and take a degree reading on the timing tape.
Same process for the valve closure (when the air stops leaking). Quite a bit more accurate than all your math and measurements to get the "actual" timing and no disassembly required.
Also a good check for valve leakage and ring leakage.
Yar Bugger Billy!!! We're up and running again. What a mad thrash it's been. I tore everything down to the bare chassis, checked the valve timing, then on reassembly I reset the ignition timing. When completely reassembled, still no joy. I had spark, I had fuel, but engine wasn't firing. As a last result I unbolted the left hand cylinder head, relapped the valves and made a new head gasket. This was very encouraging. When cranked I had fire in the left hand cylinder and smoke rings coming out the stack, but still not running. Then I pulled off the right hand cylinder head and done the same thing on that bank. There was more to this than it seems, because it involved retapping a few holes and making up some more specially shortened bolts. Finally I was rewarded with a running engine. Turn up your speakers. I do some "voice over" in the video, but the engine is noisy. Now that engine is up and running, I will do some fine tuning before I put the throttle governing governor back on. the engine. The video is crappy but I will make a properly lighted and sound controlled video after the fine tuning is completed.
Re--Getting engine to run:: If I had pulled the heads off and lapped the valves a bit more FIRST I probably wouldn't have done all the other things. When an engine runs well and gets put up on the shelf for a few years, then doesn't run properly when you get it down off the shelf, you start eliminating possible causes. The engine had spark. The engine had fuel. The engine refused to run properly. I pressure tested both cylinders with compressed air thru a fitting screwed into the sparkplug hole, and they seemed to hold pressure adequately. I did every "easy" thing that I know how to do to make the engine run properly, and none of them worked. At that point it was either abandon the project or start digging deeper. For whatever reason, this engine seems to be very very particular about the valves sealing 100%. Ah well, it's January and I don't have a whole lot going on anyways.---Brian
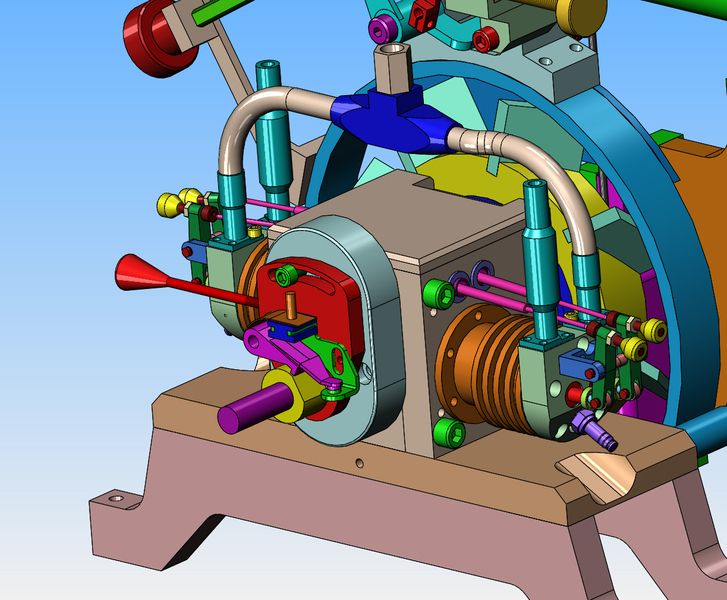
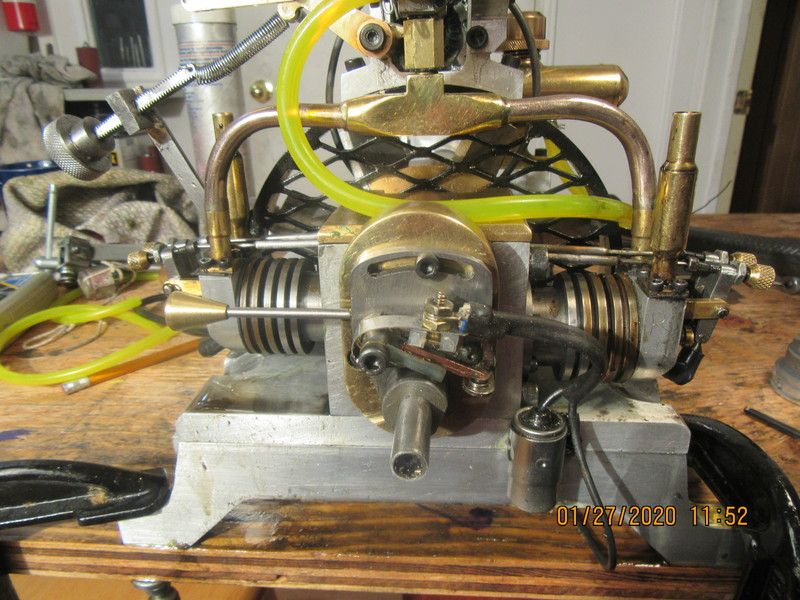
I have restored the hand built carburetor to the engine, and it is running much better. I have decided that the engine would benefit greatly if I were able to manually adjust the ignition timing while the engine was running. The points will now mount to the red plate with the red handle. The red plate rotates on a central boss on the gear case, and by loosening the green capscrew I can advance or retard the timing to find the "sweet spot" where the engine runs best.


$171.00
$190.00
Genmitsu CNC 3018-PRO Router Kit GRBL Control 3 Axis Plastic Acrylic PCB PVC Wood Carving Milling Engraving Machine, XYZ Working Area 300x180x45mm
SainSmart Official
![DreamPlan Home Design and Landscaping Software Free for Windows [PC Download]](https://m.media-amazon.com/images/I/51kvZH2dVLL._SL500_.jpg)
$0.00
DreamPlan Home Design and Landscaping Software Free for Windows [PC Download]
Amazon.com Services LLC

$599.00
$649.00
FoxAlien Masuter Pro CNC Router Machine, Upgraded 3-Axis Engraving All-Metal Milling Machine for Wood Acrylic MDF Nylon Carving Cutting
FoxAlien Official

$26.89
$34.99
Peachtree Woodworking Supply Bowl Sander Tool Kit w/Dual Bearing Head & Hardwood Handle, 42 Pieces Wood Sander Set, 2 Hook & Loop Sanding Disc Sandpaper Assortment, 1/4 Mandrel Bowl Sander
Peachtree Woodworking Supply Inc

$99.99
AHS Outdoor Wood Boiler Yearly Maintenance Kit with Water Treatment - ProTech 300 & Test Kit
Alternative Heating & Supplies

$40.02
$49.99
Becker CAD 12 3D - professional CAD software for 2D + 3D design and modelling - for 3 PCs - 100% compatible with AutoCAD
momox Shop
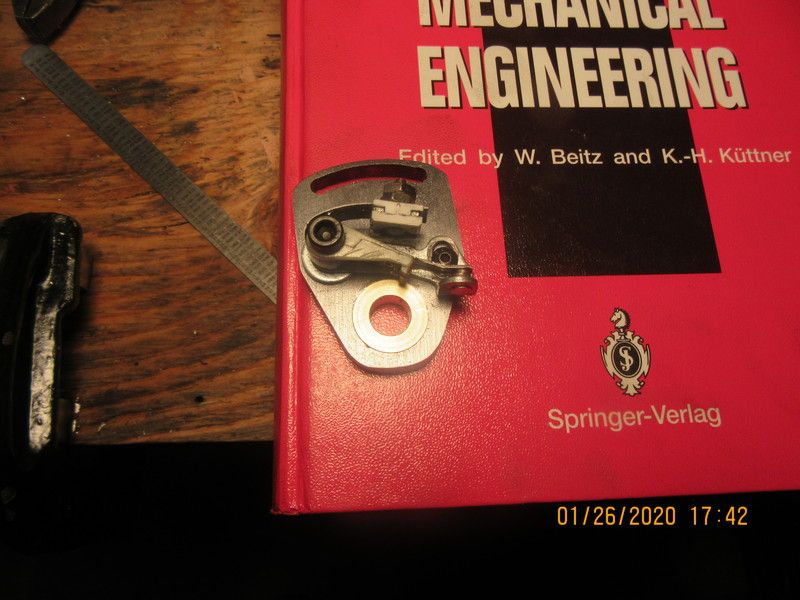
I had three grandchildren sleeping over and a sick wife, so I've been running around like a chicken with it's head cut off today.--Did manage a couple of hours this afternoon to whittle out the "Timing plate". The points shown are an old pair that I keep on hand for "set-up" purposes. The brass bit in the center will actually be attached to the front of the brass gear cover. When I have the handle attached to the timing plate, this will allow me to tilt the plate in one direction or the other, to the limits of the curved slot, to adjust the timing while the engine is running.


Here we have the timing plate and handle installed on the engine. The concept is that you set the ignition timing as close as possible with the plate mounted as shown in its neutral position.Then, when the engine is running and warmed up, you loosen the bolt that is in the curved slot, and this lets you rotate the plate and points mounted to it a few degrees clockwise or counter-clockwise. This ******* or advances the ignition timing until the engine is running in it's "sweet spot", then lock down the bolt in the slot.


- Joined
- Sep 2, 2011
- Messages
- 1,406
- Reaction score
- 413
i like the addition of the easy adjusting points.
I haven't ran of with the gypsies, nor anything nearly as exciting. I've been plugging away on this engine, correcting faults and trying to get my head around a few things. Like Bob Seger's song, "Nightmoves" I've been "Working on mysteries without any clues." I've had everything apart right to the bare bones and built it back up again, checking clearances and tolerances. I have no problem starting and running the engine. The problems are inconsistencies in the way it runs each time. Some of the new features I've added cascade. I added the manual ignition timing plate and lever, and it works fine---but it eats up 1/4" of clearance on that side of the engine. The answer to that of course, was a new pulley and starter hub, with an annular slot on the engine side 1/4" deep to fit over that #10-24 bolt head that holds the ignition points in place. I have eliminated everything that would potentially cause a problem except for the cams themselves. They are a direct copy of the cams Malcolm Stride used on his "Bobcat' and "Jaguar" engines. I made the single cylinder "Bobcat" engine with enough changes to rebrand it the "Canadian Cub", and although it ran satisfactorily it also shot vapour out the mouth of the carburetor while running. I ordered a new set of "Rimfire" sparkplugs yesterday from Roy Sholl at S & S Engineering. If I decide that the duration of the cams is too great and is causing the vapour discharge from the carburetor, I'm not sure if I will go so far as to make new cams or not. When I first built this engine, I didn't put any key in the starting hub and crankshaft on that side of the engine. The engine ran so well and with so few problems that I thought I would get away with it. Of course, it has came back now and bit me on the arse, because with all the messing around trying to change this engine over to a "Throttle governed" style, the starter hub was slipping on the crankshaft. So, this morning I broached a keyway into the starter hub and set the entire engine up on my mill table with the crankshaft locked against rotation and milled a new keyway into the exposed end of the crankshaft. The saga continues-----Brian
Today we have some good news and some bad news. The good news is that the trouble with the right hand cylinder was indeed the sparkplug. I haven't got my new plugs from Roy yet, but I did discover a 1/4-32 sparkplug in one of my other older engines and used it to replace the sparkplug in the right-hand bank. The engine now runs fine. Who knows!!!---It might have been the bad sparkplug that was the problem all along. The bad news is that the engine doesn't want to accelerate while under load. The governor and linkage works exactly as I had planned. When I spin the engine over with my electric drill, the governor weights immediately fly out, closing the throttle right up to the adjustable "stop", the engine starts, and everything runs fine. When I put a load on the engine, the governor reacts exactly as I had planned. The engine slows down, the tension spring pulls the weights of the governor back to center, the linkage opens the throttle. BUT--then the engine stalls. If I engage the load very slowly, sometimes the engine will keep up, but nine times out of ten the engine just stalls out and quits. I more or less know why, but I'm not sure what I can do about it. In a conventional "old style" automobile with a carburetor, when you step on the gas to open the throttle, the accelerator pump squirts a stream of gasoline directly into the carburetor throat to keep the mixture from "leaning out" which would cause the engine to stall. In my miniature carburetor, there is no provision for an "accelerator pump". If I richen the mixture to my carb by unscrewing the needle valve, the engine won't run at low rpm. If I start the engine under load, it will run, but it doesn't like it. The vapour coming out of the carburetor throat has lessened considerably, so that may have just been a function of running too rich and having a bad sparkplug.
Cogsy
Well-Known Member
Maybe it could be as simple as increasing the RPM that you're trying to run at? Of course you don't want it flat-chat or the governor would be redundant, but maybe running a bit higher in the rev range will give it a bit of extra time to 'catch up' before it stalls out and probably a bit more usable power as well.
I have quite a bit of time on RC engines, your carb appears to be one you have made. I would recommend 1. using a RC engine carb. 2. Use one with a smaller throttle bore, this will keep the air velocity up and more sensitive to throttle plate opening changes. 3. On RC motors if the throttle response is not there then we run a hose from the muffler (just before) to the fuel tank and use the exhaust pressure to help push fuel to the carb. This way it is a hybrid fuel injection system and helps to eliminate throttle stumble. Most RC carbs can handle going from alcohol to gas with no problems.
Ray
Ray
I have switched carburetors and am using a 4033 Traxxas Pro 15 carburetor now. I'm still having problems with the acceleration under load.
jeff.gearing
New Member
- Joined
- Feb 7, 2020
- Messages
- 3
- Reaction score
- 3
I used to run Traxxas Uk until retirement around 10 years ago. I retained a load of spare parts including IC engines and bits. If you need anything for experiment with just let me know
jeff.gearing
New Member
- Joined
- Feb 7, 2020
- Messages
- 3
- Reaction score
- 3
Oops, should have realised you were in Canada, I guess sending parts across the ditch is a bit of a waste of time. Sorry about that.
Jeff---Ahh well, a nice thought anyways. 4033 Traxxas are my "Go to" carburetor on most of my 1" bore engines. I have about a dozen of them. Right now I'm looking at building a choke for the one in this thread.--Brian
I have switched carburetors and am using a 4033 Traxxas Pro 15 carburetor now. I'm still having problems with the acceleration under load.
Brian, have you considered using the exhaust pressure to help feed the fuel?
Ray
No, I haven't considered using the exhaust gas to force the petrol up to the carburetor. I know that they do that on two stroke model airplane engines, but I've not seen it done on a four stroke stationary engine. This morning I designed and built a choke to see what effect it has.---Brian
I think I am going to "throw in the towel" on this project. I've spent two months working on it, with a few successes, but more failures and I've nowhere more to go on it. I will still wait until I get my two new sparkplugs from Roy Sholl and try the engine with them, but if I don't see a world of improvement, I'm going to call it quits. It has been an interesting but frustrating project, but I haven't been able to make it work the way I had hoped. Ah well, nothing ventured, nothing gained. I will offer this word of advice---If you design any kind of i.c. engine, don't put the sparkplugs at the bottom of a horizontal cylinder. I run a bit of two cycle oil with my naptha gas fuel to lubricate the Viton ring, but what I'm finding is the oil separates out in the cylinder and constantly fouls the sparkplugs. These engines don't run hot enough to burn the oil when running at low rpm. Thanks very much to everyone who has followed along.---Brian
Similar threads
- Replies
- 1
- Views
- 182
- Replies
- 11
- Views
- 1K


![Learning AutoCAD Civil 3D 2014 [Online Code]](https://m.media-amazon.com/images/I/51F3yi9fokL._SL500_.jpg)


