Smithy owners...

Home Model Engine Machinist Forum

Help Support Home Model Engine Machinist Forum:

This site may earn a commission from merchant affiliate links, including eBay, Amazon, and others.

rlukens

Well-Known Member
Project of the Month Winner
HMEM Supporting Member
Joined
Feb 23, 2010
Messages
136
Reaction score
60
Location
SW Florida
Greetings,
I'm just getting to know my Smithy 3in1 (Midas 1220XL LTD). I've worked most of the bugs out of the machine. I see some more improvements that I'll make, but over all I'm not disappointed with the machine. Except, I am thoroughly disappointed with the quill feed. As it stands, there is no accurate way to drop the quill a predictable amount. One notch on the dial (I haven't calculate it exactly) is a whole bunch. Have any of you owners improved on this?
Russ
 
About the only thing you can do is to install a quill gage.
 
The quill is similar on many machines. The issue is the backlash. As Wizard mentions a quill gauge is very useful and lets you know where you are, and if you snug up the quill lock just a touch it helps with the jumpy movement downward, but you then really notice the backlash in the dial (again the quill gauge helps here). Could also be the quill balance / return spring isn't tight enough - you could try giving it one more turn tighter but be careful with it - they bite! Playing with it is a job for wearing leather gloves.

Mike
 
As far as I know, the Smithy milling head is based around a Rong Fu design.

These are renowned for unstable quills, either dropping when half way through a cut or being very difficult to put an accurate cut on.

There is a way to check out the quill to see if you have a problem.

First, unplug the machine.

Then feed the quill down until near full extension, then without any further handle movement and the quill lock OFF, try to lift the quill up by lifting on the bottom of it. Usually you can get up to about 5mm upwards lift if you have a bad one.

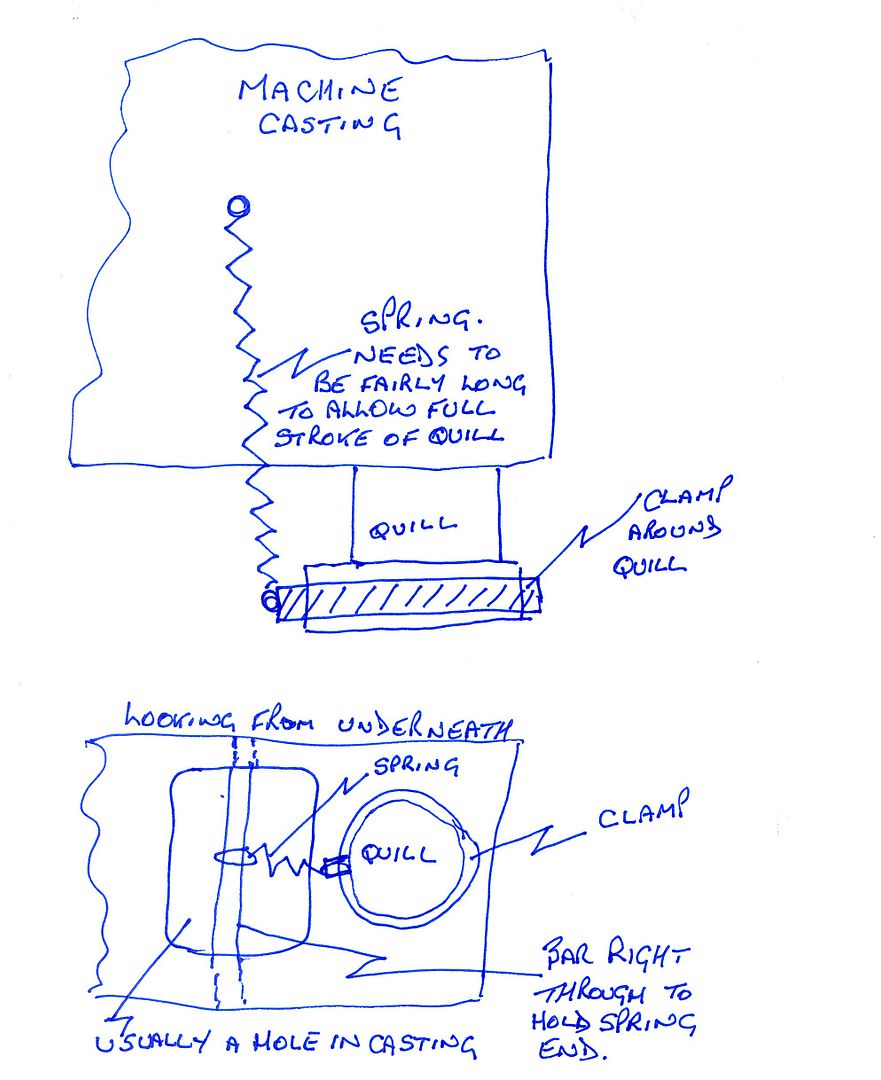
If it does lift, then there are ways to cure the problem. You need to make a fitting around the bottom of the quill and put a long spring onto it to lift the quill into the upwards position. Once that is done, you should find most of your problems disappear as the quill now has to be forced down against the spring pressure with either the fine feed or the drilling handle.

If you do have this problem, just ask and I will make a sketch to explain things a little better.


John
 
Thanks for the responses. Yes, I understand a "lifting" spring will eliminate the backlash. I'm leaning towards Blogwitch's solution... simple and positive. On the other hand, I like Ninefinger's idea because it would give me an opportunity to get into the whole feed mechanism and make some other improvements.
Another vote for Blogvitch is the fact that I'm adding a 6" DRO to the spindle. The bracket for the spring will double as a mount for the scale.
Wow, an LCD readout for $27.00... amazing.
http://www.ebay.com/itm/231603672811?_trksid=p2057872.m2749.l2649&ssPageName=STRK:MEBIDX:IT
 
Last edited:
Hmm, the best modification I made to my Smithy was to sell it and buy 2 separate machines..

It was only then I realised how cr@ppy the Smithy was! :fan:

Having said that, it was an affordable way to introduce myself to the wonders of machining. I think from memory it was possible to fit a small scale or modified digital caliper up through the castings. I have to say the digital quill scale on my SX3 mill is really useful (even with a Z axis DRO).
 
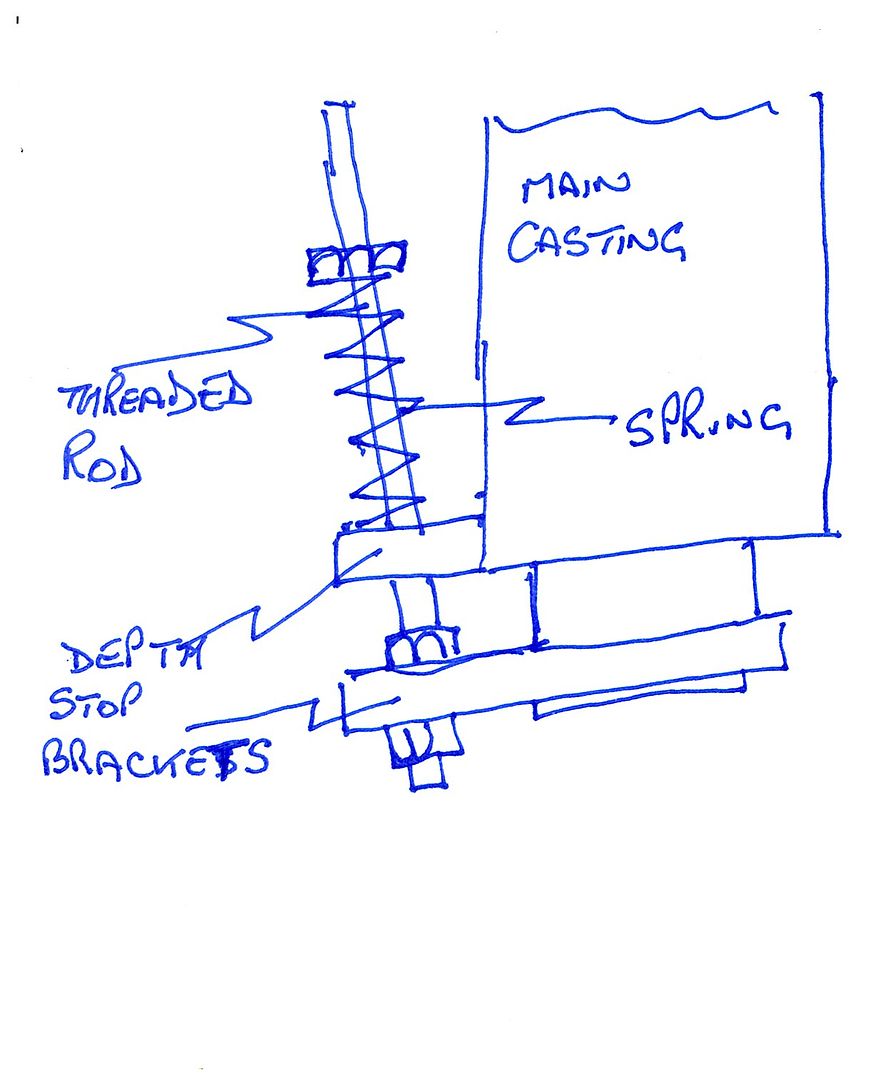
To get back to the original problem, here are a couple of ways to solve the 'dropping quill' syndrome.

It does require making a clamp ring around the quill plus drilling through the main casting to make a nice job of it, and is a fit and forget mod if you can get a spring that will keep upwards tension over the whole range of the quill.

scan0014_zpsuolvlcoq.jpg


This mod is the one I first used and it doesn't require major surgery, but it does have it's limitations, you have to fit a longer threaded rod than the spring so that you can still use it after the spring has got coil bound due to the quill being fed down, you then need to wind the top nut back to allow the spring to relieve itself of being coil bound and so the quill to go down further.
Sorry about the leaning threaded rod, time to get my eyes checked again.

scan0015_zpsdezslfsx.jpg


I hope this explains things better.


John

All good ideas Blogwitch. I took the entire quill apart. Turns out the screw that hooks onto the quill spring was missing. Also the ball dedent on the gear shaft was missing. While I had it apart I dressed leads on the worm gear and its mate. I've now got plenty of uplift and I can switch from rapid to fine feed with a nice click. I was disappointed to see that the actual quill had 2 shims glued on it (top to bottom). I guess to remove play? Never saw that before.
 
I think you will find that tightening up the handle tension spring on the LHS will do nothing for the up/down backlash on the quill, all it will do is make the drill handle more difficult to pull down.
This design of the Rong Fu mill head must have been around for at least 40 years, maybe longer, and it is still being used on a lot of newish models and people don't realise, and even the modern versions still haven't had this problem solved, so you are not alone with your 3 in 1, some people have spent a lot of money on a single milling machine and don't realise that their design is that old or bad.
This one has the same design of quill, but can get away with it by not using the quill as it has a Z axis table lift to put the feed on.

http://www.chesterhobbystore.com/626-turret-mill-3999-p.asp


John
 
Hmm, the best modification I made to my Smithy was to sell it and buy 2 separate machines..

It was only then I realised how cr@ppy the Smithy was! :fan:

QUOTE]

Rod,
I grew up in a tool shop. Retired now, my 2 car garage shares duties with 2 classic cars, a wood shop, a metal shop, a wall to wall work bench, lawn mowers, boat stuff, and cabinets full of tools and other "goodies".
At this stage in life, I'm enjoying the challenge of producing parts on a "crappy" machine. Some one else said the quality of a machine depends greatly on the operator.
Geeze us old farts do get testy. lol
Russ
 
I knew I'd get egg on my face. To be fair, I made a lot of money using my Smithy and it paid for my new machines. I fitted a 4 jaw chuck to it and I had to indicate in every part I cut even with a 3 jaw chuck as the plastic rod I use was so irregularly shaped. I don't need to use the 4 jaw any more and I don't need to indicate the parts in on my new lathe. You can't really compare a 130 kg 3 in 1 with a 280 kg lathe with a power cross slide. So many problems just disappear due to the extra stability and my productivity doubled. That was important given I'm not yet retired and sometimes the machining I do is a chore, not for enjoyment. We are all challenged for space, my shed is only 4' x 8' so I had to sell my drill press to make space for my mill (and it took me about 3 months to work out where to locate the mill in my shed before I bought it.

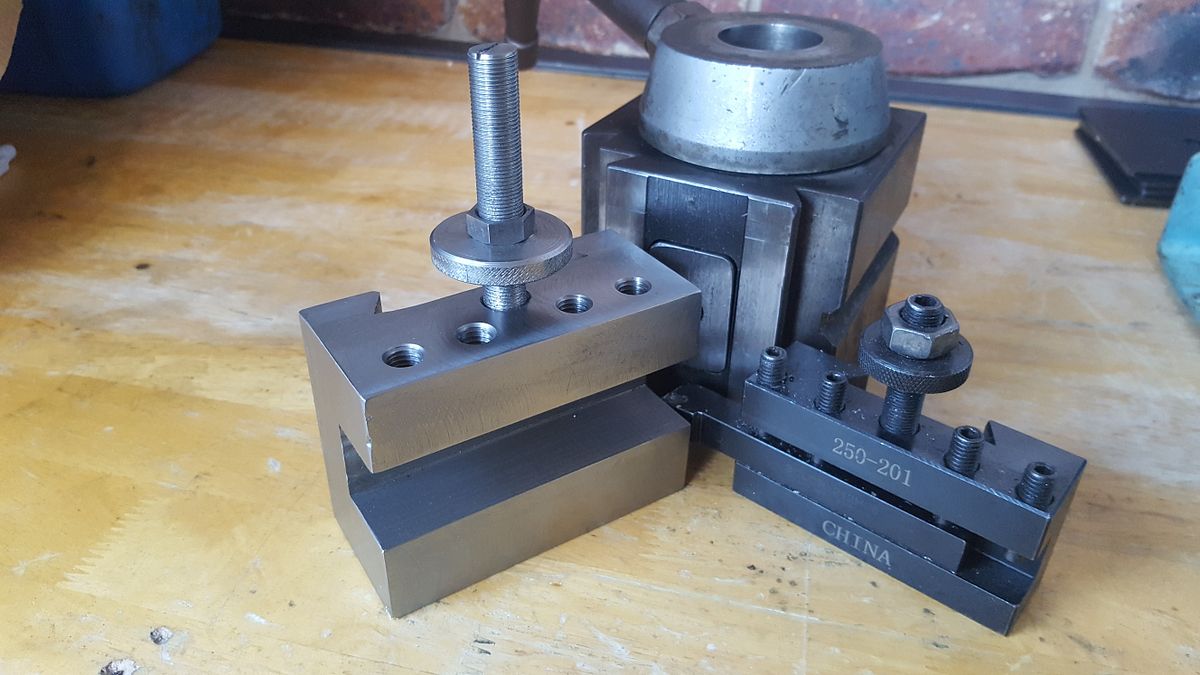
But my lathe is still just a pup in comparison to commercial lathes. Have a look at this Quick Change Tool holder I made on my mill today for a lathe with a 70 mm spindle bore and 315 mm chuck I have at work! It dwarfs my tool holder on the right!

20170226_174854_zpsovwy2uyx.jpg


I would not have dreamed of milling a part this big on my Smithy. If I did tackle it, it would have taken days becasue I could not hog into it with a 3mm cut like my little SX3 lets me do.
 
Everybody to some extent is cramped for space! I think the frustration many have is that these designs have been in production for so long with well known issues.

I've been personally frustrated with some of the machinery I've purchased. The quality of the imports varies widely, some things work as expected and then other things turn out to be complete trash. As an example I've purchased three tools from Grizzly, the small jointer was fine and surprisingly so was the g0622 bandsaw. The drill press however wasn't so impressive!!! Your odds are better in Las Vegas when it comes to getting good value for your money.

In the end it is all about the money. If you like the idea of buying kits to finish these low end machines have their place. Sometimes though the feeling of getting ripped off is very real. This leads to some of the comments you see about 3 in 1's.
Hmm, the best modification I made to my Smithy was to sell it and buy 2 separate machines..


It was only then I realised how cr@ppy the Smithy was! :fan:


QUOTE]


Rod,

I grew up in a tool shop. Retired now, my 2 car garage shares duties with 2 classic cars, a wood shop, a metal shop, a wall to wall work bench, lawn mowers, boat stuff, and cabinets full of tools and other "goodies".

At this stage in life, I'm enjoying the challenge of producing parts on a "crappy" machine. Some one else said the quality of a machine depends greatly on the operator.

Geeze us old farts do get testy. lol

Russ
 

Latest posts

Back
Top