Open Column Launch Engine from Kit

Home Model Engine Machinist Forum

Help Support Home Model Engine Machinist Forum:

This site may earn a commission from merchant affiliate links, including eBay, Amazon, and others.
Carl,

zeeprogrammer said:
The instructions called for using an edge finder and moving the center drill as required. But the instructions also called for using scribe lines and a height gauge. Their idea being to use the edge finder and see that you're over the scribe mark. I can't say I understand that. I don't know how to use an edge finder yet and this would have been a good time to learn. But I went for the scribe lines only.

I see that you sight located the crossing for the first hole. For the subsequent ones did you also go by sight or did you use the first hole as origin and dial to each of the others?

Alan
 
Alan,

I sighted them too. Your question implies I should have dialed to the others? Assuming so, I thought, why bother then with the other scribe lines? Perhaps as a way of verifying that I dialed accurately?

By the way...for other newbies like me...if you do scribe lines...do it lightly...only need to remove the dye...not metal.

Thanks Alan.
 
On a previous subject...convex cuts....

I faced a 1" dia aluminum piece tonight...
(For those who noticed my other posts tonight...I did the cutting prior to the wine. Only my typing may be affected. Well not only...but I won't be cutting.)

Not convex. Not concave. Checked with a machinist square with a light behind it.

Difference? Not sure. But I did use a carriage stop and held the carriage against it while I cranked the cross slide. There's not a way to lock the compound rest is there? (Or cross slide for that matter.)

Regards,

 
Since learning to use an edgefinder, I hardly ever do layouts any more. The machine can move to the new location much more accurately than I can (re)locate to a layout intersection line.

That is not to say that layout lines aren't useful for preventing gross mistakes. However, in most cases I can do a sufficiently accurate "sanity check" with calipers or a six inch scale.

My suggestion would be that, as a novice, you continue to layout but do the actual tool (re)location via the dials. As your confidence grows, you'll develop a sense for when you really need layout lines and when you can simply chuck the part in the vise and use the edgefinder and dials.

Most lathes have a positive carriage lock, often operated by tightening a nut located on the top of the carriage. It should be used in every instance where the cut does not require the carriage to move, e.g., facing, parting. I got annoyed fiddling with a separate wrench on my lock and made a handled nut to fit it so all that's required to engage it is a thirty degree twist of the handle.

Most lathes I've encountered have no singular compound lock but they do have gib adjustment screws. Mine has three so I replaced the middle one with a handled screw that allows me to lock the motion when necessary. Purists will admonish me for gib-adjustment-abuse but it works for me.

My lathe is a 12 x 36 so some of what I've written re locks may not apply to the smaller machines. Perhaps others with such machines will chime in.
 
While waiting for some tools to arrive...I thought I'd have a go at the crankshaft.

The instructions call for the pillow block bearing and rotary valve to be done first - flywheel after. The crankshaft has to fit all three so I'm thinking there's some dependencies here and that it might be best to 'fit' the crankshaft to the other pieces.

So instead of doing the whole crankshaft right now...I thought I'd just see what it would take and just get the crankshaft ready for machining. So I'll face it and put a countersink in for a live/dead center. It's a longish piece.

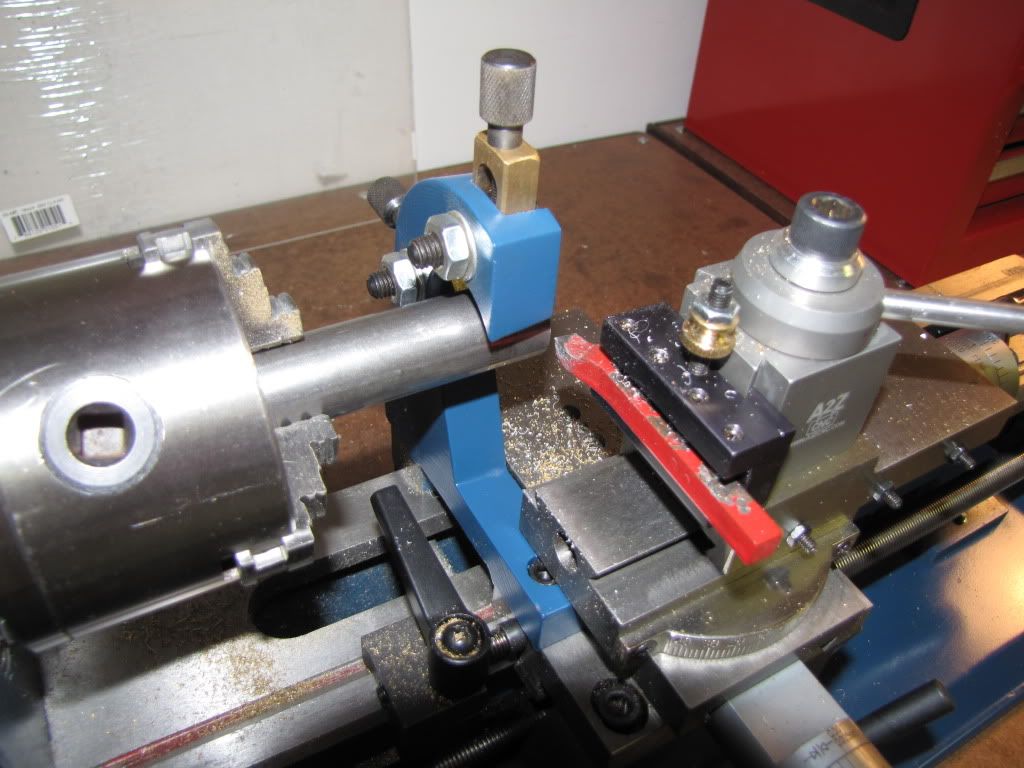
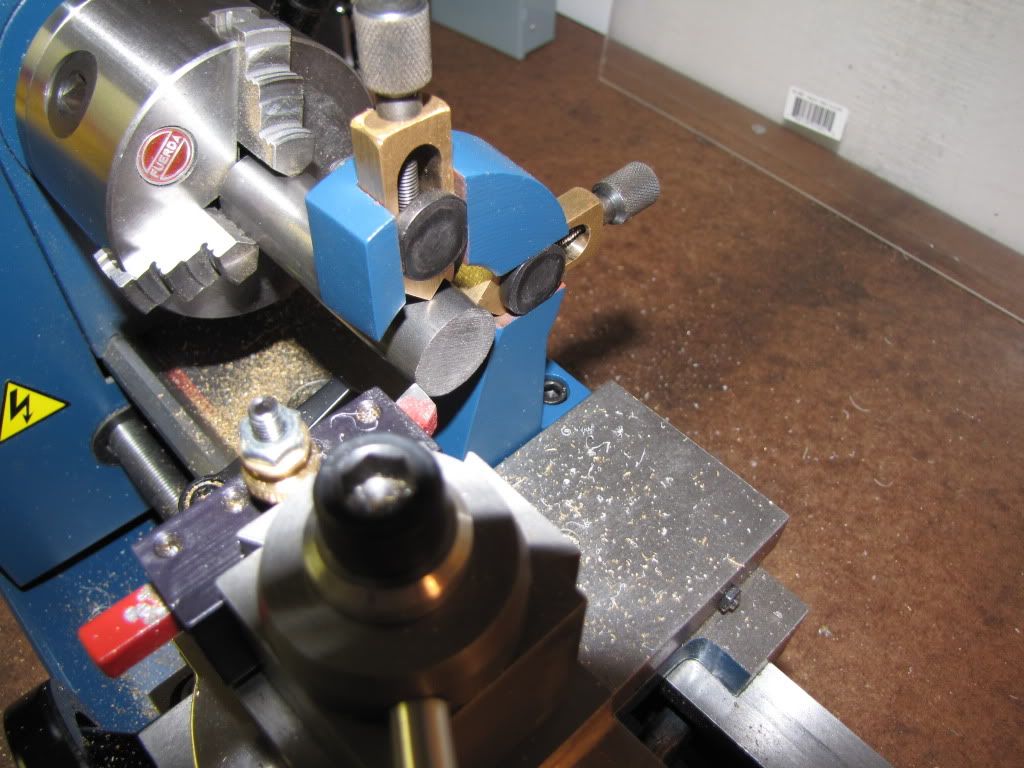
Being a long piece it seemed a handy time to learn how to use a follower. Here's my setup...

IMG_0117.jpg


And the other side...

IMG_0118.jpg


I don't know the names of the pieces...

Using the screws, I adjusted the pointy things until they were just touching the part. Then I tightened down the bolts. I hand turned the spindle to see what play there was and then ran at slow speed to double-check.

Then I faced it. Nothing came off where the follower was contacting the part...but you can tell there was a light rub. Okay?

A little smoke. Some spray coolant. But everything seemed to stay cool. I took light cuts. No coloration on the chips. (I had blue ones when I made my first project - a set of machinist jacks. Different steel.)

I left everything in place, chucked a center drill in the tailstock and drilled the countersink making sure I didn't go past the bevel on the bit. (Newbies...if you go past the bevel, the live/dead center will only contact the edge.)

Everything seems okay. I await the suggestions/criticisms of the knowledgeable ones... ??? ???

I have to turn this part down from ~0.875 to 0.2183 for 2.31. That's a lot of hard metal to me. Any thoughts/warnings you all can offer? ??? ???

Lastly...I have both a dead and live center...why wouldn't I always use the live center? ??? ???

Thanks all for your time.


Hi zee ,Lastly...I have both a dead and live center...why wouldn't I always use the live center?
The Dead center goes in your head stock when your turning between centers and rotates with the work,
Regards Rob
 
mklotz said:
Most lathes have a positive carriage lock, often operated by tightening a nut located on the top of the carriage.

Most lathes I've encountered have no singular compound lock but they do have gib adjustment screws. Mine has three so I replaced the middle one with a handled screw that allows me to lock the motion when necessary.

Thanks Marv. I do have a carriage lock. I hadn't tried it yet. Now that I see what a great difference it can make...I'm going to install it.

Gib adjustment screws: That's exactly how my mill does it to lock the table axes. When I was facing the crankshaft (my last post) I noticed the compound rest feed handle moving - it could be that I hadn't taken play out or the compound rest needs some adjustment. I'm still learning how to adjust things. I'll wait to use a handled screw until I learn more.

Thank you.

Rob...just saw your post. Yes I see. I haven't done something like that yet. Thank you.

 
Live centre vs. dead centre - I was pleased to see your question on this Zee, as I had no idea of the answer. I know Rob has answered the point, but the following expands this a bit more and may be of interest .....
http://www.cnczone.com/forums/showthread.php?t=77233

As I have said before, I think this is a great thread to follow, me being a fellow newbie etc.

Keep up the good work, and keep asking the questions!!

Regards, A
 
I just noticed my karma went up.

Thank you very much.


Just saw your post 'A'. Thank you. And thanks for the link. I enjoyed it.
 
I sense the live/dead center confusion arising again.

In the USA the conventional usage of the terms is:

dead center - a non-rotating center in the tailstock used to support the work. Since the work moves relative to the center, lubrication is required and, as the part heats up and expands, it may be necessary to back off the center slightly to reduce friction. Although arguably more accurate than a live center, they can be fiddly and require the machinist's attention.

live center - a tailstock center fitted with thrust bearings such that it rotates with the work, thus eliminating the friction problem of the dead center. Inevitably, there's a bit of play in the bearing(s) but, with a quality live center, the hobbyist seldom needs to worry about it.

Now, Rob described a dead center as going in the HEADstock and rotating with the work. This seems to disagree with what I wrote above but in reality it's just semantics. Rob's center is "dead" because it's not turning wrt the work. I've heard this usage from older American machinists and some European machinists.

Neither interpretation is right or wrong; it's simply a matter of usage. However, as a novice, you should be aware of the two interpretations since you may encounter both in the future.

For the job you've described, I would use the live center (USA interpretation) to support the work. Use the dead center when guiding taps, reamers and the like. Also, use the dead center when checking the TS alignment.

I gather that the stock is sticking out of the chuck that far because its diameter is larger than the spindle bore. (Normally, facing would be done with only a half inch or so of the stock sticking out of the chuck.)

It looks (can't quite tell from photos) as if your steady is attached to the carriage, in which case it's termed a travelling steady as opposed to the fixed steady that attaches to the lathe bed.

Supporting the stock with a travelling steady while turning the end down will be finicky. The steady jaws will need to be readjusted after every cut. That's doable but a real pain.

If you have a fixed steady, can you support the not-to-be-turned portion of the stock with it while making your cuts? That might be simpler than using the traveler.

Actually, given that you're going to support it with a TS center, I question whether you need a steady at all. 0.218 for 2.3" shouldn't be a problem assuming you take light cuts when you get near final diameter.
 
Well Said mklotz, ;D, I am not the best at describing what i am trying to get across.
Rob
 
Marv: Thanks for clarifying terms. I used a traveling steady (I had said 'follower') but I did not move the carriage - only the compound while I faced. (I guess you could say I used it as a fixed steady.)

Yes, stock is sticking out because its diameter is larger than spindle bore.

mklotz said:
Supporting the stock with a travelling steady while turning the end down will be finicky. The steady jaws will need to be readjusted after every cut. That's doable but a real pain.

I hadn't planned to use the steady while turning. I have to turn for ~2.3" out of 3". That leaves less than 0.7" to hold in the chuck. A steady would be painful indeed. So it's the live center I'll be using with smaller cuts as I get close.

Thank you.
 
I confess. One of the reasons I put off doing the port and pillow block before the crankshaft is that the instructions call for flycutting. I've never done that. In addition, although I have the flycutting holder...I only have blank tool bits. I would have to make them (yet another thing I haven't done before).

However, the instructions say the operation could be done with an end mill!

Yeah yeah. You're right. This thread about learning...not just building.

So...

I have the LMS set of 3 flycutters. 1/4, 3/16, and 5/16. Which to use? I'm thinking the 5/16...but would a knowledgeable one have some comments as to what goes into the decision? ??? ???

As for the cutter itself...I have a Ryobi out-of-the-box grinder. Used once to make a parting tool from a hacksaw blade (and a successful adventure by the way). Two questions: ??? ???

1) What shape am I trying for?
2) Does the bit needed to be honed? (In which case it's back to shopping.)

Thank you all. In the meantime...it's off to the books and google to see what I can see.

Oh...I know enough to keep a container of water nearby for cooling and to cool every few seconds. But that's all I know.

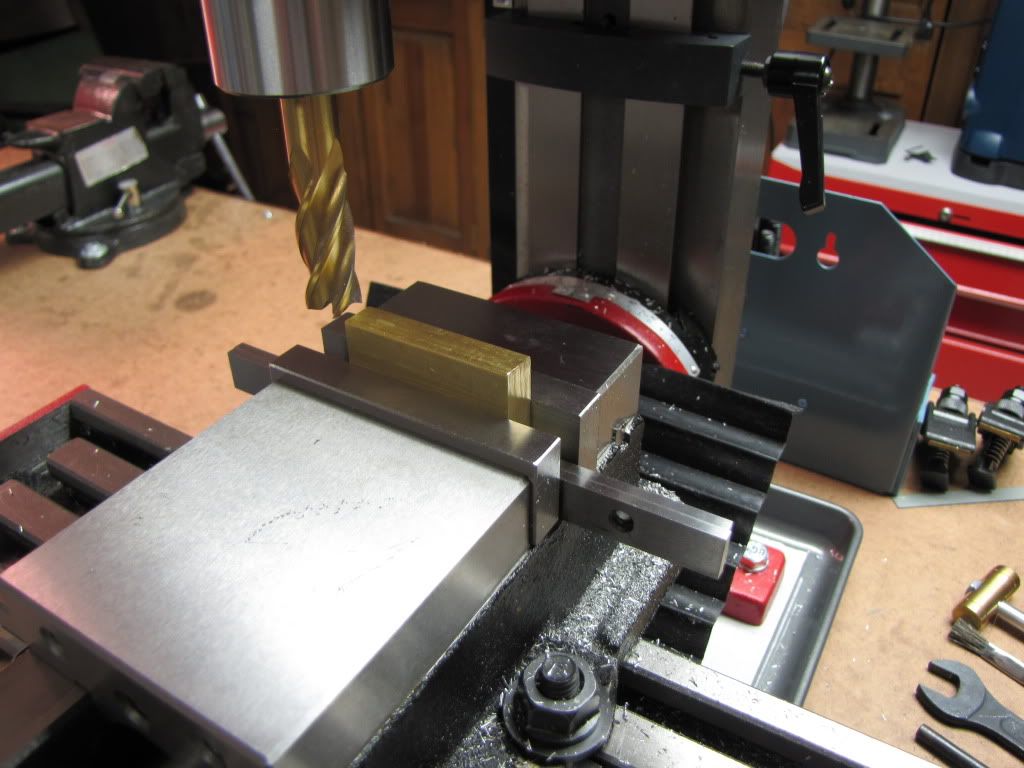
Here's some pics of the 1st operation on the blocks:

Need to trim width from 1.0 to 0.81. Here's the setup...

IMG_0120.jpg


Trimmed one side by 0.10.
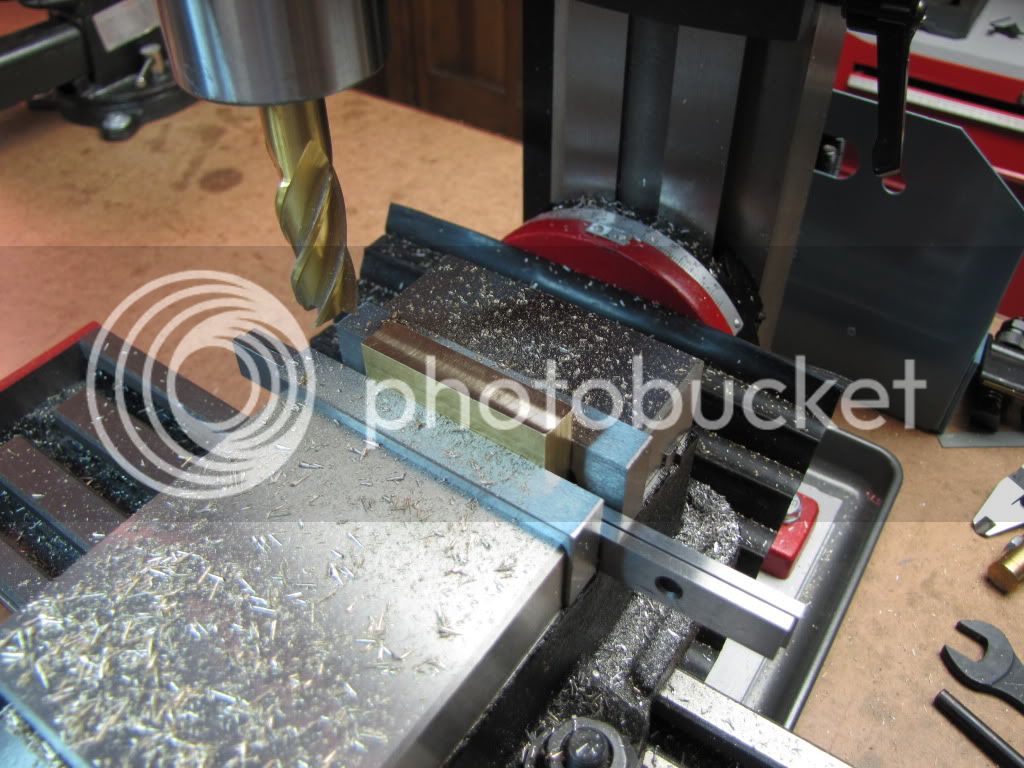
Touched the edge corners with scotchbrite to deburr a little then flipped over and trimmed the other side.

IMG_0121.jpg


360 half hard (HO2) brass.

0.81 +/- 0.001. Good!

You might notice the plastic guard missing from the mill. I use a floor lamp with a magnifying glass in it between me and the work. I also wear glasses.

Thanks all.

Oh my. Before someone else points it out...I failed to lock the Z travel stop. Foo. I did lock the head and the Y axis though.
 
Carl,
I have noticed in your milling photos that you have the end mill extended quite a distance from the collet. If your collet/spindle permits, you will improve the rigidity a lot by inserting the end mill into the collet as far as you can while still clamping on the solid portion of the end mill. I use endmills with a short flute length when ever possible and reserve the longer flute endmills for use only when I really need them.
Gail in NM,USA
 
GailInNM said:
If your collet/spindle permits, you will improve the rigidity a lot by inserting the end mill into the collet as far as you can while still clamping on the solid portion of the end mill.

Thanks Gail. Yes I have nearly 1/2" more of solid shank I can use...I will use it in future. I am learning just how important rigidity is.
 
I have to turn this part down from ~0.875 to 0.2183 for 2.31. That's a lot of hard metal to me. Any thoughts/warnings you all can offer? Huh? Huh?

This is a bit late but...

When you're going to be turning down to a relatively small diameter (7/32 in your case), ensure that your center hole is small enough that you'll still be able to reach the work with the lathe tool without interfering with the TS center.

It's difficult to describe what I'm getting at clearly so do a little trial. Take a scrap of 1/4 (close enough to 7/32) and center drill it exactly as you did on the crankshaft piece. Now, install the TS center and see if you have clearance to take a cut on the stock with the lathe tool you intend to use for turning down the crankshaft.

In the extreme case of what I'm on about, if the diameter of the center drill hole is greater than 7/32 (e.g., you used a 1/4 or larger center drill) then the lathe tool is going to hit the tailstock center before you reach your target dimension. Even if it's less than 7/32, you may not have adequate clearance to get the lathe tool in to make the final cut(s).

When you get near your target dimension, let the part cool off while you take a coffee break. Removing a lot of metal will heat the stock and the consequent expansion will give you a false reading of the room temperature size.

This is rather nit-picky stuff but it exemplifies why we think through the complete operation thoroughly before making chips. I wouldn't bore you with such minutiae had I not made the mistakes detailed above myself.
 
Thanks Marv.

I had used a #1 center drill (~0.123 dia). So I think I lucked out...but only because I followed the instructions. Had I not had the #1, or had the instructions, I could have easily made that mistake. Thanks.

Also thanks for the tip on expansion. I'll have that coffee when it comes time.

There is nothing nit-picky to us newbies...and I can't imagine you could ever be boring. :)

Your point is very important. I've made the mistake thinking I had thought the operation through up to the first cutting pass. Your point, I believe, is the operation is from setup to finished part (if not even up to removing the part) and one has to consider the path of the cutter along with everything else that moves.

 
zeeprogrammer said:
Your point is very important. I've made the mistake thinking I had thought the operation through up to the first cutting pass. Your point, I believe, is the operation is from setup to finished part (if not even up to removing the part) and one has to consider the path of the cutter along with everything else that moves.

Well not one to admit, wasn't me, was a case of too much coffee :) Using a live center and watching the material progressively reduce in size till the cutting bit decides to chew on the live center for a while. Live center dia is greater than the dead center. Bit hit it well before the stock was close to size. All kinds of little things happen to us newbies, I just chalk em up as part of the "Adventure"
 
There is nothing nit-picky to us newbies...and I can't imagine you could ever be boring.

Your point is very important. I've made the mistake thinking I had thought the operation through up to the first cutting pass. Your point, I believe, is the operation is from setup to finished part (if not even up to removing the part) and one has to consider the path of the cutter along with everything else that moves.

Thanks. My greatest fear is to turn into a boring old man.

Not to go all Zen on you but one thing I've learned is that metalworking, while being fun and gratifying, will also teach you a lot about how to think through problems thoroughly thus making you a better craftsman, a better citizen and, ultimately, a better person.
 
My fear was sitting on a porch watching the world go by. Now it's the fear of running out of time. (Well that and fire.)

Thanks Marv.
Thanks Foozer.
 

Latest posts

Back
Top