New Mill

Home Model Engine Machinist Forum

Help Support Home Model Engine Machinist Forum:

This site may earn a commission from merchant affiliate links, including eBay, Amazon, and others.
black85vette said:
I did notice the head drop down some but just locked it anytime I was cutting and it seemed to be OK with that. I did have some trouble with a plunge cut. When coming straight down into the work piece it started jumping and chattering. Did that even with the X and Y locked. Not sure what is up with that. I will have to try it again.

No...I was referring to moving the head to get to a Z before locking. Using the fine wheel was tricky for me. When I thought it moved...it hadn't...and when I thought it moved a little it had moved a lot. I'm dying to put DROs on.

As for plunge cutting...I haven't had too much problem except with brass. Really tries to pull the head down. There's been a thread or two on that as well...in particular the kind of end mill or drill bit to use.

That reminds me...when edge milling (particularly climb milling) I can feel the table being pulled into the cutter. But I have a ways to go in learning about feeds and speeds too.
 
zeeprogrammer said:
Using the fine wheel was tricky for me. When I thought it moved...it hadn't...and when I thought it moved a little it had moved a lot. I'm dying to put DROs on.

Yes, I am thinking a DRO for the Z axis is not far off. I also wonder if the air spring conversion helps with this since it would tend to pull the backlash out (I think).

[/quote]
That reminds me...when edge milling (particularly climb milling) I can feel the table being pulled into the cutter. But I have a ways to go in learning about feeds and speeds too.
[/quote]

I use climb milling very sparingly because of backlash. When I do use it I only take off a thou or two for a finish cut. That is not just with this mill but the Bridgeport I learned on and the Enco knee mill at my friend's shop.
 
The head likes to drop down for sure, especially for the first or second fine adjustment I make after beginning a facing process. I take my D.I., mounted on the magnetic base, place it on the bench next to the mill table and point it straight up into the bottom of the head. Each time I unlock the Z axis I watch the D.I. to monitor the drop.

Someday I'll go for a DRO but there are other things I need first, like a rotary table.

-T
 
GUys the Z axis is tweaky on the x-2. Similar to TS I put a DI on the mill dovetail usually above the head. Many of my adjustments for depth of cut especially on fly cutting is just unlock the head and re lock it that is usually good for a few thousandths. I can not trust the numbers on the down feed knob either.
Yes a dro would be great.
I need to finish my cnc build it is 95 % done
Tin
 
Trout and Tin;

Thanks for the tips. That is a quick and easy fix. I think HF has the magnet DI in stock.
 
My observations on the X2.

I bought my X2 from Harbor Freight in late 2003, so I've had a couple years to fiddle with it.

Don't trust the handwheel markings. I used a DI to measure all movements for years and finally fitted a DRO last year.

Check the tram regularly. It gets out of whack easily. I don't know how quickly the spindle gets out of line with the Z dovetail, but it does happen.

Check and adjust the gibs regularly. It doesn't take much at all to cause big results in the table. It's a very fine line between "almost there" to locked up tight. The table will be somewhat stiff to move when adjusted properly.

The thrust bearing on the X axis works loose and needs to be pressed back. This affects the X-axis backlash. Avoid climb milling, the machine really doesn't like it. The Y-axis doesn't have this problem.

Try shimming the Z-axis "fine tuning" block (the handwheel) out away from the head. A couple pieces of aluminum foil worked wonders for me, took some of the stiffness out and reduces backlash a little. Much less force is needed to raise and lower the head. The universal joint between the handwheel and the rack pinion is pretty sloppy. I'm thinking of replacing it with a straight solid rod.

The Big Nut: When you tighten up after tramming it will throw the tram out. You will have to "over tram" a bit to compensate. This is one of those "get a feel for" things you will learn as you get to know the machine. You may have to adjust several times to get it right.
With practice you'll be able to get it dead nuts when it's tightened up.

If possible, upgrade the locking levers. The OEM ones wear out quickly.

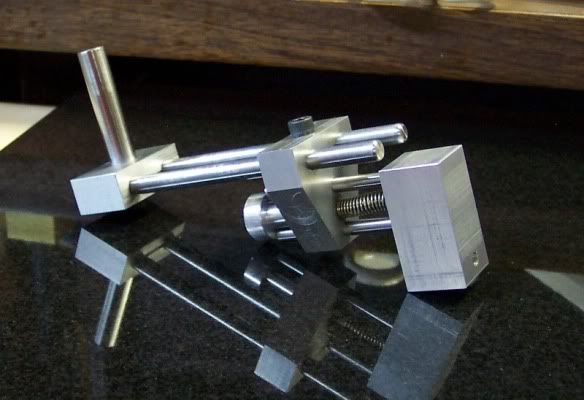
Make a Zero-It clone, it's good practice and you'll have a very useful tool for tramming and centering when done.
tn_zeroit.jpg
 
A very common complaint by X2 owners is the inability to make accurate Z axis adjustments because of backlash, etc. DRO installation can be quite expensive. An easy and less costly solution is to mount an inexpensive dial indicator upside down on a small fabricated block of aluminum, bolted to the movable head-stop that is on the column. Move the mill head down 'til the cutter just touchs the workpiece, lock it, then move the head-stop up to zero the DI. Then future adjustments accommodate any backlash and you always accurately know where your cutter is (heighth-wise) in relation to the workpiece. Sorry I don't have any photo's, I recently sold my X2.
Zeeprogrammer, you were lamenting on the amount of Z axis travel. Depending on the particular brand of X2, there are two different lengths of the rack gear on these machines. Make sure you have the long one. If you don't, the long one is available from LMS.
 
Great tips ksouers. Very helpful.

Thanks gunboatbay. I have the Z extension/spring load mod kit. I hope to do that over the holidays.

As for going out of tram...I've often wondered what the effect is on wrenching the draw bar in the spindle. I would think it make a difference to put force in Y rather than X?
 
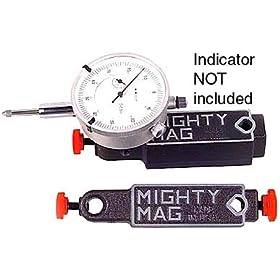
Well I think I have the Z axis (or is it the Zee axis??? :big:) measurement figured out on the cheap. Down to Habor Freight to pick up another dial indicator for $10. Took some scrap aluminum and milled out a pocket for two .708 diameter rare earth magnets. Epoxied them in and attached the DI. You can mount it anywhere on the right side of the upright post that suits you. The DI is up and away from the flying chips and in an easy to read spot. See what you think.


IMG_1821.jpg


IMG_1820.jpg
 
Looks great to me. I'm looking to make improvements over the holiday so this helps.

And no...not a Zee axis. Don't do that...I know how names can stick...just ask 'Idjit' ;D
 
black85vette, your X2 looks to be the Harbor Freight version that is sold under the
trade name "Central Machinery". My own X2 was a step down from that on the
scale of being "generic". I bought mine from a Cummin's Tool, traveling truck sale. ;)

Best thing about the X2 is there are many inexpensive modifications available for it.
You WILL break at least one of the plastic drive gears in time. The intermediate gear
is a weak point in the drive. Last time one out of my X2 looked like this.
Broken%20Gear.jpg

I replace that once at a parts cost of $4.75 The next time I broke it the
gear box was gutted and replaced with the belt drive conversion from LMS.
A picture of my X2 with the belt drive installed.
Mini%20Mill%20Belt%20Drive%20Conversion%20Kit%20Installed.jpg

The next issue for me was the inconsistent pressure of that torsion spring on the head.
The air spring mod was another quick, easy and cheap fix from LMS.
It give you a constant 35 pounds of force that is much more predictable than the "light at the top
tight at the bottom" torsion spring.
Another picture of my own X2 showing that mod installed.
Mini%20Mill%20Air%20Spring.jpg


It is a capable little mini mill that is easy to use and inexpensive to improve.
I have pushed mine to it's limits a few times and it let me know that was pushing
too hard. A Bridgeport Mill simply doesn't fit my hobby budget OR hobby shop space.
I am perfectly happy with the performance of my little, generic X2.

Rick

 
I like the idea of the D.I. with the magnets. I'll have to make one over the holidays as well.

I've got the screen capture for the belt drive system stored in my "To Buy" file in OneNote. There are so many things to buy (and build) it's hard to prioritize. I figure I'll wait until I break that plastic gear once or twice before spending $130 or so for the mod.

black85vette, you may have heard what others have stated, that it's not if the plastic gear breaks but when it breaks. One common cause of breakage is when you forget to take the locking pin out of the spindle before powering up the mill. I've been lucky so far and haven't forgotten. I did stall the mill a couple of times, once when I forgot to lock the Z axis and the head dropped mid-cut and once when I fed too fast and too deep. I figured the gear might break both times but was lucky then as well.
 
Rick;

Thanks for the photo tour of your mill. Both of those mods are on my to do list. Glad to hear the good reports on them. Right now the belt kit is out of stock with the company that makes them and LMS. Guess I better get a spare gear in stock.

Trout;

Maybe I need to attach a "Remove before flight" flag to the pin. If you have not seen them they are long narrow red banners attached to pins that lock landing gear and other moving parts while on the ground. You CAN"T miss them. As an added check the ground crew knows how many there are and hold them up to show the pilot and give him a count of them as a verification.

EDIT: Resolved the issue with the plunge cut. No issue with the mill. It was operator error. I picked up the wrong end mill. Used the correct one and it works just fine. :wall:
 
Tin;

Dang it!!! The story of my life. I think up a cool product only to find someone else already making it.

Yep. Flags just like that. Not only used them on real aircraft but I flew RC gliders and rather than a switch we had a pin to insert and turn OFF the radio. Then had a long streamer attached to the pin. While you might forget to turn on a switch you did not forget to pull the pin with the flag on it.

So does anybody make a "Remove before starting the spindle motor" flag? Maybe this is my new product.
 
The second solution, which is the one I made for my mill, is better because once it's made and installed, you don't have to worry about finding the lock-pin each time. I downloaded the plans for this a few years ago and don't remember from where:


spindle%20lock_634x480.jpg
 
gunboatbay; I like the basic idea of the one you put on your mill. I might make something like that but incorporate a retraction spring into it. Thanks.
 
I'm going to have to do something about the pin too. Twice now I've turned the mill on with the pin in place. I've been lucky...both times I was turning it on at a slow spindle speed. It's now on my in-between project list.

Just reviewed the list...I won't be starting another project for while. :(
 
I remember seeing a spring loaded lock pin mod that was built in but cant remember where. I think minimill.com but did not see it it may have been moved to the premium content section not sure.
Tin
 

Latest posts

Back
Top