You are using an out of date browser. It may not display this or other websites correctly.
You should upgrade or use an alternative browser.
You should upgrade or use an alternative browser.
Hit me - Miss me?
- Thread starter Maryak
- Start date

Help Support Home Model Engine Machinist Forum:
This site may earn a commission from merchant affiliate
links, including eBay, Amazon, and others.
Maryak
Well-Known Member
- Joined
- Sep 12, 2008
- Messages
- 4,990
- Reaction score
- 77
Phil,
Thanks for the support. :bow:
It was a great feeling that when turning the assembly over in the lathe with the palm of my other hand over the top of the cylinder there was a good amount of suck on the down stroke. This has given me confidence that the engine will be capable of opening the inlet valve.
Best Regards
Bob
Nice to see your progress, Bob.
Glad to hear you are going to cut your own gears. I hope you'll show us the hobbing process. I think
quite a few of us have cut gears with a regular cutter or single point, but we don't get to see the hob
method everyday. Sounds great!
Dean
Glad to hear you are going to cut your own gears. I hope you'll show us the hobbing process. I think
quite a few of us have cut gears with a regular cutter or single point, but we don't get to see the hob
method everyday. Sounds great!
Dean
Maryak
Well-Known Member
- Joined
- Sep 12, 2008
- Messages
- 4,990
- Reaction score
- 77
Dean Dave and Arnold,
Thanks guys for your help and support. :bow: :bow: :bow:
Attached is a PDF of the calcs and drawing of the soon to be made gear hob. Any mistakes found will be gratefully accepted before I hack the hob.
Best Regards
Bob
View attachment H&M Hob.pdf
Thanks guys for your help and support. :bow: :bow: :bow:
Attached is a PDF of the calcs and drawing of the soon to be made gear hob. Any mistakes found will be gratefully accepted before I hack the hob.
Best Regards
Bob
View attachment H&M Hob.pdf

$403.09
DM14 Engine Build Kit, Metal Engine Build Model Great Metal Material for Engineer for Factory
Easoger Official

$156.90 ($1.40 / oz)
Replacement Combustion Chamber Kit, Burnham V8 and V8H, 1-6 Sec, 108136-01, 1129
Lynn Manufacturing

$39.99
$49.99
Sunnytech Low Temperature Stirling Engine Motor Steam Heat Education Model Toy Kit For mechanical skills (LT001)
stirlingtechonline

$99.99
$109.99
AmTech300 - Boiler Treatment Professional Strength (Rust Inhibitor For Outdoor Wood Boilers)
Alternative Heating & Supplies

$45.99
Sunnytech Mini Hot Air Stirling Engine Motor Model Educational Toy Kits Electricity HA001
stirlingtechonline

$519.19
$699.00
FoxAlien Masuter Pro CNC Router Machine, Upgraded 3-Axis Engraving All-Metal Milling Machine for Wood Acrylic MDF Nylon Carving Cutting
FoxAlien Official

$99.99
AHS Outdoor Wood Boiler Yearly Maintenance Kit with Water Treatment - ProTech 300 & Test Kit
Alternative Heating & Supplies

$188.98
TM NEXDYNAMI RE41157 Water Pump Compatible With/Replacement For/John Deere 6200 7400 6300 6600 6500 6400 7220 7600 7200 RE41157
VIVID MARKET CORPORATION

$59.99
Sunnytech Hot Air Stirling Engine Motor Model Educational Toy Electricity Generator Colorful LED (SC001)
stirlingtechonline

$94.99
$109.99
AHS Woodmaster 4400 Maintenance Kit for Outdoor Wood Boiler Treatment
Alternative Heating & Supplies

$190.00
$254.99
Genmitsu CNC 3018-PRO Router Kit GRBL Control 3 Axis Plastic Acrylic PCB PVC Wood Carving Milling Engraving Machine, XYZ Working Area 300x180x45mm
SainSmart Official
Maryak
Well-Known Member
- Joined
- Sep 12, 2008
- Messages
- 4,990
- Reaction score
- 77
Hi All,
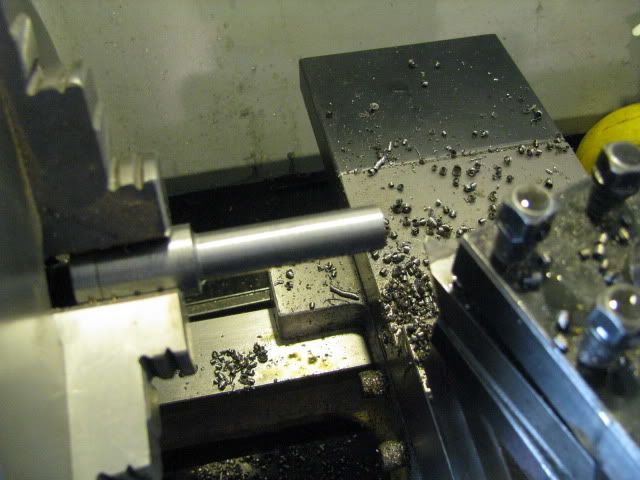
Today I managed to get the gear hob turning completed
Roughing out the hob shank.
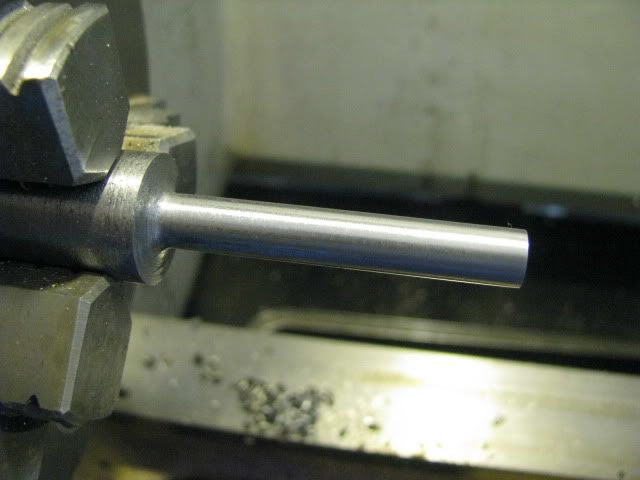
The finished shank.
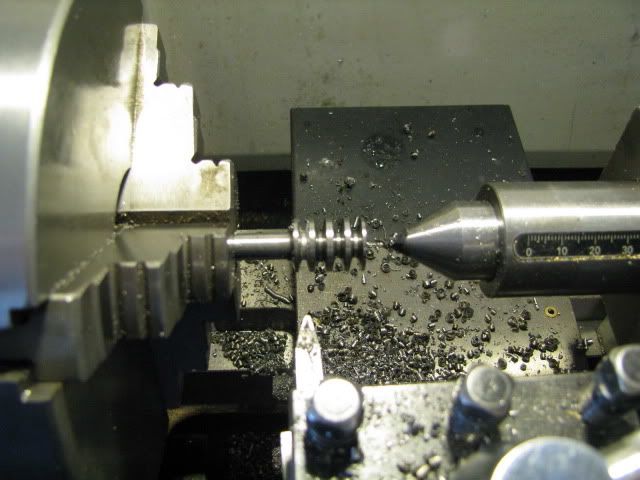
The turning part of the gear hob completed.
Next week I hope to get a little more time but I have some contract truck welding to do 1st. I have negotiated an extra day with SWMDBO.
Best Regards
Bob
Today I managed to get the gear hob turning completed
Roughing out the hob shank.

The finished shank.

The turning part of the gear hob completed.

Next week I hope to get a little more time but I have some contract truck welding to do 1st. I have negotiated an extra day with SWMDBO.
Best Regards
Bob
Maryak
Well-Known Member
- Joined
- Sep 12, 2008
- Messages
- 4,990
- Reaction score
- 77
steamer said:I have seen it used to approximate helical gears too. Your numbers seem to be right Bob, but it's 5:20 am here, and I haven't had my coffee.....
Dave
Dave - feeble excuse :
After a foray into some serious welding I made it back to the shop and here's what went down yesterday and today. I was so stuffed when I arrived home yesterday all I did was shower eat and sleep. Advancing years are a PITA sometimes.
The hob set up for milling the teeth.
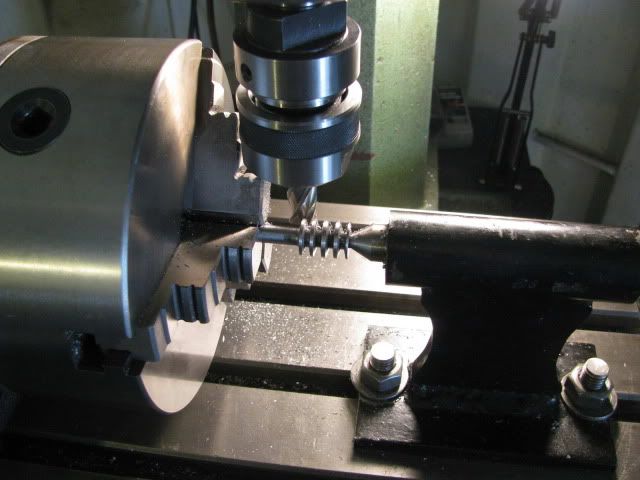
The completed hob.
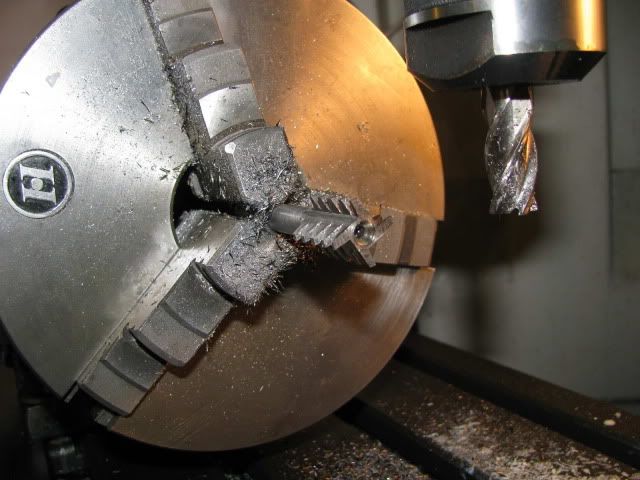
The pinion blank.
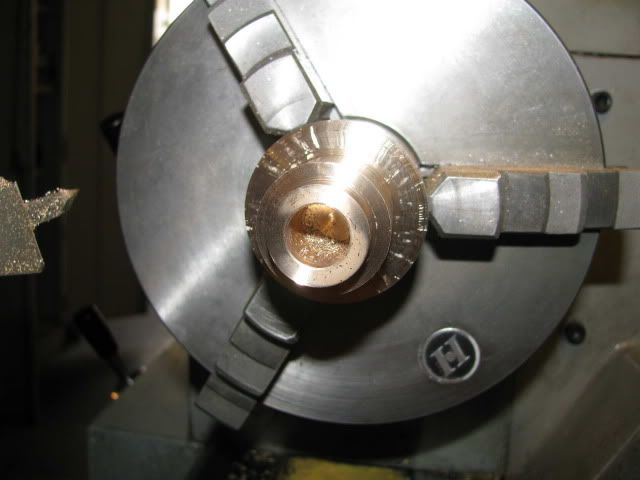
Setup for milling the pinion.
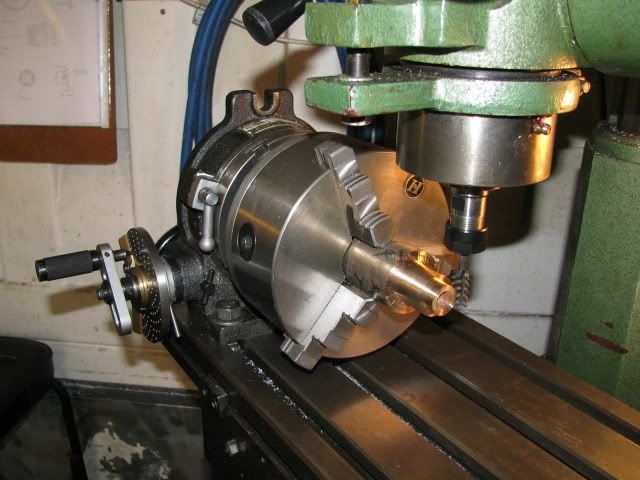
Result after the proving pass - Eureka - The hob actually cuts. ;D
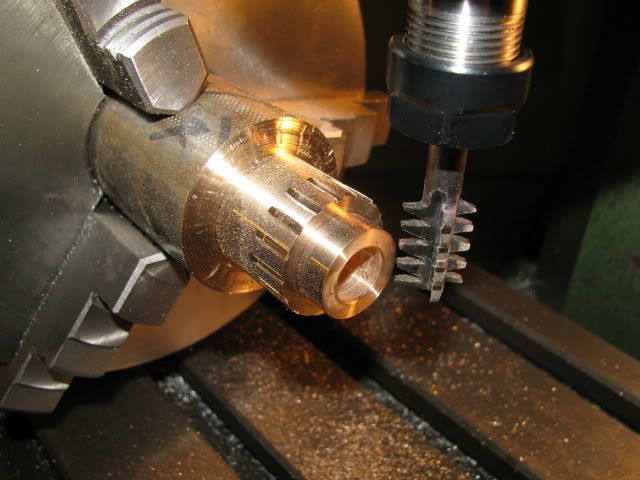
Best Regards
Bob
Maryak
Well-Known Member
- Joined
- Sep 12, 2008
- Messages
- 4,990
- Reaction score
- 77
Kevin,
Thanks for your interest and support. :bow:
Dean,
Thanks for your support. :bow:
As I did not have a magnet available, I did the hardening by colour and everybody's interpretation of cherry red is different as is the ambient light available. I was nervous that there would be more rubbing than cutting if I'd not been hot enough at the quench.
No, I did not finish the pinion - enough excitement ;D everything relevant was written on my blackboard so I can pick up where I left off next week.
Best Regards
Bob
Thanks for your interest and support. :bow:
Deanofid said:Bob, thanks for showing how you made up the hob. Kind of a tease with that last bit, ("it actually cuts").
So, did you finish the gear, then?
Dean
Dean,
Thanks for your support. :bow:
As I did not have a magnet available, I did the hardening by colour and everybody's interpretation of cherry red is different as is the ambient light available. I was nervous that there would be more rubbing than cutting if I'd not been hot enough at the quench.
No, I did not finish the pinion - enough excitement ;D everything relevant was written on my blackboard so I can pick up where I left off next week.
Best Regards
Bob
zeeprogrammer
Well-Known Member
- Joined
- Mar 14, 2009
- Messages
- 3,362
- Reaction score
- 13
Well thanks for that. Hob, hobbing, hobbers...this has sent me off into the internet to find out what this all means. Looks like it's going to take a little more than a quick wiki read.
Right now I'm stuck on the phrase "the blank is usually gashed to the rough shape to make hobbing easier"...
'gashed'?
Ah well...always good to be learning.
Right now I'm stuck on the phrase "the blank is usually gashed to the rough shape to make hobbing easier"...
'gashed'?
Ah well...always good to be learning.
mklotz
Well-Known Member
Gashing is the process of using an undersized cutter to remove the bulk of the material before using the expensive gear cutter to actually form the teeth.
Maryak
Well-Known Member
- Joined
- Sep 12, 2008
- Messages
- 4,990
- Reaction score
- 77
Zee,
Gash - Long and deep slash.
Take a slitting saw smaller than the width of the bottom of the gear tooth gap and cut all the tooth gaps to the working depth of the gear.
This is pretty well essential when using a spiral hob to make a worm wheel/ helical gear using the hob to turn a free wheeling gear/worm wheel blank at the same time as it cuts said item. The gashes for this are cut at the helix angle.
Now if your not totally confused - I hope I have helped a little.
Best Regards
Bob
Philjoe5
Well-Known Member
- Joined
- Jul 12, 2007
- Messages
- 1,727
- Reaction score
- 321
I'm with Zee here. This is the best description of gear hobbing I've ever seen. The pictures are worth 1,000,000 words. Thanks for taking the time to post them Bob, and to you Marv for the further description of the technique. :bow: :bow:
Cheers,
Phil
Cheers,
Phil
zeeprogrammer
Well-Known Member
- Joined
- Mar 14, 2009
- Messages
- 3,362
- Reaction score
- 13
Thanks Marv and Bob.
hob...interesting word. Seems origin is unknown but might be related to 'hubbe'. Haven't found anything on hubbe yet. hob is also a shelf on the backside of a fireplace to keep food warm. hobnail is 'hob'+'nail' where hob is a peg or projection...that seems kind of close.
In any case, meant to say in my last post that I was glad to see you (Bob) working on the engine again. It's really taking shape.
putputman
Senior Member
- Joined
- Nov 22, 2008
- Messages
- 600
- Reaction score
- 55
Bob, you mentioned using a magnet during heating. I vaguely remember reading something about magnets & heat treat but can not remember were I saw it. Could you explain how to use the magnet instead of watching the colors. As I recall it was more accurate.
Maryak
Well-Known Member
- Joined
- Sep 12, 2008
- Messages
- 4,990
- Reaction score
- 77
Arv,
When drill rod has reached the correct temperature, (around 800C), for quenching........ it loses its magnetism. So when the piece is no longer magnetic it has the correct metallurgy for quenching and locking in the iron carbide, the compound which imparts hardness to the steel.
Best Regards
Bob
When drill rod has reached the correct temperature, (around 800C), for quenching........ it loses its magnetism. So when the piece is no longer magnetic it has the correct metallurgy for quenching and locking in the iron carbide, the compound which imparts hardness to the steel.
Best Regards
Bob
Similar threads
- Replies
- 6
- Views
- 3K
- Replies
- 19
- Views
- 5K


