Building Fred

Home Model Engine Machinist Forum

Help Support Home Model Engine Machinist Forum:

This site may earn a commission from merchant affiliate links, including eBay, Amazon, and others.
Zee, Nick, Joe, Dean & Rich, thank you for checking in :)

I know virtually nothing about boilers...is the purpose of the rivets to provide more surface area for heat conduction? I have to admit I've been expecting to see a ball-peen.
Join the club Zee; this is new territory for me as well. I used the rivets instead of straight copper pins the plans call for - because that's what I had on hand, and yes, it is to provide for better heat conduction. I could have cut the heads off, but with my, admitted limited, thinking, the heads on the rivets provides even more surface area, while the heat that bypasses the heads get caught in the bottom cap of the boiler and heats there. I don't know how the rivet heads will impact on the airflow through the assembly though; so this is all VERY experimental.

Nick, thank you, but there's still a lot of room for improvement for me!.

Thank you Joe - Much appreciated. This is my first attempt as well, so things are not up to a good standard.

Dean, thanks - yes, we do have porcupines and very scarce hedgehogs. No woods or hedges, or any wolv... stuff though - just semi dessert. A lot of other critters - I like them all; have a certain species of spider that I actively encourage to live in my house; completely harmless to **** Sapiens, but catches & eats all kinds of ornery insects, and no spider webs to clean off ;D

Rich, thank you very much, and you are most welcome to any tips or critique :). I've been ogling those step drills; they are pretty rare here in Namibia, and a bit pricey, but certainly on my wish list. And thank you for the tip on holes first, then bushes. This will most definitely not be my last boiler if I can help it!. Once again, thank YOU for your build examples!

Probably the last update for the week:
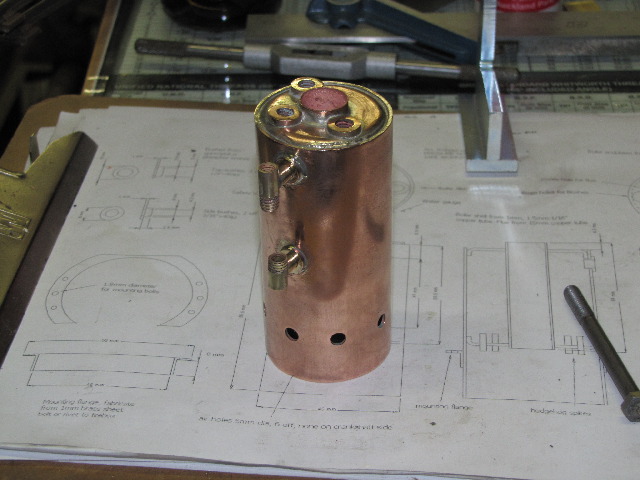
I took the boiler out of the pickle this evening after work, and checked all the solder joints. They all visually look sound, so only the hydraulic test will show up if there are defects... I couldn't resist having a quick go at the boiler with some needle files, emery and brasso - nothing fancy & really quick, as most will be covered either in lagging or painted. Far from perfect, but will do for me for now:
s0338.jpg


Regards, Arnold
 
Lookin real good, Arnold. I'm kind of fascinated with boiler builds.

Chuck
 
Chuck, Thank you :)

Happy New Year everyone ;D (though a bit late !)

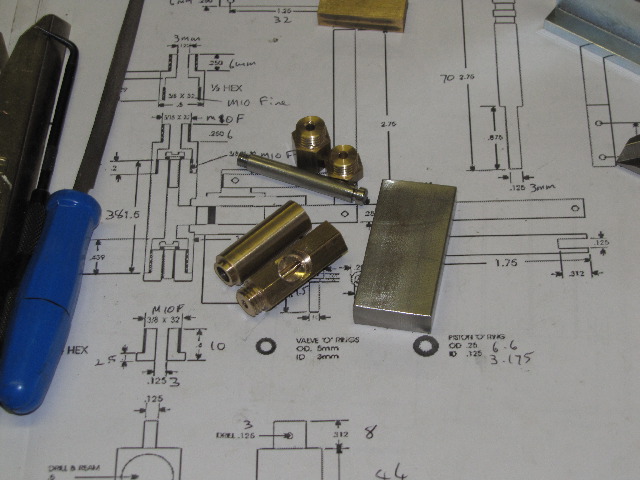
I didn't do any actual work on Fred today, but started on a hydraulic pump for the pressure test of the boiler. The build is based on Rich's design - with some bits modified to suit material and tools I have available. I happen to have a set of M10x1.25 taps and a die, I used these instead of normal M10x1.5 for the slightly finer threads; Rich's plans call for 3/8x32 which would be even better. For the stand, I'm using a block of stainless steel. I can just as well do a good job on the pump, as it will be needed in future again.

I didn't take many photos while building, as it is all simple turning and threading operations. Here is a bunch of bits already completed:
s0345.jpg


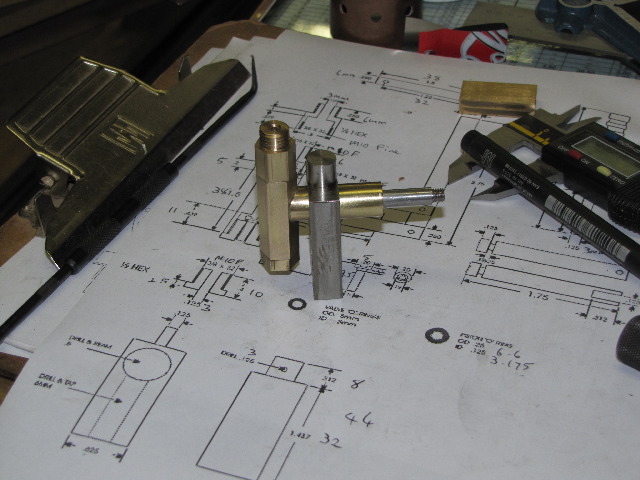
After the above photo, I silver soldered the pump cylinder & body together. While that was in the pickle, I did a bit of work on the stand - turning down the top a bit in the lathe went surprisingly easy, but the stainless nearly bit me when I drilled the hole for the pump cylinder. While drilling the 3.5mm pilot hole, at a reduced speed from normal already, it nearly work hardened; fortunately I stopped in time & finished the pilot hole with copious amounts of cutting fluid. To drill the hole to final 12mm size, I set the drill to it's lowest speed - 220rpm, and used firm pressure while flooding with cutting fluid; that, surprisingly, went better than the pilot hole - albeit with lots of smoke from the cutting fluid.

Once done, I cleaned up the pump a bit, and made a mock assembly:
s0348.jpg


Tomorrow I have to finish the valves and handle and linkages.

During the early hours of New Years' morning, we started getting rain - a rare occurrence here, and that has continued through today. So this morning, I collected a couple of liters of rainwater for later for running the pressure tests & the first steam-up :)

Regards, Arnold
 
The pump is looking good, Arnold.

I can just as well do a good job on the pump, as it will be needed in future again.

It's nice to try to make even the incidental bits well finished. I have a few tools in my shop that had to be made in a rush, but I find that I don't enjoy using them as much as the ones that have had a little more time put into them.
You can't always take the time for that, but it's nice when you can, for both you, and the tool.

Good work!

Dean
 
Hi

Its a great honour when someone uses one of your designs, thanks Arnold. As an experiment I hooked the pump up to a larger gauge and easily achieved 100 psi.

Cheers

Rich
 
I had missed following this thread for a while, so got caught up today. Great progress. I'm wondering if the engine might be too good. If it runs that fast at 5 PSI it might not stay on the tracks with steam power. :eek:
 
Dean, thank you :) - And you are so right. I also have a couple of quick-made things around, and use them all the time - without thinking, but it gets the job done. Some of the (to me) nicer things I made - like my collet chuck - really is a pleasure and pride to use, so I understand very well what you mean. Make no mistake though; some of the plug-ugly bits I made does the same, because I made some of those with as much dedication, but a lot less experience. Those are just as satisfactory to use; every time I see and use it now, I KNOW I can now do better, but those bits are part of my learning, and each have a bit of nostalgia associated :)

Rich, thank you ;D. You've done a sterling job by providing the plans and showing how to do it, so the honour is deservedly yours :bow:. I still have to break the bank this week and buy a good quality gauge to test with; I'm following your build and testing procedures very closely.

Thank you kvom :) - That video was with the engine free-running. I in fact did try to run the loco on the half-circle of track I have, and it was too fast - hence no video of that! The loco will still get a good amount of weight from the boiler, as well as all the other accessories and panel work to be done, which should slow it down. GBritnell also explained it will perform better under true steam. I must admit I have absolutely no idea how much of a difference live steam will make, but I am really looking forward to the first steam-up!

Kind regards, Arnold
 
Arnold,
That's brilliant, could you remind me how big the loco is? What gauge is it? The pump looks pretty big, buit I guess it is a hand pump so you want it to pump quite quickly.

I can't wait to see it in steam. I've never actually steamed any of my engines, they are different and much more satisfying under steam, I know that from running commercial ones and I have steamed / driven various locos made b members at our club. I have also had a couple of my own in the past but not built by me. it's magical!

Nick
 
NickG said:
Arnold,
That's brilliant, could you remind me how big the loco is? What gauge is it? The pump looks pretty big, buit I guess it is a hand pump so you want it to pump quite quickly.

I can't wait to see it in steam. I've never actually steamed any of my engines, they are different and much more satisfying under steam, I know that from running commercial ones and I have steamed / driven various locos made b members at our club. I have also had a couple of my own in the past but not built by me. it's magical!

Nick
If you haven't steamed any of your engines, you are just playing with air toys. Engines need to be steamed.
Regards,
Gerald.
 
steamboatmodel said:
If you haven't steamed any of your engines, you are just playing with air toys. Engines need to be steamed.
Regards,
Gerald.

That's just your opinion, and kind of condescending, to boot. Using air to run your engine doesn't make it any less of an engine. Using steam doesn't make it any more of an engine, either.

Dean
 
Nick, thank you :) - the engine will be about 180mm / 7" long when done, and is for O gauge track. The pump is purely to do do the hydraulic pressure test on the boiler; the loco will not be fitted with a water pump.

As to running on air vs steam - I have not run any of the models I built on steam, simply because I have not gotten around to build a boiler to use safely for that purpose. I'm sure, like me, everybody would like to run their models on steam - at least once in a while - but we all have diverse other considerations around this.

I keep my models on display in my living room and in my office; many people here in Windhoek have never seen these types of machines. Most of mine runs easily on breath power; in fact most of them has done more running on breath than on compressed air. It's a hoot to see people's faces when they see these things for the first time, and are then allowed to pick it up and feel it and blow it to see it run. No time needed for steam-ups & safety checks or anything, and it is entertaining and informative. In fact, the Tiny in my office gets taken apart and reassembled at least once a week to show visitors the internal workings as well. So my "toys" add a little extra variety, not only to my life, but also to that of others.

Kind regards, Arnold
 
Gerald,

I know what you're getting at and there is something about live steam, but I'd agree with Dean, there's nothing wrong with playing with air toys. A lot of the engines you see these days are designed to run on air, since that is what you do at exhibitions and the like. Not everybody has the skills, equipment, knowhow or desire to make boilers.

Arnold, apologies, I got the wrong end of the stick there! Enjoying your build.

Nick
 
My apologies if I have offended anyone. I did not intend to be condescending. As this build is obviously going to be steamed my post had been intended as tongue in check.
Regards,
Gerald.
 
Gerald, Nick - no worries ;D - misunderstandings happen. And absolutely no offense taken - the world would be a very boring place if people did not have different opinions ;D

Other things happen as well...

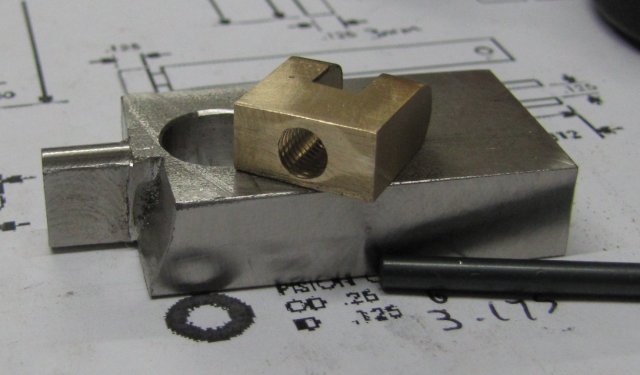
I got 2 hours shop time after work today. Started milling flats on the pump base for the handle linkage - first side went great, on the other the base pulled from the vice and got ruined. Should have stopped there, but no. Started on the link for the handle to the piston. Went well; looked good, and then I drilled the back for tapping. It was supposed to be for M5 to match the thread I made on the piston. So I drilled the hole, IGNORING the feeling that something was wrong, and started to tap. Tap went in waay to easy; I ended up drilling for M6 thread, so that bit of work is lost as well.
Some ruined parts - maybe I must rather stay out of the shop after a hard day at work; Zee's Jabberwockie got me today...:
normal_IMG0373e.jpg


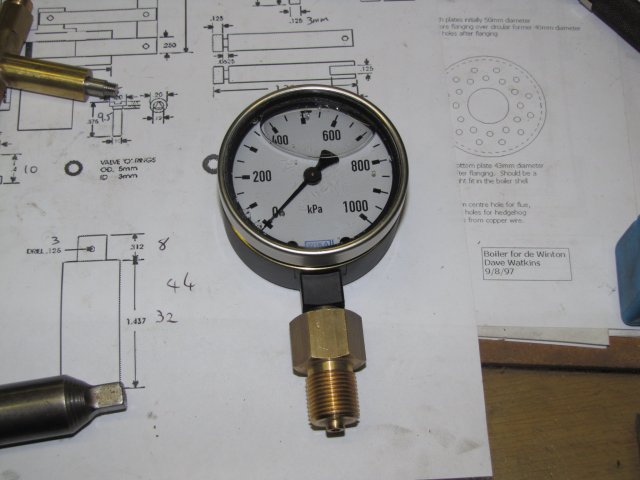
Also damaged my bank account; bought a good quality pressure gauge that reads up to 1000kPa - that's very near to 150psi - and an adapter for it that I can modify to suit my fittings; the thread on the gauge's own connector looks to be about M10x1 for which I have no taps/die:
normal_IMG_0365.JPG


Regards, Arnold
 
arnold, I'm sorry for the incidents that have occurred

when I make the same error as your in threading, I pass to the next thread (from M5 to M6) instead to rebuild the piece ;D
but I know that this isn't always possible

and for the M10x1 thread of the gauge, may be that you can attempt to thread the female in the lathe?
uhmmm, perhaps better to buy the correct tap... ::)

anyway, compliments for your work till now, the boiler is very very well done :bow:


Hi Arnold. Sorry about the boo-boo...that will soon be forgotten!

Rich's pumps was one of the first things I saw when I joined the forum. I have it in my list of things to do too.

Oh...and not my Jabberwockie...that was Marv's.
 
Must be a bad day for machinists. Just got done reading Tony's (Cobra428) post on his Whittle, and now see your pump troubles.

It all seems to hit at once. Had my own shop doofus pop his head up today while single pointing some threads on the lathe. Threads were looking just pretty as you please. Stopped for a minute to check them with a nut and.. what the heck? I'd cut a perfect length of thread for 3/4"-16. But I put them on a .775 diameter shaft. How does that stuff happen?

Everything will be better tomorrow, Arnold. For both of us!

Dean
 
Gerald,

No offense taken! ;)

Arnold, sorry to hear about the mishap - but I bet it happen even to the experts!

Nick
 
Hi Arnold

Sorry to see your mishap but if its any consolation do you remember I melted the first pump I made when silver soldering it together. Sometimes its hard to remember this is a hobby and we do it for fun. Just have another go and it will come right in the end.

Cheers

Rich

 
Ariz, Zee, Dean, Nick & Rich - thank you for checking in and your comments and commiserations.

Ariz, thank you; I'll use the link on another project ;D and for now I don't need to do threading yet; there is an adapter screwed on the guage in the photo; I bought the adapter to match the guage threads and I'll just machine & thread the outside to my own requirements :) I'll still buy a set of taps and a die for the M10x1 for future use though; Rob has given me some very good reasons to do so for future use.

Zee, it's just more parts for my personal wall ;D - and I'll try and persuade Mr. Jabberwockie to depart back to his original haunt... Marv's going to hate me for this ;)

Dean, it sure looks like it was a bad day for a lot of us ;) - I think I'll chalk up 6 January on next year's calendar as a "no machining" day!

Nick, I won't take you on at your bet; I'm darn sure mishaps happen to experts as well. I think the difference is that on the occasion an expert makes a mishap, it's a lot bigger :)

Rich, thank you; and yes, I do remember your mishap as well. In fact, I was not going to post my ****oo, but that just would not have been right, as it's part of the build experience. I actually went back to the workshop to take the photo of the ruined parts just for the post. Tomorrow I'll just re-make the parts :) - the second time round is usually easier!

Regards, Arnold
 

Latest posts

Back
Top