British 0-4-0 Toy Locomotive: he said

Home Model Engine Machinist Forum

Help Support Home Model Engine Machinist Forum:

This site may earn a commission from merchant affiliate links, including eBay, Amazon, and others.
mklotz said:
Measure twice, cut...

"twice"

What? Did you forget it was me? It's 'once' for you and 'twice' for me. :big:

Yeah a bit disappointing. On the bright side (not that I'm always successful at staying on)...I was surprised how easy it was. I was figuring I'd see/feel a change as I went through the brass, chrome, solder, to brass. But it cut like butter.

Oh and guess what I ordered along with the bit of brass? Drill rod. Yep. I have removed the excuse of not having the material. Not to worry though...I have replacements.
 
Been cleaning up the shop (basement) a little.

Decided to take apart a wood shelving unit I'd built so I can use the wood for something else.

I'd made that thing about a year before I got married. It's 36 years old.

The kids are bummed about it. But gee...it's college student quality.
It brought back a lot of memories and made me nostalgic (thanks again Mom).

So I looked at my welcome thread. It was 13 months ago I made my first engine. 16 months since I started this adventure of machining and metal working.

Thank you all.

(And no...I'm only on my 2nd martini. Now I'm being called to dinner...time for wine.)

:big:
 
You've come a long way, Zee. Keep it up, Drill Rod Man!

;)

Dean
 
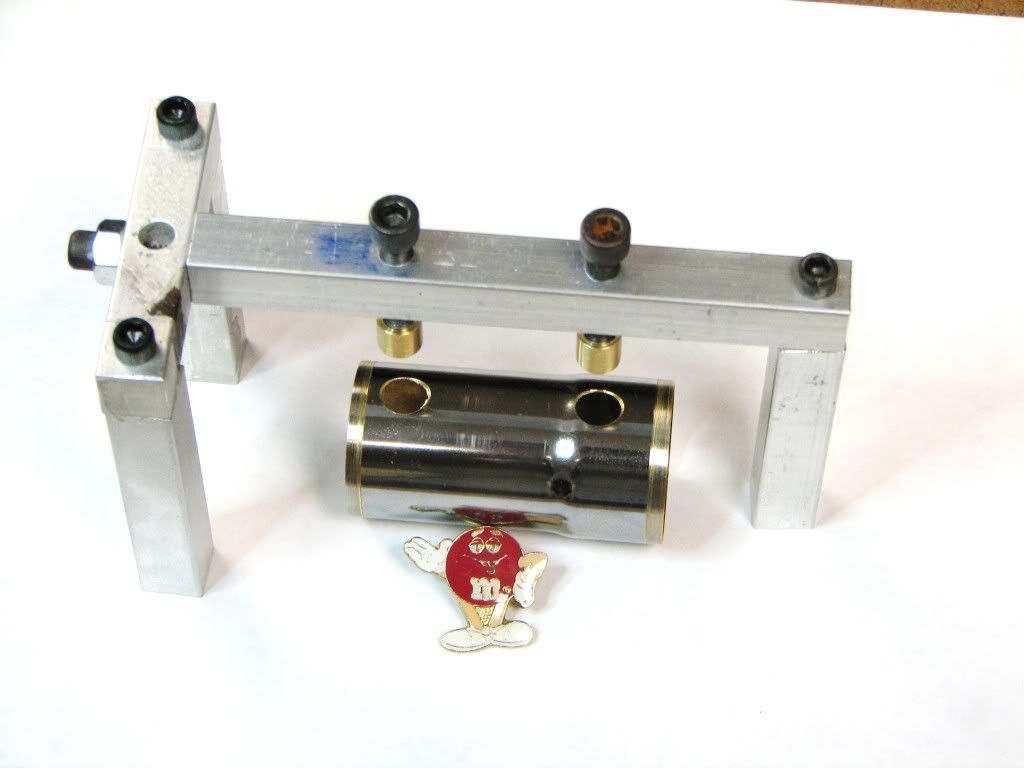
Finished preparing the boiler. A better job than the last one but I'm not too sure about the holes for the bushings. I moved them away from the end sheets a little and was more careful drilling them. So we'll see.

I also modified the jig to hold the bushings in place for soldering. The idea is to do them at the same time. I couldn't do that before (unless I drilled through the bolt) because the hot air inside would have no place to go. This time there'll be a hole in the rear end sheet. In addition, instead of a through hole through the aluminum, I tapped it. That should give a little more control in placing the bushing's height.

As you can see, the boiler will have to be raised relative to the jig but that's easy with a bit of Hardibacker board. More importantly, I need to shim the front end of the boiler relative to the rear.

77914e8d.jpg


I discovered that I've been violated. I found a cobweb on the top of my mill between the pulley and the cabling. Can you imagine? A cobweb on my equipment? I can imagine some equipment...but not my mill.

Now I must wait until the brass arrives.

Dum de dum de dum...
Twiddle twiddle twiddle...

Oh yeah! I could dust my equipment off. ;D
 
Your jig looks pretty neat, Zee. Kind of like a little crane you see at the dockyards.
A little loco lifter.

So sorry to hear about your violation! That's just so... wrong!

Dean
 
Zee,

When dusting off your equipment, another must is..............."Polish the knob" ::)

I like the jig a jig a jig etc.

Best Regards
Bob
 
Good work on the jig Zee. Someday that will be the beginnings of another project I think. I like Dean's idea - a dockyard crane.

Cheers,
Phil
 
Thanks Dean, Bob, and Phil.

I remembered I still had the stud to remake...using Marv's idea to mount it from the outside. That went well.

Then I remembered I still had to drill out the feed tube from the inner burner. I wasn't too worried about that part of it...but I was suspicious that the soldering job of the burner to the tube was less than satisfactory. I could see what looked like a pinhole between the tube and the burner on the bottom side.

Drilling was successful and sure enough...my suspicion was confirmed. I'll try resoldering it. If that doesn't go well...then I'll be remaking the burners. I won't remake the fuel tank. I should be able to make a sleeve and solder the fuel tank tube to the new tube/burner assembly.

I also thought I'd see how well the fuel tank system could clean up. The silver soldering really did a job on it...but no way it can look like the prototype at the beginning of the thread. I used a little sandpaper and scotchbrite. Enough to tell me that I think I can make it look passable with a dremel sized buffer. No?

Overall, not bad. I've spent longer times in zee-pit.

 
Heads up. I've got the new parts made for the boiler.
Time to solder (again).
Wish me luck.

The fork in the road is just up ahead...

To the left is 'A Work In Progress'.

To the right is 'Mistakes, Blunders and Boo Boos'. (I've been down that road.)

Behind me is 'Welcome'. (I'll go back if I have to. I'm used to 'do-overs'.)

I can always blame the sign post. "Did some funny guy move it?"
:big:
 
I shall be telling this with a sigh
Somewhere ages and ages hence:
Two roads diverged in a wood, and I—
I took the one less traveled by,
And that has made all the difference.
 
Welcome back Zee.

Air leak on the front bushing.
Solder went down the side of the boiler.
It looks like crap.

I don't have a good feeling about this.

This is the lowest I've been.

I'll give it one more try.
If that fails...I'll probably finish up the other soldering work (for the practice) and then put the project in the trash.

First I need to calm down.
Getting tired from the angry dance.

[EDIT:

Turn around Zee. Roller coaster is going back up hill.

Here Marv...let me do it for you. SIGH.

]
 
Carl, I can empathize with you at this point.

If I may offer a suggestion... Don't worry about the looks; I know you want a nice & shiny chromed boiler, but IMveryHO, that's adding a layer of complexity you don't need at first. Sand down all the chrome - and I do mean all of it - to a good depth. Then solder things again; use a soft pencil (or Tipex) to draw rings around the joints (about 1mm / 40 thou) away from the holes or bushing outsides - that will help keep the solder from going all over the place.
Once done, check for leaks, re-flux and solder again if needed.

When there's no more leaks, sand the lot down again, and paint it with heat resistant paint. The rest of your loco has more than enough shine!

But whatever you do, DON'T GIVE UP! - By all means do calm down - and then tell yourself you can do it and JUST DO IT!

Personally, I think you CAN do it Thm:

Kind regards, Arnold
 
Thanks Arnold.

You're right about the looks. I wasn't so worried about that. I'm happy to look amateurish at this point. But a stream of solder going down the side looks worse than amateurish.

I think you were posting while I was editing my last post...so you might have missed the reversal of fortune.

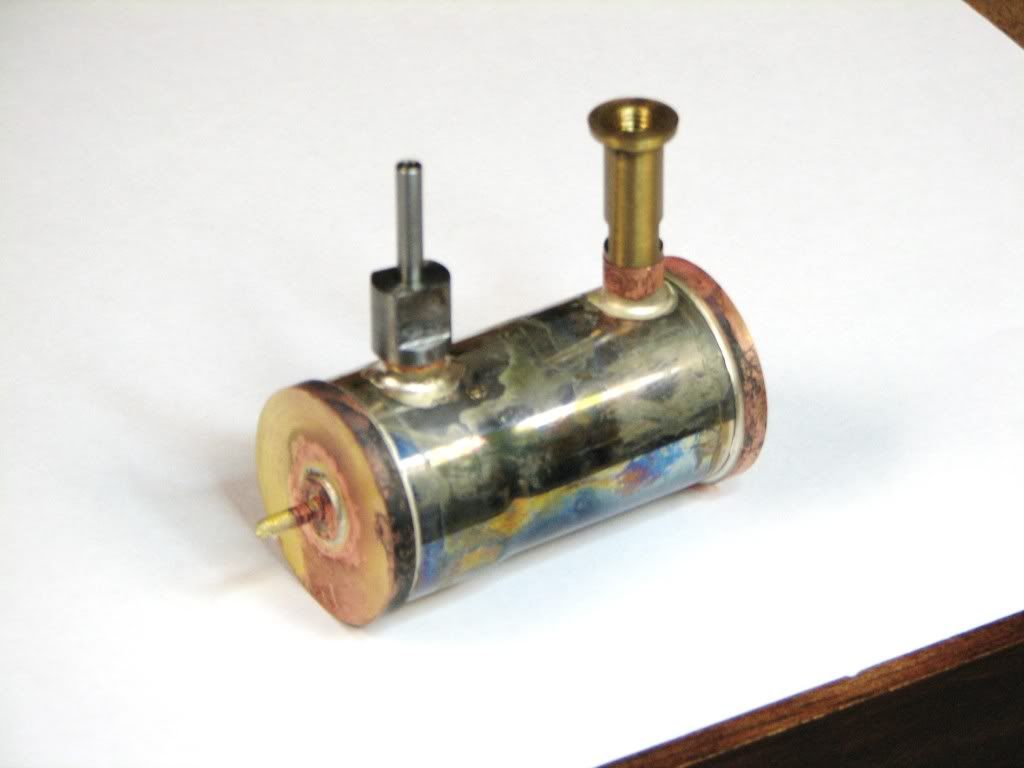
Got the stud, a' la Marv, soldered in. Here's a pic of the thing (showing the 'good' side)...

65e8870e.jpg


Too much solder? I used a single strand of .031 for the end sheets and the stud...but I doubled it for the bushings.

I put the chimney and air hose connector on to see the look. I don't think you can tell in the picture but there's a slight rake to them. I either didn't have the boiler shimmed right or something moved. Actually gives it a slight look of speed. ;D

Thanks for everyone's support.
 
Zee,
From what I've read on this board and from personal experience, boilers always leak on the first few go rounds. Personally, I want to see your loco running on a track. Hope you'll hang in there.
Dennis
 
Sigh^2

Did the bushings have flanges? Was there a pencil lead or typewriter erasing fluid dam around the flange to contain the solder? Were the bushings hanging down from the boiler when you soldered? Did you use less silver solder than you thought you needed?

Arnold's advice is spot on. You gotta finish it. If you don't, it will haunt you, you'll take to (more) drink and develop an ulcer, and require (more) therapy. DAMHIKT. Abrade the worst of the errant solder and paint it with barbecue paint, preferably something with a bit of texture. After all, have you ever seen a steam locomotive with a shiny bright brass boiler? Bling is for basketball stars and pimps. Engines should look functional. Think Craftsman period furniture, not Art Noveau.

The stud looks great. :)

 
Thanks Dennis. I don't know about the track though. No room for one. I need to think about a stationary thingie with idlers.

Marv...

No flanges. I don't know how to cut them. You'll see some previous posts about that.

I admit I forgot about using pencil...not sure it would have worked though in this case. The way the solder moved (away from the joint) I think it would have just pooled on the 'dam' (below the joint).

Not sure I could have put the bushings hanging down. I think the solder rings would have just fallen off.

As for less/more solder...I can't say until I get more experience. I used .031. I have .025 but I don't think it would have made a difference. On the other hand, for the bushings I think I used too much. As I said, I wound the wire twice...in part (and probably erroneously) thinking that the hole was still not a great fit for the bushing.

I'm going to try and clean it up the best I can and see what I think before I consider painting it. It's possible it'll look fine as is...considering.

By the way...there will be two direct flames under the boiler. Can the paint deal with that?

mklotz said:
After all, have you ever seen a steam locomotive with a shiny bright brass boiler?

No. But there is that chrome one at the start of the thread. :big:

Thanks Marv.
And thanks for helping me spend another $17. I gotta get those mics you mentioned.
:big:
 
Hi Zee;
From my point of view, that is, looking at the pic, the brazing/hard/silver solder looks like a solid job.
Have you got it to where it doesn't leak?

I know you had wanted it chrome, as in the propaganda picture, but what Marv says about finishing
it off in 'boiler black' makes sense. And then, it won't just be a copy of how someone else did it! ;)
I get a 'gob' now and then when silver brazing, too. Carefully file off the lumps, and sand things smooth
for painting, or for a brass surface.

Bling is for basketball stars and pimps.

Eh... Yes, what Marv said, again.

And yours;
Too much solder? I used a single strand of .031 for the end sheets and the stud...but I
doubled it for the bushings.

Yes, probably too much. Doesn't hurt the structure, but as you see, it can get away from you.
"I don't know if that will be enough" is usually just right.

EDIT: Just caught your last message asking about paint, Zee. I think it will be fine with the two burners.
Think of a wood burning stove. Inside is a couple thousand degrees roaring away. Paint still stays on.
Engine headers, same thing. Get glowing hot at times and paint stays.
Try it, I guess.

Dean

 
Zee

It looks good to me these things always tend to look like crap after they've come off the heat. Clean it up and you'll be amazed how much better it will look.

Chin up matey

Pete
 
See attached COC of what I had in mind relative to flanges, etc.

With only a small amount of solder, capillarity should confine it to the surface of the flange adjacent to the boiler shell.

The flange, being thicker, should be heated by the flame. By the time the flange reaches brazing temperature, the boiler shell will be hot enough.

BTW, I hate to admit this but I love Art Noveau decorations.

COC.jpg
 
Thanks Dean. I'm less worried about how it looks than if it runs. Just look at me!

But no...my point was...there's a level where it doesn't 'look good' that I can live with...and then there's the level where it looks like crap. But we can put all that aside for now...I'm happy that the boiler seems to be okay.

Thanks Pete. You're right. I played with 'boiler #1' and was surprised how well it cleaned up. Even the fuel tank. Still...I need to get better so the 'clean up' isn't so hard.

Marv...I had wondered about the flange. The CoC helps a lot to understand.

Art Noveau eh? Floral...organic...ah! I get it. Nice shot. ;D

.....................

I can tell today's bit of work got the adrenaline (fear) going. I stink! I'll be glad to have more experience.

Four more pucker jobs (solderings) to go and a bit of drilling...
 

Latest posts

Back
Top