British 0-4-0 Toy Locomotive: he said

Home Model Engine Machinist Forum

Help Support Home Model Engine Machinist Forum:

This site may earn a commission from merchant affiliate links, including eBay, Amazon, and others.
Hi fcheslop. It's a great idea but I'm more inclined to do that on another project.

It's not that it couldn't be done here...but I want to try and stay true to the kit. My hope is the next person to buy this kit will learn something here. (Even if it's..."I ain't doing what Zeep did!")

Perhaps more importantly though, I'm learning some things here that I wouldn't or would learn differently if I formed sheet metal. That day will certainly come though.

 
If I were to 'follow the construction notes'...

...but I want to try and stay true to the kit.

Haven't we had this discussion before? You know how I feel about following instructions written by some grinning idiot.

Rather than wasting all that brass (and time), I would make the stud threaded on both ends with a thin shoulder section separator. Screw it into a threaded hole in the boiler end cap until the shoulder seats and silver solder in place. Don't use the 4% solder.

Go with the chromed pipe - you know you want the bling - and exercise better solder flow control. If it still turns out too messy, slather it with black barbecue paint and call it stylish. Put shoulders on the bushes - they will keep them from falling in as well as acting as a place for the solder to wick to, thus keeping things neat.
 
I had suggestions, but then I read Marv's last post and see he's been reading my play book.
So, my advice this time is, "Whut Marv dun sayd awreddy".

Dean

post script; Oh, and if I were doing this the way those jokers who wrote the instructions actually did it,
I'd be using regular soft solder, same as they did. I know in my bones they didn't use silver brazing
wire on this thing.

Dean (again)
 
mklotz said:
Haven't we had this discussion before? You know how I feel about following instructions written by some grinning idiot.

Why yes we have. And why yes I do. ;D

mklotz said:
Rather than wasting all that brass (and time), I would make the stud threaded on both ends with a thin shoulder section separator. Screw it into a threaded hole in the boiler end cap until the shoulder seats and silver solder in place.

Seems a neat idea. Always interesting how many different ideas can be generated to solve the same problem.

The end cap is only .04" thick. Does that provide enough support? And, does this prevent the issue of unsoldering when the main piece is soldered to the boiler?

mklotz said:
Go with the chromed pipe - you know you want the bling - and exercise better solder flow control. If it still turns out too messy, slather it with black barbecue paint and call it stylish. Put shoulders on the bushes - they will keep them from falling in as well as acting as a place for the solder to wick to, thus keeping things neat.

Yeah I have to admit I want the bling.

Shoulders on the bushes sounds sensible. I'd have to think about how to do it. The tube is round...wouldn't a flat shoulder leave too much of a gap? How would I make it?

Deanofid said:
I'd be using regular soft solder, same as they did. I know in my bones they didn't use silver brazing wire on this thing.

Yeah...this was brought up before. I agree they didn't use silver brazing. But is there a good reason not to? I suspect that even using soft solder the stud unsoldering itself would still be an issue.

I'm not worried about the 'waste of brass and time'. I figure the brass bit I have won't be used for much else. But I am concerned whether silver soldering (brazing) rather than soft soldering is appropriate or can be successful. Am I wasting my time trying to silver solder?
 
zeeprogrammer said:
But I am concerned whether silver soldering (brazing) rather than soft soldering is appropriate or can be successful. Am I wasting my time trying to silver solder?


E-Gads man never! look at the experience you're gaining! But I know you were not serious. ;D ;D ;D

Ron
 
0.040 is a bit thin to thread. So, make a stud with a thread on one side of the shoulder and a tenon that fits the end cap hole in the other.

Silver solder the end caps and then soft solder the stud and bushes in place. Doing the soft soldering last means you don't need to worry about previously soldered stuff coming undone. If you're worried about the integrity of the stud joint, just make it flat on one end and solder it to the exterior of the end cap. A scratched circle during the machining of the end cap will tell you where to locate it.

[Aside: My STEAMT program tells me that at 20 psig water boils at 260 degF so that's about how hot your solder joints will get - well below the melting point of even soft solder.]

You've seen folks here describe the making of curved bushes to fit a cylindrical boiler. Basically, you use your boring head to carve a radius into the end of the stock to match the boiler OD radius. It's dead simple.

 
mklotz said:
make a stud with a thread on one side of the shoulder and a tenon that fits the end cap hole in the other.

I had wondered about that some time ago but (having no experience to know better) was worried whether the solder would hold against the pressure. I'm sure this would not be approved at higher pressures.

mklotz said:
just make it flat on one end and solder it to the exterior of the end cap.

I like that. I'd have to figure out a way to keep the stud in place while soldering. Probably wire it. But I have to admit...I'm still thinking about the integral stud. What? Did you just sigh? ;D

mklotz said:
well below the melting point of even soft solder.]
We're talking about the same stuff you can buy at HD right? 4% silver? Or that 96/4 that Dean mentioned in his thread. That's probably what I'll go for. Have to order it as I want 1/32...the stuff at HD is too big.

mklotz said:
You've seen folks here describe the making of curved bushes to fit a cylindrical boiler. Basically, you use your boring head to carve a radius into the end of the stock to match the boiler OD radius.

Yes. I figured the boring head but was stuck on cutting the shoulder. Rather silly once I thought more about it.

Use the boring bar in the mill and cut the radius.
Then put the bar in the lathe and turn to diameter then turn the shoulder.
Drill and tap and then part off.

I've never used my boring bar.

However...when it comes to soldering it...

The boiler is chrome plated. The only part that is brass (edge of hole) would be underneath the shoulder. Do I place a ring of solder around the shoulder prior to placing the the bushing in the hole? Will the solder get to the brass on brass?

Thanks for all the help.
 
Holding the stud while soldering it...

Folks make a "third hand". Picture a long, heavy steel wire with one end bent at 90 deg. Fitted with two legs on which it pivots so the end of the bent portion can bear down on something that is being soldered. An integral weight near the bent end provides downward force. The tip of the bent portion is turned to a blunt point to minimize heat transfer.

I have an old lab stand - the sort of thing used to hold a Beatrice flask over a Bunsen burner while you cook your latest chemical concoction. It supports a vertical sliding rod with a pointed end that has a weight on the upper end - same principle as above but different support. The type described above is slightly more flexible since it has greater reach.

"Soft solder" =? 4% HD stuff...

Yes. If it's too thick pound it flat on a clean anvil of some sort and cut off slender strips to approximate thinner solder. It doesn't need to be cylindrical to work.

Bushes...

With a base curved to fit the boiler OD, you would be soldering the curved base directly to the boiler exterior. I'd use an aluminum plug to align the bush to the hole. Remove the chrome plating under the curved shoulder. Apply flux and flattened solder. Turn boiler upside down so bush at bottom. Heat until solder flows.
 
Thanks Marv. Good ideas.

I have to think about it. I had 'success' putting in the one bushing..not sure what happened on the second. The proposal represents a 'first time tried' which always seems riskier to me than doing it again.

I was also concerned about screwing up the finish by taking the chrome off around the hole that the bushing would seat on.

However, I may not worry so much about that now. I just trimmed one end off the pipe and a large chunk of chrome came off. I think most of it will be hidden by the end cap and I can also turn the boiler such that the blemish is on the bottom.

Ha...not that any of looks will matter.
 
I had 'success' putting in the one bushing..not sure what happened on the second.

Solder is really bad for spanning gaps. It may have been that you had a (tiny) gap of sufficient width that the solder couldn't close it. If I understand the design correctly, you're soldering the edge of the boiler hole to the OD of the bush - sort of like a butt joint. A small deviation of the fit of the boiler hole to the bush OD might have created a void that the solder has difficulty bridging.

That's one advantage of the curved-to-fit-the-boiler flange. You're soldering two fitted *surfaces* so minor local irregularities are less critical. Not to mention it's impossible for the thing to fall into the boiler.

Whatever you eventually decide, I suggest you make up a procedure sheet and publish it here before starting. Give us a chance to critique it for your benefit. You need not follow our criticisms but at least you'll know what risks you may be taking and can be prepared.
 
mklotz said:
It may have been that you had a (tiny) gap of sufficient width that the solder couldn't close it. If I understand the design correctly, you're soldering the edge of the boiler hole to the OD of the bush - sort of like a butt joint. A small deviation of the fit of the boiler hole to the bush OD might have created a void that the solder has difficulty bridging.

I think you're exactly right. And I think it was caused by the bit wandering...in part because of the brass but given today's experience, the chrome cladding. When I trimmed the pipe today I tried to take it even slower than last time. I'm talking a feed rate on the order of fractions of a thou over several seconds. I noticed that when I got past the chrome, the cutting became easier. Still...it's not like cutting the half hard brass I have.

It's why the shoulder idea you proposed is so appealing. I have my doubts that it will look good...but like I said...I'm more interested in getting it to work.

You'd mentioned turning the boiler upside down so the bushings are at the bottom. Is the solder placed around the bushing (only to fall off) or between the shoulder and the pipe and some pressure applied so seating is achieved.

Oh and silly me...I'd mentioned earlier about (the unfounded) concern that the boiler pressure would pop the stud out. Well doh...what about the bushings? So it's no longer a concern (even though the stud is smaller).

The procedure sheet...hm...not sure what you're looking for...

The pipe is currently on a dowel held in the lathe with a live center. The ends have been trimmed off.

a) For each end, place tape around the boiler to keep a straight edge while the chrome is sanded off. Tape the other end to the dowel so the pipe doesn't spin. Protect the lathe bed with paper towels. Take it slow and use short lengths of sandpaper to lessen the chance of it grabbing. Coarse paper.

b) Move to the mill and drill/ream the two bushing holes. Use v-blocks in the vise. 11/32. I don't have a unibit yet and don't even know if they come in 1/32 grads.

c) No one has answered my question about parting of 1 3/8 brass. I'm thinking about using a small vise to hold the brass and having the bandsaw hold the small vise. I have to give that more thought.

d) For each end sheet, trepan, flip it, hold it by the inner surface, and face to length. Still thinking about making the stud integral in the one...that's just a turning job followed by threading. ('just' he says.)

e) Then it's soldering. The end sheets went very well last time so I'll do the same thing here. Stand the boiler on end, ring of silver solder and flux, and heat.

f) As for the bushings...either same as before using the jig or try the shoulder idea. Pipes are easy to get so I'll probably see what it would take to sand the chrome off around the edge. Successful or not, I want to try the boring bar.

Making the shoulder bushings...
Mount rod in a collet in the vise of the mill.
Use boring bar to cut the radius. (Calculate needed radius and use pipe to fit.)
Put bar in lathe (may not be exactly square anymore but close enough).
Turn bushing diameter.
Turn shoulder diameter.
Drill and tap.

AHA! I need (would like) to keep the bushing diameter as it is now. Otherwise the other bits that thread into it won't look right. That means the shoulder is a smaller diameter...and that means the hole I drill into the boiler is smaller. So it can't be 11/32.

How much shoulder is enough? 1/4-28 has a major diameter of 0.25".
(0.34 - .25) / 2 = .045 wall thickness.

.015 shoulder? leaving .03 wall thickness?

Thanks Marv. ;D

 
Hi Zee;

c) No one has answered my question about parting of 1 3/8 brass. I'm thinking about using a small vise to hold the brass and having the bandsaw hold the small vise. I have to give that more thought.

If it's 360 brass, that's the kind called 'half hard leaded brass', it will part off easy enough. You may not be able to get to the center of the piece with your parting tool. Do the last bit with a hacksaw, (protect lathe bed). I've parted off larger diameters than this on my little Taig. Set up good and square and run your lathe about 1/2 the speed you would think right for regular turning of that diameter.

If it's cartridge brass, and it's probably not in a piece that diameter, you can still do it easier than steel of the same size.


As to making shoulders on the bushings; The shoulder doesn't have to be large. Not even large enough that you could really notice it. It only needs to be a tiny step that will keep the pieces from falling into the boiler. Even .001" over the size of the hole in the boiler will prevent it from going inside.

Dean

 
Thanks Dean. It is 360 brass. I was going to go in far enough to simply break it off but I can also hack saw it. I'll see once I get there.

As for the shoulder thing...goodie...that means it's do-able...try-able...
 
zeeprogrammer said:
As for the shoulder thing...goodie...that means it's do-able...try-able...

Oh really Zeep? And just how are you going to do that?
Once the radius is cut so the thing sits on the boiler...how do you cut the shoulder?

I'm thinking I missed the intersection at Primrose Lane.
 
I didn't take the radius into account, Zee, and actually wasn't even thinking of it when
I mentioned the shoulder thing. On my part, can't easily recover on that one.
I guess if you're going to do the radius, you need to get clamps large enough to hole the pieces
on while soldering.

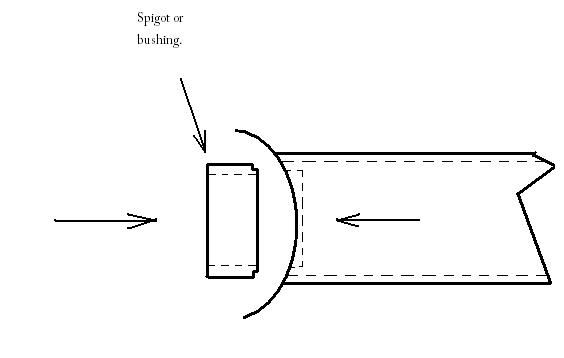
I can think of another solution, but it may seem like a lot of work for the piece.
After the radius is cut, make a shallow cut on the ID of the piece, turn up a short hollow
spigot for a tight press into the cut in the ID and the same diameter as the hole in the
boiler. Press it in and you will have your shoulder to keep the piece centered in the boiler.

Thought about this later, but you probably don't even need the shallow cut in the piece. Just
push a bushing in.

Zeeboiler3.jpg


The proportions are out of whack, but maybe you can see what I mean.

Dean
 
Thanks Dean,

That does seem like a lot of work. Plus, there's a 1/4-28 going through there and that doesn't seem to leave a lot of room.

I'm thinking I'll go back to the original plans. This time though I'll be a little more careful making the holes in the boiler. If I miss, then I can make the bushing a little larger...at least the part that goes into the hole. A little step wouldn't look that bad.


[EDIT: The bushing is .34 diameter and the pipe is 1 1/4". Without a radius and the bushing just sitting on top of a shoulder, that looks just under .024 gap between the edge of the bushing and the pipe on the sides. Too big? I'm thinking yeah.]
 
rats and fooey

Front end cover of the boiler went well.
Rear end cover flew off the lathe and is ruined.

Now I have to order more brass.
I can't justify ordering a half an inch of 1 3/8 round brass.

Guess I have to think about what I need for the next project and order that too.
Guess I have to think about what the next project is.

And no...please don't offer to send me any brass. Allow me to revel in the fact that I have to order material for another project. ;D
 
How about sawing the end off boiler #1, machining the residual boiler material out of it on the lathe, and using it on boiler #2?
 
mklotz said:
How about sawing the end off boiler #1, machining the residual boiler material out of it on the lathe, and using it on boiler #2?

Sounds very sensible. I suspect I'll have a lot of fun trying to get whatever kind of brass the pipe is made of removed from the end sheet. Then there's getting it true in the 4-jaw chuck (it doesn't fit the 3-jaw) and getting it cleaned out but still fitting the boiler. I'd also have to get the stud hole cleaned up but that looks pretty easy.

If I had more experience and knowledge so that I'd know the possibility of success...I'd go for it.

On another note...I've decided to go for your idea of soldering the stud from the outside. And I would do it last. This means I can set up a jig to do both bushings at the same time and have an outlet for the air inside the boiler.

I think a big reason why the one bushing failed is that it was too close to the front end sheet. Soldering the end sheet I think caused an issue for the hole used to hold the bushing.

Thanks Marv.
 
Zee

I am sure that if you could centre up in a 3 jaw (if you had one big enough) that you can center it up even better in a 4 Jaw. Either that or I've been reading a bunch of ?? in your posts. You have thought each step through first then went ahead and performed it. Do the same thing with the 4 jaw chuck. There are many other posts on the forum here about setting up work in a 4 jaw. Some would rather use a 4 jaw than a 3 jaw even for round bar stock. Now get that hacksaw out and give those arms some exercise. :bow: :bow:

Cheers :)

Don


Latest posts

Back
Top