A new attempt at making piston rings

Home Model Engine Machinist Forum

Help Support Home Model Engine Machinist Forum:

This site may earn a commission from merchant affiliate links, including eBay, Amazon, and others.
I don't think your far off and have certainly backed it down from what was considered an error at 1475 F in the article.
I just wanted to be sure you don't go off on too much of a tangent.

BTW.
Make the clever that Trimble recommends in the article. It's only a bit of simple machining work and careful grinding for the knives. It makes wonderful breaks / cuts or whatever the term is with no other imperfections to the ring surface. And no chance of "bending" the ring in such processes others have suggested like holding them in a vise and stressing then sideways until they break.
 
Last edited:
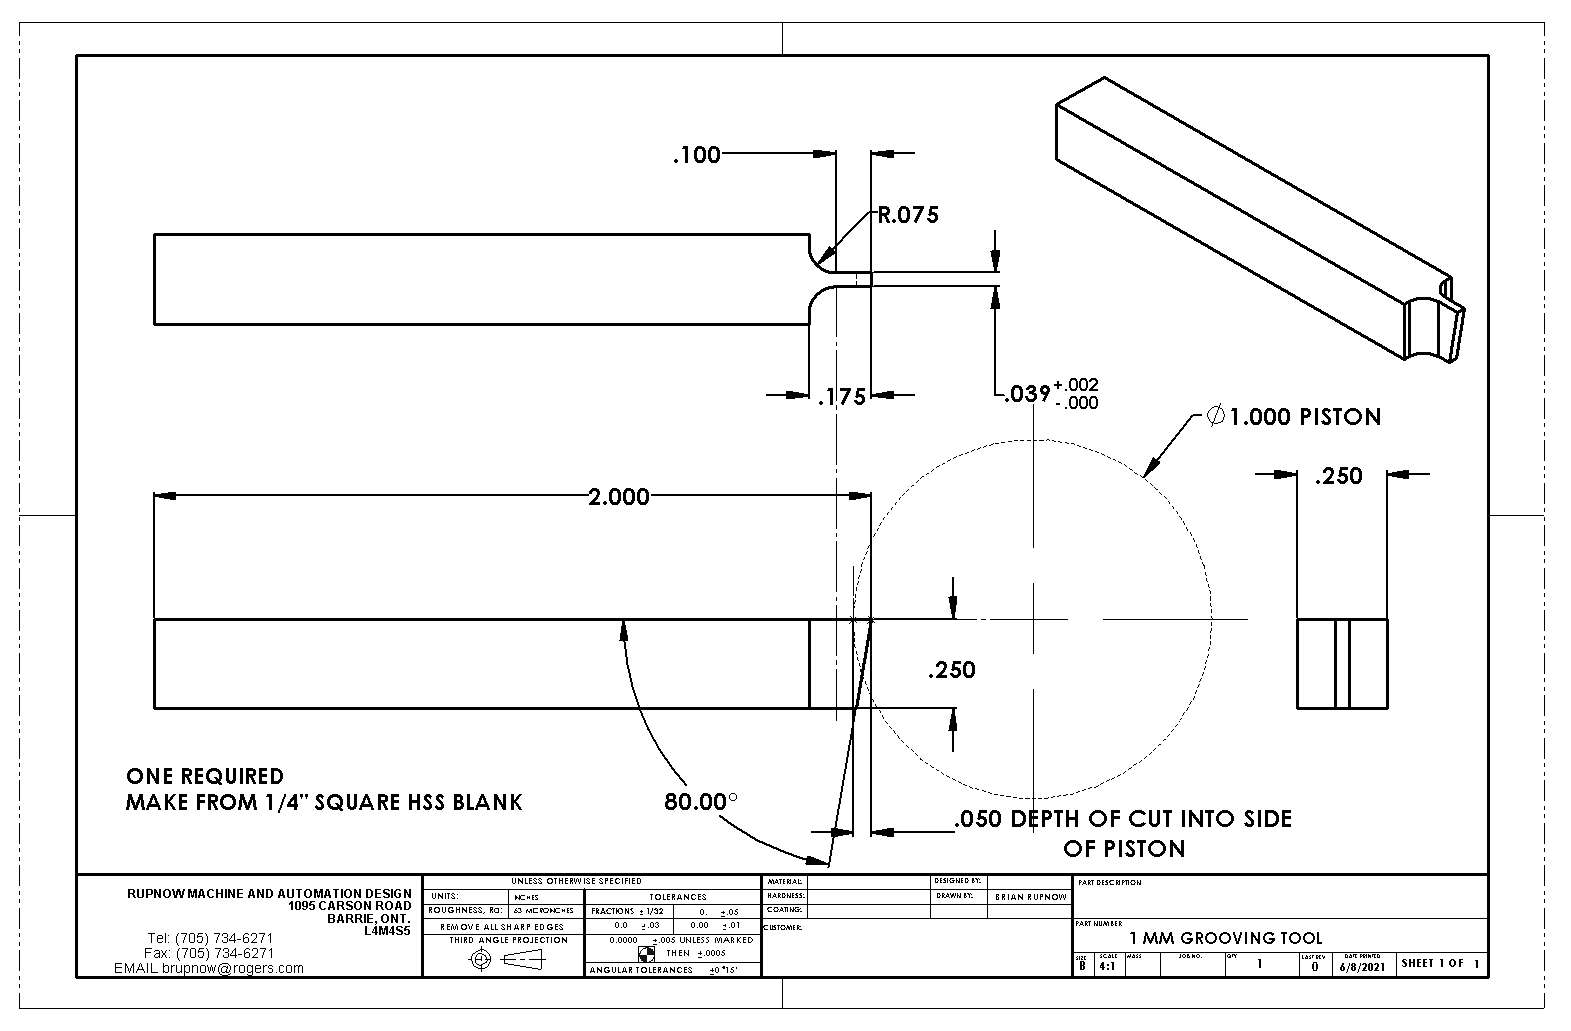
A local milling machine cutter sharpening service is currently making this tool for me to groove aluminum pistons for 0.038" wide rings. Actually, his price for a tool as shown here was $60, but a lot of that must have been set-up, because he also quoted me on a double ended tool for 75$. I ordered the double ended tool and will have it sometime this week.
0QrTMA.jpg
 
I used a viton ring on my Webster. I used purchased cast iron rings on my vertical hit and miss engine and on Thumper, the engine I hoped would run my sawmill edger (but didn't). In both cases the rings were 1/16" thick and worked perfectly . the only time I made rings myself and ran them on an engine was on the Canadian Cub, a one cylinder version of Malcolm Strides Bobcat. It ran very poorly at about 2000 rpm, but it wouldn't idle and ran poorly.
 
Tubal Cain in his article in ME dated 15July 1994, clearly states that heating cast iron rings to 1475 deg F not only reduces the Brinell hardness, Young's modulus and the transverse rupture stress, but also the fine pearlitic structure designed into the metal is lost due to metallurgical changes which occur as the metal passes through the lower critical temperature (about 1328 deg F). As a consequence, the metal is softer, will wear more rapidly and will not be able to develop the required outer ring pressure seal.
For low pressure CI piston rings (up to 15 lb/sq in) he recommends that a temperature of 1100 deg F be used and held for 15 minutes before being slowly cooled.
 
For low pressure CI piston rings (up to 15 lb/sq in) he recommends that a temperature of 1100 deg F be used and held for 15 minutes before being slowly cooled.
That's what I have used. I have found that the specimen in the oven takes quite a while to reach thermal equilibrium with the oven temperature, so a allow around 30 extra minutes for that.

Don
 
I hope that cutter is going to work for you and not run on the sides as you don't seem to have shown any side clearance angles:(

Would have thought one of the Mini-thin holders and inserts would have been a similar price over there as they work well and are available in small width increments.
 
I called the toolmaker this afternoon about the cutting tool he is making me and asked about side clearance. He was out, but I left a message. He emailed me back and this is what he had to say.
"Hi Brian
Sorry I missed your call. I was driving.
I intend to put side clearance on the tool. Probably only 2-3 degrees per side. I would put more because it’s aluminum but it’s pretty small. I will also make the tool narrower at the base. Only by .001/.002 but it will give you a cleaner cut. Both clearances will stop the aluminum from smearing and give you a better cutting action. I should have them ready tomorrow and I’ll let you know. Thanks"


Okay--I never claimed to be a tool designer. This guy is good. He has sharpened cutters for me before, and I was impressed by his background and knowledge.
 
Keep up the good work Brian, we are all learning a lot from this thread.
I understood (just generally) that once the parts ahd reached the required temperature, the fine structure (Not Molecular? but Crystaline structure?) was changed naturally, and prolonged heating would simply burn-out carbon thus changing it further to some un-controlled structure? ~ Can a metallurgist or other expert advise? - I know that endurance testing engines on Dynos during engine development proof testing, the exhaust manifolds would change size and shape as the metal "shrank" when anything over dull red heat was realised. The shrinkage was measured as part of the post-test analysis. - More than 1/8" in 12" span of the bolts holes. Some was distortion, but the metallurgical analysis revealed the "carbon content loss", confirmed by metal thickness measurements on separate studies in controlled ovens. I don't know the details, but depending on the engine and tuning, this was used to determine whether cast iron was OK, or spheroidal graphite iron was needed.
So don't "over-cook" your rings in both time and temperature. Maybe you can ask "Perfect Circle" (a US ring maker or high repute) for advice? (The only link I found was this one... https://r.search.yahoo.com/_ylt=Awr...on_rings/RK=2/RS=MpKkIHhhm.PX5nEeIwySBUl6cMM-)

Hope you are fit and well!
K2
 
1100 what? C or F.
Where did you get that?
Trimble says 1475 F which has been disputed by some as damaging to the cast iron.
I'm not saying your wrong I'm just pointing out that some believe a mistake was made in the article.
Don't start until this has been confirmed.

I usually heat to a dull red in a dark room. Which would be a litle lower than the 1100 if you meant F.
Although these types of things are usually stated in C.
I'm not saying I'm right either.
That's why I had hoped Terry would chime in. He has done a lot of research (as usual).

Here is a chart. Down the page a bit. There's a big difference between 1100 F and 1475 F in color.


https://www.hearth.com/talk/wiki/know-temperature-when-metal-glows-red/
I'm sure others will chime in on how they just "Blast them with a torch". But I think it behooves you to get it right.

BTW if you read it Trimble does not state a time. Only that the rings themselves must truly reach the correct temperature being that they are inside a fairly heavy fixture. I guess there's no "too long" so.....
Trimble says, and I use his description all the time, it is a red heat for 15 minutes. That is the crucible with the correct gap spacer you wrap the space around the rings with paper to burn up the oxygen in the air space so the ring surface does not oxidize and the rings come out blue have very good wall tension. What I'm seeing if you are heating the rings with an open flame the depth of oxidation could vary in thickness if one side of the ring is heated more than another causing an out of round ring once the oxide is removed. I have 4 different crucibles that over the years have covered the bore sizes I have standardised on. They are made so they are air tight by being a close fit in so the paper is enough to burn all the existing oxygen. The structure of the crucible dimensions is in the Trimble article. John.
 
Dave,
I've been using 975F for a couple hours.
Terry

Thanks Terry. I would take that as Gospel. I'm sure (as usual) you did your research.

And thanks for digging up the old post Gordon.

For those without a furnace. That would correspond to the color chart I posted earlier and my observation of a dark red when viewed in a dimly lit room that has worked for me.
Of course the indication that you have not gone hot enough or for long enough is that the rings do not maintain their "set" and spring closed when removed from the fixture.

Sorry to interject with all of this. But I thought if Brian was going to try to perfect the process he should have all of the correct information. And I knew that it was concluded over time by other "experts" that the Trimble article got it wrong.
 
Last edited:
Brian and others: You are having the tool bit ground to .039 width. I assume that your ring is going to be .038. That means that you are going to do a plunge cut. You have experienced in the past that the groove comes out undersize. I have seen a few other references to taking a final finish cut to clean up the side. I am wondering if it would be better to cut the groove undersize and then move over a couple of thousands and clean up the side of the groove. Common wisdom seems to be that the bottom of the groove is the critical surface so just moving over a slight bit would minimize the chatter typically encountered with a plunge cut. I have no experience with this. I am just asking for opinions and/or insight. Would it be better to plunge cut with the .039 tool, move over .002 and make your ring .040?

Gordon
 
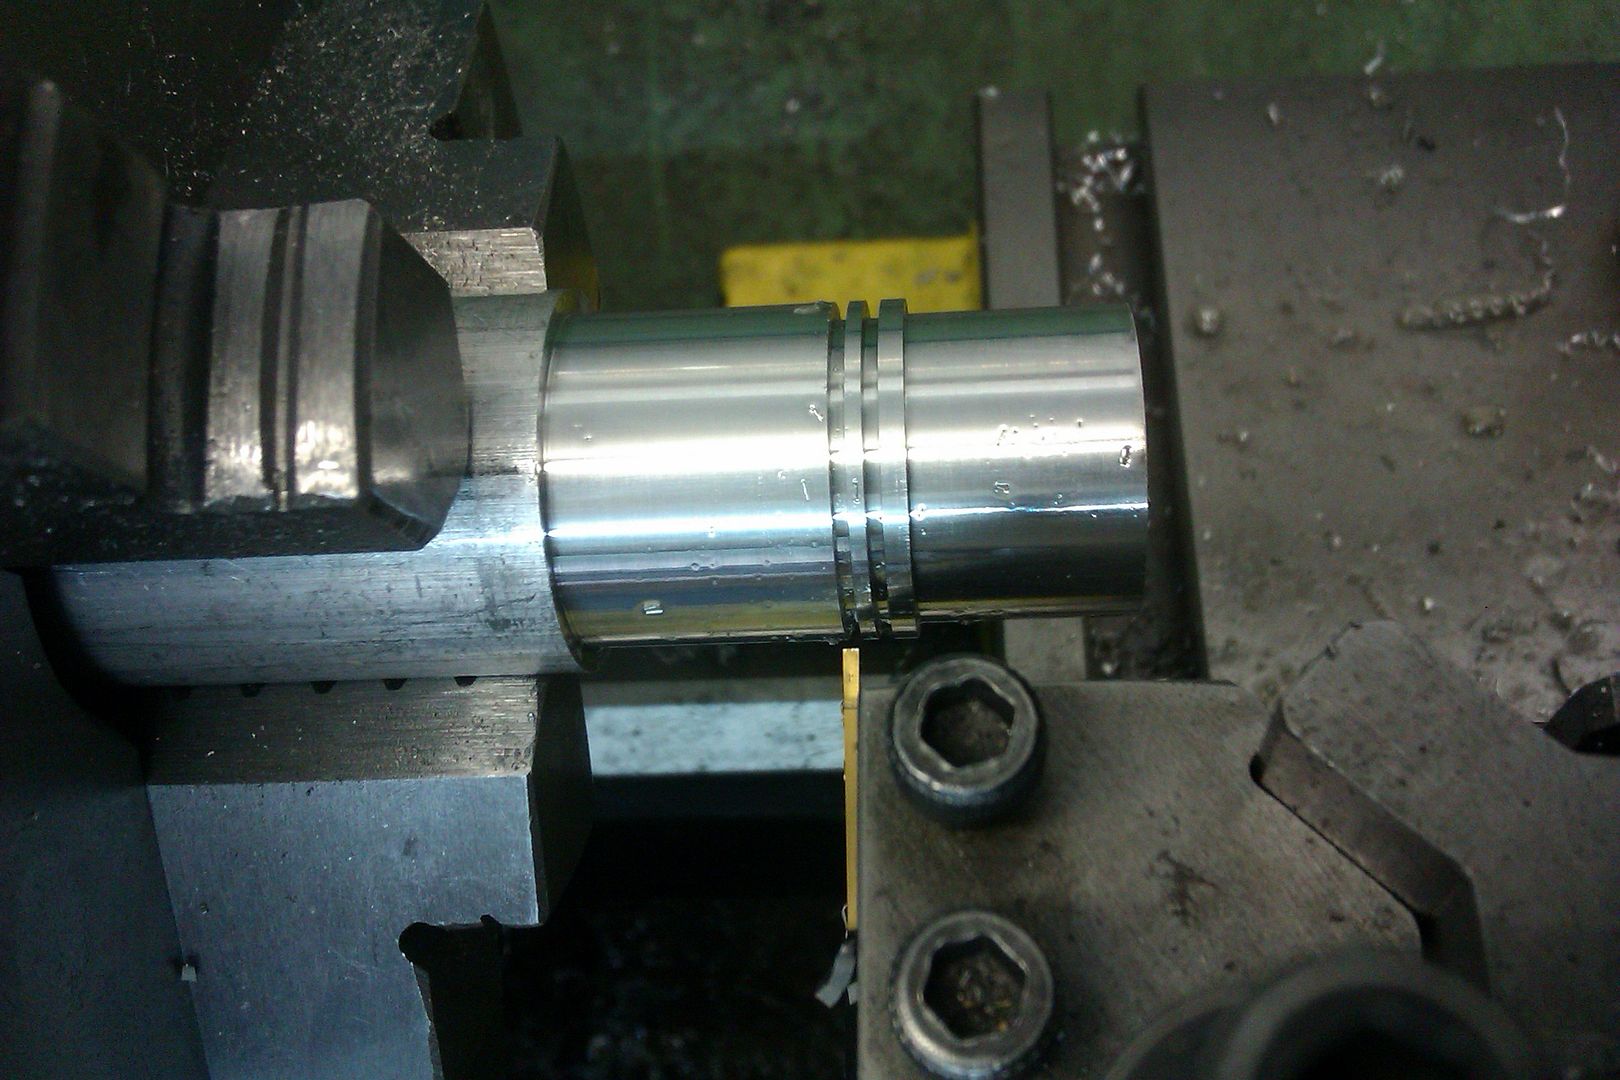
Easier to just measure the width of the plunged cut and make any adjustments to the ring if your tool is cutting undersize. I don't tend to get chatter on such narrow plunge cuts, using one of the Nikcole Mini Thin inserts

IMAG2968_zpsmwxavafv.jpg
 
I plan to plunge cut, and hopefully a good sharp tool is going to leave smooth sides on my pistons ring grooves. I will then measure the groove with feeler gauges and make my rings to 0.001" less . This is all becoming a "try it and see what happens" exercise.
 
Gordon!
My ring is 0.8 mm wide , i sharpen the grooving tool to 0.7 mm wide ,
When groove has enough depth, I will move the tool towards the bottom edge of the groove and make the groove width slightly wider than the ring.
Note that my grooving tool has 2 parallel sides,
I don't know how it works with other tools
 
Yesterday I ordered a "fine India stone" from Norton. They don't cost much, and I don't have a lot in the way of sharpening stones. I bought a 1" x 4" stone. I have one big double sided stone that I inherited from my dad, and it works fine for sharpening jackknives and kitchen cutlery but isn't something you would use on material chucked in a lathe. Trimble recommends a "Fine India stone" as part of his write up on ring making.
 
With all of this discussion I have gone back and reread the Trimble article again. One thing which I don't remember reading before is how he installs the ring. He talks about spreading the ring apart by prying your hands apart with your knuckles. I have no idea what he is talking about but he says that if you pry the ring apart by the gap it will ruin the ring. I don't doubt that others are also expanding the rings by spreading the gap.

How are you spreading the rings?

Gordon
 
Cover piston and ring with #30 motor oil. Lay ring on top of piston and spread ring as far apart as you think you can without breaking it with your thumbs and start one side of ring (right at the gap) down over the side of the piston. Work your way around until the ring is spread out enough to set down over the top of the piston. Then tease it down incrementally until it goes into the ring groove and relaxes. Damn, it's harder to explain it than it is to do it.
 
FWIW I make a tapered plug the same size as the piston about 1 inch long and about 060 or less smaller at the little end. Hold the plug tightly on top of the piston and slide the ring down with oil. When you get to the piston just keep on sliding till it drops in the groove. Colin
 
Back
Top