Yet Another Webster Begins

Home Model Engine Machinist Forum

Help Support Home Model Engine Machinist Forum:

This site may earn a commission from merchant affiliate links, including eBay, Amazon, and others.

CFLBob

Well-Known Member
HMEM Supporting Member
Joined
Feb 10, 2018
Messages
999
Reaction score
302
Location
Central Florida
I spent entirely too long deciding what to build for my first IC engine and finally decided to go with the Webster while waiting for George Britnell to finish his plans for the Holt 75.

Last weekend (11th/12th) was spent tracking down and ordering materials and I had it all by Friday. I didn't get everything, but enough to do a really good start on the engine. In particular, the parts labelled brass and bronze seemed hard to get small pieces of. I need to find a good source for that.

Found and ordered the two gears. My usual source for metals has mostly been Online Metals, but I kept coming up with sizes and costs way beyond what I hoped to pay. With eBay and a seller called USA Metal Online, I was able to save quite a bit over Online Metals for the 3/8 and 5/16" aluminum plates. I bought several smaller pieces from Hobby Metal Kits, but probably saved the most looking for a flywheel blank. The drawing says "CRS or Cast Iron", and the best I was doing was around $33 before shipping for a piece about 2" long and comfortably over 3.75" diameter of 1018 CRS. This was both Online Metals and some eBay searches. Then I ran into a different seller on eBay who had a chunk of what he called D2 tool steel at $18.75 including shipping. I figured the important part was the specific gravity of steel vs. aluminum and bought the D2 blank.

Everything I bought is in and I'm going through the drawings to figure out how to do things, but there's one thing I did that's new to me. The vinegar and salt solution for de-rusting steel really worked.

Of the things I bought, the only thing that was rusty was the flywheel blank and it was totally rusted on the front, back and sides. Since it's going onto the lathe to get cut, that didn't really matter, but I wanted to try that trick. So into a plastic container, covered with white vinegar, and some salt because I didn't know exactly how much vinegar was in the container. After 24 hours it looks like steel. All the surface rust came off. This thing was completely rust colored, without a single spot that was this color. There was really no scrubbing to get to this point. The rust just lifted off.

RustyDisk.jpg


My process is different than most of yours. My mills are both CNC, so I either have to draw the parts up in 3D CAD so that I can create tool paths, or I have to get coordinates of every point on the drawings so I can enter points for holes, or start and stop points on straight cuts. I won't be going very fast.
 
CFLBob--the Webster is the perfect engine for a first i.c. engine. Best of luck with your project, and if you need any help, give me a yell.---Brian
 
Brian, one of the reasons I'm going this is that I've read you saying that it's the best starter engine.

What I'm doing now is looking things over and deciding if there are things to change before I start cutting the parts.

I have those jpegs you posted (over on the sideshaft IC thread, I think) of the valve seat cutter and the valve cages. One of the pieces of metal I bought was a 36" bar of O1 tool steel 0.438" diameter. I can make a lot of practice pieces until I get it right.

Before I get to doing the Webster's valves and valve cages I want to figure out if I should use your cages or his, including whether I should use his 1/4" valves or the 3/8" valves the tool is designed for.
 
Bob, could you take the dfx drawings and convert to stl? is there software to do an automatic conversion? or can you even use stl for your cnc?
 
Bob, could you take the dfx drawings and convert to stl? is there software to do an automatic conversion? or can you even use stl for your cnc?

Sort of. I can import DXF into my CAD program (Rhino 5). Once they're in Rhino, I convert the DXF to Rhino's native 3D model format, which involves a lot of drawing. At the end, I have a solid model, though.

I could absolutely use a .STL file, though. I have to save my design as .STL for my CAM program.

I don't know of a way to convert DXF to Rhino automatically, or of some other utility that could convert the DXF to another 3D format.
 
Bob--when I made the Webster I had a terrible time getting the valves to seal. This was a matter of my own inexperience, not bad design on Websters part. I did make my valves exactly to the original drawing, so if the original drawing had 1/4" valves, then that's what I used. I do have two of those wonderful George Britnell valve tools, one for valves with a 1/8" stem and a 3/8" head and another for a valve with 3/32" diameter stem and a 1/4" head. You should absolutely read my build thread on it, because I learned an incredible amount of stuff when I built the Webster as my first i.c. engine, and I documented everything.---Brian
https://www.homemodelenginemachinist.com/threads/anybody-want-to-guess.7687/
 
I will be watching your build.
It's going to take you a while to whittle down that big chunk of tool steel to a flywheel!
Scott
 
It's going to take you a while to whittle down that big chunk of tool steel to a flywheel!

It's a lot of tool steel, which is a first for me and one of the many firsts in doing this engine. I'm hoping to finish it in a day or so, but most importantly, I'm hoping to finish it with the same number of tools I start out with.
 
Bob--It's been a long time since I used the smaller George Britnell tool and I can't really remember which engine I used it on. I do however have a solid model of it and of the valve cage on the Webster. I pulled them both onto an assembly file, and it became apparent that the tool I have wouldn't work for the Webster valves. I have built over thirty engines over the last 12 years, and my memory is getting foggy on some of the engines I built at the beginning of my model building in 2007 or 2008. The big trick of course is to keep the valve seat perfectly concentric to the "guide portion" of the valve cage, and that is what the "George Britnell tool allows you to do. In fact, I don't even try to cut the valve seat with a lathe operation. I turn the o.d., drill and ream the "guide" portion that the valve stem will fit into, and use an endmill to cut the opening that the port opens into. This leaves a sharp transitional edge where the valve seats, and the Britnell tool is inserted and turned by hand to achieve a seat of no more than .015" or .020" wide, after the cages have been inserted into the head. I make my valves with a 92 degree included angle, which gives a line contact at the top of the 45 degree seat. I press the cages into the head with a very, very light press, and coat them with 638 Loctite before doing so. The cages will deform very easily, so it is much safer to cut the seat 24 hours after they have been Loctited and lightly pressed into place. Then I lap with 600 grit paste to achieve a good seal.
 
To be honest, I'm not sure I understand all of that, Brian.

I was thinking that my choice is Webster's valve cages or yours (or are they George Britnell's?). I don't know if they're interchangeable in size. For sure, I don't understand how that part of the engine goes together. That's somewhere down the road (sheet 10).
 
Got it. That helped.

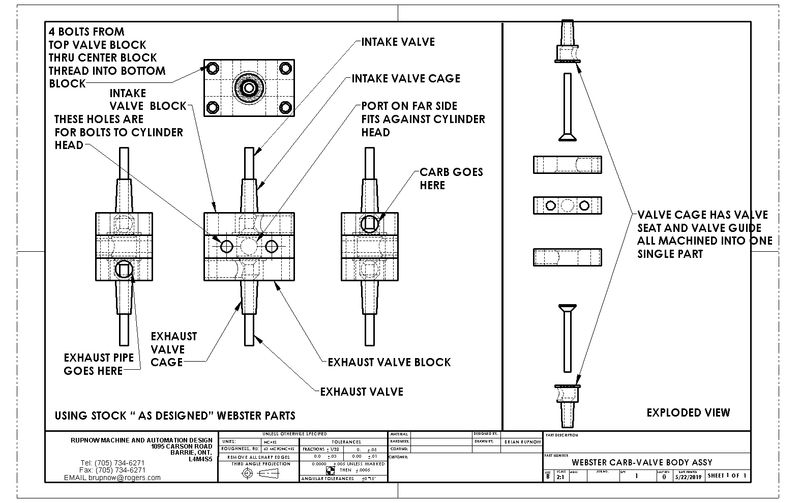
It looks like the Webster's valve cages are smaller versions of yours. I think the 2.5 degree taper on the valve guide is cosmetic, since the taper doesn't mate with another part (the piston has a spring with a hole through the shaft for a pin to retain it). They're machined as one piece, put in place, the hand-tool cutter used to cut and lap the valve seats, and then the port drilled in from the sides.

WebsterValves&Cages-Edit.jpg
 
Good stuff, just finished mine and I am quite pleased with it. I learned an absolute heap from doing it and was pleased with the end result albeit not aesthetically pleasing, functional nonetheless. I'm sure you'll get the same satisfaction, especially when you get that first sign of life!

Enjoy it, the exhaust fix calls like the drums of Jumanji...

Coincidentally I had a horrendous time with the valves seating. And mesed up the blocks with silly error, making them all (and valve cages) 4 times.

Valves... 8. I definitely learned that patience, and plenty of english ale, is a virtue.

Edit: and read plans twice, measure twice, check plans again. measure again, cut once..

Earl
 
Since it has almost been a week, I thought I'd post a little update.

The start of the project has been in CAD and deciding what gets cut first. It means importing the DXF files into Rhino and converting them from 2D flat drawings to 3D objects. The first one I did was the base.

Sheet2.jpg


This part doesn't really need to be made into a 3D part - I can drive Mach3 manually and cutout the plate, but I need to use the CAD to get all the locations of the holes in absolute XY coordinates from a reference and the start and stop points for every cut.

After looking at sheet 3, I moved on to sheet 4. Why? I already have my vise mounted on the mill. To cut out the plates, I'll have to take the vise off. So I took the top part on sheet and converted it into a 3D model. But other than cutting it to length on the mill, there's just a few cuts and it doesn't really need the CAM either.

Sheet4_Top.jpg


I was closing in on finishing this part a little while ago when I realized the countersink I was counting on being 82 degrees was really 90. Thankfully, I found werowance's post where he had the same issues and found the link to the set of countersinks at Lowe's. They're near enough that I'll pop over there tomorrow to pick them up.

The features on the front and back are done - the 1.000 x 0.500 deep bore on the back, the .625 relief on the front, and the four through holes (except the proper countersink). Tomorrow, I'll do the four holes on the left side and the one 10-32 threaded hole on the bottom.

I'll take a picture of it when it's done.
 
I could use some input from those of you who have been down this road.

I'd like to get some input on the spark plug to use and the ignition system in general. The drawings call out a NGK CM-6 Spark Plug, which is apparently a Honda (motorcycle?) spark plug, and say to drill 0.348" to tap 10mm x 1mm pitch for that plug. Then it says, "or drill 0.213 and tap 1/4-32".

What fits that 1/4-32 thread?

Should I be looking for mechanical points or is there an electronic system that people use?
 
The popular trend today is to use an electronic ignition system. S and S Engineering owned by Roy Sholl can fix you up with everything you need for about $100 Canadian, probably about $65 American. I personally use early Chrysler mechanical ignition points and condenser. I have a 12 volt coil that fits into it's own aluminum box, with an inline switch and leads which run to the engine with plug in ends. (I have about 18 i.c. engines)The nice thing about the 10 mm CM-6 sparkplug is that you can buy it quite cheaply from a generic auto parts store. The 1/4"-32 sparkplugs are "specials" and are sold by a number of people for use in model engines. Electronic ignition systems are very fragile, and are not tolerant of bad grounds. If you get a bad ground it burns out the "hall effect sensor" and then you have to buy another. The old systems like I use are tolerant of anything up to and including an elephant stampede. If you need an old school wiring diagram, I will make one for you.---Brian
 
Last edited:

Latest posts

Back
Top