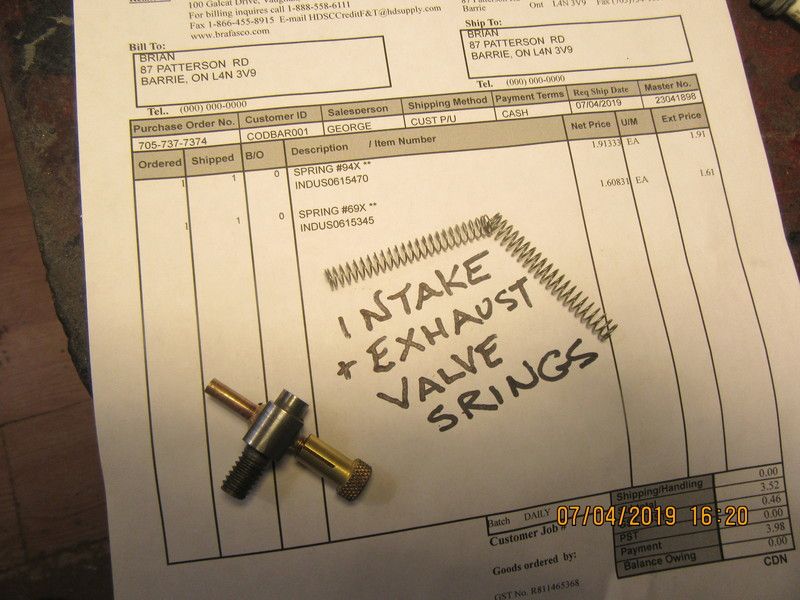
Just to set the record straight, those are neither circlips nor e-clips. They are sold by Spae-Naur and are called "external retaining rings". They are the R2000 series.
You are using an out of date browser. It may not display this or other websites correctly.
You should upgrade or use an alternative browser.
You should upgrade or use an alternative browser.
Verical hit and miss engine
- Thread starter Brian Rupnow
- Start date

Help Support Home Model Engine Machinist Forum:
This site may earn a commission from merchant affiliate
links, including eBay, Amazon, and others.
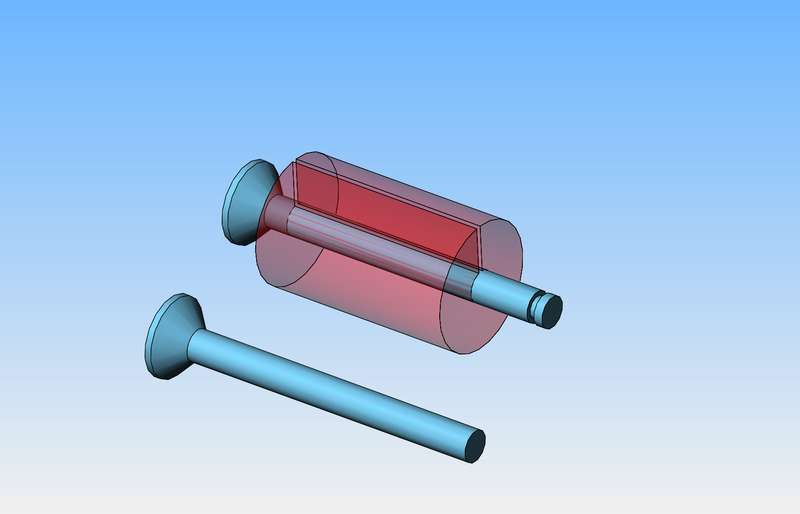
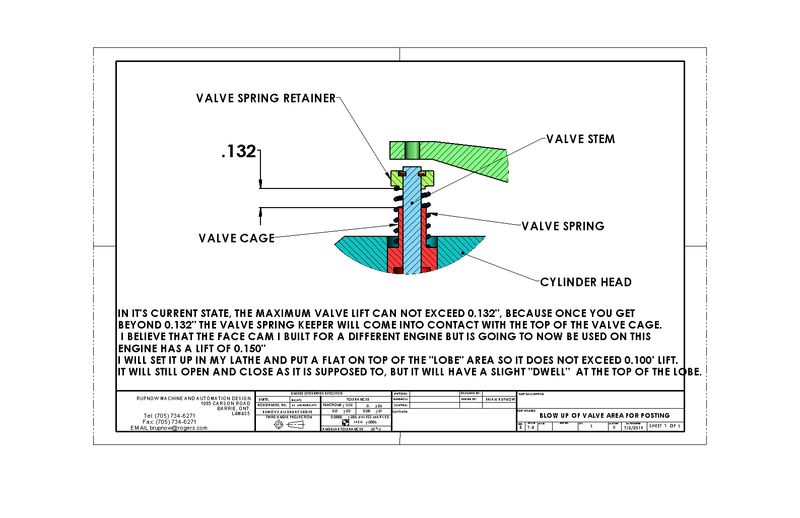
Here is a trick that is just so neat that I have to post about it. If you should be in a position to end up with a beautiful machined valve, and then remember that you haven't machined anything into the end of the stem for a spring retainer---(Not saying I did that of course). it becomes difficult. There is no way to hold the friggin' valve in your lathe chuck to add anything. Ta-Da!!! Just turn a piece of round stock to a larger diameter than the valve head diameter, drill and ream a hole the size of the valve stem and slit it lengthwise with a slitting saw. Then you can grip it in the three jaw chuck of your lathe to put in the groove.

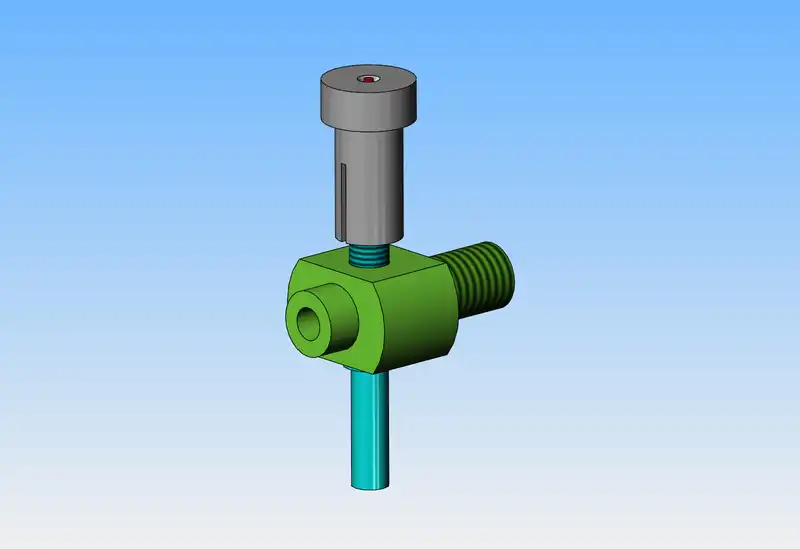
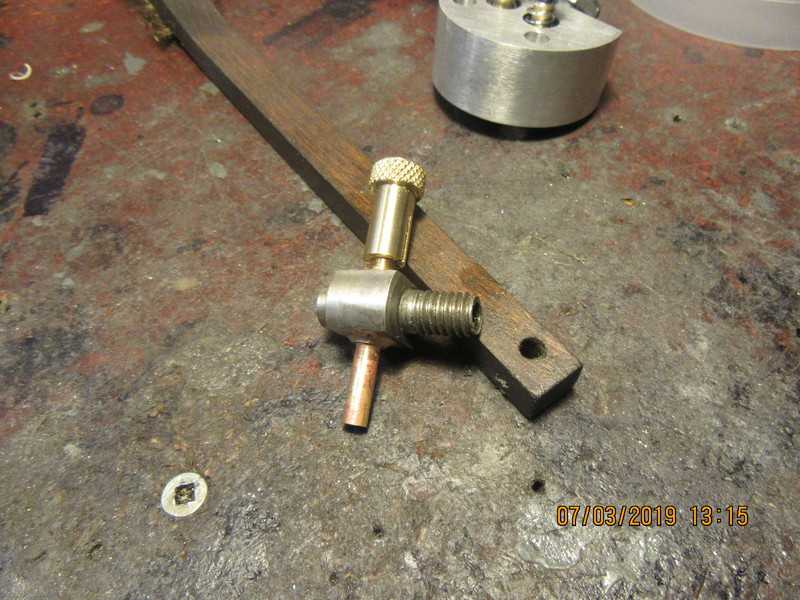
I'm starting to run out of things to make. I'm waiting for a set of rings I ordered before I make the piston. I'm waiting for a smaller set of gears to arrive before I make the crankshaft or any of the governor parts. I took a closer look at the carburetor design that I used on the sideshaft hit and miss engine. I like the design. It is easy to make and runs very well. I had made the carb body a straight thru style with no offset when I designed this engine. After a closer look today, I decided that the body doesn't have to be rectangular. It only has to have a flat on the top and bottom surfaces. If I leave the other two sides round, I can skip a couple of machining steps. Also, the fact that I am silver soldering the fuel rail into place means that a lot of care must be taken to not get solder migrating into the threads on the top of the fuel rail. To avoid the problem, I made the fuel rail 0.080" taller. That way, even if I do get some solder in the threads, the cap and needle sub assembly isn't going to hang up on any migrated solder. I'm completely out of brass in the size that I need, so will make the body out of 1018 cold rolled steel. I still have brass to make the fuel rail and the adjusting screw from. I like to use brass for the fuel rail, because it has some very small holes thru it, which would be a real pain trying to drill if the fuel rail was made from steel.

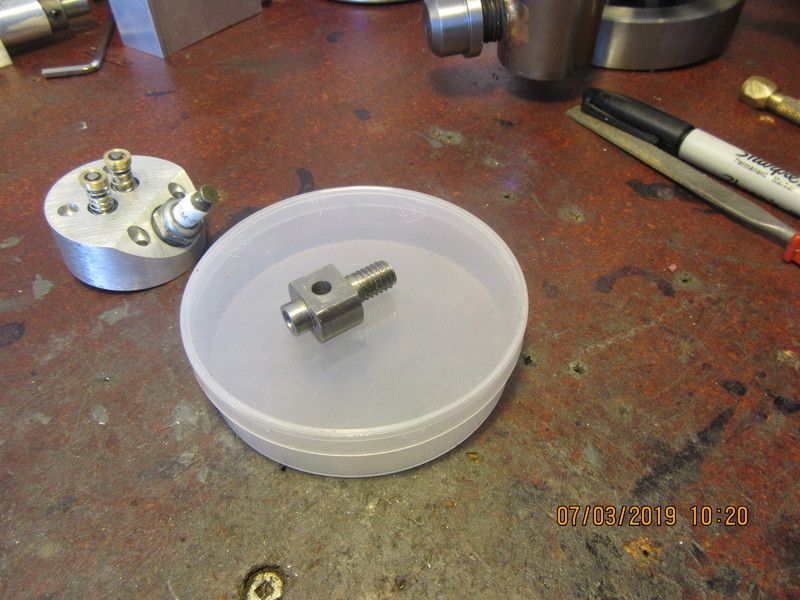
That went surprisingly well. Carb body is made from 1018 steel. The only thing I would do different if I made this part again would be to put the threads on before I got everything else turned down to size. I waited until everything was turned to size, then found it very hard to hang onto while the threads were being cut with a die. I could have made this from aluminum, except for the fact that I can't solder aluminum. I can only silver solder brass and steel.

- Joined
- Sep 2, 2011
- Messages
- 1,407
- Reaction score
- 415
Hi Brian, if you have any close ups of the valve seat I would like to see them please. I have read your posts about the britinellie valve seat cutting tool and how you just use finger preasure to cut your seat but wanted to see how deep it really cut and what I'm looking for when finished if I do the same thing.

$45.99
Sunnytech Mini Hot Air Stirling Engine Motor Model Educational Toy Kits Electricity HA001
stirlingtechonline

$171.00
$190.00
Genmitsu CNC 3018-PRO Router Kit GRBL Control 3 Axis Plastic Acrylic PCB PVC Wood Carving Milling Engraving Machine, XYZ Working Area 300x180x45mm
SainSmart Official

$99.99
AHS Outdoor Wood Boiler Yearly Maintenance Kit with Water Treatment - ProTech 300 & Test Kit
Alternative Heating & Supplies

$19.15
$29.95
Competition Engine Building: Advanced Engine Design and Assembly Techniques (Pro Series)
MBC Inc.

$26.89
$34.99
Peachtree Woodworking Supply Bowl Sander Tool Kit w/Dual Bearing Head & Hardwood Handle, 42 Pieces Wood Sander Set, 2 Hook & Loop Sanding Disc Sandpaper Assortment, 1/4 Mandrel Bowl Sander
Peachtree Woodworking Supply Inc
![DreamPlan Home Design and Landscaping Software Free for Windows [PC Download]](https://m.media-amazon.com/images/I/51kvZH2dVLL._SL500_.jpg)
$0.00
DreamPlan Home Design and Landscaping Software Free for Windows [PC Download]
Amazon.com Services LLC

$38.70
$49.99
Becker CAD 12 3D - professional CAD software for 2D + 3D design and modelling - for 3 PCs - 100% compatible with AutoCAD
momox Shop

$599.00
$649.00
FoxAlien Masuter Pro CNC Router Machine, Upgraded 3-Axis Engraving All-Metal Milling Machine for Wood Acrylic MDF Nylon Carving Cutting
FoxAlien Official

$49.95
$55.99
DjuiinoStar Hot Air Stirling Engine Assembly Kit: Spend 30 Minutes to Build Your Own Stirling Engine
djuiinostar

$9.99 ($1.00 / Count)
$13.99 ($1.40 / Count)
10 Pcs Carbide Burr Set Bits 1/8" Shank Compatible with Dremel Milwaukee Rotary Grinder Tool Kit Accessories Drill Rasp File Attachment Wood Metal Stone Carve Grind Cut Sand Engrave Polish Porting
SworkerDirect
Werowance-I don't have a picture as everything is assembled now. The 45 degree valve seat should only be about 0.020". That's not much, but its a lot easier to get a perfect valve seal on a narrow seat than a big wide one.
So---Here's my days work. I still have to buy a needle and mill the hole thru the center of the fuel rail. Now I've got to grab some lunch and go on my fat mans walk.

- Joined
- Sep 2, 2011
- Messages
- 1,407
- Reaction score
- 415
so what is the purpose of the slit on the needle nut side for?
Without the slit there is no way to keep the needle screw from vibrating out of position. When it is slit, then squeezed in a bit with pliers, it grips the threaded shank of the fuel rail and won't vibrate out of position.
el gringo
Well-Known Member
- Joined
- Aug 30, 2010
- Messages
- 333
- Reaction score
- 175
Hi Brian,
don't mean to break into your build thread but I thought there might be some interest in pics of Bob Shores original Silver Angel I built in 2003,my second attempt at a gas engine...Bob helped me along with the build via telephone.
When might you expect to have plans available for your Silver Angel?


note fuel tank in base as all of my engines
Ray Monahan
don't mean to break into your build thread but I thought there might be some interest in pics of Bob Shores original Silver Angel I built in 2003,my second attempt at a gas engine...Bob helped me along with the build via telephone.
When might you expect to have plans available for your Silver Angel?


note fuel tank in base as all of my engines
Ray Monahan
Hello Ray.--Bob shore's Silver Angel was the inspiration for my engine. All I have ever seen is YouTube videos of the Silver Angel, and I liked the look of it. I know that the original engine was 3/4" bore x 3/4" stroke. Mine has a 1" bore and stroke. I haven't come up with a name for mine yet. I have cataract surgery scheduled in mid July and the end of July, and I won't sell plans until I have ran the engine and made a video of it. Probably I will have plans for sale in September.---Brian
el gringo
Well-Known Member
- Joined
- Aug 30, 2010
- Messages
- 333
- Reaction score
- 175
I'll be waiting for your plans...possible raw material list preview?
I had my cataracts done last year. No big deal, actual surgery about 20 minutes but big improvement in vision.
Ray M
I had my cataracts done last year. No big deal, actual surgery about 20 minutes but big improvement in vision.
Ray M
Ray--there will be a complete bill of materials with the drawings I release. There is certainly nothing exotic about the materials, but it's too soon to release any information at this point.
And just for general knowledge---I want to build one of those crankcase vent valves that let air out but won't let air back in. This keeps the crankcase in a state of semi-vacuum and prevents oil from leaking out around the main bearings. I am going to use a 3/32" diameter check ball, but nobody in Barrie sells springs that small. I went to Sayal Electronics and bought a bag of assorted springs for about $7.00 Oh Joy--there are probably half a dozen or more compression springs that are 0.085" in diameter, and some 0.123" diameter springs.
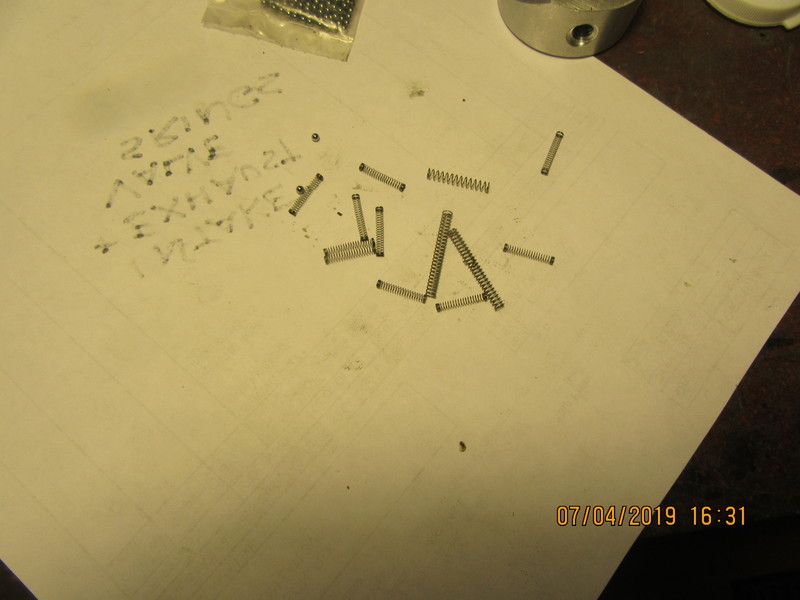

--I want to build one of those crankcase vent valves that let air out but won't let air back in. This keeps the crankcase in a state of semi-vacuum and prevents oil from leaking out around the main bearings.
Brian Rupnow !!
I like valve of this type and want to see how the valve work
- Joined
- Sep 2, 2011
- Messages
- 1,407
- Reaction score
- 415
wish you well with your eye surgery. and thanks for explaining the slit. that's a good idea.
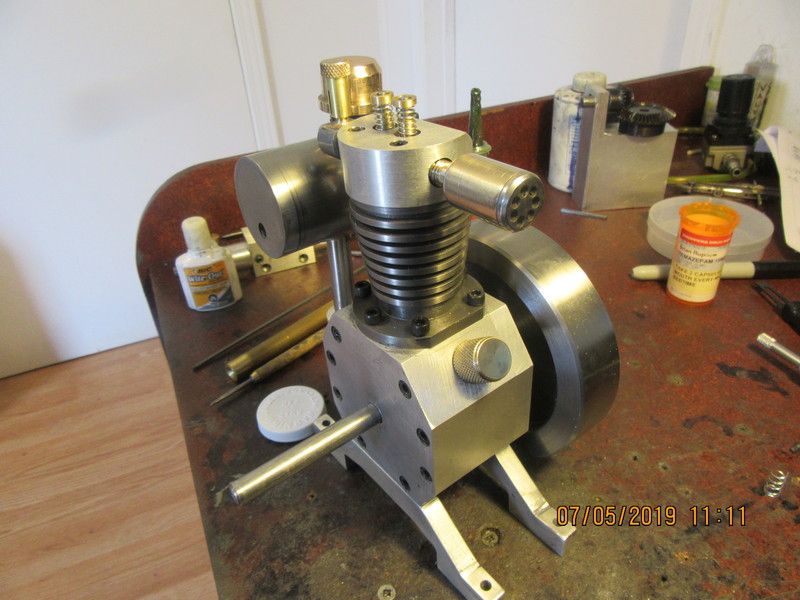
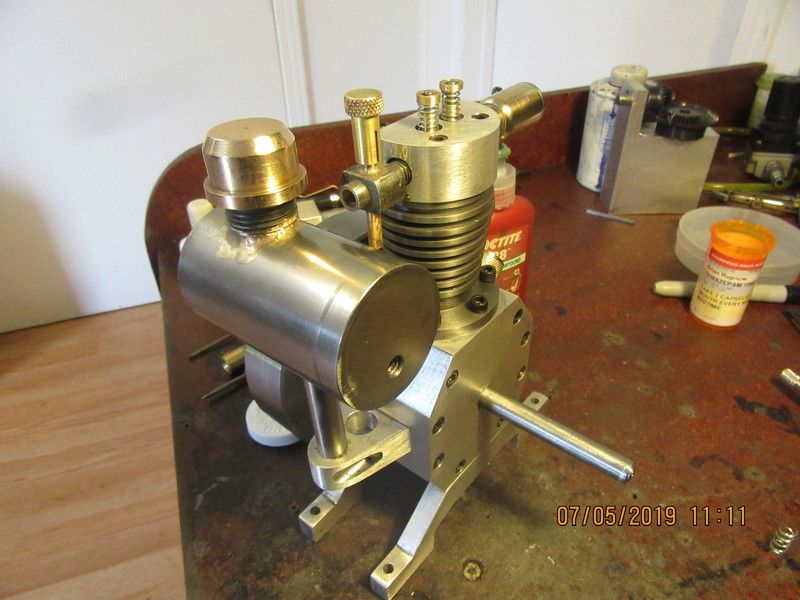
Things are progressing. I found a short piece of "mystery bronze" and turned it into an exhaust pipe, with a bit of mild steel pressed into one end to give it the "look". Carb is installed, and I rescued a bronze or brass gas tank filler cap from one of my extra gas tanks. Now that I have sourced some very, very small compression springs, I can go ahead and figure out my crankcase vent valve.


Similar threads
- Replies
- 1
- Views
- 679
- Replies
- 11
- Views
- 1K
- Replies
- 0
- Views
- 340




![MeshMagic 3D Free 3D Modeling Software [Download]](https://m.media-amazon.com/images/I/B1U+p8ewjGS._SL500_.png)


