Paper Tray Motor with rotary encoder

Home Model Engine Machinist Forum

Help Support Home Model Engine Machinist Forum:

This site may earn a commission from merchant affiliate links, including eBay, Amazon, and others.

chucketn

Senior Citizen
Joined
Dec 17, 2009
Messages
1,326
Reaction score
167
Location
Near Jonesborough, TN
I have a small DC motor that was removed from an old Lexmark Laser Printer Tray. The motor has what looks like a optical or IR emitter/detector under a plastic cover on one end. The motor has a disk on the shaft with small holes in it which is positioned so that the Emitter/detector straddles it.
I want to hack the circuit for the emitter/detector, but it is not marked to identify it. How do I figure out it's properties and circuit requirements?
It has 3 wires, and I have used a multimeter To measure resistance between the leads.
Once I figure out the electrical characteristics I want to use an Arduino Uno to experiment with it.

Chuck
 
pics of the motor in question:

Chuck

DSCF0244.jpg


DSCF0245.jpg


DSCF0246.jpg
 
I have a small DC motor that was removed from an old Lexmark Laser Printer Tray. The motor has what looks like a optical or IR emitter/detector under a plastic cover on one end. The motor has a disk on the shaft with small holes in it which is positioned so that the Emitter/detector straddles it.
I want to hack the circuit for the emitter/detector, but it is not marked to identify it. How do I figure out it's properties and circuit requirements?
It has 3 wires, and I have used a multimeter To measure resistance between the leads.
Once I figure out the electrical characteristics I want to use an Arduino Uno to experiment with it.

Chuck

Chuck have a look at this site, it should help guide you to the answer you seek.

http://madpenguin.ca/blog/2011/06/1...learn-servo-motor-control-with-emc2-part-2-2/
 
Not much help there, TB, but thanks for the link. I do have a couple of inkjets to salvage. I salvaged these motors 3 or more years ago and just came across them in my junk collection. I think they came from Lexmark lasers but I didn't save any circuit boards. These were in a pile of paper trays.
Chuck


Hi Chuck
the are opto coupler one side the LED side is on 5 volts TTL logic
and the other side Could be any thing the coupler will stand
now how to ID thw wire put a multim meter on the ohms higher scalle
possible and look at you sensor with your cell phone camera you will see the infra red led on then the transistor is the other side check the picture.
I also put a complete instruction books on robots in the download section and covers that with the arduino board

good luck

opto coupler.jpg
 
Page 3 and 4 of TB's link should help you determine which lead does what.
True, yours isn't identical to those pictured, but most optical encoders work the same.
Luc's post is for an optocoupler which is kinda similar but not same.
What you have is a photo interrupter, with the disc it is known as a quadrature rotary encoder.
The whole unit is a servo motor (Motor with position feedback)
 
Last edited:
Not much help there, TB, but thanks for the link. I do have a couple of inkjets to salvage. I salvaged these motors 3 or more years ago and just came across them in my junk collection. I think they came from Lexmark lasers but I didn't save any circuit boards. These were in a pile of paper trays.
Chuck


Chuck you need to read the details of the post and follow the first couple of links:

http://letsmakerobots.com/node/24031


http://en.wikipedia.org/wiki/Rotary_encoder

specifically, read the section that comes after this part:

"Suffice it to say that we’re looking to work with a linear (or rotary) quadrature encoder and there are a few basic things we’re trying to determine about it.

1) How do I supply power to the encoder reader?
2) At what voltage?
3) How do I get signals out of the encoder reader?"

Those are the same questions you wish to answer are they not?
 
As I have 2 or more of these, I decided to experiment. I connected the leads in all possible combinations on a proto board with 5 VDC input and 2 led circuits on the outputs. I can get the leds to light with 5v on green or grey wires and white to led circuit. With green to 5v, and white to led, the grey lead has 3.6v out, with white disconnected, grey goes to 5v. The only hook up that has any change.
As stated before the 'encoder' only 3 wires. Any ideas? I did look at all the references posted, but none seem to fit what I have.
So far, I see no use for it.
Motor does run slowly on 5vdc.
If I had an o'scope available, I might see a difference in output...

Chuck
 
chuck can you make a chart of what you are seeing
can you post a photo of your multimeter connected when making these reading
from 3.6 to 5 is normal cause you have two pn junction at .7 each

3.6 +.7+.7=5
 
With only three wires I would suspect it's not a quad, just a simple photo interrupter with the LED cathode and the Photo-transistor emitter tied together.
 
Last edited:
My guess on the encoder end is...
The part with just two wires is the light source part, and the part with more wires is the reader/sensor part of the circuit.

But of course that's just guessing.
Rich
 
My guess on the encoder end is...
The part with just two wires is the light source part
The red and blue wires?
They look to be the motor wires.

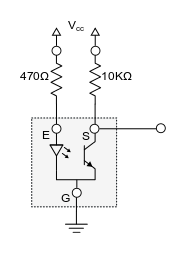
Of the three remaining, one would be common to both the LED cathode and PT emitter(G in the image I have borrowed), another would be the LED anode(E), the last would be the PT collector(S).
Tho which is which could only be determined by closer examination/experimenting.

Connected in this way(you add the resistors), the output at the collector would be low(~0v) when light passes thru the slotted disk, and high(~Vcc) when light is blocked by the disk.

optical_interrupter_schematic2.png
 
Last edited:
Hey Chuck,

I just happen to have a pile of these exact same motors that I salvaged from Lexmark paper trays from several years ago, and I was trying to work this out myself. Although it's over a year old late I thought I'd post a solution that worked for me to help anyone that has these motors...

I found using a 10K voltage divider you can take a reading on either an analog or regular GPIO pin. I'm not sure of the exact values that should be used here, so someone else might want to clarify if I haven't given the circuit enough protection by using a 100 ohm resistor here...

See attached fritzing circuit, and sample Arduino code below...

____

int val;
int rotation;
int mode; // encoder either being high or low

const int encoderPin = 7;

void setup() {
counter = 0;
rotation = 0;
Serial.begin(115200);
pinMode(encoderPin, INPUT);
}
void loop() {
val = digitalRead(encoderPin);

// only increment rotation when switching mode from high to low
if (mode == 0 && val == LOW)
{
mode = 1;
rotation++;
Serial.println(rotation);
Serial.println(val);
}
else if (mode == 1 && val == HIGH)
{
mode = 0;
rotation++;
Serial.println(rotation);
Serial.println(val);
}

delay(1);

}


___

I created another version and circuit, that counts the rotation and when it goes over 100 it powers the motor on for a second. I then left the circuit on the table and waited for the kids to pick up the motor and play with it. The surprise they had when it started spinning in response to their action was priceless!

Cheers,
Reid

Lexmark Printer Tray motor encoder wiring.jpg
 

Latest posts

Back
Top