Open Column Launch Engine from Kit

Home Model Engine Machinist Forum

Help Support Home Model Engine Machinist Forum:

This site may earn a commission from merchant affiliate links, including eBay, Amazon, and others.
Since the valve position on the crank shaft is important (it determines valve phasing relative to piston position), are you certain that:

The flat on the crankshaft is properly placed relative to the pin that drives the connecting rod to the piston.

The setscrew in the valve is properly placed relative to the grooves in the valve.

The combination of those two determine proper valving operation. If either of those is fuggulated, it very likely can't run.

Stop fiddling with the piston/cylinder until the valving is sorted out. Occam's razor here.

Write the following in your shop notebook:

Don't commit on valve placement/orientation/etc. until the engine is running.

Next time you're at the hardware store, buy some lightweight oil to lubricate engines.
(Rea's Hardware (if they have them in the Keystone state) sells turbine oil.)
 
How much air are you able to feed it? PSI? Micro compressor or something larger?

If it turns over by hand without massive resistance, it'll spin with enough air pushing it and reasonably close valve timing.


Celebrations will be had shortly.
It's turning over.
No congratulations yet...please wait for video.
Need to pretty it up some.

shred...I think you're right. Fiddling with it enough may have gotten it 'loose' enough to run with enough air.

Here' hoping I'm not speaking too soon.

 
Despite the many warts and errors...it runs


It can be better. Will it be better? Well, not tonight.

woohoo1 woohoo1 woohoo1

I intended to go through the thread and list everybody who had a part in this...there's too many and this thread is long.

Very many thanks to all. A special thanks to Rake60 for starting this forum. I'm sure I'm not the only one who would have been lost or taken much longer had it not been for this forum and the many excellent people on it.

As I said, it's not feasible to go through and name each contributor. Be assured that every post was meaningful and helpful (whether related to machining or developing camaraderie).

But if you go through the thread...there are two members that stand out...mklotz and Foozer. Thank you.

This is great fun. The most fun I've had in a long time. Some may think I'm putting this project away too soon...probably. But as a software engineer...I know the danger in continual improvement...you never finish.

I accomplished a number of goals...

1) To begin this hobby (that was big one).
2) To begin to learn (can't say finished...never will).
3) To build an engine that runs. Well it does! Sorta.

What I hadn't counted on was meeting such a fine group of people. That's just invaluable. I look forward to a long and fun relationship with them.

I'm here to stay! Getting ready to start the next project. With your help, I'd like to make it another learning thread (but aren't they all really?).

The project will be the Elderberry Mill Engine (the engine that started this thread).
 
Thm:
Congratulations Carl!
You have a runner.
The first of many I am sure.
th_wav
Gail in NM,USA

 
Carl,

A huge congratulations to you on your successful build. Thanks for taking us all along for the "ride". Thm: Thm: Thm: Thm:
th_wav th_wav woohoo1 woohoo1

Bob
 
Yippee! Does small vicarious dance in front of computer. I knew you could do it.

Thanks for the thanks but, remember, it was you who actually got it to work. What do you think the problem was? As a physicist - we're always searching for the God particle and the Theory of Everything - I need to know or I'll lose sleep.

Just a few remarks...

The connecting rod is at quite an angle. It could be enough to induce friction on the crank pin as well as the wrist pin. Can the whole crankshaft be moved to the left (as seen in the video) so it's straighter? Maybe it really does need to be bent as per the plans?

Is that air input stub 3/16" diameter? If it is, the green silicone tubing available in aquarium supply stores will slip over it and stay in place so you don't have to handhold things. If not you can turn the existing stub down to fit the tubing you have.

Again, congratulations. Wasn't the feeling you have now worth a few hours of fiddling?
 
:bow: :bow: Congrats, Zeebuilder! th_wav th_wav

I'm really happy to see your engine running. I knew you could do it. ;D

Mklotz is right, that connecting rod is at a severe angle. Fix it, don't stop quite yet.
 
Now THAT is way, WAY cool! 8) I am glad to see you finally have had success in your adventure and am looking forward to seeing your progress through another set of trials. :bow:

Now, Have yourself adeserving bottle of wine and go lie down! Rof}

BC!
Jim
 
Carl,
Congratulations woohoo1 woohoo1 woohoo1 :bow: :bow: :bow:


Best Regards
Bob
 
Thank you Gain in NM.
Thank you Bob (90XL_Notch).

Marv. Thank you. Re: 'you who got it to work'...nope. It was all of us. I couldn't have done it without everybody's help. Credit goes to all. Yes...the feeling is worth it. Actually checked an aquarium store on the way back from hardware. I'll have to go on line. (It'll help if the next engine is a bit better too!).

I'll be counting on you and the rest of this forum for the next project.

Yes. It turns out the connecting rod has to be bent per plans. At least for my build. If anything...I didn't give it enough. If not adjusted right there can be some interference on the edge of the crankshaft or the columns. In this case...it just makes it. I think the 'severity', that Vernon points out, may be more effect of angle/video. And the fact that it's not quite enough. I think too that it's bent in one axis that it shouldn't be. But what do I know?

Oh there's lots that could be done better/right. The rotary valve could use some work as well as the cylinder. But I'm happy. I mean it moves!! This is better than when I used to design robots at my first job.

Vernon. Thank you. Fix it? I'll fix it when you fix your broken offers. :big:

What a great ride. I'm really looking forward to the next one. In the meantime...I need to make some tools and get Marv off my back. :big:

The engine isn't great...it won't win any prizes...but it runs and I built it! A stepping stone to the next. Maybe I really can fulfill that dream....

Got some more posts while writing this one...

Jim: Thank you. Hee. I'm halfway through that bottle.

Bob: Thank you. You and many others are a great inspiration.


Sorry Marv...forgot to answer your question about why. Hm...should I let you sleep? Well unfortunately I don't think it's a big thing. It could have been some slight interference. But I think it ended up that it needed to be run in a bit. It needed a lot because of the less than stellar quality on the valve, cylinder and piston. Takes quite a bit of air too.
 
Congratulations Carl!

I am sorry to have to tell you that the bug bite you have
just received is a permanent affliction...
;)

Rick
 
rake60 said:
Congratulations Carl!

Thanks Rick. Your forum and its members made it possible.

rake60 said:
I am sorry to have to tell you that the bug bite you have
just received is a permanent affliction...

Good! I'll tell the family not to waste their time looking for a cure.


I took another look at the video (I probably will a few more times :))...
I see what Marv and Vernon are concerned about.
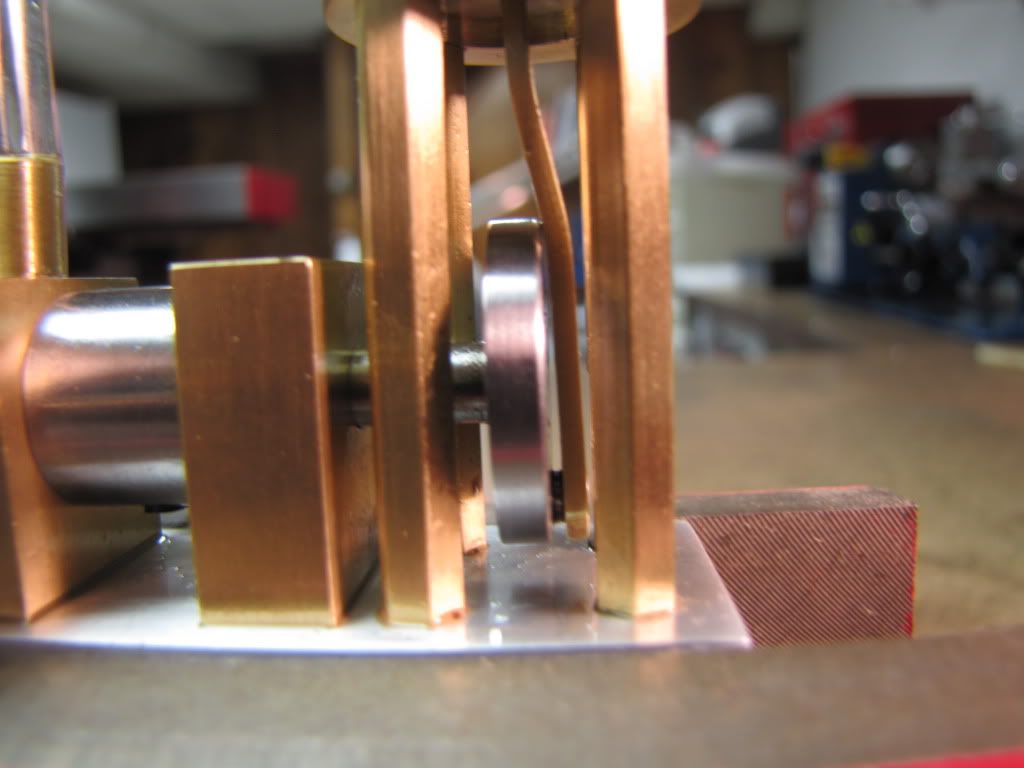
It's definitely the angle/resolution that makes it look like the connecting rod is at a severe angle. A closer look would show a kind of 'z' shape. Comes down from the piston...angles to the right...and then angles back down again to the crankshaft.

Here's a pic. The connecting rod could have been better. The angle going down to the crankshaft isn't as...clean...as it should be.

IMG_0245.jpg
 
Carl,
Congrats! Feels good huh?
You did a great job on the engine and you learned a lot too! I'll be you'll find the next one will come about a lot easier.
One thing you might try is to put a few drops in the intake, hook'r up and let run for a while to break in. My last two rak Ok at first, but following the above procedure improved quite a bit in 20-30 minutes

Mark
 
Zee, while I have not posted regarding your build I have been following it faithfully as you asked all the right questions that I probably wouldn't have thought to ask. I have never built an engine yet but am in th eprocess of building 4 marine 2 cyls at the moment. 1 of the 4 is my "mistakes" engine. All of my goofed up parts go to it. I want to see if it will run and to keep it as a monument, if you will,to my 1st feeble attempt at engine building. I have learned a lot from your post and all the advise given by Marv and Foozer and everyone else. I will folow your next build too and maybe chime in this time. You have my admiration sir and congratulations on a runner.


Ron

 
Zee,

Way to Go! I knew you had it in ya! Very nice effort for a first engine and while a lot of advice was given to help, you had to act on it! :bow:

Major kudo's to you! :bow: :bow:

I better get off my butt and get something posted tonite! ::)

Congrats again,
Sean
 
Congrats Zee!

:bow: :bow: :bow: :bow:

I new you could do it!.....and now YOU know!

Dave
 
Mark: Thank you. I did put oil in the intake, but I need to find some proper clamps so I don't have to stand around holding a hose.

Ron: Thank you. Please chime in. Just showing support is a great help. And you never know what observation will make someone think..."oh! maybe that's it". Another pair of eyes always sees something different.

Sean: Thank you.

Dave: Thank you.

I was thinking earlier about my 'wall of shame'. That's really wrong. It's really part of the library of learnings.
 

Latest posts

Back
Top