Design and build side-shaft hit and miss engine from bar stock

Home Model Engine Machinist Forum

Help Support Home Model Engine Machinist Forum:

This site may earn a commission from merchant affiliate links, including eBay, Amazon, and others.
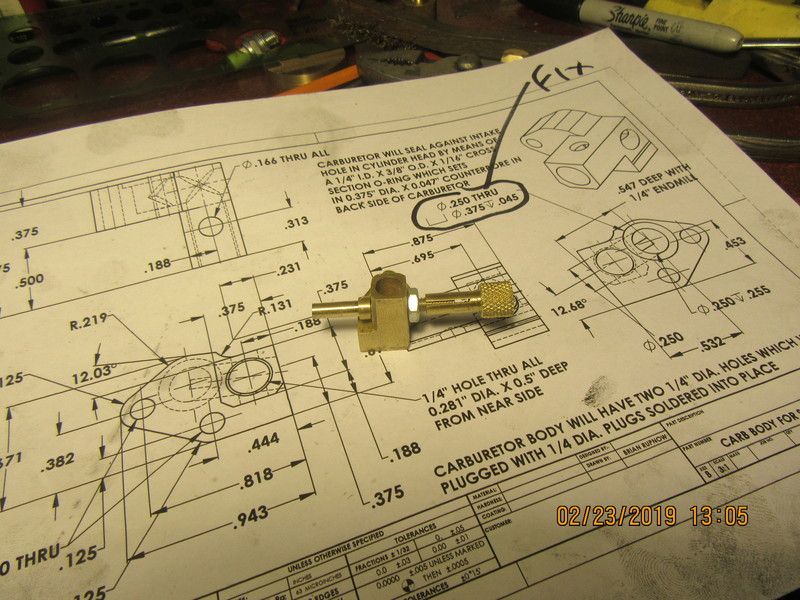
This isn't exactly micro-surgery, but it's darn close. I will make up the two 1/4" plugs and solder them in later today.
NcFLmL.jpg
 
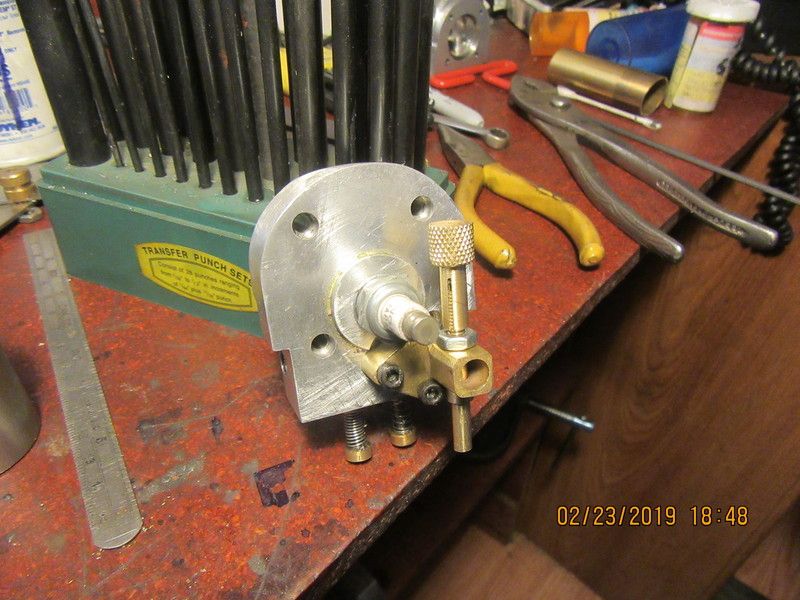
And this is as much carburetor as I can build today. I need some very small drills, which can only be bought at a toolshop to finish this off, and they are closed on the weekends.
8uYYD0.jpg
 
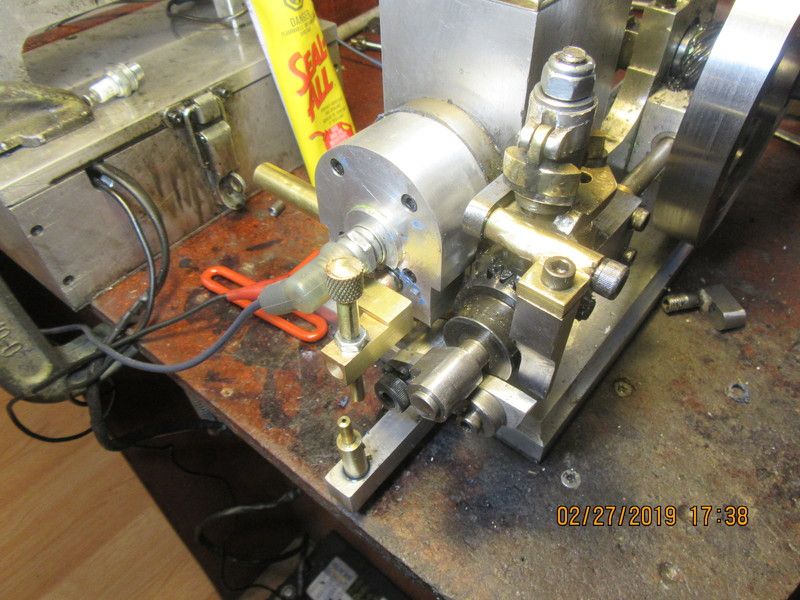
I couldn't go any farther with the carburetor today, due to a lack of miniature drills.---But--I could fit the carburetor to the cylinder head and make what changes were necessary (drill and tap two holes in cylinder head, and a small counterbore over the port hole for an o-ring). I didn't really want to machine anything today, but goodwife has a cold and didn't feel like going out. Everything fits and clears like I had anticipated, so I'm happy on that account.
HvvKBT.jpg
 
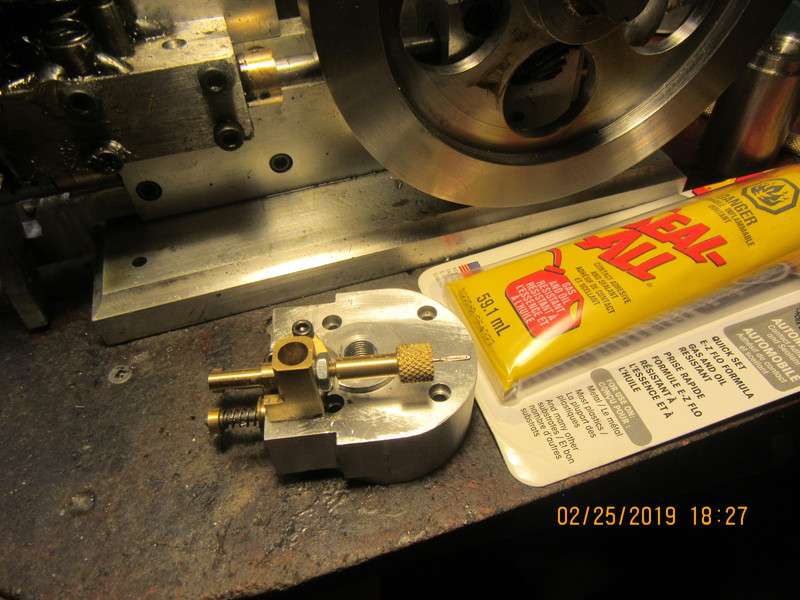
Making carburetors is not terribly difficult, just a bit time consuming. I drove across town in a blizzard today and got the 0.040" and 0.052" diameter drills I needed. Came home and carefully drilled the holes in all the right pieces, and just about to finish up here. In final assembly, I screw the needle valve top (knurled part) down onto the fuel jet until it bottoms out against the carburetor body, then back it off two full turns. I have a selection of sewing needles from the local fabric shop, and I find one that slides all the way in until it bottoms out against an shoulder in the fuel jet. To be sure, I use the old "blow your guts out" trick on the end which the fuel line will eventually connect to. If you can't blow any air through unless you pull the needle back a bit, you have found the right size needle. I will now clip whatever part of the needle sticks out past the top of the knurled part, and solder the needle to the knurled part while everything is assembled. You will also see a tube of "seal all" laying beside the carburetor. After the parts have cooled off a bit, I unscrew the knurled part (which now has the needle attached to it), loosen off the hex nut, and put a dab of seal all on both sides of the fuel jet where it exits from the body, then quickly reassemble everything. If you don't use the seal all to seal things, the carburetor will suck air around the jet rather than sucking up fuel from the tank. Don't ask me how I know that!!
C5fznC.jpg
 
The only other bit of carburetor wisdom that I have is this. Those lovely, shiny sewing needles have some kind of clear coat on them to prevent them from rusting while setting on the shelf. Before I try and silver solder them to the knurled part, I soak them in laquer thinners for about 5 minutes, then wipe them down with a clean dry rag and rub the area that will actually see solder on a very fine bit of sandpaper. If you don't do this, the solder will all pool up around the end of the needle but not flow onto it.
 
wgpeters---Me too. Actually, that train has already left the station. I decided that my newest carburetor which was supposed to seal with a rubber o-ring wasn't sealing. At that point I had to make a decision between shooting myself in the head or building another carburetor that screwed into the tapped 5/16" hole in the cylinder head. The newest carburetor is setting in a jar of citric acid pickling solution at I type this, and in about 20 minutes I will take it out, scrub off all the black nasties, and install the fuel jet, and needle valve into it. Then---We'll see!!!---Brian
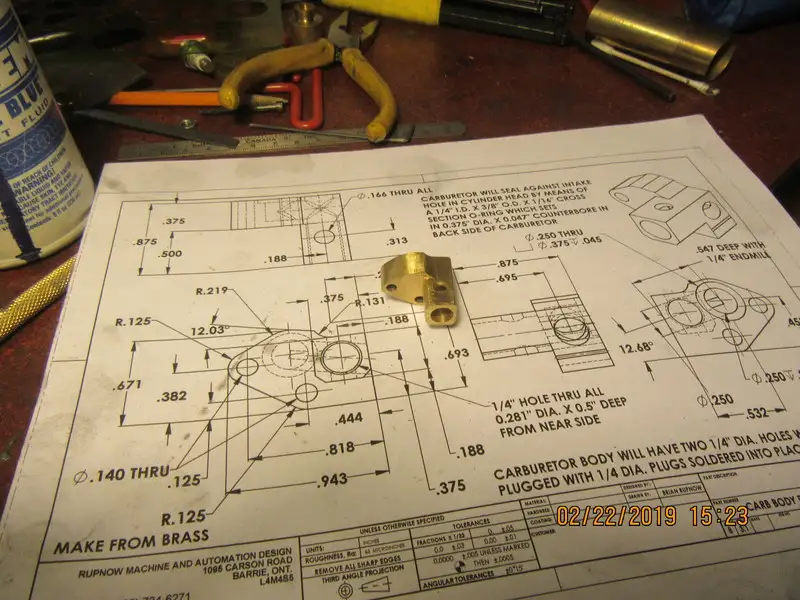
 
"The best laid plans of mice and men"---I think perhaps Robby Burns may have built small engines as a hobby. My great little new carburetor that was supposed to seal tight against the head with a small o-ring---didn't!!! I played all day yesterday with no success, so today I built carburetor #4, which goes back to sealing on the 5/16" tapped thread in the cylinder head. It wasn't that bad--I got to salvage the fuel jet and the nut and needle from the o-ring carb that didn't work. Tomorrow, after the Loctite and seal all has had overnight to dry, we'll try this dance again.
jaiJpf.jpg
 
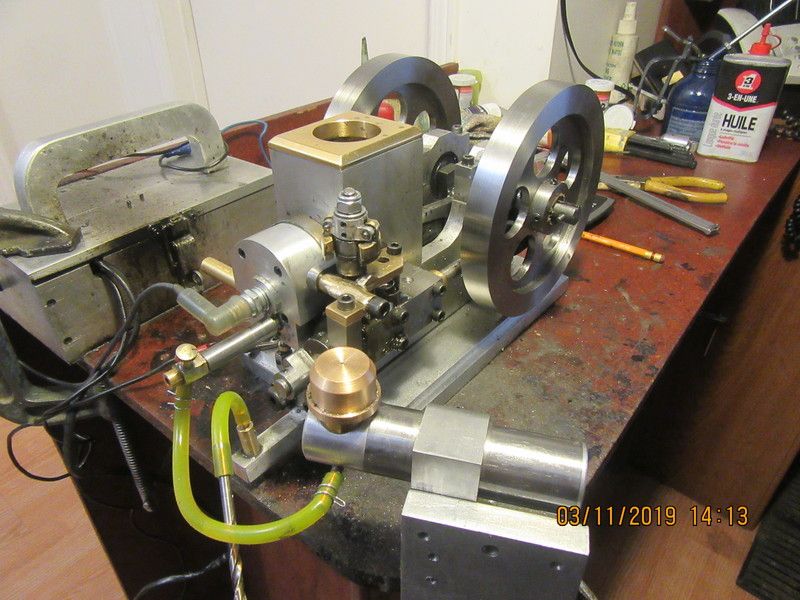
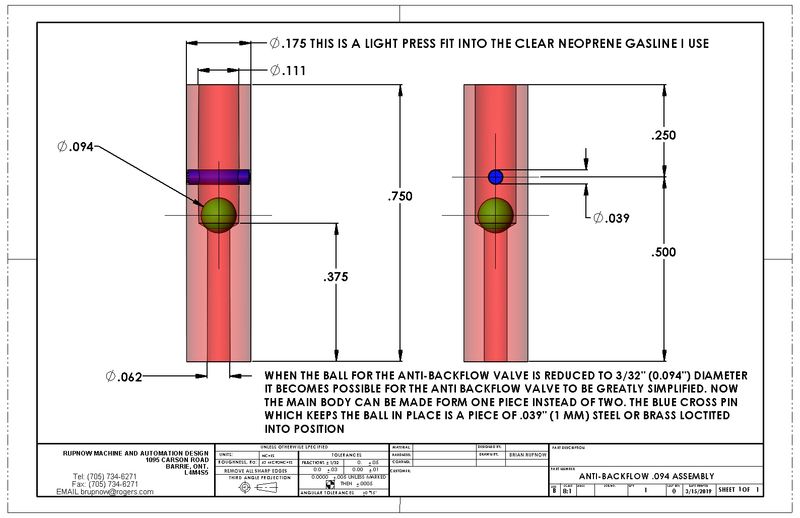
I'm back, after a 10 day rest from this engine. I needed a break, because it wasn't working up to it's full potential, and I had totally ran out of ideas. I have had problems right from day one with this engine, where it would fire along with the drill driving it, but then gradually die away and quit when the drill was removed. Sometimes it would run for 5 or 6 minutes, long enough to get a video of it, and then gradually die away and quit. I tried a different cam and cam follower---no joy. I tried a couple of different carburetors---no joy. I think that today I have isolated the cause of all my heart-ache. There is something very, very fishy about either the position of the gas tank (in the base) or with that anti backflow valve which now has the 1/8" check ball in it. Today I changed back to my carburetor with a 0.156" throat and the gas tank from a different engine mounted about 1/2" below the carburetor throat, and the engine ran for 15 minutes straight and didn't offer to quit. I actually had to shut it off with the switch. This amazed me so much that I started it three or four more times, and each time I had to shut it off with the switch. I am going to see today about getting a 3/32" steel ball for the anti backflow device. Also, I have to devise a mechanism for the governor which lets me increase or decrease the pressure of the compression spring in the governor while the engine is running, so I can fine tune the hitting and missing.
UQkC5F.jpg
 
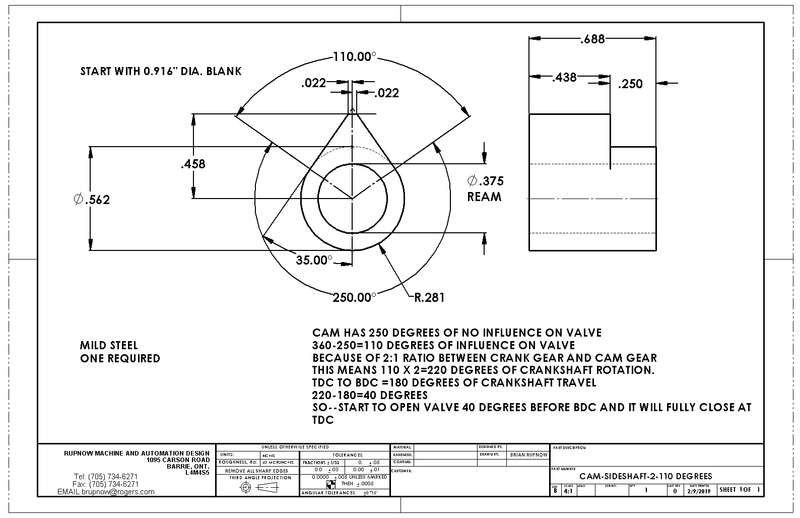
This is the exhaust cam I am using on this engine. Keep in mind that the angles are somewhat theoretical. I made no allowance for the gap of about .008" between the end of the exhaust valve stem and the part of the rocker arm that contacts it. This gap, called "valve lash" is necessary when the cam is not acting on the rocker arm, otherwise the exhaust valve would be held open and leak. The numbers say that the valve will begin to open about 40 degrees before the piston is at bottom dead center, remain open thru the full 180 degrees of piston travel as it moves from bottom dead center up to top dead center and then closes. The reality is that it begins to open about 20 degrees before bottom dead center, however it still must totally close when the piston reaches top dead center. If it remains open past top dead center, the atmospheric intake valve won't open until the exhaust valve is fully closed. I finally got around to checking the compression ratio on this engine, and it is very close to 7:1 ratio.
jveQUD.jpg
 
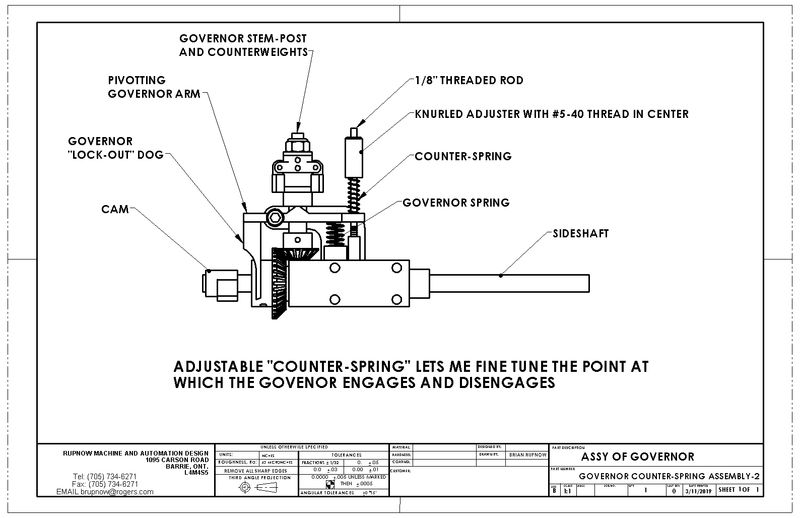
And just for interests sake--This is how I intend to add a "counter-spring" and adjuster to fine tune the point at which the governor kicks in and out.
chv1Rh.jpg
 
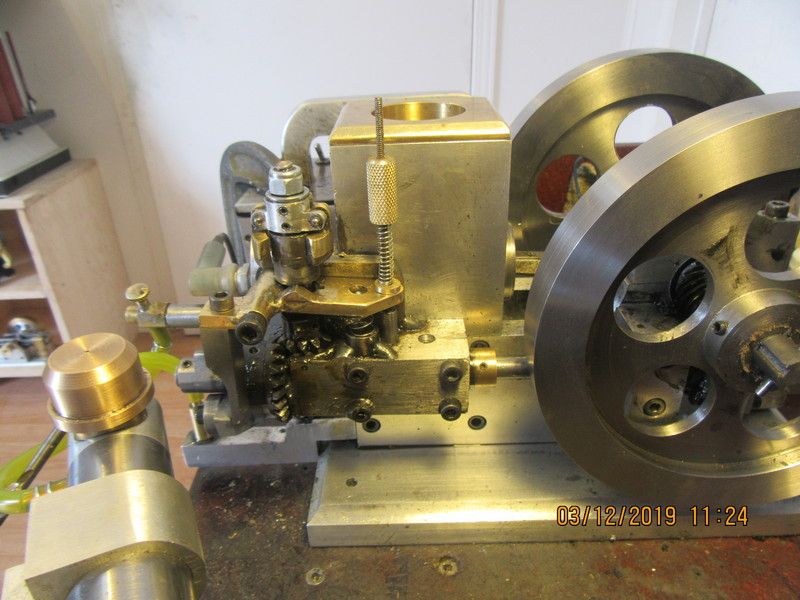
The counter-spring for the governor has been built and installed. It works. You can definitely change the rpm at which the governor engages. It is a very delicate adjustment. Now I need to address the carburetor one more time, because it is running on a borrowed carburetor. This engine does not have a great "coast" mode. I'm not sure if it's simply a matter of flywheel diameter and engine bore, or if there is just too much inherent friction from the helical gears running the sideshaft and the bevel gears which operate the governor weights. This is basically the same engine as was built by Craig Deshong, based on a 1905 Myers hit and miss engine. His model has 8 1/2" dia. flywheels and I "think" a 1.25" bore cylinder. His engine runs marvelously, and has a much longer "coast cycle" than this one does.
WMEI6s.jpg
 
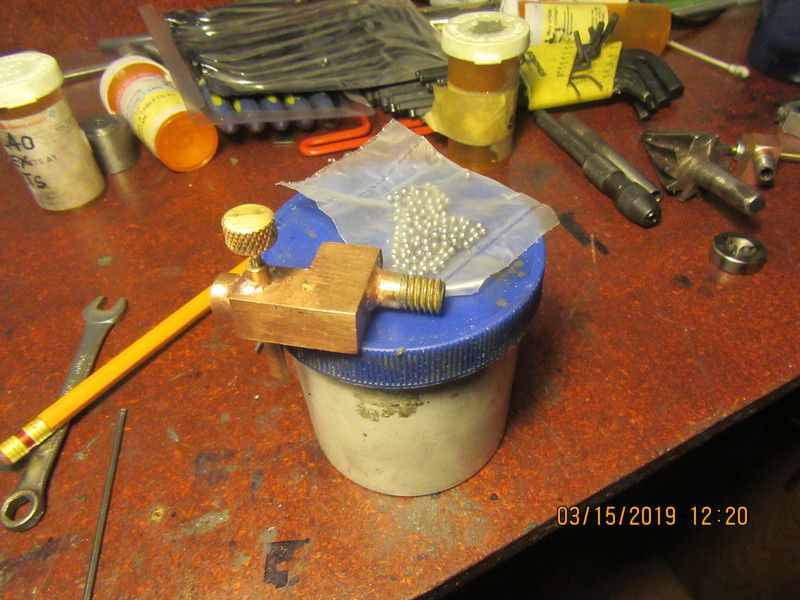
Just so ya know I'm not being totally slothful up here---Newest carburetor with 0.156" bore and bag of 100
3/32" steel balls in a plastic bag. I'm having a terrible fight with my arthritis this past week, so I'm not moving quite as fast as I usually do.--Going in on Monday for a cortisone shot in my left knee. Hope to have new carb mounted and new anti backflow made sometime over the weekend.--Brian
8hx6mn.jpg
 
Very happy to report that new carburetor works fine. Engine is running and starting consistently with new carburetor. I will post details of new carburetor tomorrow.---Also hope to finish new anti-flowback valve tomorrow.---Brian
 
Finally--With the 3/32" steel ball in the anti backflow valve and the new carburetor with the 0.156" throat diameter, we are running off the main gas tank in the base and getting sustained runs. I am going to post drawings details of the new carburetor, take a final video, and then this thing is done like dinner.
 
Back
Top