You are using an out of date browser. It may not display this or other websites correctly.
You should upgrade or use an alternative browser.
You should upgrade or use an alternative browser.
Dave's twin
- Thread starter Dave G
- Start date

Help Support Home Model Engine Machinist Forum:
This site may earn a commission from merchant affiliate
links, including eBay, Amazon, and others.
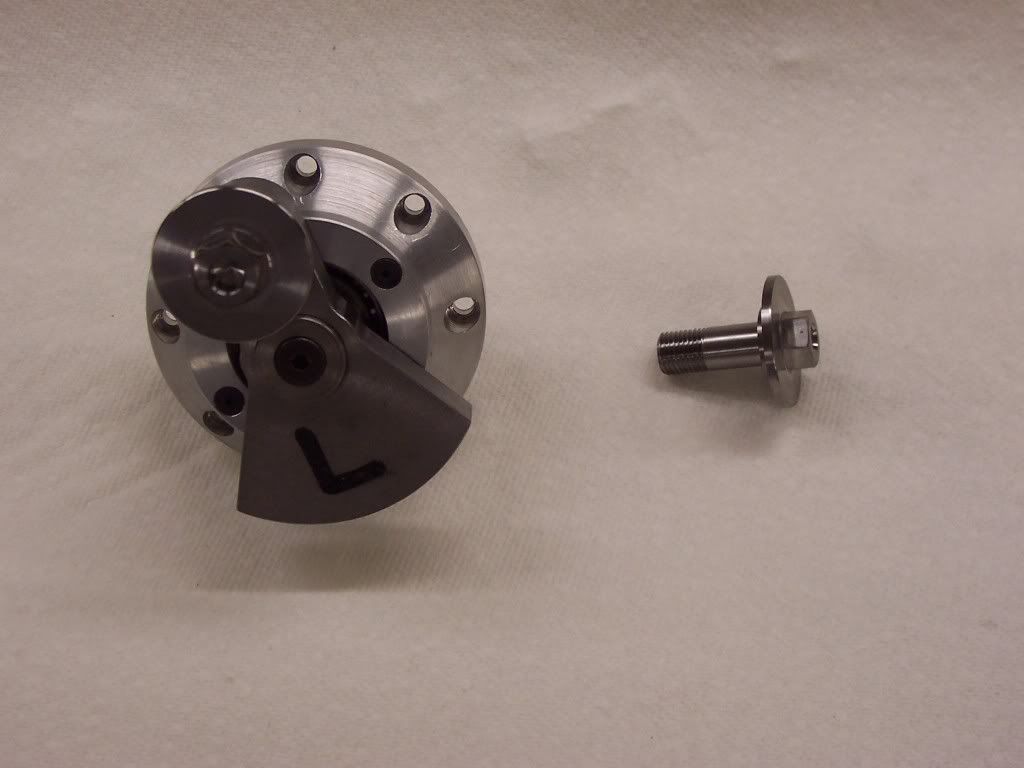
Its been too long since I've posted any progress, I spent some time in the shop the last couple of days and made the 2 crank pins. These were made from a piece of 6AL 4V titanium I bought from the scrap man a few years ago. It doesn't machine that bad, slow speeds and proper feeds with sharp tools did the trick. I used titanium to keep the weight down and for the strength and I have been saving the stock for a special occasion and this was it. I didn't take any in process pics as it was a fairly easy job to turn them up. The thread is 3/8-24 unf which will thread into the crank disks. The threading was done by single point and made to fit the mating piece with a close fit. I machined a 7/16" hex to be able to tighten them at assembly.

The crank pins will support and tighten on a hardened sleeve made for roller bearings. The big end of the rod will have a needle roller bearing pressed into it and the roller bearing will rotate on the hardened sleeve.
The wrist pin will be a press fit in the small end of the rod. This is the first time I will try to use a pressed pin here. I need to modify the pistons to have a surface to rest on when the pins are installed. An undercut should do it. This I will do next and take pics.
After I mod the pistons I think I will have everything made to be able to assemble the engine and give it a try. Alot of cleaning first and then a trial fit of all the pieces. I hope to be able to do this soon. Its getting close so I will take pics of all the components before assembly. Dave
Nice work, Dave. This is not only an exotic design, but exotic materials too. I'm looking forward to seeing your twin run.
Regards,
Chuck
Regards,
Chuck
Chitownmachine
Well-Known Member
- Joined
- Oct 30, 2010
- Messages
- 50
- Reaction score
- 0
Beautiful work.....your finishes are amazing....how do you get such a fresh clean finish on all your parts? whats yer secret??

$99.99
AHS Outdoor Wood Boiler Yearly Maintenance Kit with Water Treatment - ProTech 300 & Test Kit
Alternative Heating & Supplies

$599.00
$649.00
FoxAlien Masuter Pro CNC Router Machine, Upgraded 3-Axis Engraving All-Metal Milling Machine for Wood Acrylic MDF Nylon Carving Cutting
FoxAlien Official

$45.99
Sunnytech Mini Hot Air Stirling Engine Motor Model Educational Toy Kits Electricity HA001
stirlingtechonline

$26.89
$34.99
Peachtree Woodworking Supply Bowl Sander Tool Kit w/Dual Bearing Head & Hardwood Handle, 42 Pieces Wood Sander Set, 2 Hook & Loop Sanding Disc Sandpaper Assortment, 1/4 Mandrel Bowl Sander
Peachtree Woodworking Supply Inc

$19.15
$29.95
Competition Engine Building: Advanced Engine Design and Assembly Techniques (Pro Series)
MBC Inc.

$37.82
$49.99
Becker CAD 12 3D - professional CAD software for 2D + 3D design and modelling - for 3 PCs - 100% compatible with AutoCAD
momox Shop
![DreamPlan Home Design and Landscaping Software Free for Windows [PC Download]](https://m.media-amazon.com/images/I/51kvZH2dVLL._SL500_.jpg)
$0.00
DreamPlan Home Design and Landscaping Software Free for Windows [PC Download]
Amazon.com Services LLC

$49.95
$55.99
DjuiinoStar Hot Air Stirling Engine Assembly Kit: Spend 30 Minutes to Build Your Own Stirling Engine
djuiinostar
Thanks guys, I'm glad you are enjoying it.
With aluminum I use sharp tools made from hi-speed steel and steady feed. I hone my tools with a stone after grinding to shape. The naked eye can't tell if your tools are sharp or not, at least mine can't. Normally no sandpaper with al. after turning. With steel I use carbide insert tooling and a new one for finishing. If I can't get a good enough surface from turning or milling I will either stone the high spots off and then sandpaper it to death. The beams of my connecting rods were milled then I used 240, 320, 400, and 600 grit to sand out the previous grits scratches. I try to get as good of surface finish when machining as I can so it is easier to finish with sandpaper. I have rubbed my fingertips to nubs trying to get something to look good before so I try not make myself more work than I have to. Sometimes that is what it takes though.
With brass, lots of sandpaper. I think its actually fun to shape brass by hand. Hard on the fingertips though.
I guess with finishing it is where you finally say thats good enough or your fingers quit working, which ever comes first. In the last couple of years uncle Arthur Itis has taken up residence in my knuckles and the fingers will quit working before that good enough point gets there. I'm glad the camera does a good job of hiding it. I still get a kick out of shaping a piece by hand after machining but it doesn't come as easy at it once did.
I just recently bought George B's v-twin drwgs because everyone should have one in my opinion. I love how he shapes the crankcase and other parts by milling away the stock then finishing the surfaces by hand. A sign of a true craftsman. I want to build this engine in the worst way and will find a way to do it. I just have to talk my fingers into it.
I'm glad you're still with me on this one, Dave
Chitownmachine
Well-Known Member
- Joined
- Oct 30, 2010
- Messages
- 50
- Reaction score
- 0
Dave, Thanks for the info!! I'm gonna work on sanding till my fingers are nubs!  Looking forward to the rest of the build!!!
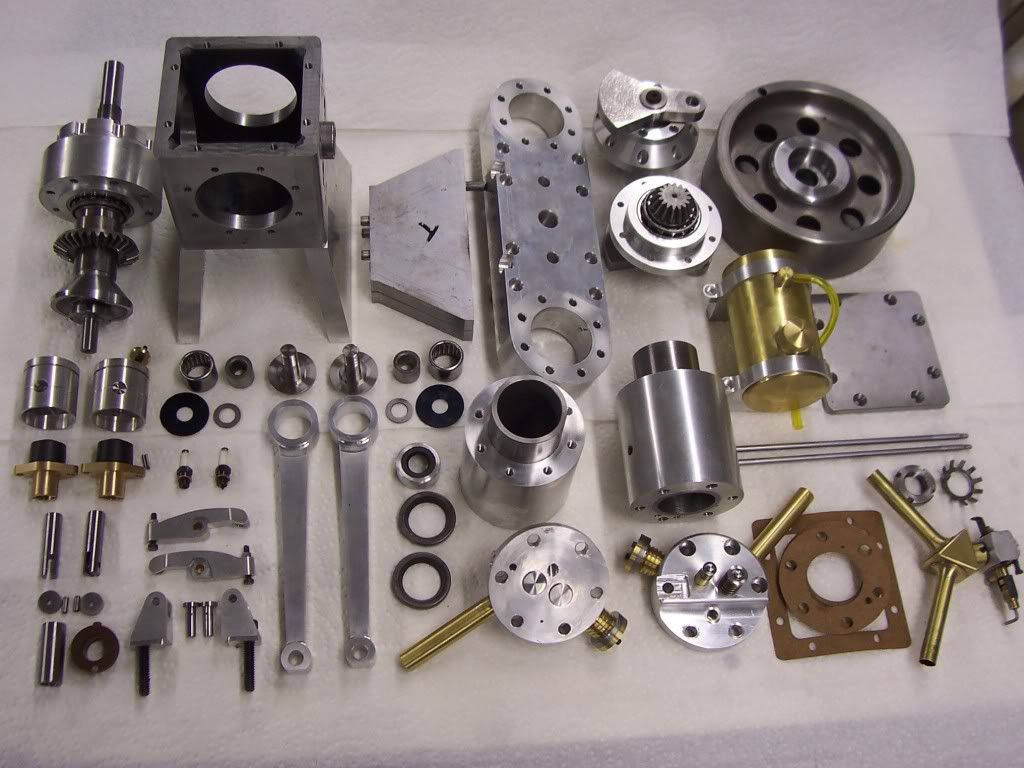
I still need to modify the pistons yet, but I took a pic of all the components that are finished up to this point.

I think I have everything made that will allow this thing to run. Still need a base to mount it to though. The base won't be anything special until it runs and then it will get a new one. If I can make this thing run it will then need a coolant system made for it. That won't happen until the fall. Dave

I think I have everything made that will allow this thing to run. Still need a base to mount it to though. The base won't be anything special until it runs and then it will get a new one. If I can make this thing run it will then need a coolant system made for it. That won't happen until the fall. Dave
Good stuff!!
Similar threads
- Replies
- 35
- Views
- 3K
- Replies
- 11
- Views
- 1K


![MeshMagic 3D Free 3D Modeling Software [Download]](https://m.media-amazon.com/images/I/B1U+p8ewjGS._SL500_.png)


