Cheap DIY DRO scale, do they work?

Home Model Engine Machinist Forum

Help Support Home Model Engine Machinist Forum:

This site may earn a commission from merchant affiliate links, including eBay, Amazon, and others.

Holt

Well-Known Member
Joined
Oct 14, 2010
Messages
164
Reaction score
4
Its been a while since my last thread, http://www.homemodelenginemachinist.com/f28/i-stole-lathe-16864/ and this is about the same lathe, I have been wanting DRO from the start, but have run into problems every time, I would of course prefer glass scales, but a 1.3 m glass scale for the main sattle is out of my league, I have seen some DRO sets using cheap Chinese digital calipers, which I think is precise enough for my use, the problem is the longest versions is 600 mm.
I then came across these replacement sensor strips for a Wixey saw.
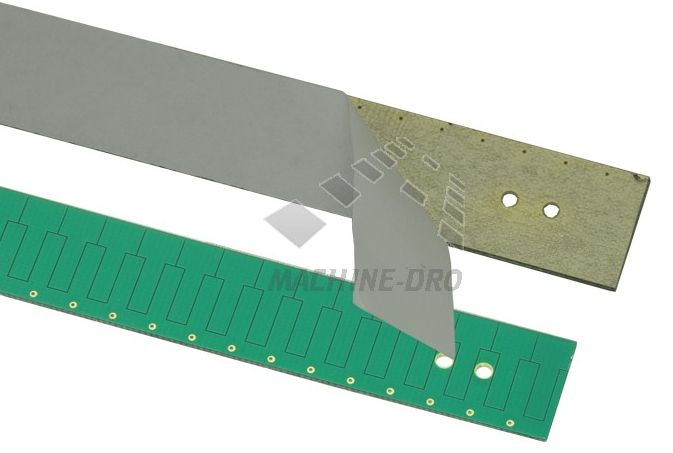


They come in 800 mm lengths and two can be joined to 1600 mm length and have the exact same pattern as a digital caliper.
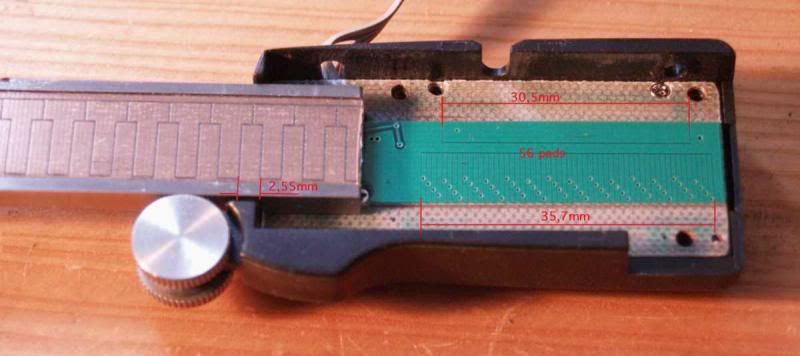


(photo from YADRO's home page)
I have read about people mounting these strips, but never heard if they worked satisfactory in the long term, anyone know about that?
If this is the way to go I would probably use them with this setup:

http://www.yuriystoys.com/p/android-dro.html


Holt
 
Last edited:
Before you give up on glass scales, try getting a quote from Ditron on AliExpress. I purchased a 2 axis DRO recently for USD $370 delivered to Australia. (Freignt was $119). Admittedly, my lathe is only 600mm long but the 1 micron scale was only $67 (you could save $10 by going with 5 micron scales) . They also do a nice slimline scale that is smaller than the others out there which was important for me.
 
The big advantage in some of the DIY sets is you can mix different scales on various axes, the Z axis (main sattle) don't require as precise measuring as the X axis in my opinion for more reasons, the X axis is only counting half the length, and the diameter is always the most critical measurement, the compound slide could do with a digital caliper connected to the DRO.


Holt
 
Its been a while since my last thread, http://www.homemodelenginemachinist.com/f28/i-stole-lathe-16864/ and this is about the same lathe, I have been wanting DRO from the start, but have run into problems every time, I would of course prefer glass scales, but a 1.3 m glass scale for the main sattle is out of my league, I have seen some DRO sets using cheap Chinese digital calipers, which I think is precise enough for my use, the problem is the longest versions is 600 mm.
I then came across these replacement sensor strips for a Wixey saw.


They come in 800 mm lengths and two can be joined to 1600 mm length and have the exact same pattern as a digital caliper.


(photo from YADRO's home page)
I have read about people mounting these strips, but never heard if they worked satisfactory in the long term, anyone know about that?
If this is the way to go I would probably use them with this setup:

http://www.yuriystoys.com/p/android-dro.html


Holt

Holt,
I just saw 900mm glass scale on eBay for $108 (free shipping with USA) and one 100mm to 400mm between $88 and $95. I haven't tried that seller, but this is almost cheaper than "AccuRemote" scales.
If that is still out of the budget, I would suggest to get a capacitive scale for the long dimension and short glass scale for the cross slide. On the cross slide the cheap scales will give you +/-0.002" in the best case scenario. In practice it might be as much as +/-0.004" on the diameter. Glass scales will be a factor of magnitude more accurate.

I haven't finished a controller that can mix glass and capacitive scales, but if you end going that route I can send you a custom-compiled version. (I'm stuck at auto-detecting the glass scales, but if I know which axis uses which kind I can pre-set that in the custom firmware).

Hope this makes sense.
Thank you
Yuriy

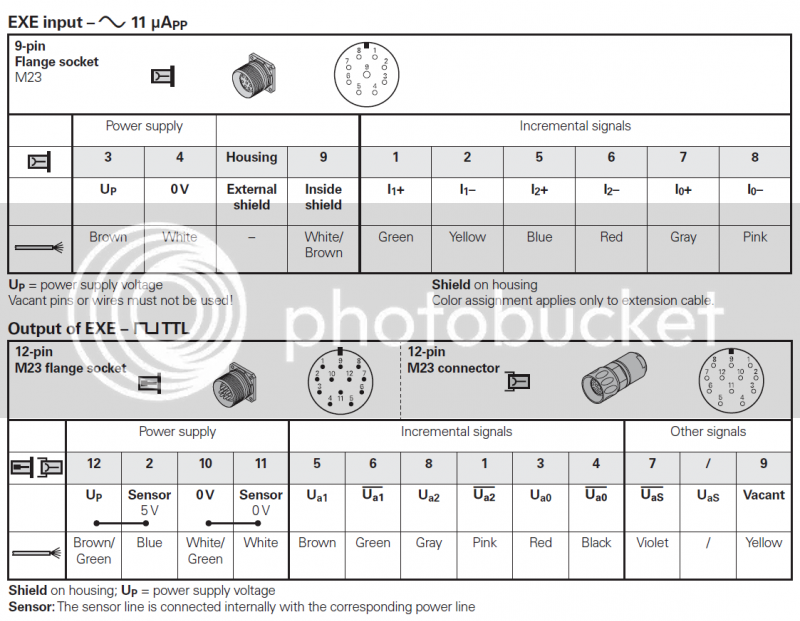
It makes perfect sense, I have a Heidenhain glass scale for the cross slide, unfortunately it's an old sine wave scale, but I managed to get an interpolation box which put out TTL signals, the down side is I haven't got a clue how I should connect it, the pinout don't make any sense to me.


Now that I got you. I have done lots of electronic, but never programmed such a controller, does your firmware come in a file I can load from my PC?
I have tried searching program loading for dummies, but it seems all guides are written to people with much more knowledge than me.
Thanks.
Holt
 
I'm stuck at auto-detecting the glass scales

Would it be possible to make a program that uses dip switches to set each port manually, it's only the first time you have to set the switches, you don't change the scale type on a regular basis.


Holt
 
It makes perfect sense, I have a Heidenhain glass scale for the cross slide, unfortunately it's an old sine wave scale, but I managed to get an interpolation box which put out TTL signals, the down side is I haven't got a clue how I should connect it, the pinout don't make any sense to me.


Now that I got you. I have done lots of electronic, but never programmed such a controller, does your firmware come in a file I can load from my PC?
I have tried searching program loading for dummies, but it seems all guides are written to people with much more knowledge than me.
Thanks.
Holt

Holt,
First of all, if you know which pins output the sine wave, you can connect the scales directly to the interface board: http://www.yuriystoys.com/2013/10/voltage-shifter-circuit-for-mixed-scale.html. The comparators will "square" the signal. You might need to replace the voltage dividers that set the virtual ground to potentiometers and tweak the level if the sine waves aren't at the same level.
Take a look at this section of the project page: http://www.yuriystoys.com/p/android-dro.html#msp430_2

With that said, it looks like your scale output "double ended" signal. I.e. each line has a symmetrical complimentary line. This is a superior setup, since it cancels the noise, but if you're not planning to run the wires across your house, you can ignore the negative lines. I suspect that L1 and L2 lines are A and B, L0 is the "R" or "Z" signal (that you can ignore). If you end up using the interpolation box, Connect Ua1 to A input, Ua2 to B input, Sensor + to +5V (Vcc) and Sensor 0V to the ground.

As far as programming the chip, this should help: http://www.yuriystoys.com/2013/09/how-to-upload-firmware-to-msp430.html

Finally, the problem with DIP switches is that I don't have enough input pins left on that microcontroller. I think what I will do is "assume" that capacitive scales have to send the position in no more than 1 second. If I don't see it, I must be dealing with the glass scales. This means that a user will need to reset the unit when plugging/unplugging the scales but it shouldn't be too big of a deal.

Regards
Yuriy

EDIT: Just found this document on the manufacturer website: http://www.heidenhain.de/de_DE/php/dokumentation-und-information/dokumentation/prospekte/popup/media/media/file/view/file-0429/file.pdf Page 39 has the information you're looking for.
 
Thank you for the links, I have missed that guide, I thought I had red it all, but apparently not.
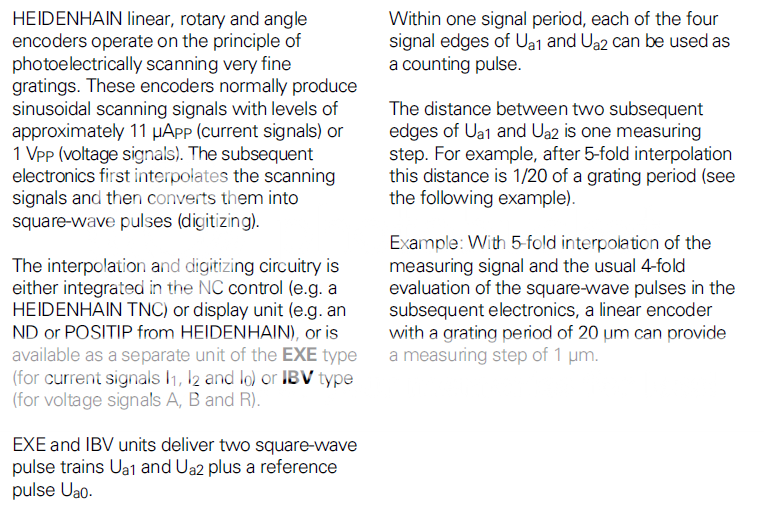
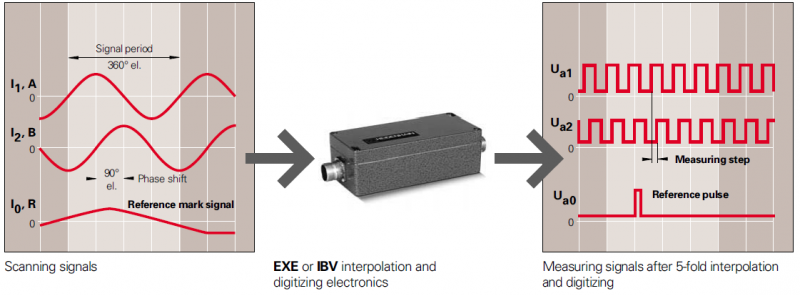
It seems that there is more to the interpolation box than just converting the sine wave to square wave, it reads the sine wave and put out (in my version EXE 610C) 5 or 10 times the numbers of signals than the numbers of sine waves (being this technical my English starts lagging)


Also explained here http://www.lna.br/~det/Projetos/TCSPD/doc/HeidenheinEXE602.pdf


Holt
 
Thank you for the links, I have missed that guide, I thought I had red it all, but apparently not.
It seems that there is more to the interpolation box than just converting the sine wave to square wave, it reads the sine wave and put out (in my version EXE 610C) 5 or 10 times the numbers of signals than the numbers of sine waves (being this technical my English starts lagging)


Also explained here http://www.lna.br/~det/Projetos/TCSPD/doc/HeidenheinEXE602.pdf


Holt

In that case simply connect Ua1 and Ua2 to the A and B inputs on the adapter board, +5 to +5 and 0V to the ground and you're good to go.
Is this the scale you will be using for the cross slide or the longitudinal travel? In any case, the adapter board can do 4 inputs. You need only 2, so you can skip half of it.

Thank you
Yuriy
 
I've been thinking about a 2 axis readout for my lathe, will probably go the same way that RodW did, and order the lot from China.

Holt, I've only noticed the pic that you use for your avatar, I have the same knurling tool and think that it's great.

Paul.
 
Is this the scale you will be using for the cross slide or the longitudinal travel? In any case, the adapter board can do 4 inputs. You need only 2, so you can skip half of it.

Thank you
Yuriy

Thank you for your patience, I am using the glass scale for the cross slide, the rest should be caliper type scales, I am planning a scale on the compound as well.
I would love to take you up on your offer on a custom firmware, by the way, do you know if I can use a tablet without Bluetooth if I use a usb Bluetooth dongle


Holt

Not likely. I haven't seen a USB dongle that works with a table yet. They might exist, but I haven't seen one ...
Your best bet is to use a FTDI breakout board (in the USA you can get it from Sparkfun.com. Don't know if they ship to Europe) in place of the Bluetooth transceiver.

Regards
Yuriy
 
Holt, I've only noticed the pic that you use for your avatar, I have the same knurling tool and think that it's great.

Paul.

I'm interested in your knurling tool as well are there plans and where can I get them. They had one in Home Shop Machinist but I didn't care for the design.

Todd
 
Thank you for your patience, I am using the glass scale for the cross slide, the rest should be caliper type scales, I am planning a scale on the compound as well.
I would love to take you up on your offer on a custom firmware, by the way, do you know if I can use a tablet without Bluetooth if I use a usb Bluetooth dongle


Holt

I'm not what tablet you have but my Ipad has Bluetooth in it I've yet to get it to work but it's in there. I have a Kensington Bluetooth usb plug in for my desk top but just have not been able to get them to talk.

Todd
 
I'm interested in your knurling tool as well are there plans and where can I get them. They had one in Home Shop Machinist but I didn't care for the design.

Todd

The brand of knurling tool is "Quick", I think that they are made in Austria. They work by actually cutting the knurl, this way it doesn't put much pressure on the workpiece. The knurl is set for the work diameter and then brought in in one pass, lots of little bits of swarf are produced. They are ideal for production work on CNC lathes, I kept mine when I finished work, the home hobbiest would find the cost prohibitive.

When they are set up correctly, there is no change to the diameter of the bar being turned.

Paul.
 
As swifty said, the knurling tool is a industrial grade tool too expensive for most hobby machinists, the pic was taken at work where I was turning a part on our Shaublin 125, that was before I got my own lathe.
I just ordered the TI MSP430 Launchpad that should be here in a few days, and the Bluetooth Transceiver from China, interesting to see how much the Chinese new year will influence on the delivery time.
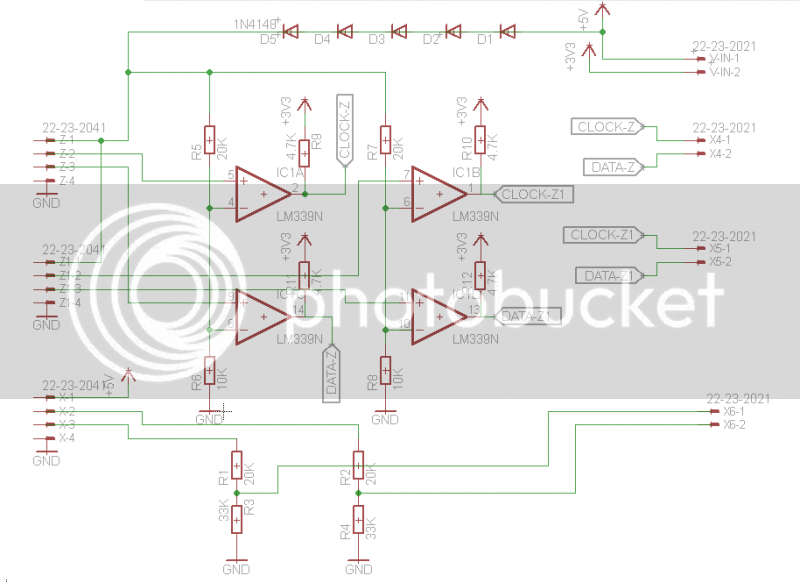
Yuriy, do you have schematics and ideally PCB layout for the voltage shifter, or are the stripboard the only option? (backwards engineering looks a bit unmanageable) when I know exactly which scales I am using, I guess it could be made a bit simpler.


Holt

Holt,
I don't have a PCB layout (yet). Haven't had time to do it yet. More precisely, haven't had time to finish the tachometer and edge probe input, and didn't want to have two different version of the PCB.
The (partial) schematic is in one of the posts in my original reply. The stripboard simply combines two of those circuits: 2x(comparator, two voltage dividers and four pull up resistors on the outputs).

For 5V scales with the interpolation box you don't need the comparators. Use a voltage divider version shown here: http://www.yuriystoys.com/2014/01/connecting-glass-dro-scales-to.html. 3V scales (Shahe/iGaging DigiMag/AccuRemote) don't need anything between them and the controller, 1.5V scales need the signal to be amplified, so you can either use half of one LM339 comparator or dream something up using either another comparator or op-amp.

Regards
Yuriy
 
Thank you very much, your help is much appreciated, I will try to draw up something in the near future and post it here.


Holt
 
I've been thinking about a 2 axis readout for my lathe, will probably go the same way that RodW did, and order the lot from China.

Paul.

I think this is the way to go. You might get a bit more mounting hardware in the kits ex Singapore on eBay, but my cross slide had to be a custom mount as there was not much room. By making your own mounts you probably get a better install. For instance, I machined up a pair of mounting pads for the longitudinal scale with a 1 degree angle on them to compensate for the bed casting shape and did not need to use any grub screws to align the pads.

Ditron included two quite nice cast brackets for the longitudinal sensor that included tapped holes but I only used one of them. Extra hardware might just end up in the bin anyway.
 
I have been playing with EAGLE, does this seem right, I am a bit in doubt about the supply at the LM339 at pin 1 - 2 - 13 and 14, it have been a couple of years since my last play with EAGLE, so I am a bit rusty.


Holt
 
Back
Top