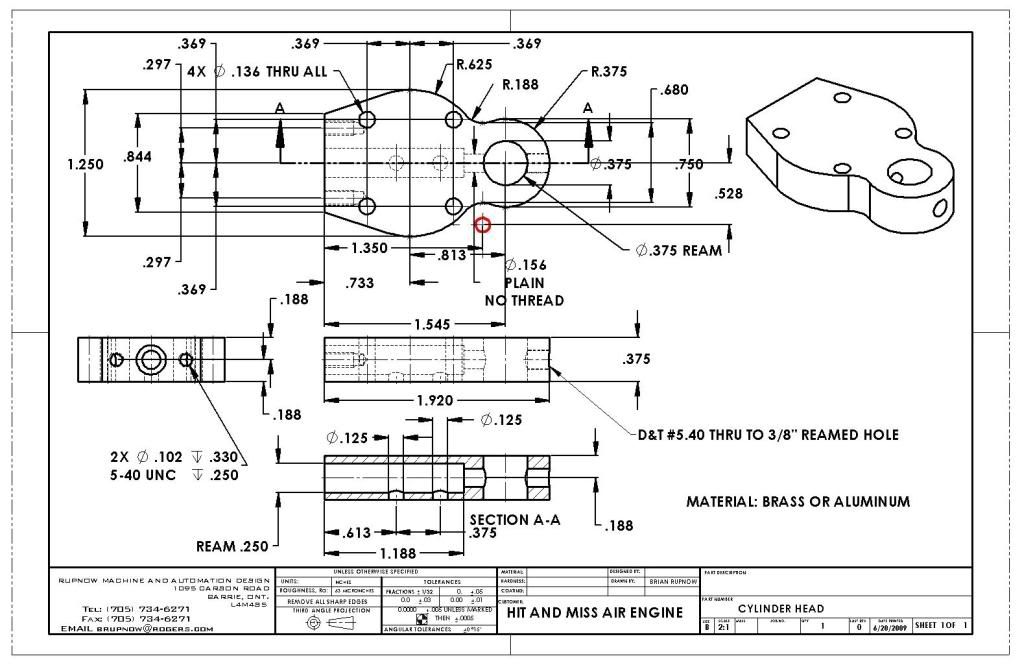
Brian Rupnow build--Hit and Miss air/steam engine

Home Model Engine Machinist Forum

Help Support Home Model Engine Machinist Forum:

This site may earn a commission from merchant affiliate links, including eBay, Amazon, and others.
I usually keep an eye on eBay for items I use (and break) a lot. I can usually find small taps in lots of 5 for under $15 including shipping. I also buy my end mills and carbide inserts from ebay.

Chuck
 
Okay---Its update time. first of all, thanks for that link Marv---I am going to find a source of cheaper taps.--I was tapping the holes in the end of the cylinder which attaches to the crankcase when I broke the tap off in the third hole. My "fix" will be to rotate the cylinder 10 degrees and D&T 4 new holes ---nothing lost!! I got my #5-40 SHCS from the nut and bolt store, so was able to bolt the connecting rod cap into place, then drill and ream it to fit on the crankshaft. After MUCH filing and fiddling, everything rotates quite nicely, with the piston moving back and forth in the bore of the cylinder smoothly.
I decided that I didn't want holes through the outer rim of the flywheel like my plans call for, so I just drilled and tapped a #10-24 hole in the extended hub of the "non-governor" flywheel. I have one of those hinky vices that will rotate into many strange configurations, so I put the set screw hole into the flywheel governor at an angle as shown in the picture. I still haven't undertaken any "cosmetic" work on any of the parts, so they look a bit rough.--My plan is to make all the parts, test assemble thm, then to blow it all apart for polishing.
finishingflywheels003.jpg

flywheelsonengine001.jpg

flywheelsonengine002.jpg

 
Looking good Brian. And a fine recovery on the flywheel. Looking forward to your finished engine and video. I love hit and miss machines, they're so... mechanical.

Rudy
 
It pays to shop around. I just wnt to a different supplier of machine tools here in town and picked up 2 taps, 2#38 drills, and 10 assorted Dremel type grind stones wirh 1/8" steel shanks for the same $ as Brafasco wanted for one tap!!!!!


You make an engine in about the time it takes me to set up to machine one part. :big: :big: :big: Looking good.

Ron
 
Spent today attending to a myriad of things--- I stopped at my metal suppliers and picked up enough brass to build the cylinder head and all the other tiny bits. I redrilled and tapped the cylinder, (both ends) successfully this time, and while I had things apart I spent an hour on the polishing wheel. The flywheels have all the appropriate cutouts and slots now.
polished002.jpg
 
This morning I built the cylinder head. the very first thing I noticed was that I had left a dimension off the drawing which locates the 0.375" reamed hole.---Since I wanted to use my 3/8" end mill to do a plunge cut to form the 0.188 rad between the two circular ends, I added in the dimensions of where that circle would be. (see red circle--that is the center of the radius).
I cut it from a 3/8" x 1.5" peice of brass bar. Everything worked out very well. I will add the fixed up drawing to the downloads when I am all finished.
CYLINDERHEAD-1.jpg
CYLINDERHEAD002.jpg

CYLINDERHEAD004.jpg

CYLINDERHEAD005.jpg


View attachment CYLINDER HEAD.PDF
 
Not too much to say about the exhaust gland, other than that is finished and it fits. I turned it from 1" round brass. then used a peice of 1/4" round cold rolled about an inch long as an alignment guide when I assembled it to the cylinder head to keep the 1/4" reamed holes lined up. I bolted it in place, still with the 0.1" thick part a full 1" in diameter. Then I scribed around it, removed it from the cylinder and milled away the excess, leaving it rectangular to match the cylinder.
EXHAUSTGLAND001.jpg
 
This morning I built the lower and upper halves of the valve body. I didn't have any tooling that was small enough to reach into the lower valve body and turn the 45 degree angle. I didn't want to go out and buy another peice of tooling for a one time use, so I started looking through my shelves to see what else I could possibly use, and discovered a bunch of countersinks that I had very seldom used. They have an included angle of 82 degrees, not the 90 degrees called for on the drawings, but--Hey---I can turn the valve itself to match whatever the valve seat is. I turned a bit off the outer diameter of the countersink so that it would fit into the 0.438 bore with a bit of clearance, and used it to turn the angled seat in the lower valve body.
VALVE-LOWERHALF001.jpg
 
This afternoon I built the rest of the valve. I hate working on stuff this small, but the valve does work. I discovered that with the bolt circle originally called up I simply ran out of room. I had to increase the bolt circle, so there will be 2 more drawings that change to reflect this larger bolt circle in the upper and lower half of the valve. In this first picture, you can see how I cranked the compound rest around to allow me to turn an 82 degrees angle on the end of a peice of brass. I then reamed it to 0.093 and inserted the valve stem. Since the steel valve stem was inserted into a blind hole, steam build up during silver soldering tries to pop the stem out of the brass. To overcome this I clamped the brass in my mill vice and brought the chuck down to rest on top of the steel valve stem so it couldn't pop out, then I soldered it right in the vice. Of course, after the soldering was finished, I put it back into the lathe to clean it up and get silver solder off the valve face.
VALVEBUILDING001.jpg

VALVEBUILDING002.jpg

VALVEBUILDING004.jpg
 
This is the finished valve assembly. Of course, I have to shorten the bolts so that they only come flush with the underside of the lower valve body.--And somehow I have to figure out how to put an 0.024 wide slot into the bottom of the valve stem for an e-clip. (maybe use the sharp corner of a cut off tool???) NOW I NEED SOME HELP---Even though I took great care when making the valve and the lower valve housing, it still leaks a bit of air with the valve closed. I seen mention of using some silicone on the valve seat (I think) in one of the other posts of people who built this engine, but I didn't see any detailed description of how to do that---can someone please jump in and tell me a bit more about that.
VALVEBUILDING005.jpg
 
I decided to make the "SOLDERED ASSEMBLY OF BACKING PLATE" from a single peice of brass. I milled out the shape, and then had to figure out how to put the 1/16" slot in it. I had never used a slitting saw before, so this gave me a chance to buy some new tooling. (Which is always good!!!) I bought a 1/6" x 2" diameter slitting saw and arbor, and after some head scratching, decided to set it up as shown. The operation worked perfectly, and I also drilled the two 1/16" diameter holes in the same set-up.
SOLDEREDASSYBACKINGPLATE001.jpg

SOLDEREDASSYBACKINGPLATE003.jpg

SOLDEREDASSYBACKINGPLATE004.jpg
 
That was a good option. I imagiune that trying to position those bits accurately for SS would be a problem. You could also have milled the slots with a 1/16" endmill, but the slitting saw is a good thing to have and is more robust than those tinu enmills.

I think I would have drilled the holes before slitting.
 
I just finished the "CAM ACTUATOR BUSHING" and the "SLIDING CAM" . They look a bit grubby in this picture because I had coated them with oil and worked them back and forth on a peice of 1/4" rod to get them meshing smoothly. (Note to self--Clean parts BEFORE taking pictures!!!)----now I have to call my friend and see if he has a #0-80 tap and drill.
DOGCLUTCH002.jpg
 
Brian
About your valve problem. Consider making an interference angle on the valve, by which I mean the angle on the valve is 1 to 11/2 degrees less than the valve seat angle. The interference idea being to get a valve seal as narrow as possible. A very narrow seat is common practice on most internal combustion engines. You could also consider lapping the valve to the seat, now that you have a slitting saw cut a little bit if a grove in the top of the valve head, not right across but just wide enough for a screw driver. Use a fine lapping compound and a back and forth twisting motion with a screw driver to clean up and polish the seat. You are making excellent progress, enjoy seeing your work. :)
Regards,
Ernie J
 
Thanks Ernie--I considered lapping the valve, ---its easy enough to do because the shank sticks out through the bottom of the valve housing. In the end I took the easy way out---since I run my engines on air, not steam, I undercut the valve face and glued on a viton o-ring. Problem solved. Its as airtight as a fish now.
 
Back
Top