You are using an out of date browser. It may not display this or other websites correctly.
You should upgrade or use an alternative browser.
You should upgrade or use an alternative browser.
Wallaby 30cc 4 Stroke
- Thread starter bezalel2000
- Start date

Help Support Home Model Engine Machinist Forum:
This site may earn a commission from merchant affiliate
links, including eBay, Amazon, and others.
Thanks Dave.
I've always been a fan of Westbury and his model engineering. That compensating carburetor works very well too. He designed it for the locomotive that this Wallaby engine was intended for and the engine runs so well that I use it to tune new experimental carburetors too.
The water pump needs a top bleeder tube which I have never gotten around to. I also had to make a windage tray and oil relief valve to keep so much oil from being flung up under the pistons. Before the rings finally seated, the plugs would oil foul after just a very short run - but breaking the rings in helped too. That oil pump will do some serious oil pumping and actually too much....
Keep rollin' Bez, you're doing great....(keep in mind that some folks buy two casting sets when they decide to build an engine - in case a casting might go out a window or something like that.... This engine was a joy to complete and has been a joy to run - you're gonna love it!
I do some castings too. I made an odd side pattern for an oil pan for a Wall Four that I'm working on. Casting is addictive. I've got to show off my drill press! I'm anxious to see you do these castings!
BillC
I've always been a fan of Westbury and his model engineering. That compensating carburetor works very well too. He designed it for the locomotive that this Wallaby engine was intended for and the engine runs so well that I use it to tune new experimental carburetors too.
The water pump needs a top bleeder tube which I have never gotten around to. I also had to make a windage tray and oil relief valve to keep so much oil from being flung up under the pistons. Before the rings finally seated, the plugs would oil foul after just a very short run - but breaking the rings in helped too. That oil pump will do some serious oil pumping and actually too much....
Keep rollin' Bez, you're doing great....(keep in mind that some folks buy two casting sets when they decide to build an engine - in case a casting might go out a window or something like that....
I do some castings too. I made an odd side pattern for an oil pan for a Wall Four that I'm working on. Casting is addictive. I've got to show off my drill press! I'm anxious to see you do these castings!
BillC
bezalel2000
Well-Known Member
- Joined
- May 8, 2011
- Messages
- 316
- Reaction score
- 7
Thanks Dave
The sump is cleaned up a bit now and I'm waiting for the paint to Dry - so more Pix when I can handle it again.
Bill
A real big thank you to you, you have no idea how much I needed to see some good photos of the real thing. :bow:
or did you :-\
Good pictures o a lot better than 2D drawings.
So now, thanks to your pix Bill, the block pattern I made was apparently just a practice run ;D
I can see all my errors in reading the drawings.
1. It looks like the cam housing is the wrong diameter; and
2. on the other side ( as you can see in post #15 the water jacket outlet flange is at the wrong end of the block) it was the wrong shape anyway :big:
The sump is cleaned up a bit now and I'm waiting for the paint to Dry - so more Pix when I can handle it again.
BillC said:Here's mine...
Bill
A real big thank you to you, you have no idea how much I needed to see some good photos of the real thing. :bow:
or did you :-\
Good pictures o a lot better than 2D drawings.
So now, thanks to your pix Bill, the block pattern I made was apparently just a practice run ;D
I can see all my errors in reading the drawings.
1. It looks like the cam housing is the wrong diameter; and
2. on the other side ( as you can see in post #15 the water jacket outlet flange is at the wrong end of the block) it was the wrong shape anyway :big:
bezalel2000
Well-Known Member
- Joined
- May 8, 2011
- Messages
- 316
- Reaction score
- 7
Well the paint's dry
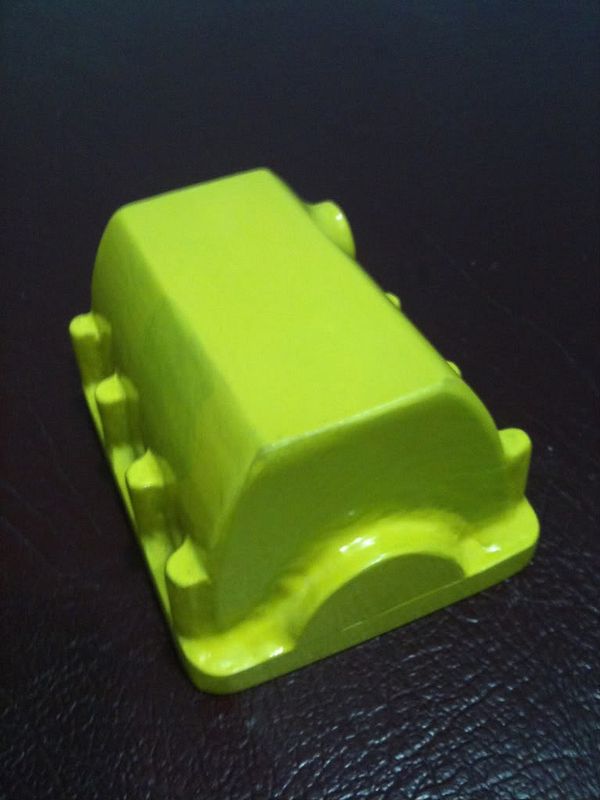
Next up - Timing Cover ? :-
Bez

Next up - Timing Cover ? :-
Bez
Bez,
The block is a complex casting...The core needed is almost as intricate as the outer block. I believe you are going about this right because when I machined this one I saw a few things that I would have done differently but working with the casting as it was did fine. The oil gallery under the cam is due some scrutiny. That is an area that I would change to have all of the oil lines inside of the castings and no external lines except to and from the pump and you could do it quite easily in your instance where you are making your own patterns....
I made a spring loaded oil relief valve (brass part on the line above the pump) and a small needle valve to adjust the volume of oil to the crankshaft. As I said; I made a windage tray for the bottom end because of the amount of oil that pump was delivering - but: that would not have been necessary if I had done the relief valve and needle valve first.
I will be happy to take some photos of this 'nude' block casting if you would like.....Sometimes a drawing just doesn't do it!
BillC

$45.99
Sunnytech Mini Hot Air Stirling Engine Motor Model Educational Toy Kits Electricity HA001
stirlingtechonline

$49.95
$55.99
DjuiinoStar Hot Air Stirling Engine Assembly Kit: Spend 30 Minutes to Build Your Own Stirling Engine
djuiinostar
![DreamPlan Home Design and Landscaping Software Free for Windows [PC Download]](https://m.media-amazon.com/images/I/51kvZH2dVLL._SL500_.jpg)
$0.00
DreamPlan Home Design and Landscaping Software Free for Windows [PC Download]
Amazon.com Services LLC

$37.38
$49.99
Becker CAD 12 3D - professional CAD software for 2D + 3D design and modelling - for 3 PCs - 100% compatible with AutoCAD
momox Shop

$171.00
$190.00
Genmitsu CNC 3018-PRO Router Kit GRBL Control 3 Axis Plastic Acrylic PCB PVC Wood Carving Milling Engraving Machine, XYZ Working Area 300x180x45mm
SainSmart Official

$599.00
$649.00
FoxAlien Masuter Pro CNC Router Machine, Upgraded 3-Axis Engraving All-Metal Milling Machine for Wood Acrylic MDF Nylon Carving Cutting
FoxAlien Official

$26.89
$34.99
Peachtree Woodworking Supply Bowl Sander Tool Kit w/Dual Bearing Head & Hardwood Handle, 42 Pieces Wood Sander Set, 2 Hook & Loop Sanding Disc Sandpaper Assortment, 1/4 Mandrel Bowl Sander
Peachtree Woodworking Supply Inc

$99.99
AHS Outdoor Wood Boiler Yearly Maintenance Kit with Water Treatment - ProTech 300 & Test Kit
Alternative Heating & Supplies

$19.15
$29.95
Competition Engine Building: Advanced Engine Design and Assembly Techniques (Pro Series)
MBC Inc.
bezalel2000
Well-Known Member
- Joined
- May 8, 2011
- Messages
- 316
- Reaction score
- 7
BillC said:Bez,
The block is a complex casting...The core needed is almost as intricate as the outer block.
Thanks Bill
I did a concept sketch of the block core a few weeks back, which I thought would look something like this;
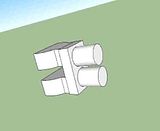
If its way off, now would be a good time to find out. the rectangular section is the water jacket, the cylinders are long but its nearly all core print.
BillC said:The oil gallery under the cam is due some scrutiny. That is an area that I would change to have all of the oil lines inside of the castings and no external lines except to and from the pump and you could do it quite easily in your instance where you are making your own patterns....
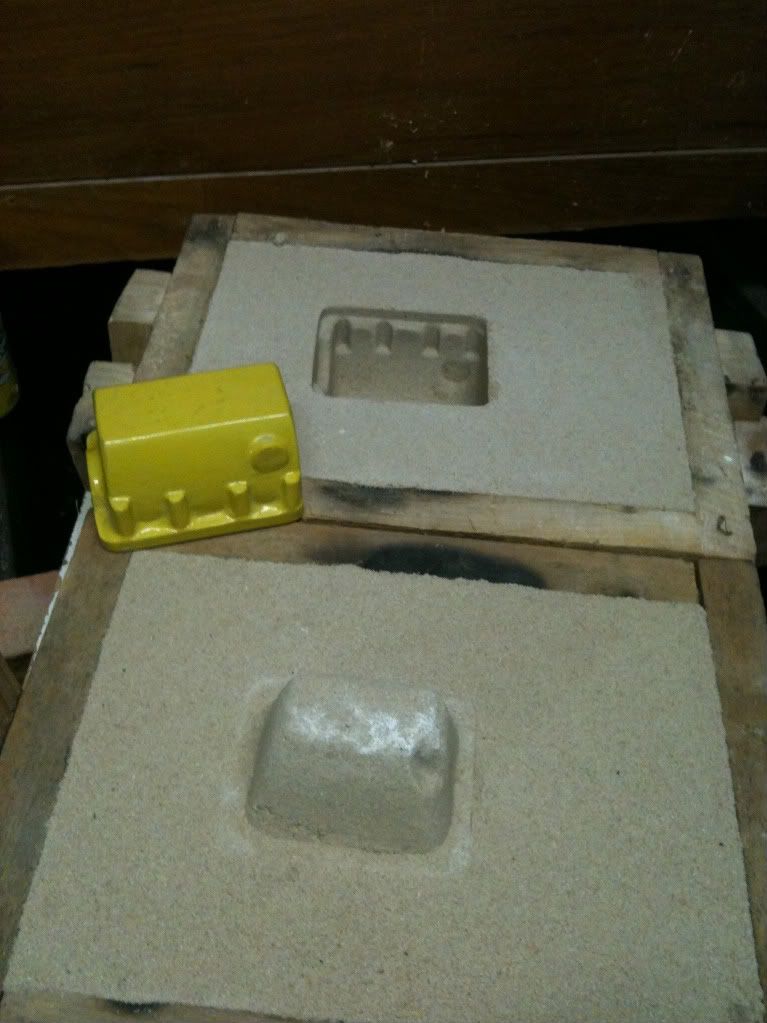
I would like to look into that, on the subject of oil - in particular, the filter and it's connection point. this is not looking too good with this pattern as I thought I could get away with a one piece pattern.
I have rammed up a test mould and the out side of the sump slides out real nice. The sump's inside with its internal filter connection point is a whole different story. In spite of the heavy draft angle it is still to deep for the pattern to slip off without braeking off the core. It looks like I have little choice but to make a separate core. not a bad thing overall as I can make parallel sides on a separate core, and that should overcome the oil filter connection issue.
BillC said:I made a windage tray for the bottom end
My ignorance to the fore here, what is 'windage' ? ??? ? I was expecting this thing the burn gas not make it. :big:
BillC said:I will be happy to take some photos of this 'nude' block casting if you would like.....Sometimes a drawing just doesn't do it!
BillC
Please hold that thought, I might just cash in the offer if it all starts to go a bit pear shaped here.
although thinking about it - in cross section, the bottom half of the block and sump is supposed to look a bit pear shaped anyway,
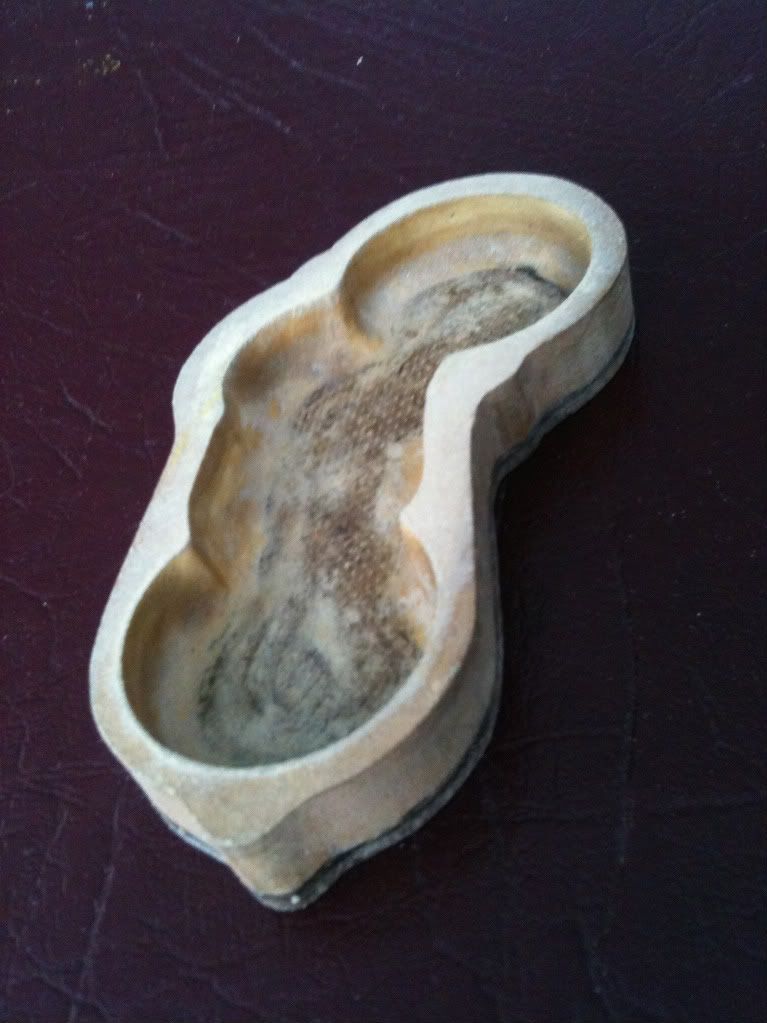
and I got the Timing Cover started, but there is still lot more work to be done there yet.
Bez
- Joined
- Nov 12, 2009
- Messages
- 1,427
- Reaction score
- 221
Hi Bez
A Windage tray is a short tray on the top of the sump that stops too much oil splashing around inside the engine block and can help bed in rings with hi volume oil pumps etc
A Windage tray is a short tray on the top of the sump that stops too much oil splashing around inside the engine block and can help bed in rings with hi volume oil pumps etc
bezalel2000
Well-Known Member
- Joined
- May 8, 2011
- Messages
- 316
- Reaction score
- 7
Thanks Pete, I've not heard of it before
Bez
Bez
The windage tray prevents the oil from being swept up out of the oil pan by the turbulence of the whirling crankshaft and connecting rod big ends. It's made of sheet metal curved in a half circle and placed so that there is very little clearance from the crankshaft. Normally fitted in dry sump engines. It is used to keep the oil in the pan and prevent excessive oil on the cylinder walls - too much oil on the cylinder walls will force by the piston rings and accumulate on top of the piston basically preventing the engine from running.
The boss on the side of the oil pan is the oil pump sump pickup connecting point. The pickup lays in that side of the pan. There is also a boss on the bottom for a drain plug.
Your block core doesn't have water jacket spaces around the cylinder liners...the water jacket is one large cavity with liner holes at the top and bottom. The engine has wet liners.
I'll hold on any more photos....
bezalel2000
Well-Known Member
- Joined
- May 8, 2011
- Messages
- 316
- Reaction score
- 7
Thanks BillC
So much to learn - So little time
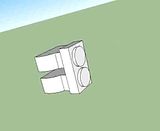
If I read this right the long cylinders appear to be the sleeves however the long Cylinders are only there to support the weight of the core in the mould the sleeves are inside the water jacket and therefore not visible - below the water jacket needs boring out to the correct depth to fit the sleeves.
it may look different if I draw it this way;
(if you click on the image you'll get 3D walk around)
Bez
So much to learn - So little time
BillC said:Your block core doesn't have water jacket spaces around the cylinder liners...the water jacket is one large cavity with liner holes at the top and bottom. The engine has wet liners.
If I read this right the long cylinders appear to be the sleeves however the long Cylinders are only there to support the weight of the core in the mould the sleeves are inside the water jacket and therefore not visible - below the water jacket needs boring out to the correct depth to fit the sleeves.
it may look different if I draw it this way;
(if you click on the image you'll get 3D walk around)

Bez
bezalel2000
Well-Known Member
- Joined
- May 8, 2011
- Messages
- 316
- Reaction score
- 7
BillC said:There is also a boss on the bottom for a drain plug.
Yep, I need to remember to add that too :
Bez
willburrrr2003
Well-Known Member
- Joined
- Jun 10, 2011
- Messages
- 113
- Reaction score
- 9
What a really nice job making your patterns  Sand casting is such a fun even in it's own right, but to make an engine from it is even cooler huh
Regards,
Will R.
Regards,
Will R.
bezalel2000
Well-Known Member
- Joined
- May 8, 2011
- Messages
- 316
- Reaction score
- 7
Thanks Will
I'm having fun - and its a challenge
Your never absolutely shore the pattern is right until the metal goes hard :big:
Do you do your own casting ?
I'm having fun - and its a challenge
Your never absolutely shore the pattern is right until the metal goes hard :big:
Do you do your own casting ?
willburrrr2003
Well-Known Member
- Joined
- Jun 10, 2011
- Messages
- 113
- Reaction score
- 9
yes I do, been awhile since my last pour though... have to build a new lid for my foundry. I can see myself doing several pours for this hobby though  I got into sand casting through the Dave gingery series of backyard metal casting, I built the foundry and have halfway completed my gingery lathe. I haven't done anything with it since I moved a couple years ago ...at that time I came into a good deal on a mini-lathe and then cnc'd it. I would like to finish the lathe though and may start back on it soon.
Regards,
Will R.
Regards,
Will R.
Hi Bill
I wonder would you mind giving me a little more detail on your thoughts about running internal oil lines.
In particular what changes would I need to make to the patterns to permit these internal oil lines.
I'd be happy to discuss this publicly, in the thread if you wish, but I just wanted to ask privately first.
With the experience you already have with this engine I'm keen to make use of that experience if you are happy to help me with it.
kindest Regards
Bez
-----------------------------------------------------------------------------------------------------------------------------------------------------------
Bez,
I would incorporate a boss on the oil pump end of the block for an internal oil relief valve, then allow a means to drill the delivery lines internally. The needle valve is a basic restrictor and could be included at the point where the drilled lines intersect at the corner at the end of the main gallery.
Some builders may still prefer the external lines (I used 1/8 brass bent to fit using cerrobend) then nickel plated. They make the engine look like 'real' old school...
Happy to help out Bez, let me know if you need those photos....
BillC
bezalel2000
Well-Known Member
- Joined
- May 8, 2011
- Messages
- 316
- Reaction score
- 7
Hi Bill
Thanks.
currently the timing end of the block has a boss that is shaped to the timing cover itself.
If this extra thickness were extended across the whole block at that end the oil line could feed in any suitable spot.
Directly above the pump outlet looks a good option.
By modifying the Block core, to be cylindrical,(follow the red line) in lieu of following the external surface, it could make room for an oil gallery above the crank shaft (and off to one side).
An oil feed to each main bearing could be drilled upwards to meet the horizontal oil gallery. (The green line)
I modified Westbury's sketch to help explain the idea. The Blue section is the core.
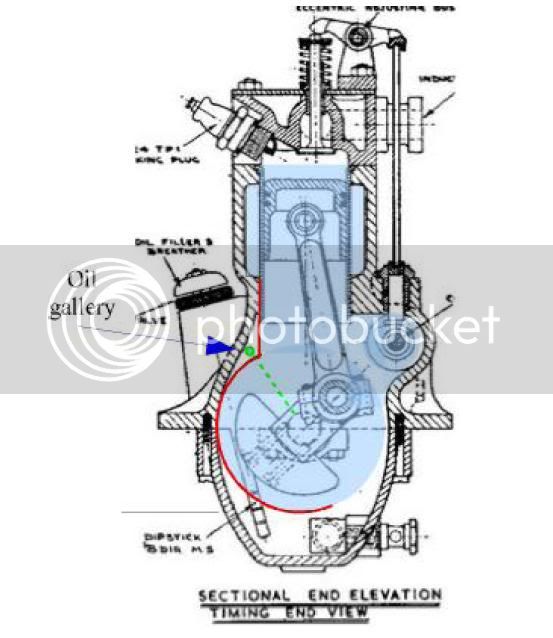
Do you think that has a chance of working as intended?
One possibility I may need to consider is to make room for a long twist drill, since longer drills are usually bigger, I may have to reduce the crank to block clearance to minimize the possibility of breaking through to the crank space or worse - out into the fresh air.
Cheers Bez
Thanks.
currently the timing end of the block has a boss that is shaped to the timing cover itself.
If this extra thickness were extended across the whole block at that end the oil line could feed in any suitable spot.
Directly above the pump outlet looks a good option.
By modifying the Block core, to be cylindrical,(follow the red line) in lieu of following the external surface, it could make room for an oil gallery above the crank shaft (and off to one side).
An oil feed to each main bearing could be drilled upwards to meet the horizontal oil gallery. (The green line)
I modified Westbury's sketch to help explain the idea. The Blue section is the core.

Do you think that has a chance of working as intended?
One possibility I may need to consider is to make room for a long twist drill, since longer drills are usually bigger, I may have to reduce the crank to block clearance to minimize the possibility of breaking through to the crank space or worse - out into the fresh air.
Cheers Bez
Hmmm I'd leave more meat in that area. The drill will wonder, and the start machining point will too with a casting.
Seems kinda close to me.
If you went to the oil gallery above and to the right, I think you would have more room...
I'll think about it....but of course it's completely up to you.
Dave
Seems kinda close to me.
If you went to the oil gallery above and to the right, I think you would have more room...
I'll think about it....but of course it's completely up to you.
Dave
- Joined
- Nov 12, 2009
- Messages
- 1,427
- Reaction score
- 221
Hi Mate
U back from Tassie yet?
Dont forget the Conrod clearance in that area with the green dot Buddy.
U may find, u need it all, once the Crank comes around to 90 degrees.
When we gunna do the Pour
Pete
U back from Tassie yet?
Dont forget the Conrod clearance in that area with the green dot Buddy.
U may find, u need it all, once the Crank comes around to 90 degrees.
When we gunna do the Pour
Pete
Similar threads
- Replies
- 29
- Views
- 1K


![MeshMagic 3D Free 3D Modeling Software [Download]](https://m.media-amazon.com/images/I/B1U+p8ewjGS._SL500_.png)


