Tiny I.C. Engine

Home Model Engine Machinist Forum

Help Support Home Model Engine Machinist Forum:

This site may earn a commission from merchant affiliate links, including eBay, Amazon, and others.
Very nice Gail, it's great to see how everyone adds their own unique touches.

Mine is still coming along, although shop time has been limited. I will probably create a thread with pics once I am done.

Thanks to all of you for the great design and further ideas!

Lee
 
Thank you all for the kind comments.

Arv: Adding a carb is in the works for the future. That was another consideration in the manifold design that was influenced by Kel.

Garry and Nick: I have seen too many models that have no information on them after the builder is gone. Many times they have a sad fate. About 10 years ago I started documenting the models I build. Mostly just a name tag, but a lot of them have the plans and construction details in a comb binder for each engine. The binders are stored in the bottom of my display case. I don't have to worry too much about my engines future as my son is interested in engines also and builds steam engines commercially. He is also a member of HMEM.

Lee: Go ahead and post your photos now. A lot of us get sidetracked or otherwise delayed on builds so don't worry about a time frame. Sometimes it takes years, but eventually they get done. I think Arv was ready to give up on me and my Tiny.

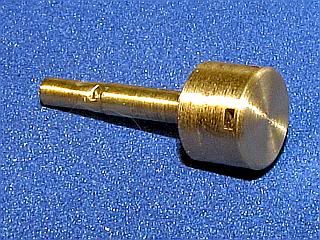
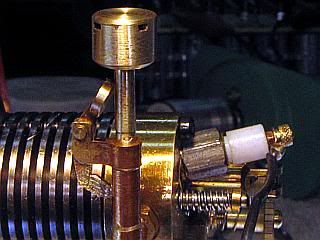
A couple of quick additions to Tiny. First is a simple muffler. It just plugs into the exhaust pipe. It just mellows the sound a bit. It can be inserted or removed while the engine is running.

muffler1.jpg
Muffler2.jpg


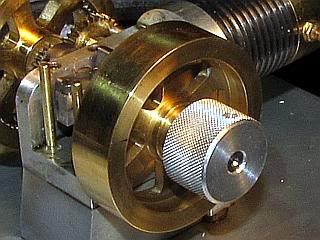
Second is a 3/4 inch diameter knurled starting knob. The polished flywheels make starting a little difficult trying to grip them to start. I had extended the crankshaft to use for this or for a power take off so it was only a few minute job.

Startknob.jpg


******
Now there is bad news and good news.
The bad news. Tiny QUIT running. I was just humming along at about 2000 RPM and just died. I had run it for a few more hours since my last post and it had about 20 minutes of running on a refilled tank. A quick check showed no sign of compression. Exhaust valve rocker had plenty of clearance. OK. I had been running in on straight naphtha with no oil added. Pulled the cylinder and the o-ring had plenty of oil left. But what did need lube was the intake valve. It was not closing with the light spring. A drop of 10W machine oil and a little exercise restored it to like new condition.
The good news. After reassembly Tiny took right off. And I am back to 1/2 percent oil in the fuel.

Two minor ignition problems have shown up. As Kel noticed the spark will jump from the plug to the exhaust rocker support. On mine this only happens if I flood the engine. I am going to replace the insulator on the plug with a longer one. The PTFE insulator just presses in so it will only take a short time to repair. This brings me to the second problem. The PTFE works out of the plug body a little bit every few hours of running. Everything keeps running, but the fuel mixture adjustment gets more critical. When I make the new insulator I am gong to cut a couple of shallow grooves in the PTFE so I can get a grip on it with a little high temperature epoxy when I install in into the body.

Gail in NM


Wow Gail! That little sucker hum's along beautifully!

You scared me with your last post but I'm glad you got it sorted and found even more room for improvement.

Well done everybody.

 
Hi Arv and Gail,
Thanks for taking the time to talk with me about the engine.

I now have all the metal for the build.
I will make my first cut Friday.
With the help of everyone here,I hope to be able to build one.
I think I am going with Gail's air cooled style,it seems it might be a little easier.

I have always lurked in the shadows,so now it's time to try my hand at a real engine.
This will be a first and during the build there will be a lot of firsts.
Arv I did find the gears at a hobby store.That was a worry not being setup to cut gears.
I am going to call S/S Machine & Engineering in the morning to order the CDI ignition.
Thanks to all for this great forum,I look forward to talking and learning.

Tim. ( Alabama--Roll Tide! )
 
Glad that your are joining in the fun Tim.
If you need any assistance, there is lots of help is available here from lots of people.
Gail in NM

 
Gail,
If I can finish with a engine half as nice as yours and Arv's I will be doing ok.
Thanks Arv for the plans and the help.
I hope to talk with you more about the ignition.I going to get the same that you used in your Tiny.
Thanks again to all.
Tim
 
Hi Tim, Welcome to the forum. I'm glad you finally jump in. I think you will really like it here.
If there is anything we can help you with, just ask.
I hope you can post some photos as you move along on this one.
 
Hey Arv,
I talked with S/S about the Cdi ignition and the lady that I spoke with was kinda lost.
I told her I would ask some guys that new the type I needed.
So,what type do I need? ???
I thought I would get my Aluminum today but it didn't come today.Shipped it in two boxes.
So as soon as I get it I will make photos of the build.
My dad had a box of old stuff from his working days and found some small blank punches like you used for the valves.They don't look like they are hard steel,am I saying that right?I don't know how to tell if it is or not.
When I get to that point I hope I can use them.Still thinking about the valve cutter??
Thanks for all the help.
Tim
 
Very niece build it shows a lot of talent read your post and thinking I might like to build one. Could you post the prints again I downloaded the ones in the post but I couldn't find the one that you talked about where the corrections are and there all on one PDF file. Again awesome build Thanks Cliff
 
Tim,
Arv and I used the same ignition system.
Here are the details since they don't have part number on the website.
If you want to use your own batteries and charger they have the same thing for $20 less.
Gail in NM

It is the sixth item down on the left side of this page.
http://www.cncengines.com/ic.html

Complete CDI Ignition system
for many single cylinder engines
up to 12,000 RPM.
Multi cylinder engines with distributor
up to 12,000 sparks per minute.
THIS IS A BOLT ON FOR THE
BRASS MODEL "T" ENGINE
BY DALE DETRICH
INCLUDES:

1. single spark cdi module
2. hall sensor and 1/8 dia. X 1/8" long magnet
3. battery holder with 4 AA - 700 ma NiCad batteries
4. ON - OFF slide switch with charge jack
5. overnight wall charger - 110 volt
6. spark plug wire assembly with flat spark plug clip
7. ground wire with ring terminal for #6 stud

$100.00


Tim, the pin punches I used were called Royal Pins. Don't know if they are even available any more. They are very hard. The problem is that they have a slight seam on the bevel part of the head and unless you have a toolpost grinder to remove that seam, you never get the valve to seal tight. You might be better off to make your valves like Gail did. I'm sure he will provide the information you need to make them.

I have always talked to Roy Sholl at S/S. He is very helpful. I recommend you buy the entire package that Gail suggested. That way you will get fresh batteries & a charger along will all the connectors, wires, & switch.

Cliff, just hang tight for a day or two. Gail is going to load all my drawing into the download area so they will be easier for everyone to download.
Looking forward to your build also.
 
The building package for TINY has been placed int the Downloads section. It is the second item on page 10.
Everything is in a single ZIP file. There are 20 drawings in PDF format and a set of notes also in PDF format. The drawings have all known corrections from the original in them.
About a 2.6 Mb download.
The download can be directly accessed at:
http://www.homemodelenginemachinist.com/index.php?action=tpmod;dl=item310

Gail in NM

 
Thanks Gail,

I'll file that away, I've always wanted to do an i.c. so it's only a couple of projects down the line! I wanted to do a hit and miss but seeing peoples success with Tiny it might edge it's way to the top, it doesn't cost the earth if I have to do it again!

Nick
 
Tim, about the valves.

I made my valves out of 1/4" drill rod. the stem diameter was turned down to .078" instead of .0625". I then cut the angle on the valves and the valve cutter without changing the setup on the lathe.

I did not get a perfect seal with the valves until I used a tiny dab of fine lapping compound from the hardware store. I put the valve in the head with the spring on it, dabbed on the lapping paste, and twisted the valve back and forth for a few minutes. I then tested the seal by taking a vacuum pump for auto use and applying a vacuum to the backside of the valve. I was satisfied with the fit once it was able to hold a vacuum at 20hg's for about 1 minute.

I also used the same ignition system from S/S. It is really easy to get setup, and works like a champ.

You picked a great engine to make, Although its size may seem intimidating, It is a pretty easy engine to make, and cheap to Re-make if any parts come out less than satisfactory.

Kel

 
Hey,
Arv,
The pins my dad has looks like drill rod and he called them punch blanks the head is 60 degrees and about 2 inches long.He said they cut them to length and added them to some machine?
Gail,
Thanks for the info.on the Cdi.I saw that one and thought that was it.I'm going to order it tomorrow or Monday.
Kel,
Thanks for the help on the valves.When I get to that point I would like to talk with you more about making them.
I will definitely need the help.
Thanks to all of you for the help.I look forward to building the Tiny with all of your help.
Tim


Gail,
I'm sorry I haven't posted sooner. This is an outstanding build and I especially like the instruction panel. I have been concerned with passing along information with my engines and you have solved that for me.
As far as making a new Teflon plug, I know that the small diameters are a bugger to cut so why not see if you can get a piece of Corian. It is rigid, will take the temperature and has fairly good electrical qualities.
George
 
Thank you George. That is a high compliment coming from you.

The data plate on this engine was done on 3mm thick acrylic that was deep laser engraved and then filled with solid paint. Any modern engraving shop can do what ever you want for a few dollars. Cheapest is if they make the plate out of standard multilayer engraving stock like what is used for name tags. No paint filling is required on that. If you supply a data file that they can work with then you can keep costs down also. The standard for most shops is Correll files, but many can read DXF and DWG files. Just put the cutting lines and the engraving on separate layers or different colors. The cutting kerf width will vary from machine to machine but is typically 0.006 inch. For mounting holes I typically draw the standard clearance size and do not correct for the kerf. So I draw a 0.086 for a 2-56 clearance and the hole will end up about 0.092. I have a small 30 watt laser engraver/cutter and the TINY data plate took about 7 minutes to cut and deep engrave directly out of ACAD 2000. The engraver is treated like a Windows printer with different colors used to set the speed and power of the laser.

Cutting the Teflon is not a problem. I drill the center electrode wire hole first and insert a music wire in the hole. Arv used a bushing in his tailstock chuck, but I have a small drill chuck that is live with a couple of ball bearings supporting it. I just clamp on the electrode wire size mandrel with the chuck and the Teflon is supported so that it cuts as easy as brass as long as the cutting tool is very sharp and on center. I originally made up the live chuck to support mandrels for winding small diameter spring stock in the lathe, but it has been used for other things far more than spring winding.

I have Corian and have made larger plugs with it. I was a little concerned about electrical breakdown in this small size. Calculated breakdown for it is about 14kV while the the Teflon calculates out to be about 40 KV. As a rule of thumb I have tried to keep above 20 kV to allow for flooded engine conditions. But, when I turn a new insulator I will make a few out of Corian also to see if it works OK. It probably will be.

Tiny got a little bit hard to start recently. Took about 6 or 8 spins on the finger start knob as opposed to the 2 or 3 that it normally takes. I think it has about 18 hours on it now. I pulled the plug and I could not see the center electrode for all the carbon. The plug was just set up as a surface discharge. Pressing it apart, I cleaned it and then peeled back the Teflon support around the center electrode at about a 45 degree angle and left 15 or 20 thou of the center electrode bare. After reassembly it was a whole new engine. Operating fuel mixture range was almost doubled on the needle valve and rich mixture low speed running was much smoother with less misfiring. I think I will make up a whole new plug and extend the 1/8 diameter tip enough that I can mill away the sides to leave enough of a protrusion to bend over for the ground electrode to make up something that looks more like an automotive spark plug. Maybe these full size plug makers really do know something. It will be a few day before I get to that however as a couple of household projects need my attention in preparation for some model engineering type house guests arriving from out town for a week of intense toy building.

Gail in NM


Latest posts

Back
Top