SX3 DRO Kit

Home Model Engine Machinist Forum

Help Support Home Model Engine Machinist Forum:

This site may earn a commission from merchant affiliate links, including eBay, Amazon, and others.
Cedge. that last sentance, Very little printed but a lot said. I'm working on a deal for a new lathe, Only dealer is in Quebec, Over 2500 miles away. Lathe is made by Weiss Machinery, Nanjing China. Jasonb a member here owns one and pmed me with a very favourable report on it. Only lathe of this size and weight that has power cross feed. Hope to order next month, Will probably use c-6 for uuuug!!! wood, Or fix some of it's accuracy problems and use it strictly for grinding, Still buying Chinese tools just very carefull now.

Pete
 
SmoggyTurnip, Dealer is GARANT MACHINERY, Phone no. 418-837-5832 ask for Yves, Web site www.garantmachinerie.com Lathe I'm ordering is not shown on their web site But is exactly the same (except colour) as www.warco.co.uk shows on their web site. Lathe model no. WM-280V-F, Lathe they sell comes with MT2 tailstock, So I'm special ordering one with MT3. This is the only lathe (In this size, 11 x27.5) And weight, That comes with power cross feed, Or at least that I know about.

Yves seems like a real good guy to deal with, Fast with e-mail questions, Willing to deal with special orders,ect. Only U.S. dealer I've found on the net, Is in california, And is just setting up his business. So can't ship equipment yet. Lathe is built by WEISS MACHINERY Nanjing, China. Specs. so far look pretty good.

Sorry about getting away from the original topic.

Pete
 
Forgot to add, Yves is fully flluent in english so no problems there either. Again Cedge sorry for horning in on your original post.

Pete
 
Pete
No apology required. I'm the one that took it in an off topic direction anyway.

Steve
 
Cedge, Sorry and yeah a apolligy was required, As I try to be very carefull on what I say, And do on these boards. (Dosen't always work tho) I'm sick and tired of people getting into B****n,and moaning, and P*****g contests over the slightest little thing. Everyone has, And is entitled to their own opinion, If you don't agree well so what, move on. I think most people are here to learn, And talk with people of similar interest's. If I need an arguement, All I need to do is tell the wife that her butt does look fat. Life is far to short for that.

Pete
 
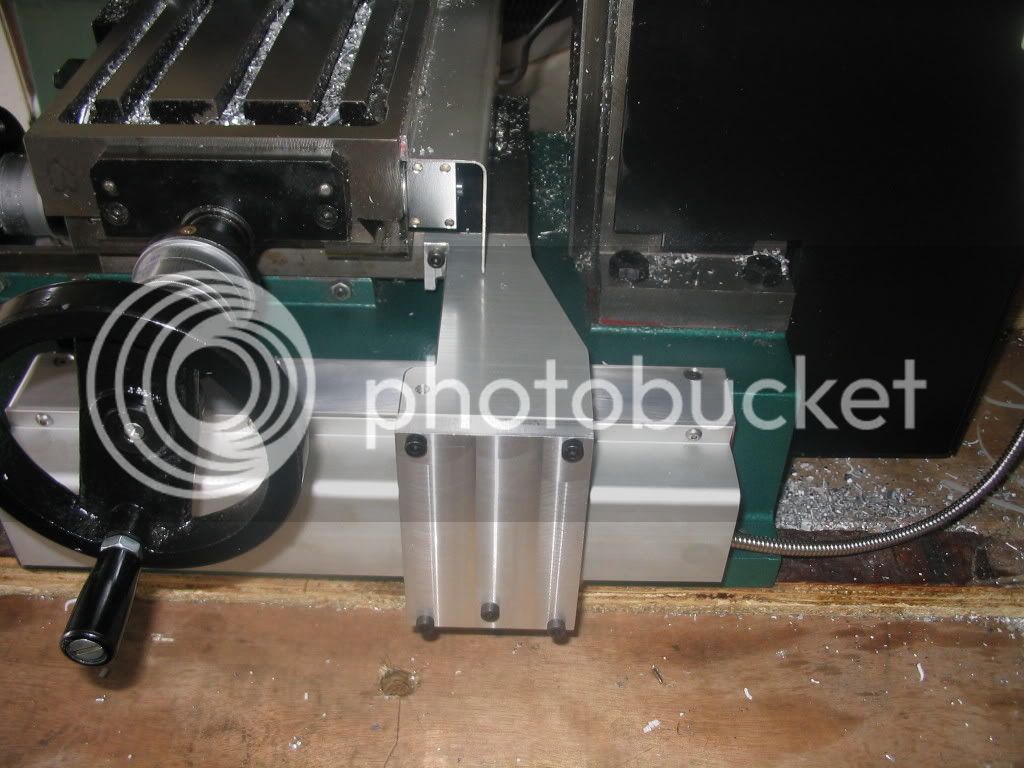
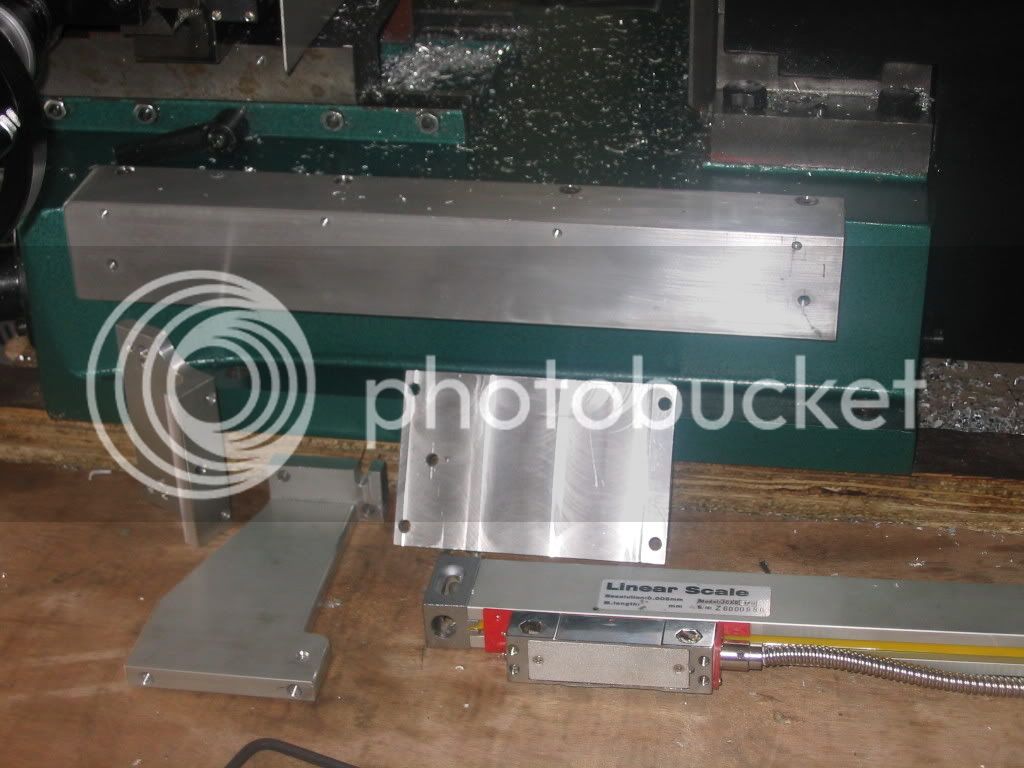
if you got your readout, i thought a couple of pic's could save you alot of hassle in nounting the y scale . and you will see that i mounted it on the right side. that is because i have a powerfeed unit on the left side for the x travel . and because of that there was not enough space and still have full travel in x and y .

Picture600.jpg

Picture584.jpg

Picture581.jpg
 
Bmuss
Thanks for the photos. I will probably have to do the same mount for the same reason.

The kit arrived on schedule, yesterday and first looks are impressive. The mounts are not stamped metal, but are made of heavy aluminum. Unfortunately I won't be able to begin the install for a few days, due to previous obligations.

Steve
 
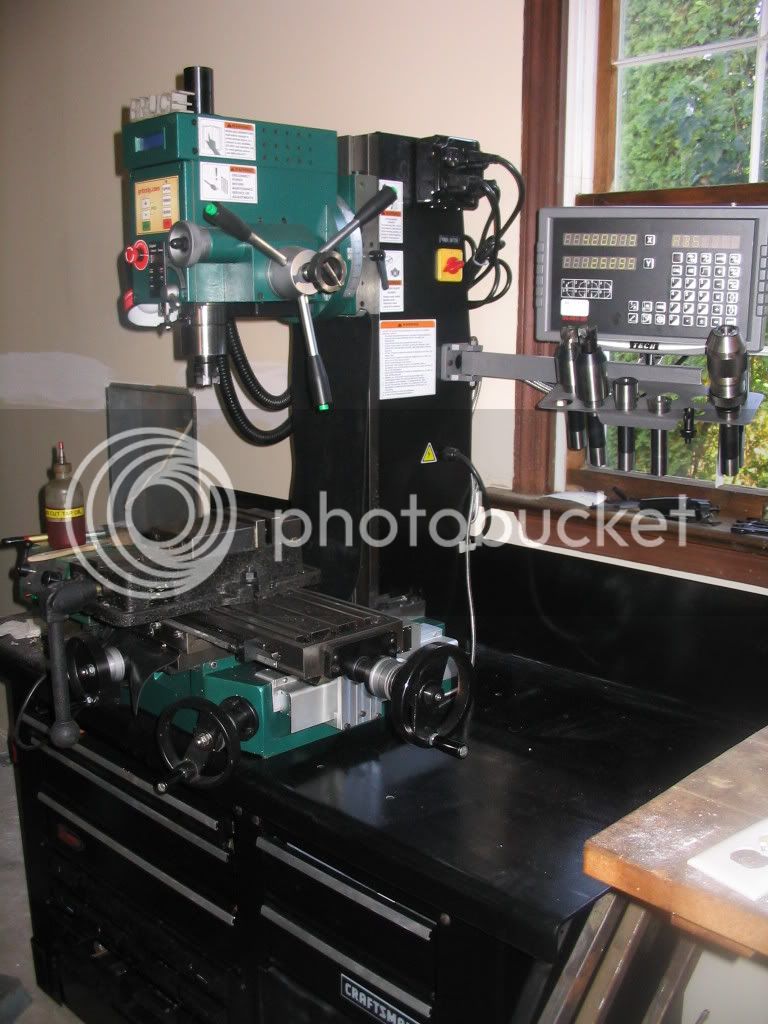
if you look at the top back of the machine you will find a 4 outlet elec. box that i added .and the reason for this is that i can turn on-off everything hooked to the mill with the master switch. you may have noticed a light mounted on the left side which is a nice add-on for getting more light to the cutting area.this was a craftsman light that has a pt.# under drill press parts. first pick a drill press that has a movable light and then look up the pt#. and from what i found this is the best and also the cheapest way to add a light. which i believe cost around $12-14 delivered. as for the bulb i found a ceiling fan light bulb works the best because of the vibration. so back to the elec. box. the one plug is used for the light and the next is used for the readout, and the other is used for the powerfeed.
now for a ? to this forum.
you might see the powerfeed i have installed, but i am getting tired of the sys. it uses to switch directions. by turning off the feed rate and then switching directions before i can turn on the feedrate again. and i saw in a video somewhere that this can be overcome. and what i mean is to be able to switch directions and not have to play with the feed speed switch. so can anyone describe how this is done? maybe a couple of pic's would help me understand or a drawing of where the change has to happen!
 
Bmuss

The attached photo shows the approach I used to conquer the lighting problem. The "Flying Saucer" is from Northern tool and was heavily modified to fit the quill column. It required an aluminum collar to be fiitted to its back side once the opening was made large enough to fit.

The Light bar in the rear is from Harbor Freight. I power them both with a single small 4.5 volt wall wart transformer.

The power feed thing is an easy one. The rheostat that controls the speed also has a switch built into it, for reset. If you look at the component, you'll note there are several terminals around the base. Those control the speed. There are also two terminals on the end of the rheostat, for the switch. Simple jumper those two terminals and the switch is out of the system. Once removed, the power feed direction can be switched, at will and instantly, without having to reset the travel speed.

Now..... if I can just rewire the directional switch to a normal toggle switch I'll have things like I want them. That huge honking switch they installed is a bit annoying, especially with the monster detents .

Steve


mill-lights.jpg


mill-lights1.jpg
 
Thought I'd pull this thread up to the top. Did you get the DRO installed? If so, how is it working? There are probably a lot of us "thrifty types" out here wondering.

Glenn
 
After seeing this post on a web search on Sat. morning, I have the DRO kit ordered by noon. Hopefully yours is working for you, its not too late for me to cancel mine...........lol
 
1hand
I've had zero problems and lots of satisfaction from the unit I installed. Several others have made the same leap since I started this thread and to my knowledge at this time, not one has been heard to be unhappy with it.

I can assure you I wouldn't want to be without it, now that I've used it enough to get comfortable with it. I suspect you'll soon agree.

Steve
 
Thanks for the info. Its leaving Hong Kong today. We start our 9 day deer season this Saturday, so hopefully it will be here when I return. May have to come home early from deer camp..........lol
 
I've just completed mounting my "toolsales" DRO on my SX3, and I've got to say I am pretty impressed with the hardware!

The installation instructions do leave a bit to be desired, but all we're machinists here and we should be able to figure out this mechanical stuff by ourselves, right? ;)

All kidding aside, the only issue that I have is that the provided operation instructions (appear to be for some (different) version of the display unit; some of my front panel buttons don't all match those in the manual - most of the differences are just changes to the "icons", but I've also got a couple of buttons that are not in the instructions at all.

I don't know what they are for.
 
I just started hanging on the Z axis last night. Started there cause it looked to be the simplest one to put on. Yeah the instructions are something to be desired. Did you guys remove your mill tables to do the drilling and tapping? I will be cordless drilling them and looks to be a bit tight back there for that. Sure wish I had another drill press for this but I don't. May have to drag the table along with me to work and use one there. But don't want the coworkers there to know what I'm capable of doing...............LOL
 
I had pulled the table & saddle from my SX3 (after marking the locations for the X axis scale and the Y head bracket using a transfer punch and a combination of indicators, shims & clamps) and drilled the holes on my drill press. I did a partial re-assemble to locate and mark the locations for the X axis head and the Y axis scale blocks and drilled the X axis head holes into the saddle on the drill press. The hole for the lower end of the Z axis scale and the holes for the Y axis scale blocks were drilled "in place" using a cordless drill.
 
It took a quite bit of bodily contortion, but I installed mine without having to disassemble the table. I did move the machine to my hydraulic lift table so I could work all the way around it. That proved to be my best idea of that day.

Steve
 
Ok got the z and y axis mounted up. Thought I would try them out before I go to bed and something isn't right. Both are reading like 5" when I only move the table or mill head 1" ??? In the message board it says ABS. What have I got wrong?
 

Latest posts

Back
Top