Sows ear

Home Model Engine Machinist Forum

Help Support Home Model Engine Machinist Forum:

This site may earn a commission from merchant affiliate links, including eBay, Amazon, and others.
I'll give you a little hint----That whole friggin' trough fills up with oil when the engine runs. and it doesn't seem to matter if you are running mixed gas, or straight gas with an oiler.
oilintrough001.jpg
 
opps
maybe im not gunna need to add oil to the fuel :big:
Thanks brian
Pete
 
metalmad said:
My mate will not part with it so far but that motor needs a good going over before it starts to deteriorate

You're just going to have to sweeten the pot some more then, you know, a few cases of Fosters or a couple of Gnus or Razorbacks.... C'mon man, you gotta get that engine from him so that it can be saved. ;D


BC1
Jim
 
Hi Jim
don't worry I have not given up on it but Morrie might have an over inflated idea of its value I think,so I don't want to push him on it.
Meanwhile there has been a disaster here
I took a pic of my mornings work and while I was transferring the pic to the Computer, my little Helper has helped himself to my Cam follower :mad:
Not Happy :mad:
 
Did not do much today except a little more "fitting"of the pushrod alignment. The fuel cap,
I ended up putting on the other side, cos I thought that side was getting a bit boring :big:
Pete
 
Looks good Pete Thm:

The little helpers can sometimes help in the "wrong" way ;D But at least he's trying!

Kind regards, Arnold
 
Hi Arnold
I have two beautiful kids and In some ways concider myself a "rich" man although I must admit, sometimes a little cash would not go astray ;D
I can not wait till the boy Is old enough to talk so I can ask him what he did with my parts :big:
I hope he takes an interest in machining when he is a little older, so we can make things together.
At the moment he likes to sit in my lap and watch the "running videos"
Its a start.
I want to get a bit of toolsteel for my big flycutter today so I can take the sides of the Tank down to size in one go.Another project earmarked for this arvo if I get time is to turn the pull start pulley for the offside.
Pete

View attachment cap.JPG
 
Hi guys
had a little play with the fitting up of the lock out lever, but I will have to have another crack tomorrow as its nowhere near right.
The lever hits the gear when disengaged as ive stuffed up the shaft (The pin hole is too close to the gear)
I still have not threaded the pushrod as I can not get a 6/ 32 die anywhere
(why can't u guys use threads a man can get :p)
I might have to atempt this in the lathe
Pete

View attachment not right.JPG
 
Do yourself a favour (as I've mentioned before) and switch to BA threads. They are much more readily available here, and you have an excellent supplier just across the way from you in John Strachan at Hobby Mechanics.

http://www.hobbymechanics.com.au/

The engine is looking good. Just remember that when all the governor gear is coupled up the inward travel if the bobbin will be restricted and you problem might nearly go away, don't get too enthusiastic about hacking the arm about until you've seen what happens there.
 
Be wary of that long "thumb" that sticks out beyond the actual working surface on the lever. I found that when I was trying to get my engine to operate in hit and miss mode, that long thumb would pivot over and contact the face of the L shaped peice with the cam follower bearing on it, before the bob weights and spool had reached the maximum limits of their own travel. This put a large frictional load between the other end of the lever and the sliding spool, and made the engine really bog down. I couldn't figure out what was happening untill I noticed all the powdered brass laying under the arm and pulley. After seeing that, I just cut the "thumb" off flush with the surface that slides UNDER the L shaped peice. That lets the bob weights and the spool move out to their full extent without putting any frictional load on the engine.---Brian
 
Hi Tel
I think I will look into BA after this build as I am finding that not being able to get anything here is a pain in the ar$e.
unfortunately that hobbymechanics site seems to be only online, and mate I don't even have a credit card, as I like to see it and touch it before I buy it :-[
Hi Brian
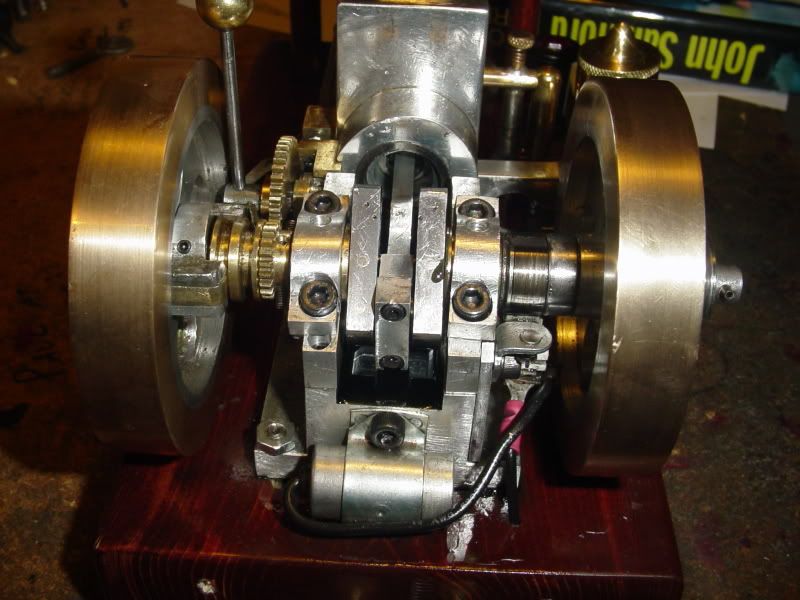
There is a long road ahead, before mine even thinks about running.
But you better believe, if that lever becomes a problem,then its history :big:
Pete
 
Hi all
I remade the mandrel for the cam today and it works great and was able to find my 6/32 die too :))
Its from a cheap and nasty set I got awhile back, but was hiding in my big set.I had to cut it, to make it work, but it did the job.
 
I feel for ya' there mate, about not being able to source the proper tools or materials easily. Although you do seem to be making quite good headway here, keep the faith and please continue supplying us with updates on your progress. I've found them to be informative as well as entertaining. I'm eager to see how that trip arm works out for you. So far you are looking good if it helps/matters any.

BC1
Jim
 
It's rather funny, you are closer to China and they have flooded us with taps and dies. ::)

Coming along rather nicely.
 
Hi jim
and good morning.
Im very happy with the lockout lever now after remaking the mandrel, unfortunatly my eyes are not good and sometimes I make the sillist of mistakes.
When you do yours mate, make sure you have that .250 from the gear to the pin right, as if its short, you hit the gear before the lockout clears the cam follower.As I used an old bolt for the shaft I had to use a grinder to do the groove for the lever ( the bolt was very hard and did not mill well)

Hi jeff
Thank you for the support as it really helps me get motavated to overcome the latest hurdle.
I am starting to get excited about getting this running even though I know, I have a long way to go.
I do not have any work today so Im going to see if I have the materal for the regulator weights.
I have a piece for the rocker arm but will have to leave it until I get a 1/8 ball nose mill and collet.As for China I just wish that what they do send us worked :big:
Pete
 
When you do yours mate, make sure you have that .250 from the gear to the pin right, as if its short, you hit the gear before the lockout clears the cam follower.

I think I have that OK, but I will double check it before I get the arm done. I think part of your problem, and I measn no offense here, is that you have way too much engagement on the latch - which means the arm has to travel much further before the cam follower disengages. You could, with advantage, take a file to it thus.


regulator arm.jpg
 
Hi Tel
I will play a wait and see on the lockout arm and if it will not disengage I will mill a little bit off :)
I spent the afternoon in the shed today and made the weights and started on the arms.
Be aware in viewing my pics that I am a novice and there very probably is a better way of doing it :big:
I just make it up as I go along

View attachment W1.JPG

View attachment w2.JPG
 
Don't think therew is a right way or wrong way to do 'em, the fly weights looks good, and that's what counts.

Meanwhile I roughed out the latch arm today and made a complete cock up of it - misread something somewhere, but the actual latch part came out about 3/16" short of where it has to be.
 

Latest posts

Back
Top