You are using an out of date browser. It may not display this or other websites correctly.
You should upgrade or use an alternative browser.
You should upgrade or use an alternative browser.
Small Locomotive & Boiler (ME Northumbrian)
- Thread starter doubletop
- Start date

Help Support Home Model Engine Machinist Forum:
This site may earn a commission from merchant affiliate
links, including eBay, Amazon, and others.
zeeprogrammer
Well-Known Member
- Joined
- Mar 14, 2009
- Messages
- 3,362
- Reaction score
- 13
Beautiful model Pete!
I'm looking forward to a video of you on the track with it.
Nice job whetting everyone's appetite for the Simplex too. ;D
I'm looking forward to a video of you on the track with it.
Nice job whetting everyone's appetite for the Simplex too. ;D
Say Pete, terrific looking work and good progress being made there. How about starting a new thread about The Thistle Engine rehab? We all know you are going to be working on that one at the same time, (now don't we) ;D That way we all can have our cake and eat it too.
BC1
Jim
BC1
Jim
- Joined
- Mar 1, 2010
- Messages
- 866
- Reaction score
- 82
Ron
Thanks; its coming together. I've just spent the evening sketching a wagon in Visio (that's all I have). I want to do a closed wagon so I can hide the gas bottle. Examples I have to work from are this 2nd class from the Didcot Railway center

Although its for 7ft gauge something in this style would be easy in MDF.
From the National Railway Museum in York, Northumbrian's sister "Rocket" apparently had something a bit more fancy.
1st Class

Or 3rd class, but open

So I'm working on that at the moment.
Carl
I heard you were back in town, welcome back. A video of it running is a bit of a way off I'm afraid, not least of which the track is work in progress at the moment. That's my excuse for now anyway, but dig back through then thread and there is a video of a static steaming.
Running will be a problem at the moment; our new club track is under construction, notice the use of a kerb laying machine that extrudes concrete, with special former for the track base.

Ready for the track to be manufactured by the project team

Jim
You must have your spies out. Yes, I've done a few bits, the motion has a bit of play in it, I think the technical term is "shagged". I've already remade a few pins and purchased the silver steel for others. A lot of the steel on steel bearings have worn badly. I doubt they were hardened where they should have been. I'm finding that stepping up from the original imperial size to the next up metric equivalent is going to work. I've also purchased the "Cherry Red" (Kasenite) for the hardening when I need it.
The thread will start at some point, probably with catch up. Photos are being taken otherwise how on earth am I going to get it back together again?
Regards all
Pete
Thanks; its coming together. I've just spent the evening sketching a wagon in Visio (that's all I have). I want to do a closed wagon so I can hide the gas bottle. Examples I have to work from are this 2nd class from the Didcot Railway center

Although its for 7ft gauge something in this style would be easy in MDF.
From the National Railway Museum in York, Northumbrian's sister "Rocket" apparently had something a bit more fancy.
1st Class

Or 3rd class, but open

So I'm working on that at the moment.
Carl
I heard you were back in town, welcome back. A video of it running is a bit of a way off I'm afraid, not least of which the track is work in progress at the moment. That's my excuse for now anyway, but dig back through then thread and there is a video of a static steaming.
Running will be a problem at the moment; our new club track is under construction, notice the use of a kerb laying machine that extrudes concrete, with special former for the track base.

Ready for the track to be manufactured by the project team

Jim
You must have your spies out. Yes, I've done a few bits, the motion has a bit of play in it, I think the technical term is "shagged". I've already remade a few pins and purchased the silver steel for others. A lot of the steel on steel bearings have worn badly. I doubt they were hardened where they should have been. I'm finding that stepping up from the original imperial size to the next up metric equivalent is going to work. I've also purchased the "Cherry Red" (Kasenite) for the hardening when I need it.
The thread will start at some point, probably with catch up. Photos are being taken otherwise how on earth am I going to get it back together again?
Regards all
Pete
- Joined
- Mar 1, 2010
- Messages
- 866
- Reaction score
- 82
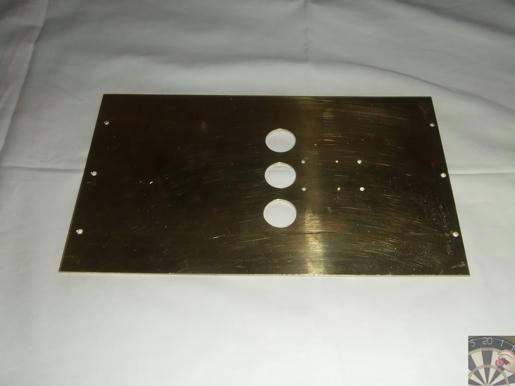
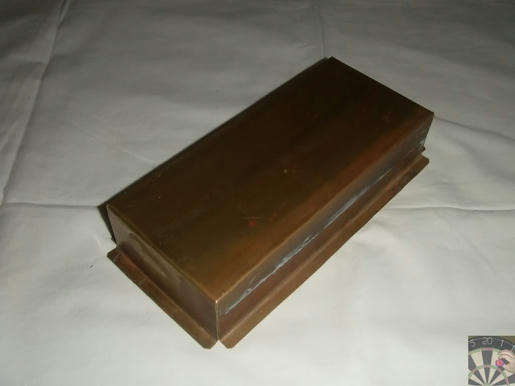
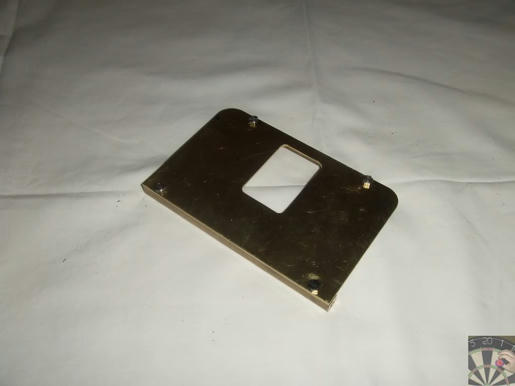
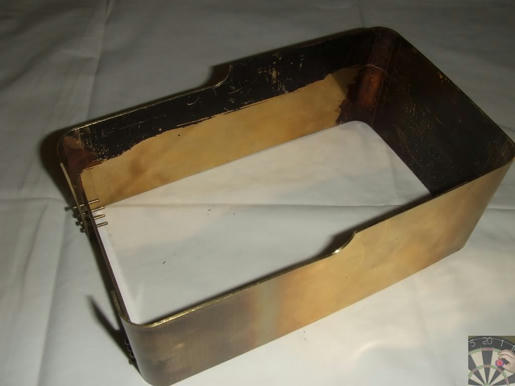
I've had some sheet brass delivered so I was able to make a start on the tender over the weekend and made pretty good progress.
Base plate
Well Tank
Top Plate
Body
All loosely fitted together
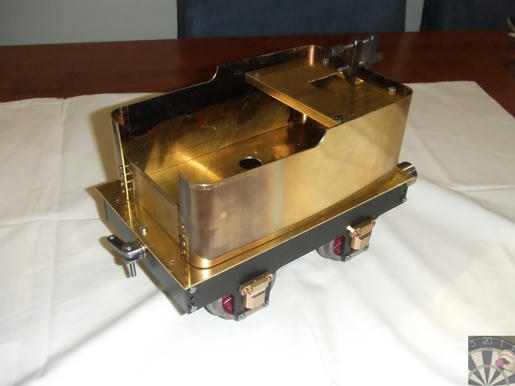
A few more parts to make then I can start of the assembly. Apart from my boilers, sheet metalwork like this is another new thing for me, so I'm quite pleased with the way its going. The soft soldering is also going to be a nice change.
Pete
Base plate

Well Tank

Top Plate

Body

All loosely fitted together

A few more parts to make then I can start of the assembly. Apart from my boilers, sheet metalwork like this is another new thing for me, so I'm quite pleased with the way its going. The soft soldering is also going to be a nice change.
Pete
- Joined
- Nov 14, 2009
- Messages
- 675
- Reaction score
- 104
Hi Pete ,That looks good,if you use Bakers soldering fluid,the solder will flow great and really penetrate,went well for me on my minnie tender.
Don
Don
![DreamPlan Home Design and Landscaping Software Free for Windows [PC Download]](https://m.media-amazon.com/images/I/51kvZH2dVLL._SL500_.jpg)
$0.00
DreamPlan Home Design and Landscaping Software Free for Windows [PC Download]
Amazon.com Services LLC

$94.99
$109.99
AHS Woodmaster 4400 Maintenance Kit for Outdoor Wood Boiler Treatment
Alternative Heating & Supplies

$17.90
$24.95
Backyard Building: Treehouses, Sheds, Arbors, Gates, and Other Garden Projects (Countryman Know How)
Amazon.com

$45.99
Sunnytech Mini Hot Air Stirling Engine Motor Model Educational Toy Kits Electricity HA001
stirlingtechonline

$89.99
Outdoor Wood Boiler Water Treatment Rust Inhibitor- AmTech 300 & Test Kit
Alternative Heating & Supplies

$519.19
$699.00
FoxAlien Masuter Pro CNC Router Machine, Upgraded 3-Axis Engraving All-Metal Milling Machine for Wood Acrylic MDF Nylon Carving Cutting
FoxAlien Official

$29.95
Competition Engine Building: Advanced Engine Design and Assembly Techniques (Pro Series)
Amazon.com Services LLC

$39.58
$49.99
Becker CAD 12 3D - professional CAD software for 2D + 3D design and modelling - for 3 PCs - 100% compatible with AutoCAD
momox Shop

$99.99
AHS Outdoor Wood Boiler Yearly Maintenance Kit with Water Treatment - ProTech 300 & Test Kit
Alternative Heating & Supplies

$25.34
$34.99
Bowl Sander Tool Kit w/Dual Bearing Head & Hardwood Handle | 42PC Wood Sander Set | 2" Hook & Loop Sanding Disc Sandpaper Assortment | 1/4" Mandrel Bowl Sander for Woodturning | Wood Lathe Tools
Peachtree Woodworking Supply Inc

$180.50
$190.00
Genmitsu CNC 3018-PRO Router Kit GRBL Control 3 Axis Plastic Acrylic PCB PVC Wood Carving Milling Engraving Machine, XYZ Working Area 300x180x45mm
SainSmart Official

$39.99
$49.99
Sunnytech Low Temperature Stirling Engine Motor Steam Heat Education Model Toy Kit For mechanical skills (LT001)
stirlingtechonline
- Joined
- Mar 1, 2010
- Messages
- 866
- Reaction score
- 82
Thanks Don
I've got the Bakers lined up already. I'm going to hold off any soldering until I've got all the parts ready. The plan is to hold everything together with small nuts and bolts until I'm ready. Otherwise its guaranteed that something will get soldered that needs to be un-soldered to get something else done.
I went out into the workshop tonight expecting to make some more progress. The only equipment that got turned on was the TV. I fiddled with this and fiddled with that without making up my mind what to do next. I worked out a way to hold the body rigid in the mill so I can drill the holes for the mounting brackets and decide stop there. Sometimes its better to walk away than make a start on something and mess it up. You know when the time is right.
Pete
- Joined
- Mar 1, 2010
- Messages
- 866
- Reaction score
- 82
Thanks once again Pete. I knew somebody would ask about the flare. There isn't going to be one, I think it could only be achieved with any degree of success with copper Although I've got some 20swg copper I haven't got 21" of it and wasn't going to join sheets together. I'm using 1mm brass sheet and I'm not going to attempt to flare that.
The write up does say various different tenders were used and the drawings on line sort of support that even though there is a degree of artistic licence
On drawings; I was rummaging through the National Railway Museum (York) online and found they had a blueprint of an original Stephenson drawing of the Northumbrian, side elevation. Its frames are made up e.g open lattice but not the Warren girder style in one of the sketches. They sent me a .tiff, as a sample but I won't post it here just in case there's any copyright restrictions. One thing is sure, we can't call this "fine scale"
Pete
No problems Pete, - it's your engine so press your own buttons. I have already got some 0.8mm brass sheet so will be using that when I get back into it. Would have been perfect tonight except we had the good old parent / teacher night, and I think it will start warming up again! :'(
- Joined
- Mar 1, 2010
- Messages
- 866
- Reaction score
- 82
I've been making a bit of progress with the tender getting all the mounting brackets, internal baffle etc. all finished, riveted and soldered up
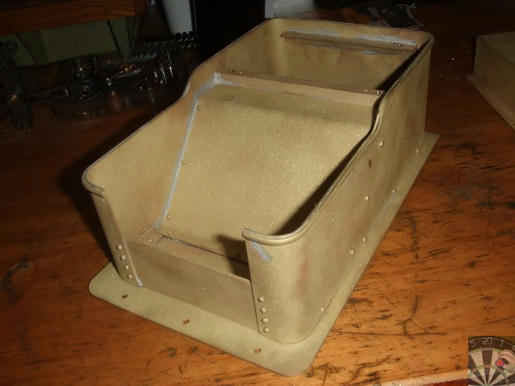
I've gone for an angled baffle rather than the curve in the drawing basically because it was simpler. I also skipped all the rivets and replaced with 10BA bolts. again because it was easier. I'll save rivet counting for a later project, when I've worked out how people do all those dummy rivets.
I've also done all the other unions and pipework for the well tank.
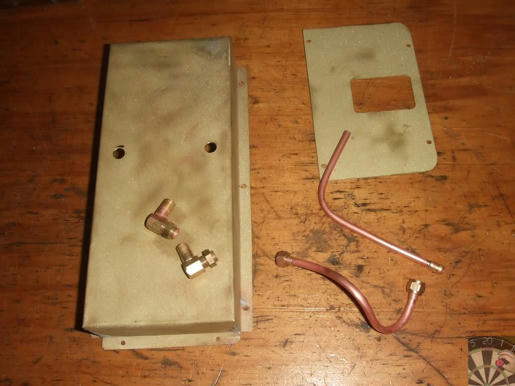
I'm using a hand pump from Polly Model, again its easier.
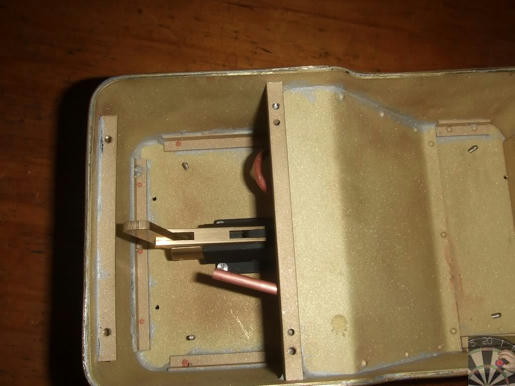
I'm holding the well tank on by screws rather than solder it. If its soldered there's no way of getting back in to fix anything if you need to without making a mess. There are plenty of silicon gasket products out there to ensure it gets sealed properly.
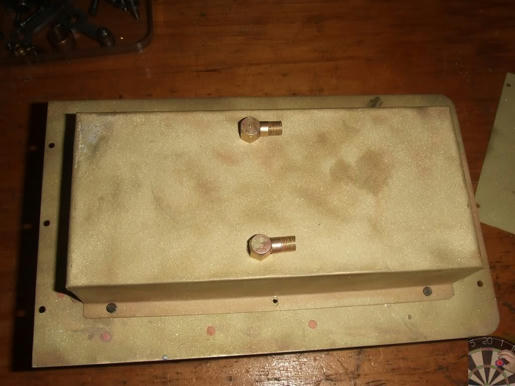
Sitting on the frames. A bit more tidying up and that's about it before I start the painting. You'll see it's spent some time in the sand blaster so the etch primer will stick.
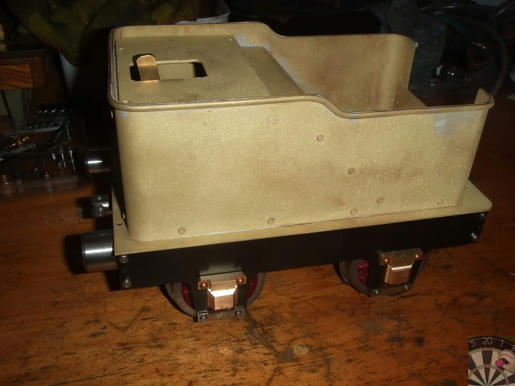
Better get some springs in those axle boxes.............
Pete

I've gone for an angled baffle rather than the curve in the drawing basically because it was simpler. I also skipped all the rivets and replaced with 10BA bolts. again because it was easier. I'll save rivet counting for a later project, when I've worked out how people do all those dummy rivets.
I've also done all the other unions and pipework for the well tank.

I'm using a hand pump from Polly Model, again its easier.

I'm holding the well tank on by screws rather than solder it. If its soldered there's no way of getting back in to fix anything if you need to without making a mess. There are plenty of silicon gasket products out there to ensure it gets sealed properly.

Sitting on the frames. A bit more tidying up and that's about it before I start the painting. You'll see it's spent some time in the sand blaster so the etch primer will stick.

Better get some springs in those axle boxes.............
Pete
- Joined
- Mar 1, 2010
- Messages
- 866
- Reaction score
- 82
Chuck
Thanks for looking in. Doing this tender is just something that has to be done otherwise the rest of the effort will have been for nothing. Anyway you got me thinking about my approach
#1 is an understanding partner who encourages me to go into the workshop. I got 16 hours in over the weekend with a regular supply of tea at appropriate intervals. ;D
#2 is one job at a time, however much you may want to do something else, just stick with it. I've got that Simplex to look forward to, with bits of it spread around the workshop, but I manage to not get distracted.
#3 is plan, well to some degree, set out the objectives for the session and stick to them as much as you can.
#4 is walk away when its starts going wrong, you are rushing, not enjoying it or just tired, put it down and come back another day. You'll be surprised how well something goes that you were struggling with the day before.
But of course all you guys have been around long enough to know all that.....................
Pete
doubletop said:#4 is walk away when its starts going wrong, you are rushing, not enjoying it or just tired, put it down and come back another day. You'll be surprised how well something goes that you were struggling with the day before.
Have to agree with No 4
Pete
- Joined
- Dec 2, 2008
- Messages
- 971
- Reaction score
- 9
Hi Pete
I'm a little late to pick up on this project but I have to ask about a step that you glossed over. How did that tender acquire that nice rolled top edge. One picture its flat and the next picture its round. Must be magic.
Jerry
I'm a little late to pick up on this project but I have to ask about a step that you glossed over. How did that tender acquire that nice rolled top edge. One picture its flat and the next picture its round. Must be magic.
Jerry
- Joined
- Jun 4, 2008
- Messages
- 3,294
- Reaction score
- 636
Most people make the rounded edge with half-round brass rod.
- Joined
- Mar 1, 2010
- Messages
- 866
- Reaction score
- 82
Pete
Being a fellow Brit I find its the tea that helps. Maggs has delivered said item from time to time to find me dozing in the workshop chair. The tea refreshes those parts that a beer doesn't do and its back to work.
Jerry/Kvom
Kvom has hit it on the head. I found a length of half round lurking in the back of the cupboard annealed it progressively bent it to shape clamping as I went. It only needed finger pressure to form the shapes with the occasional tap to get it into line. An hour or so in the pickle to remove 20years of muck and then I tinned the back wiping off the excess with a damp cloth. Clamped it back in place and re-heated it to melt the solder and hold it in its final place.
Well that's the ideal version; it wasn't going right and got half way round and was about to remove it all when aforementioned tea arrived so I sat down drank the tea and had another go. The last part went the way the first (pre tea) part should have gone. So I redid the the original attempt and what you see is the result.
It's all been etch primed, blemishes body puttied, where needed, and rubbed down with 1000 grit wet and dry so top coat is the plan tonight.
Pete
- Joined
- Mar 1, 2010
- Messages
- 866
- Reaction score
- 82
After a number of attempts at the painting of the tender I finally got it to a state that can be considered moderately OK, which was recovered from bloody awful. As people have said on here before there are rattle cans and rattle cans. I tried cans from Repco, which were Holts. They spluttered and farted and did a hopeless job after a number of rub downs with 1000 grit and retries I ran out of paint so went to Super Cheap Auto and got another brand they seemed to be marginally better but not as good as a can I had from MMP Industrial branded "Australian Export" which do a great job but didn't have the colour I wanted. Closer inspection of the SuperCheap cans they were from Holts as well. Ho hum, I persevered and here we are:
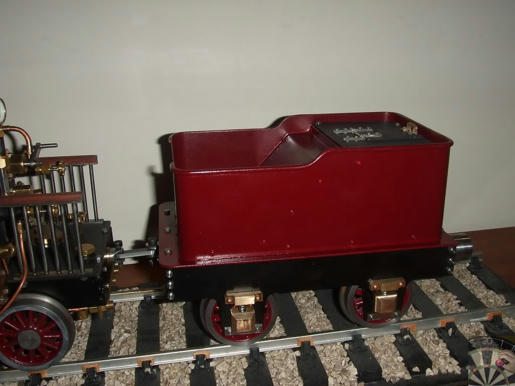
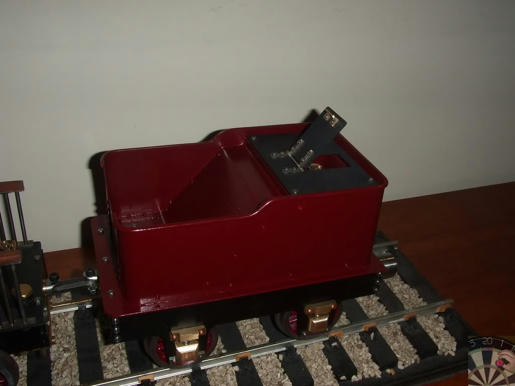
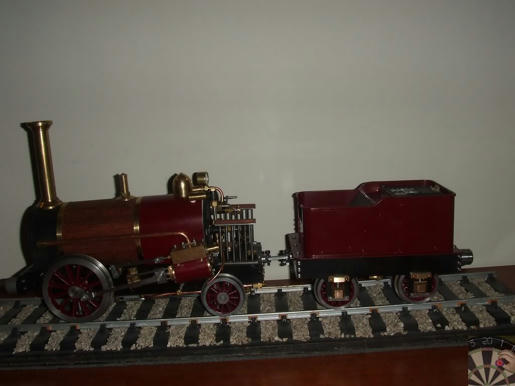
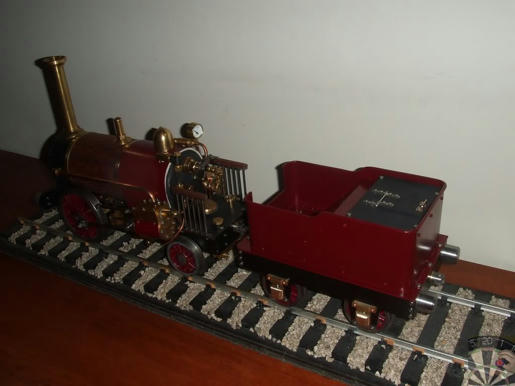
A couple of bits of pipework to connect the tender to the loco. Next job is get the loco running properly. The burner needs some work to get it right. JasonB pointed out that the lubricator didn't have a second clack, and he was right, it needs one. I've got something in mind for the small space it needs to go into.
Pete
That's looking great Pete! Thm: Thm:
On another note, could you take a look at post # 105 on my Simplex thread?
http://www.homemodelenginemachinist.com/index.php?topic=8358.105#lastPost
I am having some issues with the motion works and posted a question about it here and on another forum but no replies so far.
Thanks
Ron
- Joined
- Mar 1, 2010
- Messages
- 866
- Reaction score
- 82
Thanks Ron
That's probably the last time it will look like that. If my Rob Roy experience is anything to go by, getting it to run properly with dis-assembly/ re-assembly, heat and oil gives it a patina unobtainable in the build process. It wasn't built to sit on a shelf and look pretty so it will get to look 'lived in' before it works well.
I've posted something over on your thread.
Pete


