Small Heat Treat Oven

Home Model Engine Machinist Forum

Help Support Home Model Engine Machinist Forum:

This site may earn a commission from merchant affiliate links, including eBay, Amazon, and others.

Brian Rupnow

Design Engineer
Project of the Month Winner
Joined
May 23, 2008
Messages
15,259
Reaction score
8,544
Location
Barrie, Ontario, Canada
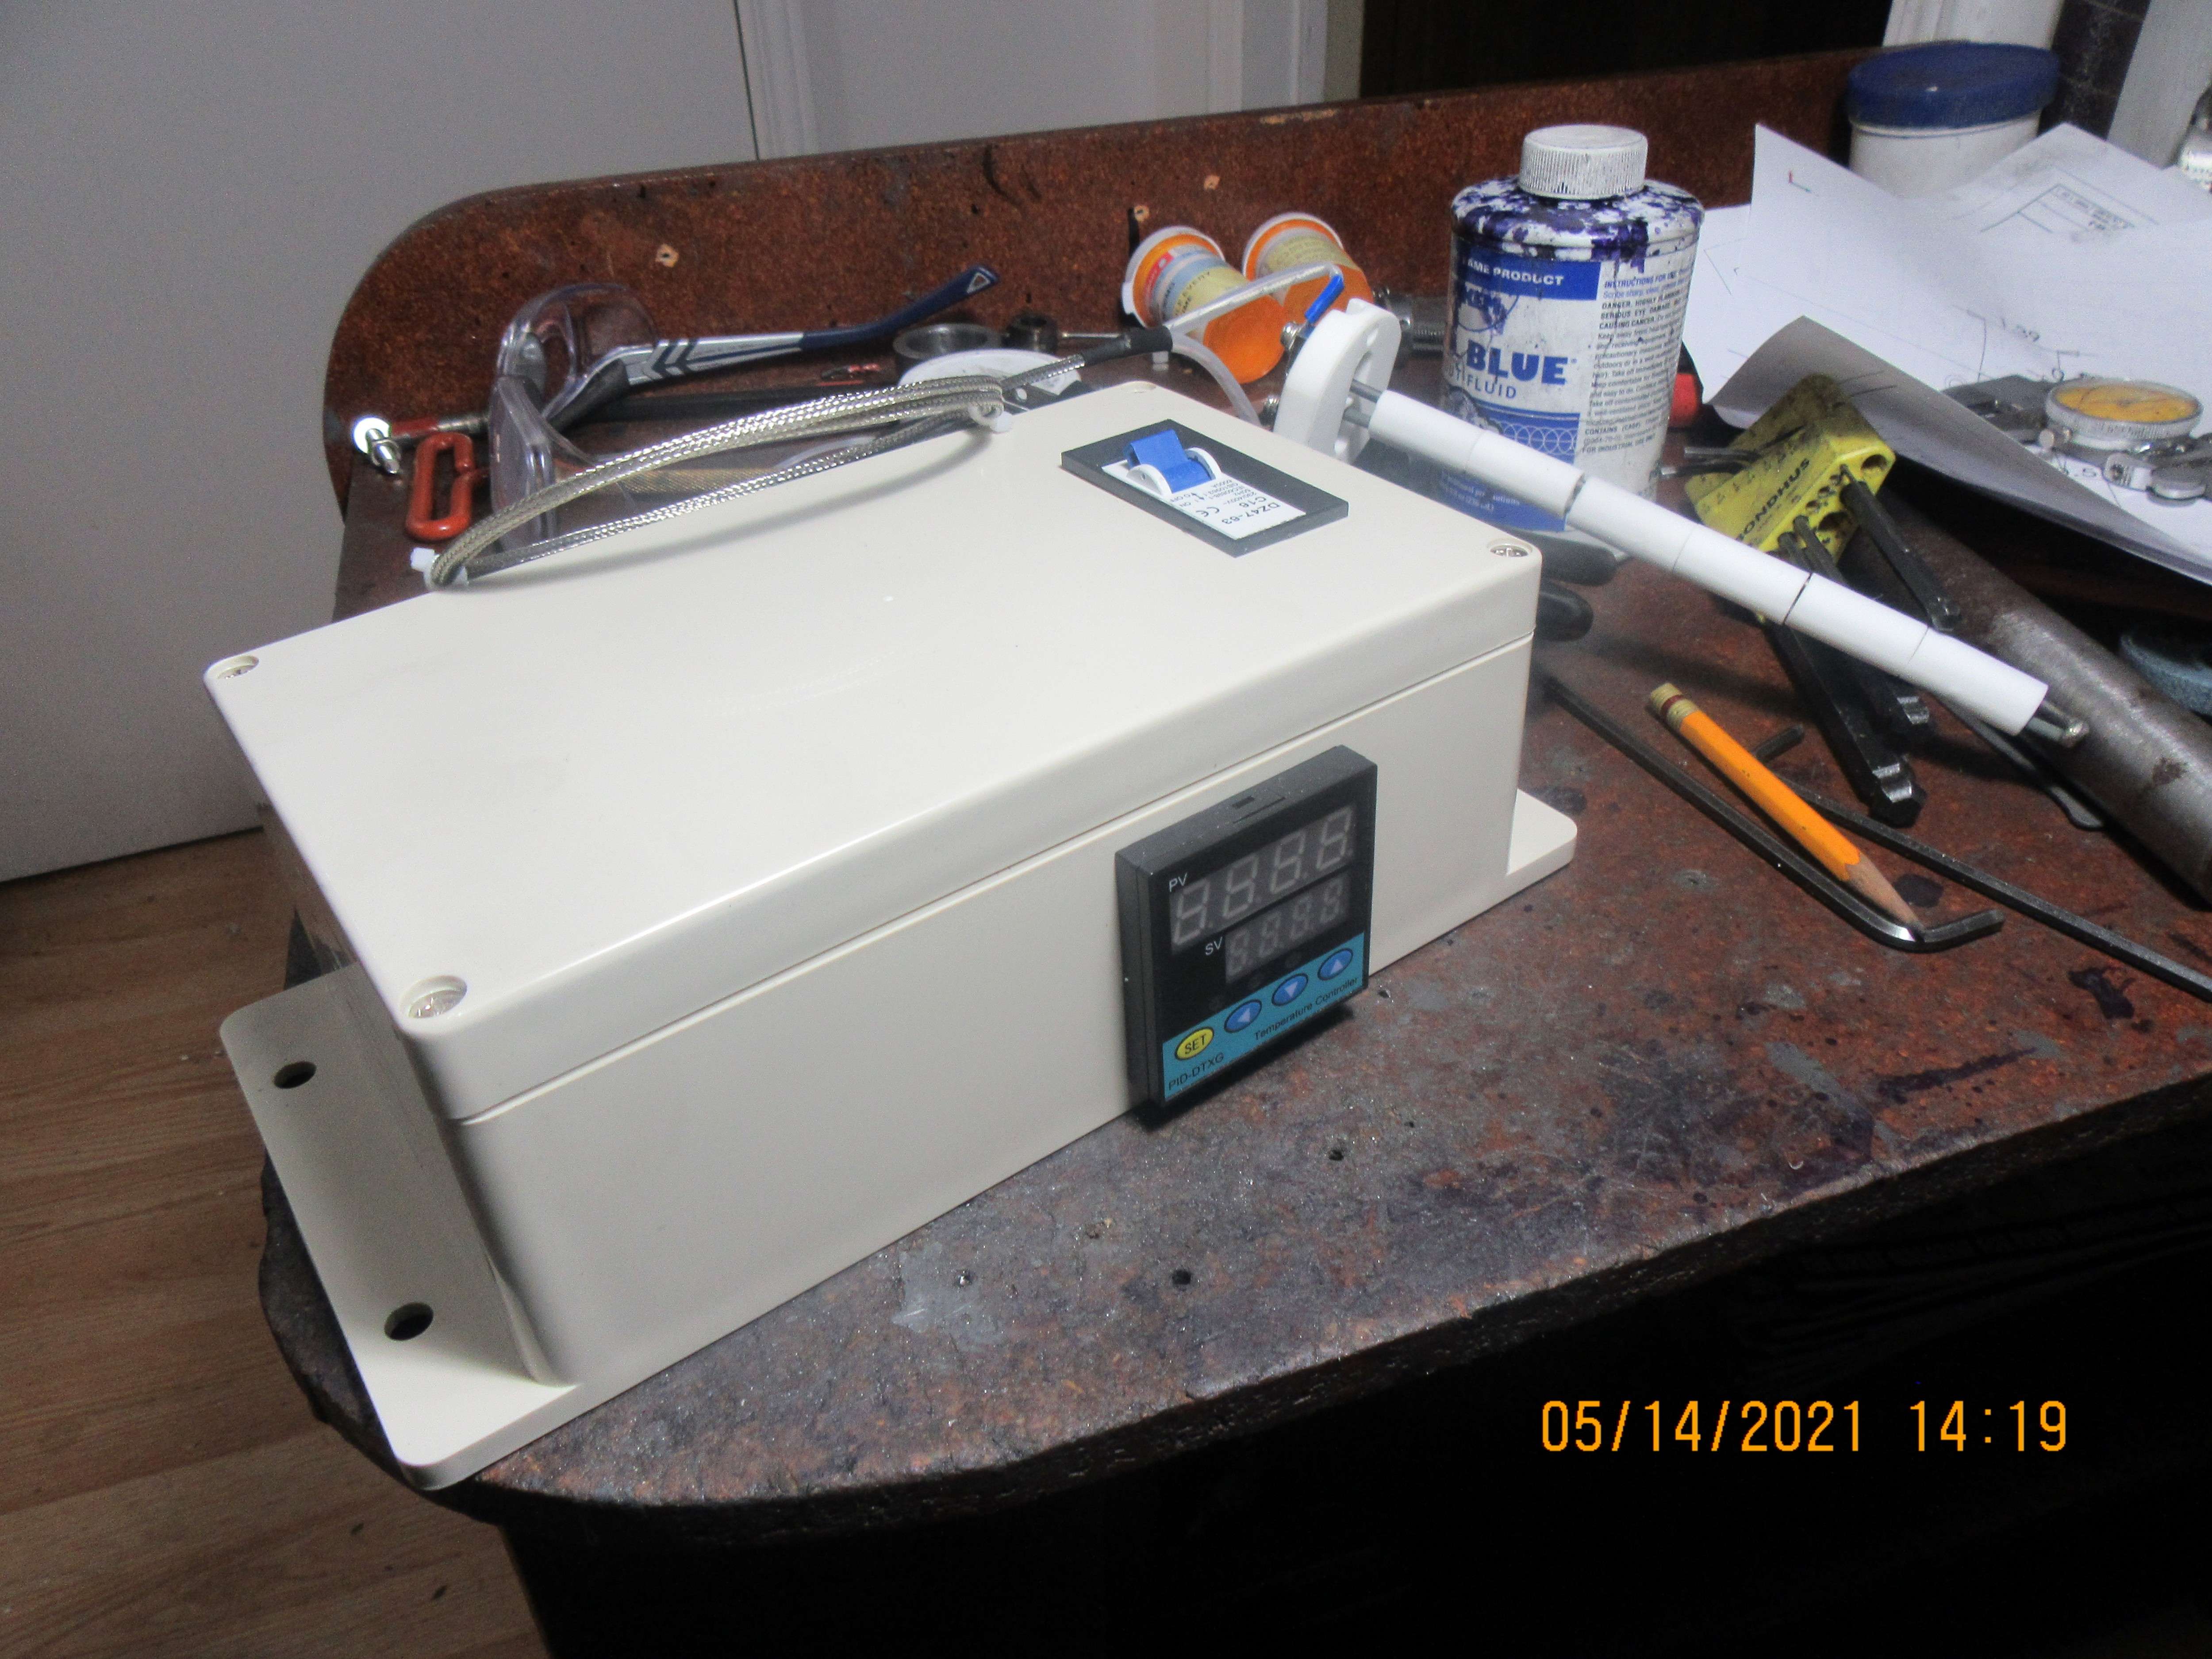
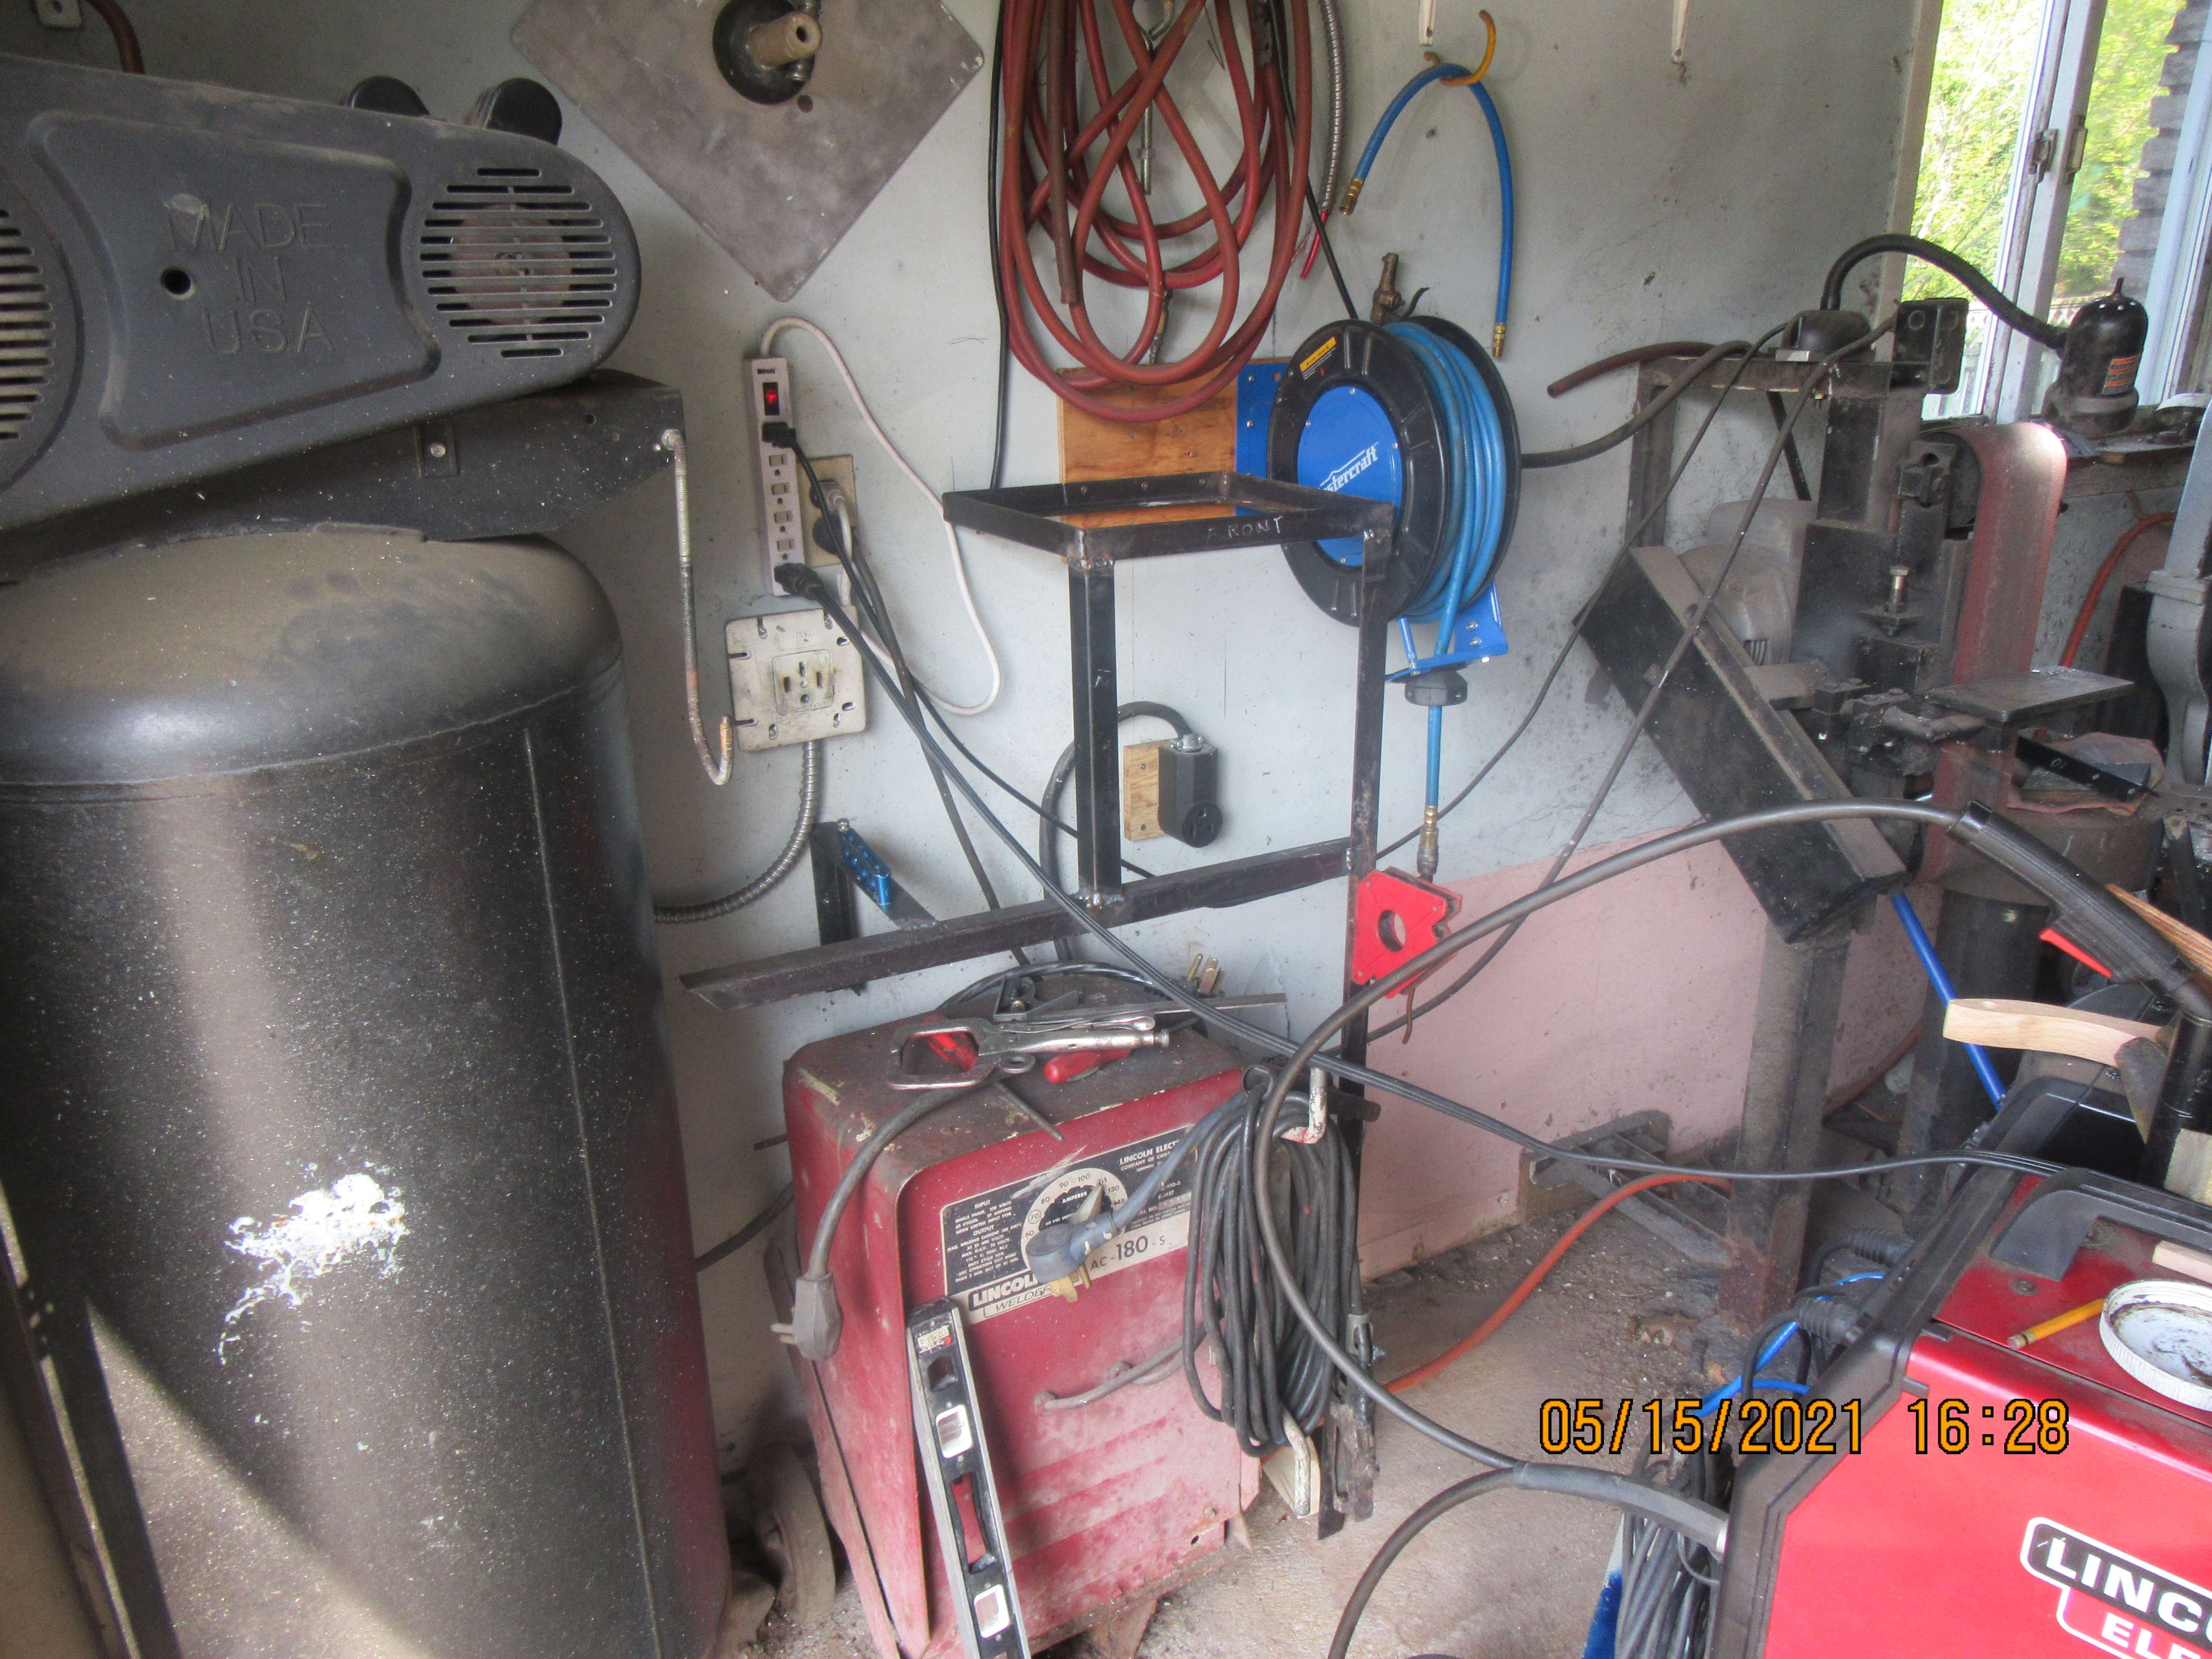
This deserves a thread of it's own. I have decided that I need a small heat treat oven. I know nothing about them, but I'm learning fast. I checked out the internet, and ovens in the size range I need range from about $800 Canadian up to $3000 Canadian. I didn't want to spend that kind of money, so I posted a want add in local Buy and Sell newspapers. I got a phone call from Montreal Quebec from an Anglican minister who had some connection to potting. She had two ovens, and would sell me one for $200. plus shipping from Montreal. It shipped UPS and that cost $98. So---the oven came, I plugged it in to 110 volts and it warmed up immediately as you can see in the picture. It had no controls on it at all. I had no idea what controls I needed, but a few helpful people on the forums stepped up and advised me on what I would need. I purchased a PID controller from Ebay, and it cost me about $230 Canadian including shipping. It consists of a plastic box about 5" x 8" x 3" deep, a pyrometer probe which extends thru the side of the oven, two 110 volt cords coming out of it, one with a male end and one with a female plug, an on/off switch, and a digital screen on it. At his time I don't know a heck of a lot more about it, but as I said, I'm learning fast.
aSpY57.jpg

7thGaP.jpg
 
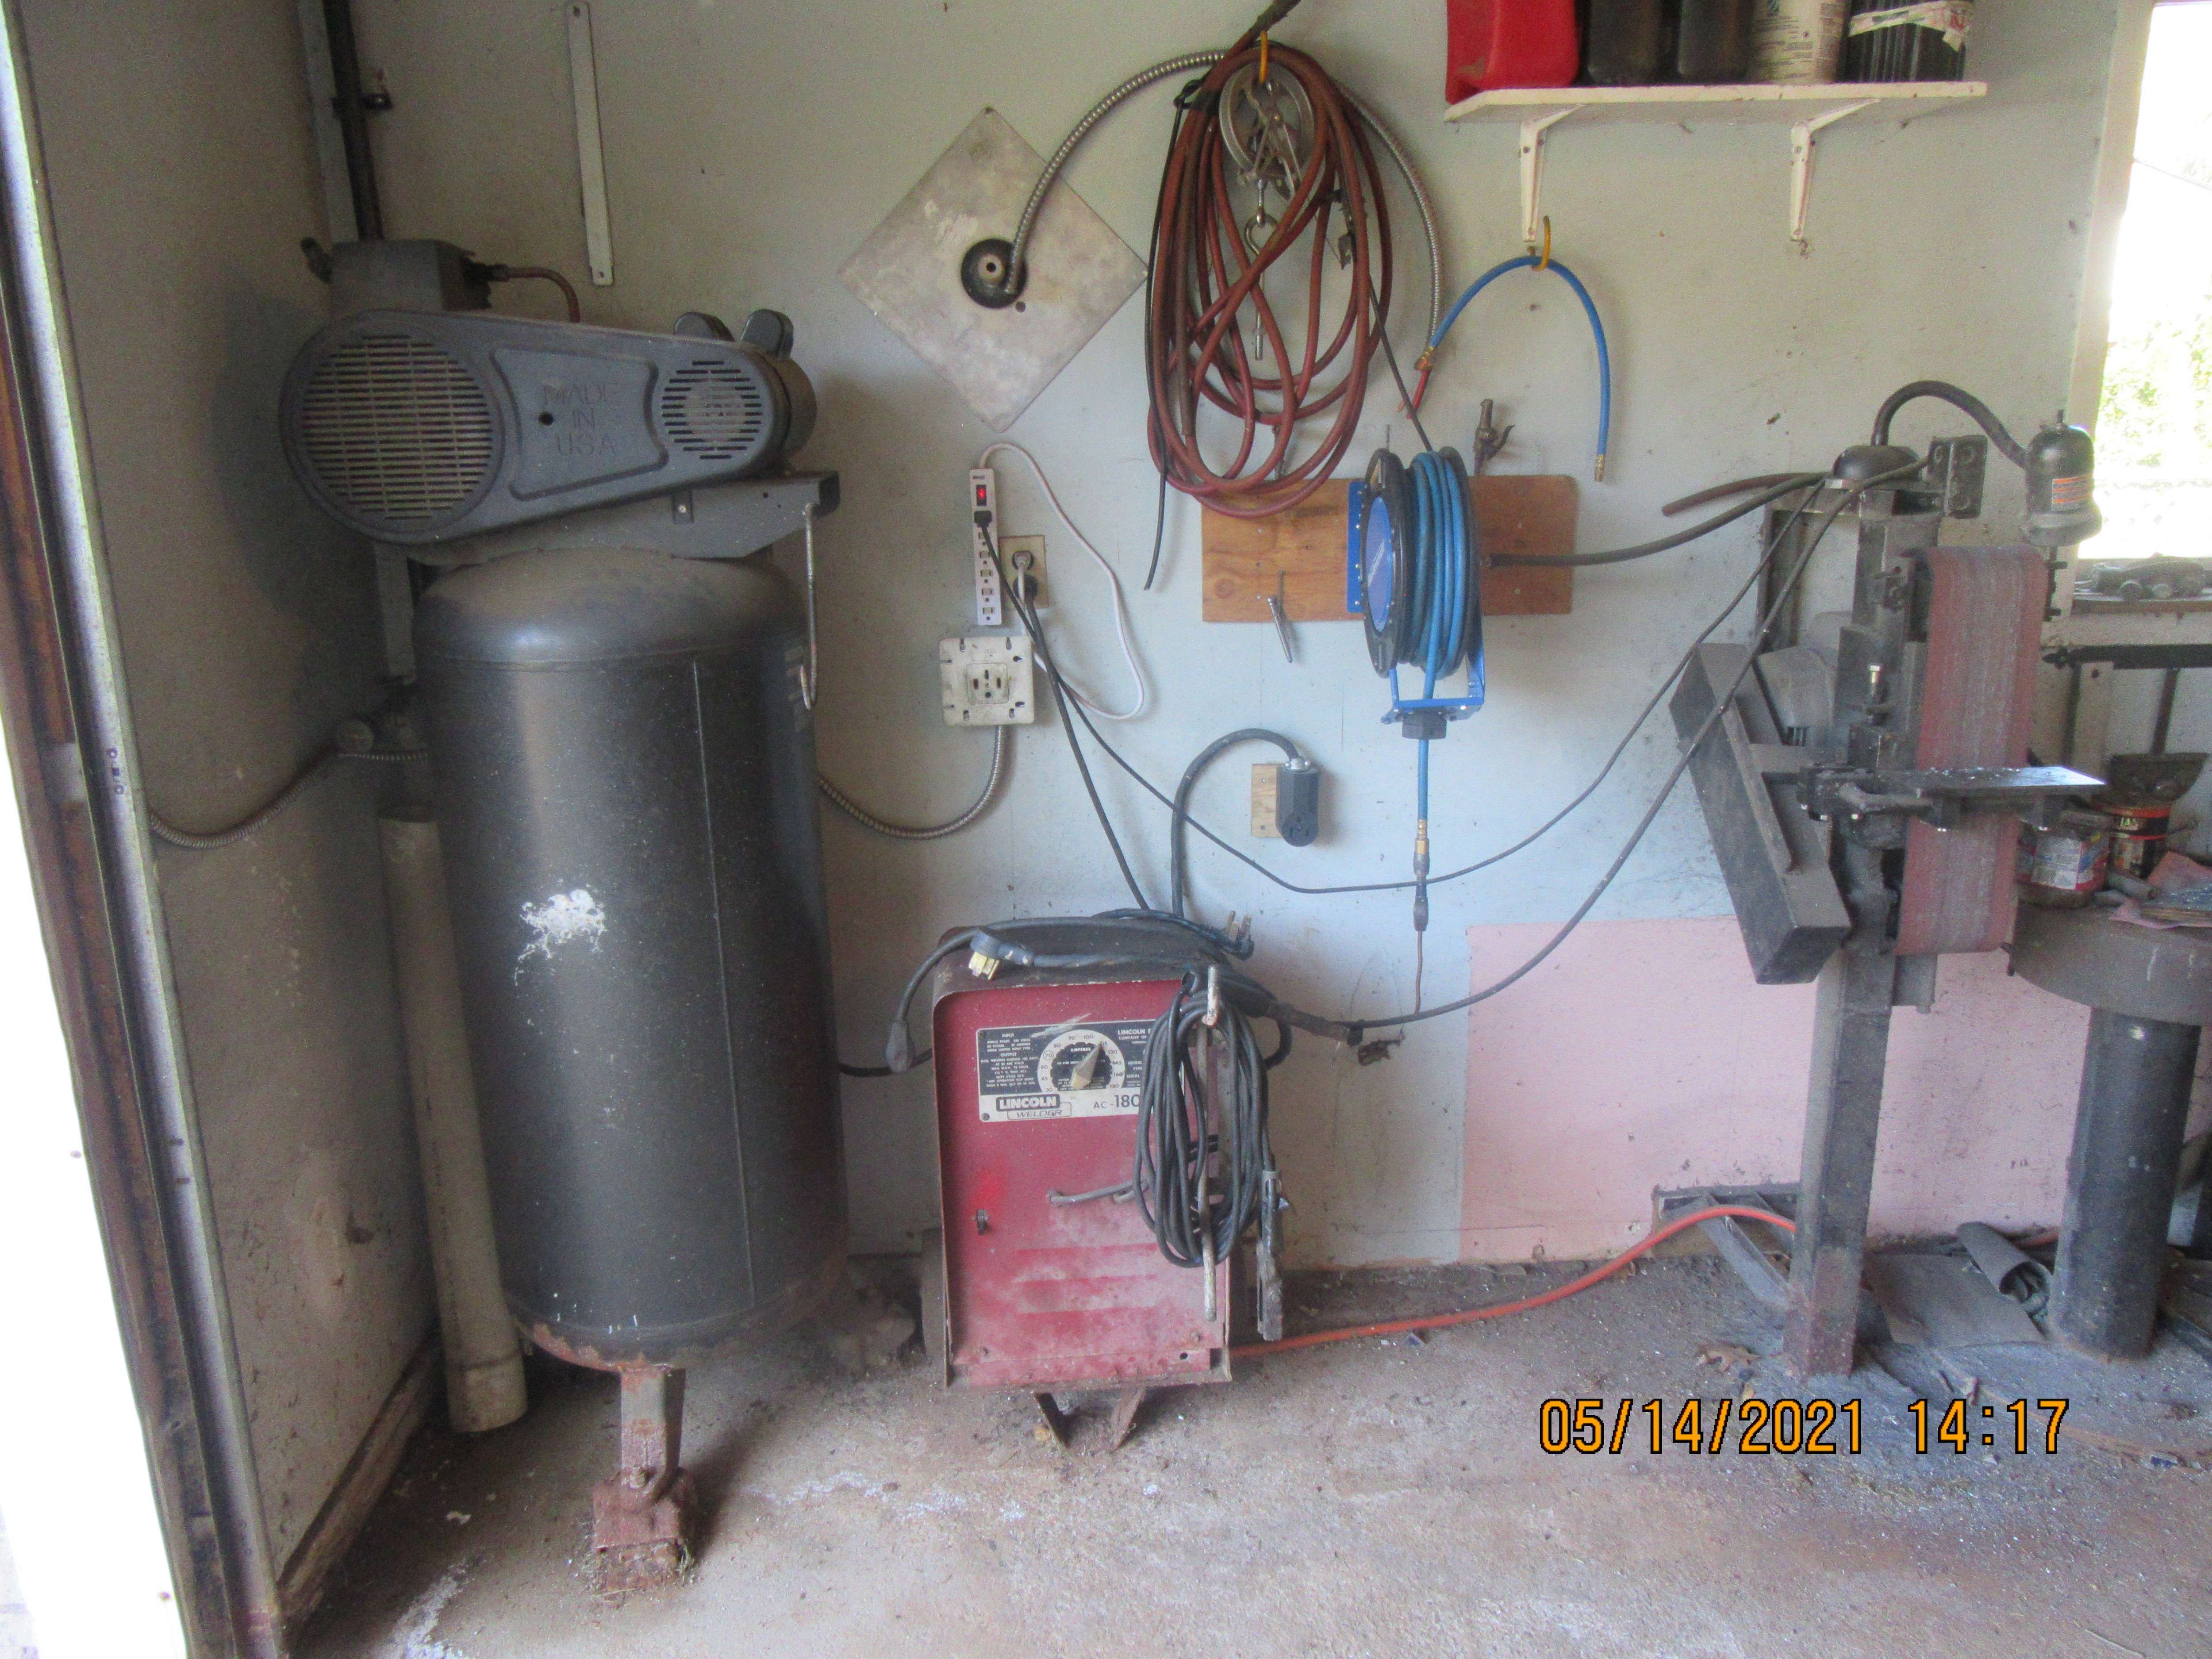
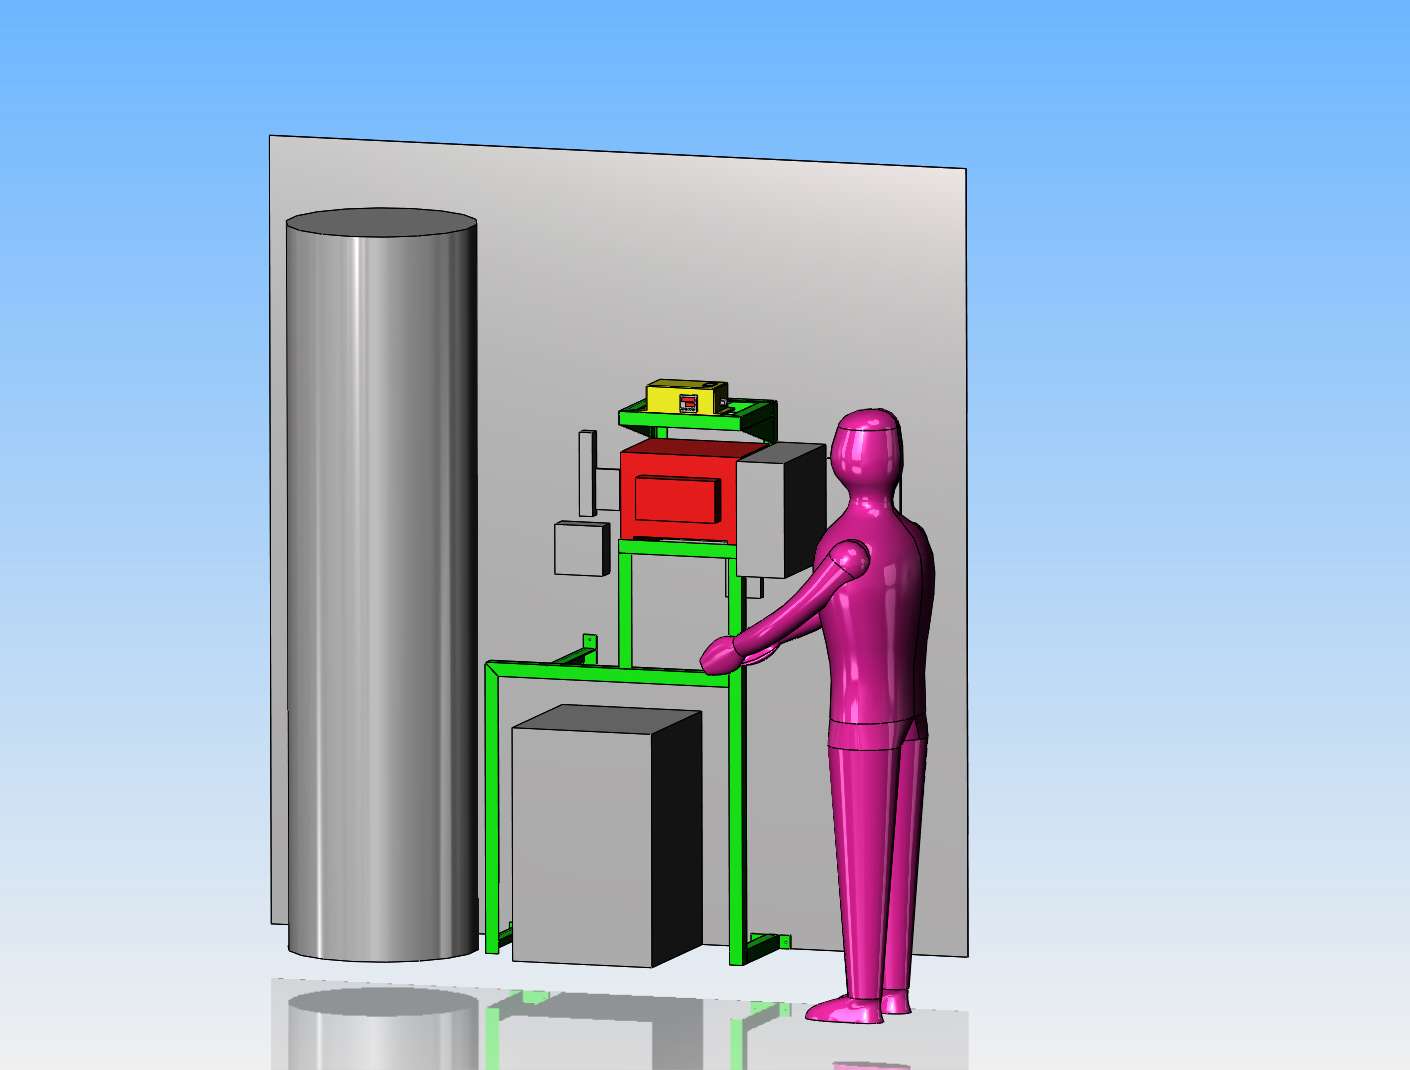
My two car garage holds a lot of the "overflow" from my small engine hobby, and MUST have a clear space for my good wife's car. I have one place near my air compressor and old stick welder that will do for a place to mount the oven. I have angle iron harvested from 3 old bedframes (That cost $15), and will use that to make a shelf that holds my oven. So here you see the corner where my air compressor and stick welder live, and the frame of angle which will support the oven and the controller. The 3D model of a person is 67" tall, same as myself except for the white beard and pot gut.
xe8ZL0.jpg

FFnVWc.jpg
 
So, if you've been keeping track, I'm now up to $543 Canadian. I don't think I am going to need anything else, but if I do I will let you know. An observation---This heat treat oven, as purchased with no controls, would be very simple and cheap for a home shop guy to build. There is really nothing to it, just some light gauge sheet metal, some fire brick, and a door. There are lots of "How to build your own heat treat oven" videos on Youtube.
 
Don't put your oven controller above your oven where it can fry. Better to locate it underneath the oven or off to the side.
 
jkimberln--I thought of that while I was designing the support stand. I don't have room to locate the control below or off to the right side. I could always move that 220 volt outlet mounted on the piece of plywood down another six or eight inches--that might free up space to mount the controller below the furnace.
 
Your set-up certainly looks good! As explained in the parallel thread 'Keeping 01 free of carbon buildup while hardening' quick transport from oven to quencing bath is essential, so you may want to spend some thought of where to position your quencing bath. Our resident heat treatment engineer has explained to me that quencing slightly alloyed Silversteel in water may give a somewhat harder result. But it brings the risk of soft spots where vaporbubbles originate and the risk of cracks. So water quencing is best limited to simple shapes and under vigorous stirring. In other situations quencing in oil is preferable at a temperature of about 50 degrees Celsius. In a bath of one liter oil or more small components will only increase the quencing temperature a couple of degrees.
By the way, in full heat the topside of my oven is only a little bit hotter than handwarm. So I think that when you put a piece of steel or aluminum sheet as heatsink/-deflector under your control its position on top of the oven should not be a problem.
 
Last edited:
Further to clockworkcheval's note - - - - put your controller shelf a moderate distance above the oven and run a 3W computer type fan to move the warm air from above the oven to make sure that the controller is kept cool.
Low cost for purchase and in use and will minimize space requirements - - - - HTH.
 
I purchased a PID controller from Ebay, and it cost me about $230 Canadian including shipping. It consists of a plastic box about 5" x 8" x 3" deep, a pyrometer probe which extends thru the side of the oven, two 110 volt cords coming out of it, one with a male end and one with a female plug, an on/off switch, and a digital screen on it.
Hi Brian,
Congratulations on the oven - it's always much better if one can do one's own heat treatment.
Regarding the PID, did you get an operator's manual with it? If not, search online for the name/model number of the unit mounted in your box and download the info (if possible). PID's come in various flavours, but all of them have some capability to be programmed. In case you don't know, they work by switching "on" before the temperature that is being controlled falls to your lower required limit, and switch "off" before reaching the upper set limit. This then evens out the lag where with a normal household oven the temperature overshoots the desired (set) temperature, and then undershoots the lower limit by only starting to warm up again when it crosses the set limit threshold (hope this is clear...).
Most PID's (if set into the correct mode) can also "self learn" what the actual lead and lag times must be , so as to not overshoot the target temperature. The operator's manual should tell you about these matters, and how to program the unit. If you cannot find the information, please drop me a PM with your email address, and I will send you some generic information, in PDF format, that should put you on the right path.
Just to get you started, the "SV" display is your set value (the temp that you want to maintain), and the "PV" is the actual temperature of the oven. Press the sideways arrow below the displays to get into "set" mode, and then either of the "up" or "down" arrows to adjust the flashing digit. Press the sideways arrow again to scroll through all the digits, setting each digit individually. Press the "set" button to store the set value and start the oven. (As I said, units differ, and yours might need you to press the "set" button to start...

I agree with jkimberln that it's not ideal to have the controller directly above your oven.

I don't think I am going to need anything else, but if I do I will let you know
You will need a quench tank and a proper quenching oil (don't use old engine oil or similar...). You will also need a tempering oven, if at all possible. One can use the main hardening oven, but it uses a lot more electricity than a small dedicated toaster oven, and it allows one to do both the hardening and the tempering operations at the same time.
An old fire extinguisher, with just the top cut off, makes a very nice quenching tank for small items, holding about 4-5 liters of oil. If you are going to heat treat larger parts then you will probably have to weld your own larger tank. I have two tanks, a 5 liter ex-extinguisher, and a much taller large diameter pipe with one end welded shut with a 2mm steel plate that also acts as it's stand - this tank holds 25 liters of oil.

Depending on the type of steel you plan to harden, your cheapest "best" quenching oil to use (if you don't want to buy actual quenching oil...) is Canola cooking oil - it is a rather quick quenching oil, and being a vegetable oil, it has a very limited vapour phase, ensuring uniform hardening. It also smells like chips when heated - a much more pleasant smell than most other oils ;)
And yes, clockworkcheval is correct, heat up your oil to make it cool the steel more rapidly.
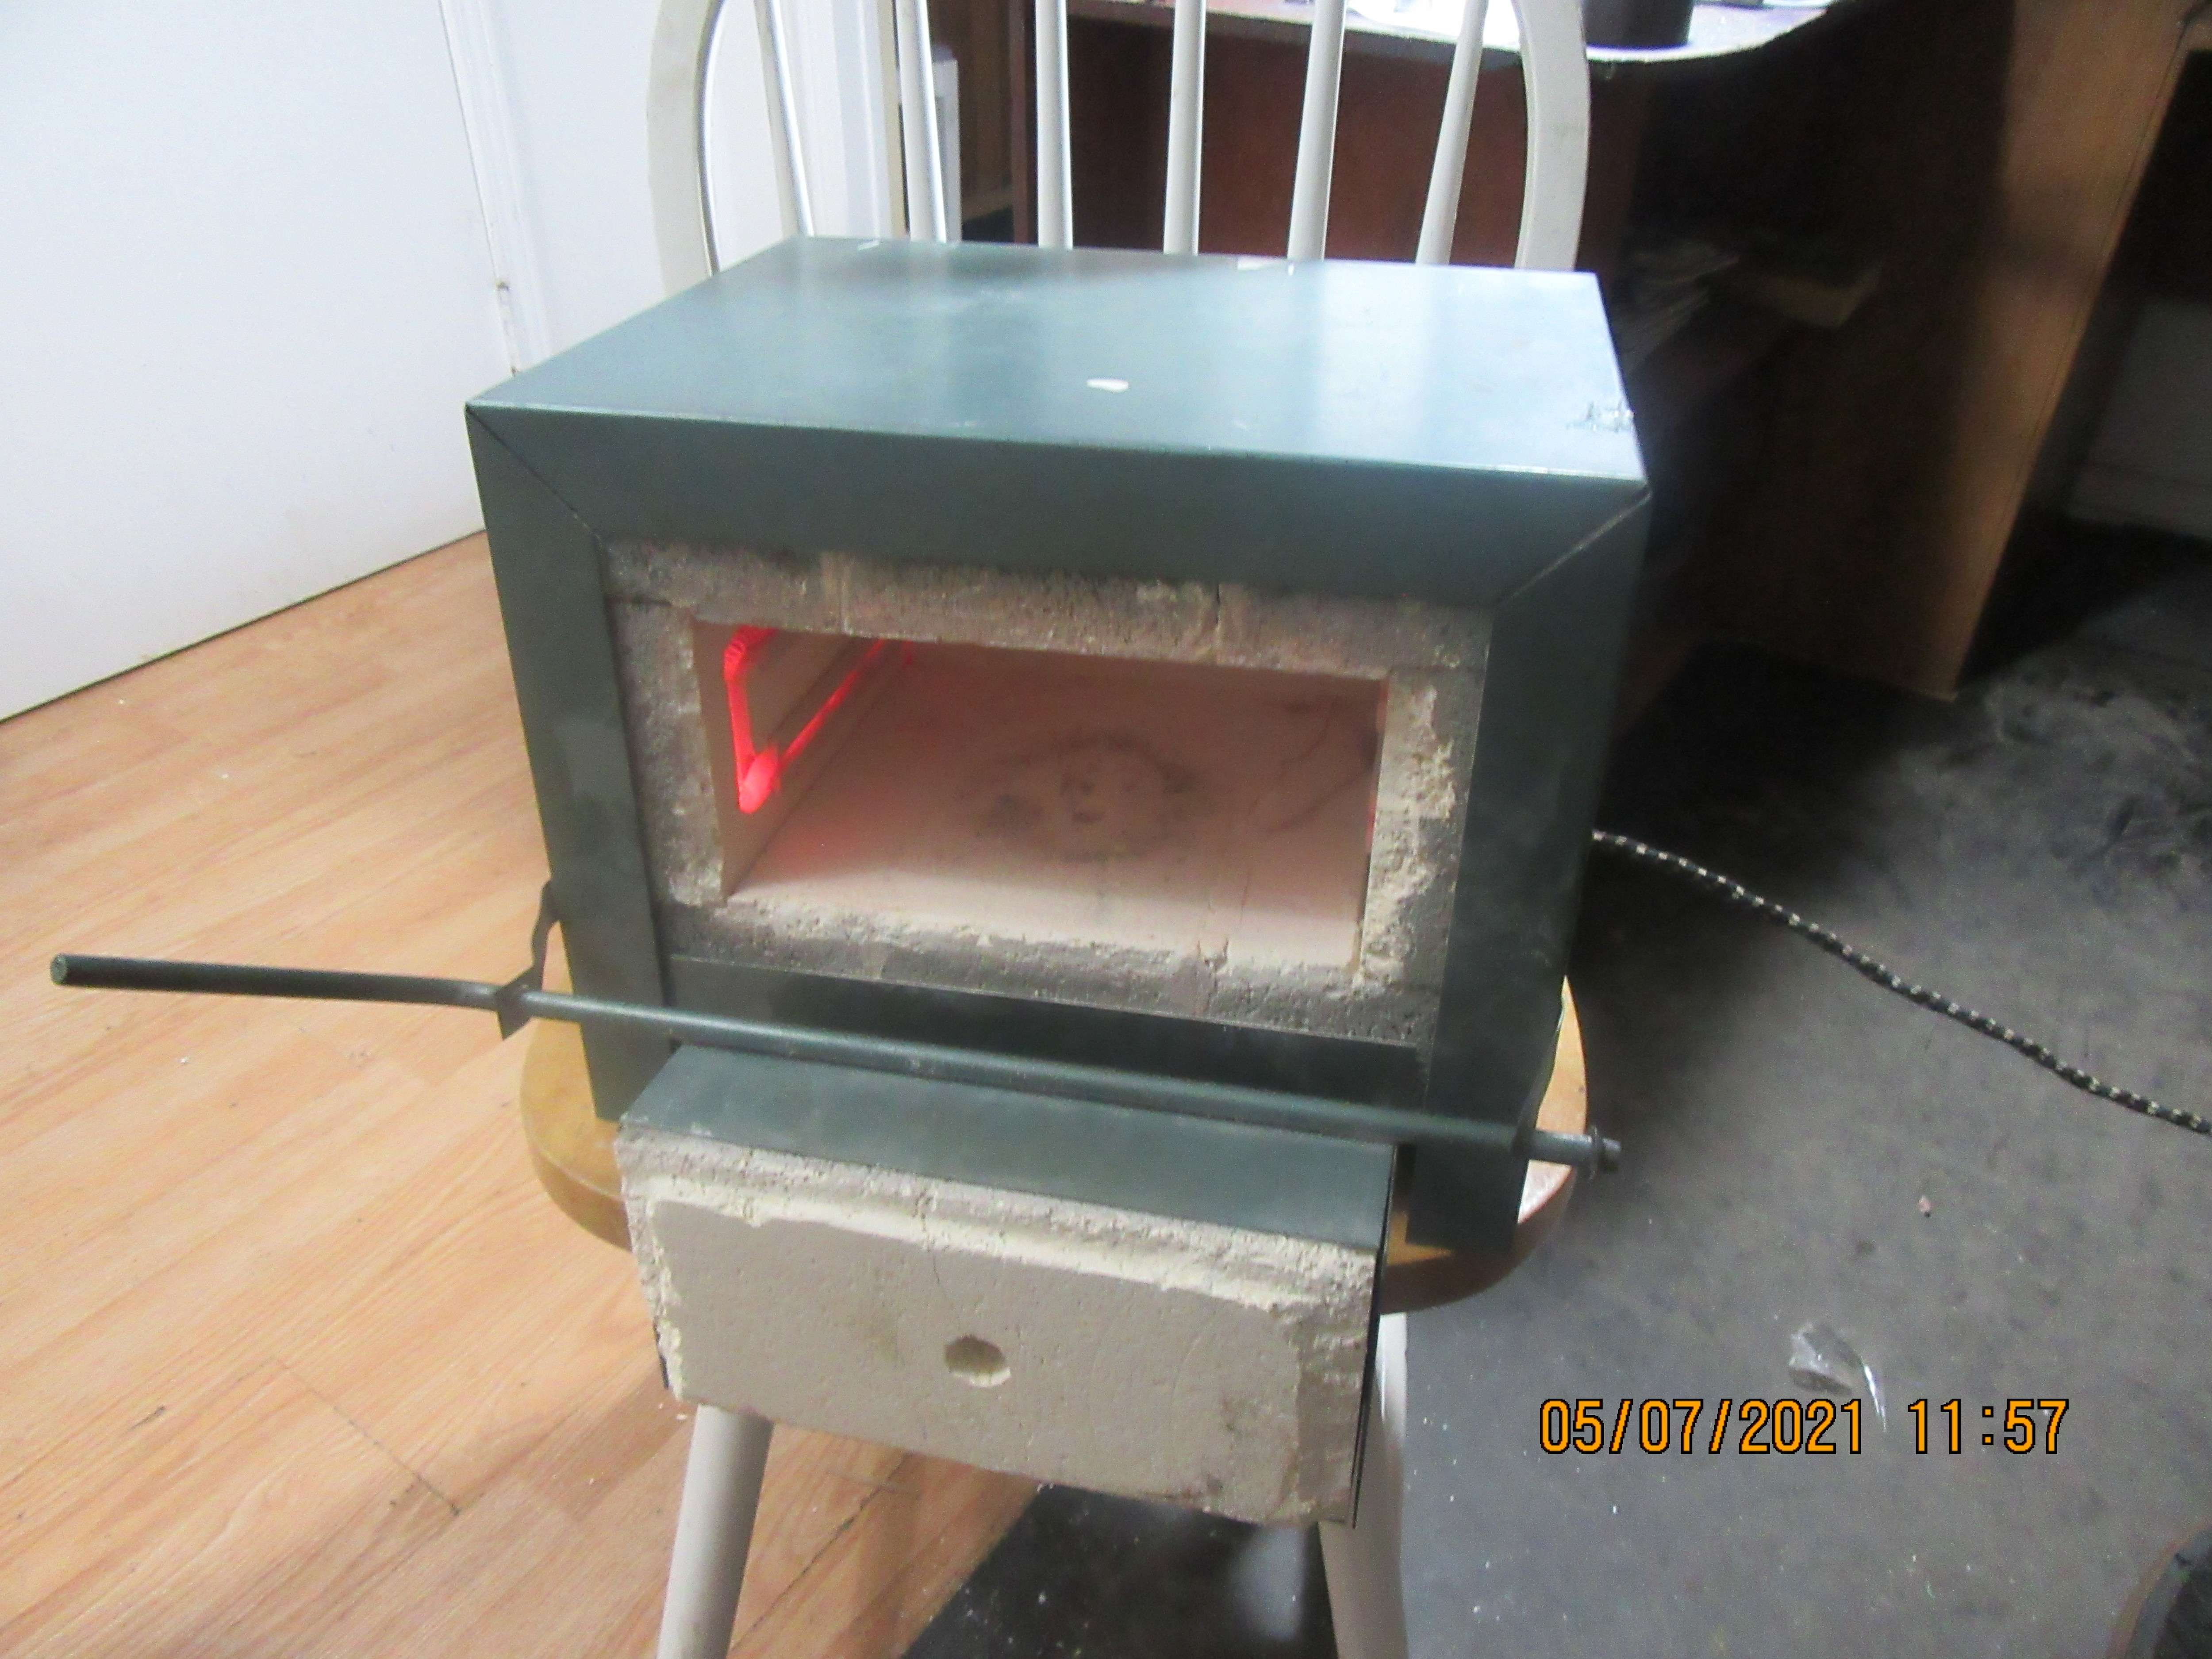
 
One more thing, Brian - You should place some type of baffle between the exposed heating elements and the steel you want to harden. The temperature of the element is much higher than the optimal austenitizing (heating) temperature of most steels, and will tend to create "hot spots" on the sides of your tool that is exposed to the element. This will result in grain growth and carbon loss, both unwanted. This can be something as simple as half a fire brick, or even a sacrificial sheet of steel. Well worth the added effort/cost.
 
Thank you Hennie L--I did get two sheets of info with my controller, but after reading it, I don't have the faintest idea what it said. A lot of gobblydegook. Once everything is hooked up and in place, I may have to reach out to you for a a bit for help to get it set up.--Brian
 
Two reasons for a separate tempering oven. In the first place you want to do the tempering immediately after the quencing, and your big oven will take a while - up to 30 minutes - to cool down to tempering temperature. In the second place at least my wife was not happy with the prospect to let 'my stinky oily part' simmer for an hour in her kitchen oven. A small oven capable of heating up to 200 - 220 degrees Celsius or 400 - 430 degrees Fahrenheit and with a timer up to one hour will probably set you back no more than $ 20 to $ 30.
A word of caution on the self-learning of some controllers: at one time mine teached itself to go full-out to reach the maximum temperature the oven can handle. And still went full-out when I wanted a lower temperature causing a strong overshoot in temperature.
 
Thank you Hennie L--I did get two sheets of info with my controller, but after reading it, I don't have the faintest idea what it said. A lot of gobblydegook. Once everything is hooked up and in place, I may have to reach out to you for a a bit for help to get it set up.--Brian
My pleasure, Brian - just shout if you need help.

A word of caution on the self-learning of some controllers: at one time mine teached itself to go full-out to reach the maximum temperature the oven can handle. And still went full-out when I wanted a lower temperature causing a strong overshoot in temperature.
Yup, that happens if the programmed parameters are incorrect. Best to record all the parameters (and there are a lot of them...) pre-programmed before making any adjustments to the program - these units are not called "Proportional, Integral, and Derivative" devices for nothing - they like Calculus o_O
 
I hope the controller you bought has an auto tune feature built in. I have used those for controlling the temp of a heat staking tool. Makes initial setup painless. Turn on the auto tune and let the thing go through its motions. Essentially it is smart enough to heat up watch the response and and set the PID gains for fast response with minimal overshoot.
 
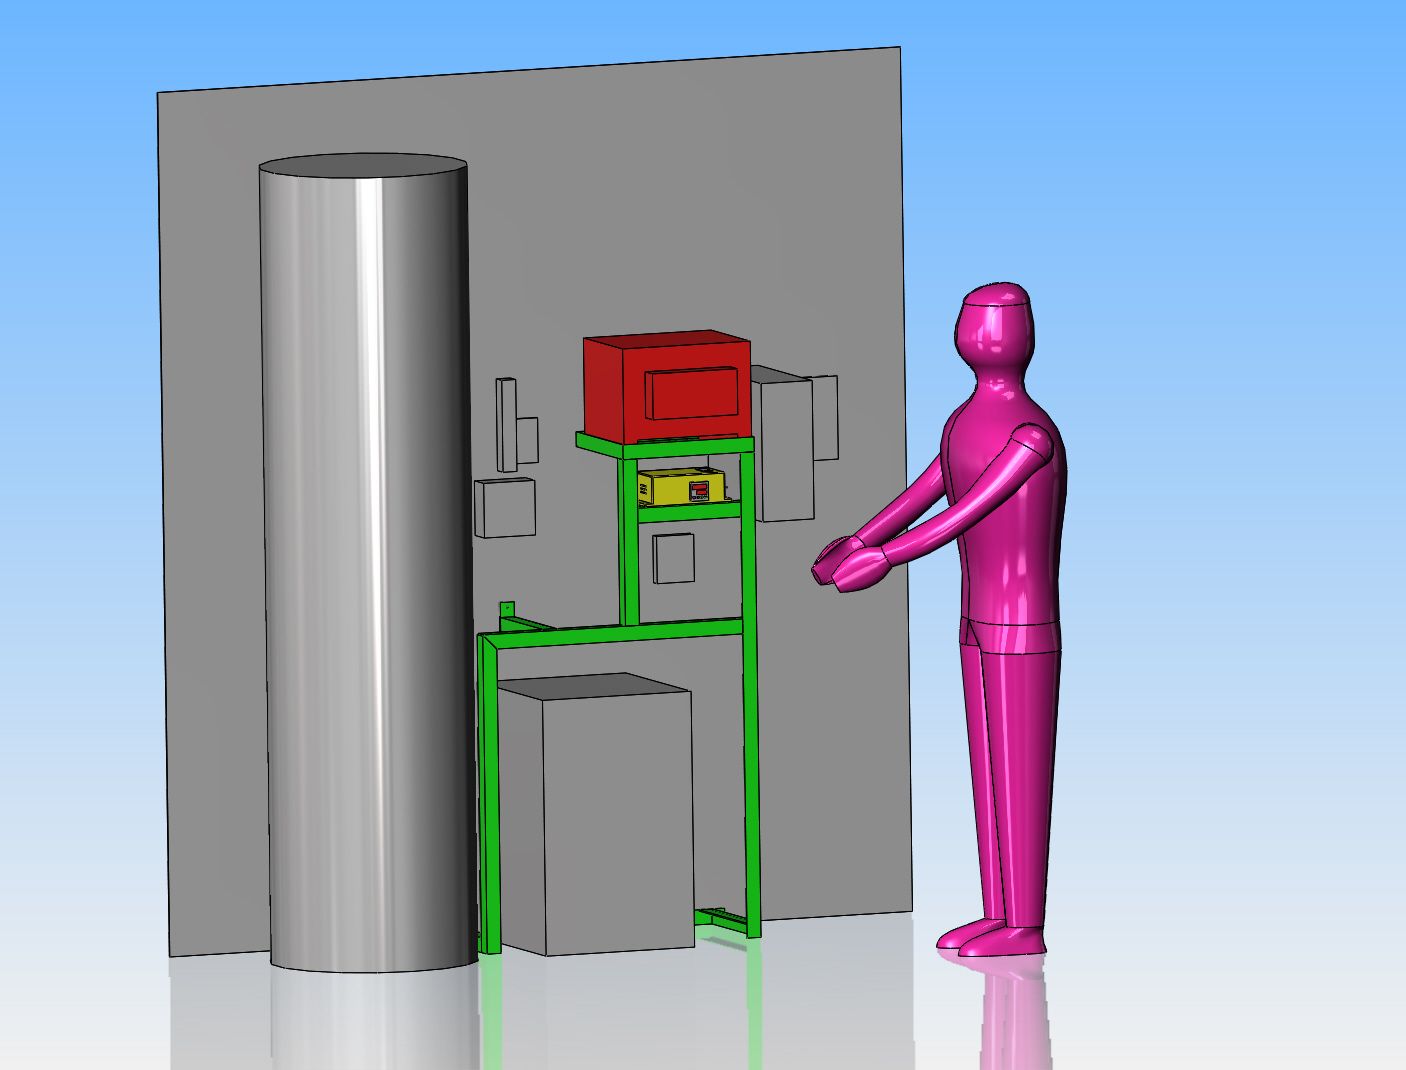
I moved things around a little and located the controller below the oven. That should keep oven heat away from the controller better. If I had to, I can put some insulation in the gap between the oven and the controller.
CXvBkR.jpg
 
I've had as much fun as I can stand for one day. Probably about half done on the support frame for the oven. It's been a while since I done much welding, but I do love this mig.
b4T30z.jpg
 
interesting thread. I have just bought a Prometheus Mini Kiln Pro-1 which has a digital controller. I thought it was time to make my toolmaking a bit more precise. I have had an initial play and have had variable results thus far using silver steel (drill rod) and gauge plate (01 tool steel) the former water hardening the latter quenched in oil.

Very happy with the kiln/muffle furnace/ oven which does a great job. It is not much use for tempering as it takes ages to cool to the correct temperature, using the domestic oven pro tem.

I have tried a variety of technique raging from heating the oven to the correct temperature then placing the sample on a stainless rack and waiting for the temperature to recover and then quench. Heating the sample slowly and soaking for 1 hour per inch and something in between.

Smaller diameters up to about 3/8” have all been good and are glass hard after quenching. Above this things are not so simple, the outer part remains soft with the centre hard soft all the way through. Tried a few things including raising the temperature to 800 deg C for silver steel which according to the data sheet is at the upper end. I made a D bit 1/2” dia and this proved a challenge. 35861F48-377C-4BCA-B435-275B64A704F1.jpeg

Gauge plate seems more consistent but I have not tried any large sections as I mostly use it to make form tools for the lathe 3/8 x 3/8” or thinner and wider.

I have ordered a set of hardness test files which should remove some of the guess work. I then plan to adopt a more scientific approach.

All in all I’m not really sure why I am doing this as I really did not have a problem hardening the stuff I need with a propane torch. Occasionally I would have distortion on long thin work.

One other observation: I think I was heating well above 780 degs with my gas touch as the colour seems brighter than what I am seeing in the oven. By the way I have a high temp thermocouple and gauge which confirms the temp of the oven within a few degrees.

I may make a short video showing my experiments.
 
Increasing the hardening temperature above 800 deg C seems like a good idea. Our resident metallurgy engineer advises for small oil quenching parts a hardening temperature of 830 deg C for at least 15 minutes. After that as quick as possible transfer to the quenching bath of oil at 50 deg C. Tempering soon after that at 200 deg C for something like one hour.
 
I have tried a variety of technique raging from heating the oven to the correct temperature then placing the sample on a stainless rack and waiting for the temperature to recover and then quench. Heating the sample slowly and soaking for 1 hour per inch and something in between.
Ideally one should heat the steel in the oven from cold, but that only works if you have an industrial oven with an inert atmosphere, and/or a oven that does not have any "hot spots" as a result of exposed heating elements or direct flame. In practice, I pre-heat my oven to the correct temperature, and then insert the steel to be hardened. I then start my "soaking timer" once the temperature inside the oven has recovered - this normally takes 5-10 minutes, depending on the size of the item being hardened, and the actual hardening temperature required (stainless and high-alloy steels require temperatures in the range 1050°C to well over 1150°C for some types of HSS, and these take longer to recover...). Important is to ensure that you "soak" the steel for the required time at the hardening temperature - i.e. leave it at temperature in the oven/kiln for the required "soaking" time (this varies from steel type to type...)

I have had an initial play and have had variable results thus far using silver steel (drill rod) and gauge plate (01 tool steel) the former water hardening the latter quenched in oil.
Smaller diameters up to about 3/8” have all been good and are glass hard after quenching. Above this things are not so simple, the outer part remains soft with the center hard soft all the way through. Tried a few things including raising the temperature to 800 deg C for silver steel which according to the data sheet is at the upper end. I made a D bit 1/2” dia and this proved a challenge.
Gauge plate seems more consistent but I have not tried any large sections as I mostly use it to make form tools for the lathe 3/8 x 3/8” or thinner and wider.
Larger pieces of steel are apt to "self temper" if you just leave them in the oil, or remove them from the oil whilst still warm (50°C - 100°C) as many people recommends one to do. I disagree with this advice. What happens is that the outside of the tool cools down rapidly whilst the inside remains much warmer (above 200°C) for some time, and this results in the interior of the part tempering the exterior whilst the interior is still hardening. Rather remove your larger parts from the oil whilst still too hot to touch, and then plunge it into water to finally cool down to air temperature. There is a very slight increased risk of the part cracking, but I've only experienced one such crack during the 10+ years that I have been doing my own heat treating.

Of course, the steel type also plays a major role in how deep one can harden a thick part - look for steels that have some manganese, molybdenum and/or chromium in the alloy - this makes for deeper hardening. O1 is excellent for larger parts - I suspect your silver steel is a plain medium carbon steel without much other alloying elements, hence the reason why it won't through-harden.
 
The discussion is interesting but I doubt that Brian's kiln is capable of reaching the temperatures needed for heat treating tool steel. I think that his goal is to merely anneal cast iron rings and that is 1100 F. I have a small ceramic kiln and I doubt that is is capable of reaching the temperatures required for tool steel. I have never tried to push it to that type of temperature so I may be wrong. An industrial heat treat furnace is an entirely different animal than a ceramic kiln.
 

Latest posts

Back
Top