My zx 45 dro photos

Home Model Engine Machinist Forum

Help Support Home Model Engine Machinist Forum:

This site may earn a commission from merchant affiliate links, including eBay, Amazon, and others.

Naiveambition

Well-Known Member
Joined
May 15, 2012
Messages
369
Reaction score
95
I have installed my new dro from dro pros. Here are some photos to show what I did. The y axis was easy going , as was the y. I did need to make a small bracket to mount the reader head. Doubles as a axis stop so that helps. As for the z axis I went a little farther with the customization. I knew it would be a tall order, so a lot of thinking, planning, I came up with this. I wanted the brackets to cause the least interference when machining. The machine will hold the numbers without flashing up to a .1 cut in alum. Have. Not tried steel yet. The scale slides with the lower bracket , assisted by a slide fit brass bushing. The bushing is attached to machine, and doubles as a reader head mount. Spindle play was reduced after to less than .001 , so that was nice.

I'm really happy with it so far, amazing the amount of time it speeds things up, and my bolt holes line up. Now I can restart my project again. Amazing how I just need to make one cut and spend a month making tools and other things for a . 050 cut, but it has to be right. LolView attachment ImageUploadedByModel Engines1461957171.831403.jpgView attachment ImageUploadedByModel Engines1461957197.748923.jpgView attachment ImageUploadedByModel Engines1461957220.664967.jpgView attachment ImageUploadedByModel Engines1461957239.115014.jpgView attachment ImageUploadedByModel Engines1461957256.174693.jpg
 
Good work, just one major fault.

On the Z axis read head (the bit with the cable coming out of it), the cable needs to be coming out of the bottom rather than the top.

This is a common mistake and can cause problems at a later date.

If any condensation, oil, or any other liquids gets onto the cable, it will follow the spiral down and enter the workings of the read head, even though it should be sealed with silicone, it will still pentrate eventually.
If your instructions are any good that came with the system, they should show you how to easily reverse the cable entry point, so that it is pointing down, to eradicate the problem, rather than having to reposition all the components.
I have had to do that a few times, it takes about half an hour, but do have some silicone sealant handy to seal everything up as you modify it.

If you can't do it, then have the cable hanging downwards from it's entry point as tight as possible, then clip it into position, you will only have a few inches where it goes over the top to worry about then.

You shouldn't have too much trouble getting the cables into a lower position on the X & Y as they come out horizontally, just have the cables dropping down from the heads so nothing can spiral down them, before clipping them permanently into that position.

John
 
I had struggled with a suitable mounting position for the z axis reader head. Even though the reader is mounted fast, I still need the vertical movement of the mill head.
I read the plans thoroughly prior to install and don't remember anything about switching the cable entry. So I'm prob gonna opt for just bending it over with a mount. Though I still have the problem of the cable.the way the clips are made there is a little room for sliding, but with my angles , I thought it would pull too much on the cord to justify mounting. This way I have the least resistance. Hopfully I will come up with a mounting position, so we will wait on the "aha" moment for inspiration .I don't use coolant and don't expect much dirt, swarf etc. , but Texas humidity is something else. Condensation gets really bad some days to the point of water droplets on everything, even the floor is slick...
I have to wax my mill every couple months or rust will take over fast.
I opted for glass scales since in my info search they are a little more resistant to moisture than the other styles. It's a good point about using silicone around the cord, I will most likely do that.
 
Sorry N,

It looks like I was critising your work, but I definitely wasn't.

I was just raising a point that most people forget about when installing DRO's, they want to get it up and running as quickly as possible and cable routes get forgotten.

At the system design stage , cable routes should definitely be looked at, to give a more protected system, as one drop of liquid getting into the head can cause hundreds of bucks or pounds of damage by having to replace the whole head.

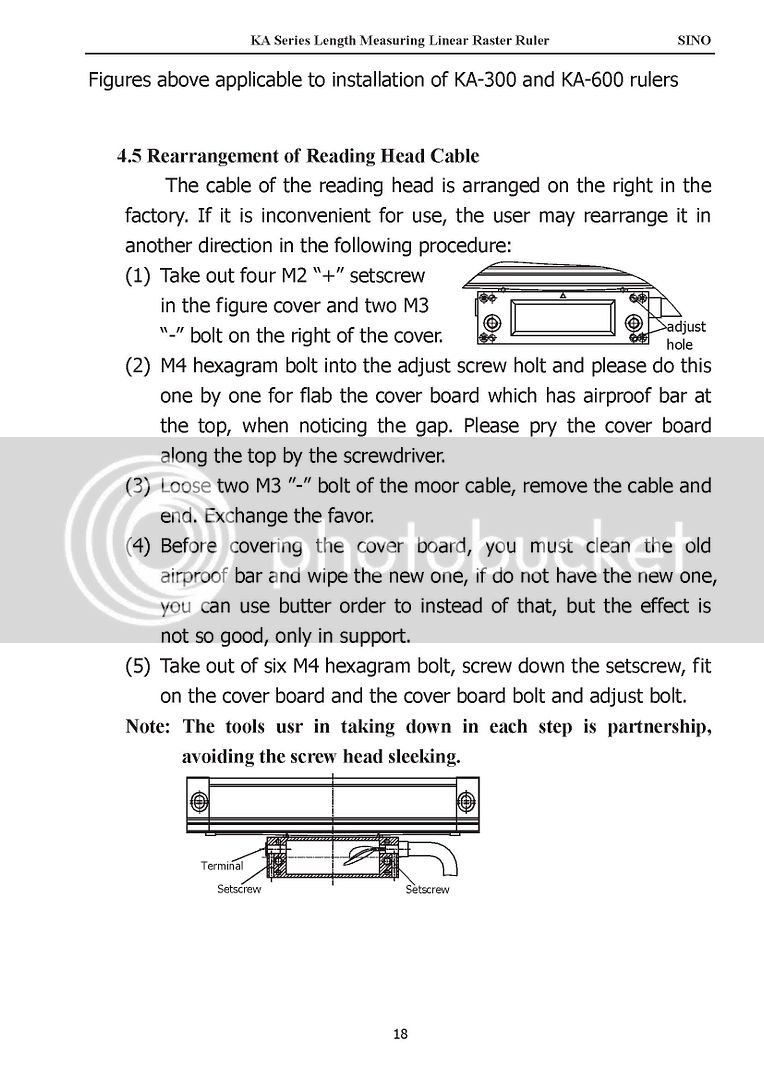
My Sino manual definitely shows you how to change the cables over to the opposite end, but looking at it, it is common sense when you actually open the unit up. But anyway, if you want to do it then here is the manual write up, in standard Chinglish.

Endchange_zpso1ml4chr.jpg


BTW, when they say 'use butter order' in the text, they mean apply a thin layer of silicone.

John
 
Last edited:

Latest posts

Back
Top