Me and slitting saws don't get along

Home Model Engine Machinist Forum

Help Support Home Model Engine Machinist Forum:

This site may earn a commission from merchant affiliate links, including eBay, Amazon, and others.

smfr

Project of the Month Winner!!!
Project of the Month Winner
Joined
Oct 29, 2011
Messages
284
Reaction score
2
It seems like every time I use a slitting saw, I mess something up.

Last night I started on the conrod of a Stuart No. 4. It's a gunmetal casting, and gunmetal is tricky to machine; it seems to squirm under the cutter, and move around in ways you don't expect.

So I set up the conrod with a couple of 1-2-3 blocks to hold it square, and went at it:
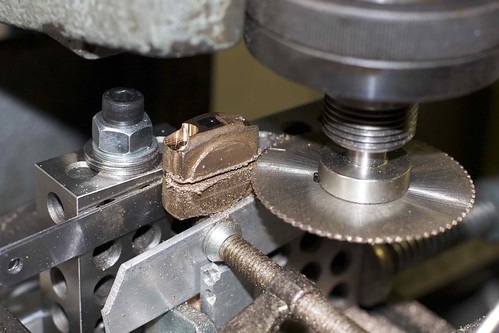


only to find that I'm about a tenth off on one side:
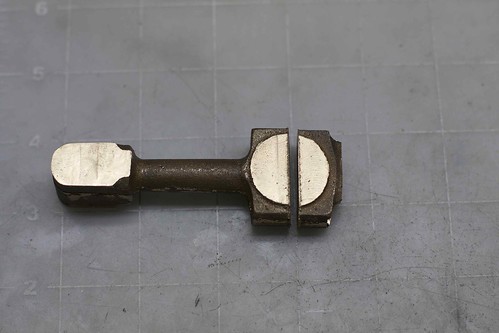


I think in this case my setup was at fault, but I wonder also if the saw was wandering. I don't really have a feel for the right depth of cut and feed rate for sawing. I'd set the cutting speed to about 150 RPM (100 SFPM x 4 / 2.5" diameter), but anything more than a 0.02" depth of cut seemed to be putting too much force on the part. (It probably doesn't help that I'd previously blunted this blade by running to too fast in steel ;D )

So what kind of depth of cut should I expect from a sharp saw blade in bronze?

[I'm thinking of remaking this conrod from steel, with a bronze bushing anyway. Seems odd to use gunmetal for this part.]

Simon
 
Simon, the cut looks to be relatively straight even if at an angle so you could be right in that the set-up lost squareness early on. AS to the depth of cut issue, that sounds like its more a matter of the saw not being sharp enough. The rpm's seem in the ballpark and I assume your feed rate was slow too. I have seen very thin ones warp a little with too much heat build-up but that would have been noticable. In bronze, I would think a .050" or even slightly deeper cut isn't unreasonable with a good sharp blade. Just my 2 cents though.

Bill
 
Gotta agree with Bill. Think about the surface area in contact with the part with a saw. If the cutter is dull, the cutting force will be very high( lots of little teeth over big area), and it'll move, especially if the clamping surface is very hard and smooth like 123 blocks and shim stock.

If you can get yourself a small piece of annealed copper roof flashing ( I used to use lead flashing, but I don't want to get yelled at for recommending it::)) between the irregular shaped part as the clamping surface, it won't squirm around as much. If you don't have copper, use construction paper. It really does give the part something to hold on to.
.....and use a sharp saw....and not too fine toothed....that'll give the chips a place to go.

Nice build Simon....I'm watching, your doing a great job! :bow:

Dave

 
I'd have to agree with Bill - you need to clamp as close to the cut as you can - the dull cutter didn't help either.

The problem is if the work moves the tinyest amount it binds the blade and the force increaces exponentially - this can be bad enough to jam or even break the blade - your blade is then "supporting" the work - preventing it from rotating - the results are self evident.

When in doubt put a dial gauge on it to keep an eye on it that it doesn't move. Give it an appropriate tap with a thumper before using the saw - if it moves, there is doubt.

I am always a little leery of slitting saws - which is curious in that I get along with them really well but when it goes wrong it usually goes badly wrong.

Ken

Edit - posted on top of Steamer - agree - smooth hard surfaces are sub-optimal for clamping.

For clamping odd shaped castings I will sometimes make up a conformal clamp using Aluminium filled hard polyurethne (I always have the stuff on hand for industrial use) it only takes a few minutes and is worth the effort - especially for multiple parts.
 
With a fine tooth, thin blade, I usually make the first cut no deeper than the depth of the gullets. On repeat passes, you have to check for for plugged gullets and clean them. Listen to the cut. If it starts to thump, it has probably picked up a plug. This can cause the blade to wander or distort. Aluminum is the worst, cast iron the best.

Jerry
 
Simon-

I would think the C-Clamp is what really hurt you. I would think that it acted like a pivot. I made little clamps for my 123 blocks; however, they might not have been ideal for your situation. For your situation, I would have made a couple of straps with vees in them that straddled the connecting rod and bolted them to the 123 block.

-Bob

DSCN0332.JPG
 
Simon,
You have several issues that have caused your problem. They both have to do with the setup. The first one is whenever you clamp a smooth surface (con rod) to a smooth surface, steel parallel against the 123 block the part is going to move. To alleviate that put a piece of paper between them. This will add friction and help prevent the part from shifting. The next problem is the way you have it clamped. The c-clamp is clamping the rod which is below the flat face of the rod which if enough force is applied it will bend the rod and keep the flat face from sitting flat against the parallel. Also with rod part being round you don't have a good clamping surface.
Sometimes it's more expedient to use a hand hacksaw to cut something apart. As much as it's 'easier' to use the slitting saw sometimes it's not always the best way.
Looking at your rod it looks like the beam section is round and parallel, not tapered. If I were to do this job I would file the flash line off of the beam and then make up a couple of small brass v-blocks, I have many sizes made, and clamp is between 2 little v-blocks with the journal area sticking out. With the rod being so short and stout it won't flex when you're making the cut with the slitting saw.
The next thing is always conventional cut with a slitting saw (general rule) This will prevent the saw from trying to pull the part into the saw (backlash in leadscrew).
gbritnell
 
Simon,

It is interesting seeing and learning how others tackle similar machining operations. From the limited experience I’ve had machining and cutting a number of gunmetal parts on my Stuart triple, I’d have personally cut those conrods in half with a hacksaw. That is how I opted to cut the gunmetal eccentric straps which are equally difficult to hold as your conrods. I had all 6 eccentric straps cut cleanly and accurately in less than 5 minutes, and if I sensed the part moved in the clamp, I could stop or adjust long before I risked making a pretzel.

What I have learned of gunmetal to date is that even un-machined gunmetal surfaces are quite slippery, and machined gunmetal is very slick. It is difficult to clamp securely without crushing or bending it. And with anything but the sharpest of cutters, it is hard to predict when a cutter is going to start ploughing and pushing the gunmetal around like it hit some sticky chewing gum rather than cutting it cleanly. And machining inadequately supported gunmetal is a recipe for making an instant pretzel. Combine all those attributes, and cutting a difficult to clamp part like a conrod with a slitting saw seems like trouble to me personally. I’ve found out from a minor mishap with one gunmetal part that it is pretty easy to bend back into shape with no ill after effects.

The author of the ME articles that shows a nice build of Stuart triple, to which I have read several times to gain insight in how others tackled some of the tricky parts, used a slitting saw on a lathe with what appeared to be a very precarious setup to cut the eccentrics – he even admitted to it being a little dubious.

It is good to see that you prevailed, even if it was with an unplanned angled cut. Looks like you have plenty of material still to work with.

I have been watching your latest build with great interest. You’re making some great progress and achieving very nice results.

Robin
 
Thanks all, lots of useful hints there. I think this was one of those "it's getting late and I just want to get this done" screwups.

Now I have to decide whether to continue with this part as-is, try to get it to the right dimensions it by silver-soldering some extra material on, or start a new part from steel. Of course I'm kicking myself for spot-facing the bolt holes so deep that I don't have enough material on the end part.
 
Simon,
You don't want to make it out of steel. Part of the reason it's bronze is so that it hold up better against the steel crankshaft. If you make the rod from steel you should then put a bronze bushing in it. The problem with that is the bushing will have to be split and that opens up another whole can of worms.
gbritnell
 
+ 1 for George's comments....a piece of bearing bronze or brass would do as well

You could plug the co-bores with silver soldered plugs and get the "do over"......

Dave

 
Hi Marv,
I used one of these saw blades for the last four or fife Years.
But it finely gave up on me. Now I need a new one, the old one was i belief $7.00 or $8.00.
The " First Storm " I have not seen in the stores lately. Now I have to go for the one by Home Depot.
Different Brand also, but same size , 3 1/2" diameter , hole 15 mm. cut is 1.5 mm.
Big problem, $18.00. now!!!.
Hilmar
 
Hi Simon,

Bummer with your conrod. :mad:

Many full size bearings have a series of shims between the 2 halves which allow the thing to be adjusted for wear.

May I suggest you square off the 2 faces and then put 2 bronze spacers in to bring it back to size add a couple of dowels to stop the spacers twisting. Finally bolt the lot together and bore/face to size.

Hope this helps.

Best Regards
Bob
 
Simon,
If you are considering silver solder, why not just silver solder the two halves back together and continue as if nothing happend.

Rather than trying to "build up" the part.

Ken
 
Ken, that's a nice idea. I'm wondering if the solder lines would show up on the finished part. If they do, I could try to make them "decorative", and have them match on either side of the split blocks, which would mean milling down the top part, and soldering an equal thickness of bronze onto both parts before bolting together and continuing.

I'm also a bit concerned that my bolt holes (which I drilled before sawing) aren't in line with the axis of the part. The more I think about that setup, the worse it seems!

George, if I were to make a steel conrod, I'd certainly do a split bronze bushing on the crank end, but it sounds like you think this would be tricky? I've seen a few examples on the site which have turned out well.

Simon
 
Simon, I doubt anyone would see the silver soldered joint so long as both halves are skimmed flat so you aren’t trying to fill a rough gap. When working with brass, I’ve had to silver solder plugs in blind holes, and soldered rivets and other parts together, and once finished up, the solder joint is essentially invisible, unless you know to look for it. I’ll have a hole to drill then plug in a gunmetal water pump shortly, that will be in a very visible location – I expect it will vanish too. Being the bottom end of the conrods in your case, the joint is going to be further hidden by the crankshaft journals and partly cut through when you cut the conrod in half a second time. The bigger concern if you solder the halves back together is whether you have enough remaining metal for a second cut, or do you need to solder in a shim? The choice of shim stock you use may be a little more visible, especially as parts tarnish over time. I think you can get generic pieces of gunmetal castings in the US rather cheaply, should you be looking for matching shim stock.

If you haven’t already done so, I would suggest measuring the narrow end of the cut-off piece, as you might find that you still have just enough metal remaining to make the part to spec. Don’t forget to account for the profiling too. Stuart seems to be rather chincy in places with supplying enough gunmetal to make the part. With my triple, I have had to do some tricky and careful planning to make sure I have the gunmetal where it is needed most. The eccentric straps to my triple were very tight on metal in most dimensions too, but provided a rather generous allowance for cutting them in half. I’m guessing you may be able to machine the angled cut straight to the bolt holes and still be fine.

Robin

 
I think I probably have enough material to hacksaw a sliver from one side, and solder it to the smaller side. I do need to leave some spare for trimming, since the join needs to pass through the center of the big-end bore.
 
Hi Simon,
I only stated it that way because I never know what someone's capabilities are. It's not really a hard thing to do but it takes a little practice.
gbritnell
 
I would have to think that once you have it bored out and a crankshaft sticking through it, nobody but you and us would be the wiser. ;D
 

Latest posts

Back
Top