HELP!!! Lamina for dummies??

Home Model Engine Machinist Forum

Help Support Home Model Engine Machinist Forum:

This site may earn a commission from merchant affiliate links, including eBay, Amazon, and others.
Joined
Dec 13, 2009
Messages
8
Reaction score
0
OK, here goes. I'm new to the machining hobby & have just completed my first Lamina engine. I have been trying for 4 days now to get it to run, to no avail. I have tried different amounts of regenerator material and in different locations. Still nothing. I replaced the alum piston with one made from steel, still nodda.

Dimensions are as follows: test tube 15mm x 125mm, hole leading into the test tube is .22, Cyl - alum .749 ID 1.2 long, Piston - steel .747 OD .7 long, Stroke is approx .85, flywheel is 2.7" taken from a VCR & is part alum and steel, connect rod is brass, Escentric is alum 1", flywheel & escentric are mounted to a shaft spinning on a ball bearing from same VCR as flywheel was taken from.

I did notice that an engine built by Harrie IJzendoorn had closer tolerances to the piston/cyl then I do. But maybe I should go for more. Engine does have good compression. After turning the engine by hand for sometime, it wants to push the test tube off it's location (held in place by O rings). With test tube attached, there is some resistance felt due to compression(?). With test tube removed, assembly spins quite freely.

Attached are pics of assembled engine as well as exploded view. I guess I should have phrased that as a disassembled view.

Any advice and/or help would be appreciated. Gritz

100_0534.JPG


100_0535.JPG


100_0536.JPG
 
I made one of these engines and it is a mystery to many.
Sometimes it runs quite well and fast, sometimes not so fast.
It is hard to find others that know about these
engines, and even at model shows you don't see them.
Mine ran better after I made sure there was no extra friction anywhere. My piston was made from graphite. There are ball bearings on the crank shaft and connecting rod. These small bearings have the dirt shields removed and the grease washed out for even less friction.
The position of the stainless scrub pad and the position and size of the flame makes a difference.
The diameter of the hole between the glass tube and the piston seems to make a difference too.

The best comment I read about these engines was " I'm going to build engines from now on that make some kind of engineering sense.
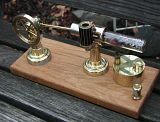
I'll try to post a photo.


IMG_0179.JPG
 
Gritz said:
OK, here goes. I'm new to the machining hobby & have just completed my first Lamina engine. I have been trying for 4 days now to get it to run, to no avail. I have tried different amounts of regenerator material and in different locations. Still nothing. I replaced the alum piston with one made from steel, still nodda.

Dimensions are as follows: test tube 15mm x 125mm, hole leading into the test tube is .22, Cyl - alum .749 ID 1.2 long, Piston - steel .747 OD .7 long, Stroke is approx .85, flywheel is 2.7" taken from a VCR & is part alum and steel, connect rod is brass, Escentric is alum 1", flywheel & escentric are mounted to a shaft spinning on a ball bearing from same VCR as flywheel was taken from.

I did notice that an engine built by Harrie IJzendoorn had closer tolerances to the piston/cyl then I do. But maybe I should go for more. Engine does have good compression. After turning the engine by hand for sometime, it wants to push the test tube off it's location (held in place by O rings). With test tube attached, there is some resistance felt due to compression(?). With test tube removed, assembly spins quite freely.

Attached are pics of assembled engine as well as exploded view. I guess I should have phrased that as a disassembled view.

Any advice and/or help would be appreciated. Gritz
so instead of a aluminium cylinder you can use brass cylinder with steel piston apply some lubricant oil to reduce the friction between cylinder and piston......then heat at the end of the regenerator stack for proper working of engine....
 
Doug, appreciate your reply. Nice looking engine. Do you know the ratio between the tube and the hole leading into it? I just ordered some bearings from fastenal.com and they should be here Monday. Plan to add one to the connecting rod. Is the compression on your engine pretty strong? I was thinking that maybe I need to enlarge the bore or reduce the piston size a little bit to allow some of the air to pass a little more freely. Not sure if this would help or not.
 
No Problem,
I'll get the dimensions for you later this weekend.
My bearings I got from the hobby shop, they had a nice selection of bearings for RC car wheels.
My engine does have a nice amount of compression. They also suggested putting a screw into the cylinder connector to releave compression after they hot end is warmered up. I also read that increasing the stroke therefor increasing compression has helped some people with better results.

 
Gritz, built one last month and was lucky and it ran without much fussing. Originally didn't have any restriction between piston and hot end. It would run but no reliable. It would run at 60 rpm and adding more heat or moving the flame would make no change in the speed. Added restriction and now it runs around 1,000 rpm. My bore was .886" and made the hole in the restriction about .200". The restriction is moved close to end of pistons forward movement thinking to reduce dead air space as much as possible.

Have Graphite piston in stainless steel cylinder. The piston passes the test, if it is placed in the vertical bore and hand placed over the cylinder top so air doesn't get in the piston won't fall and if hand is removed from the top the piston will fall freely.

When flywheel is given a flip the piston bounces back and forth freely from the compressed air.

Added a water jacket on mine to help on the cold end. Think the only thing that helps is it will run longer before stopping.


Another thought.
Make sure you are heating the end of the glass tube that is closest to the piston. Heating the far end will not work.

Doug
 
Doug & Ghart3, have been using HEET in the yellow bottle for fuel. I have tried to adjust the regenerator stack in various configurations to no avail. Not sure how "packed" the Stainless Steel stack needs to be. Have tried it packed tightly and loosely, still nothing.

Ghart3 suggested a method for testing the piston. I did this and it was pretty tight, but I think the weight of the steel piston allowed it to slip ever so slowly. Compression against my hand was good. I am going to mill some off of the piston, around where the connecting rod attaches. Hopefully the reduced weight may help.

After seeing the engines you guys have built,,,, I'm a little embarrassed at the way mine looks. Well, next time I'll have some ideas on how to dress it up a little.
 
........Your piston is too tight! You will have great compression but so does a running Lamina. I had a hell of a time with my twin on one cyl. because the one test tube on the piston side was not quite round. Change brand of test tube and it was a match then. Depending on how your piston is attached to its con rod ( mine are threaded), you can rotate the piston in the bore to find the sweet spot where it begins to run. If on the other hand it is loose fit, take a capful of rubbing achohol and dump it over the underside of the piston and try a run. The alky will temporarily fill in between the piston and bore and evaporate without a trace. This test is just an aid in trouble shooting and not the final word. If your engine responds then the piston is'nt a match to the bore. Anyway I think you are on the right track..........its the piston /bore fit! [ame=http://www.youtube.com/watch?v=SqWU6MMg4CY]http://www.youtube.com/watch?v=SqWU6MMg4CY[/ame]
 
Welcome to the wonderful world of Lamina engines. There was a long thread on this board about a year ago. Myself and one other member were building Laminas. He was working from a Jan Ridder plan and I was working on my own design. He eventually got his running but mine has gone through multiple redesigns and the best I achieved was sporadic running using a propane torch for heat.
 

Latest posts

Back
Top