Got my Bridgeport home

Home Model Engine Machinist Forum

Help Support Home Model Engine Machinist Forum:

This site may earn a commission from merchant affiliate links, including eBay, Amazon, and others.
Bernd

I am watching your work with bated breath, I am very definitely wishing you a safe move with the base. Please be careful, I'm sure you will but i for one will be worrying about you until i hear all went well. good luck for the move.

Kind Regards

Malcolm
 
Bernd,

Since you have it apart, any chance you could take a pic of the under-table oiling mechanism?

Mine has a manifold under the table, and the input tube fitting is leaking. Seems to have a 5/16-24 male thread, and the tube is 6mm.

I'm trying to find a fitting to replace it, and don't know if it's a standard type.
 
Bernd,
It should be lighter with all those chips out of it :eek:

On a more serious note, please be careful and best of luck. We'd all like this saga to have a happy ending.

Are you planning on taking it down with it standing up or laying on it's back?
 
kvom,

I've got some pics for you.

bp46.jpg

bp47.jpg


Here's the two pics I took of the oiling system
Any more questions, just ask away. I'll see if I can answer them.

Regards,
Bernd
 
ksouers said:
Bernd,
It should be lighter with all those chips out of it :eek:

On a more serious note, please be careful and best of luck. We'd all like this saga to have a happy ending.

Are you planning on taking it down with it standing up or laying on it's back?

Unbelieveable about those chips, ay? I figure I took about 2 pounds of chips out of that thing. Like I said this machine was the poster child as to why not to blow chips off of your machine. :eek:

Thanks for the concern. Read on and you'll see I'm still here to post a reply. ;D
 
This will be the last installment of getting my Bridgeport home and moving it "in pieces" into the basement.


bp38.jpg

Here comes B1P1 down the stairs. Looks like a robot, almost.

bp39.jpg

All lined up and ready to tip the base forward.

bp40.jpg

'Thar she goes'. Sure hope I got everything hooked up.

bp41.jpg

About half way down and she started to turn on me. If the skid went over the side I'd never get back on track. I did get her straightened out. I also had to take the 4" riser off or it won't have fit under that overhead beam.

bp42.jpg

She turned on me again near the bottom. It looks like the panel box is scraping the side wall but it's not.

bp43.jpg

Got here all straightened out and up on the first roller.

bp44.jpg

This is how you get something heavy over the door sill. Make sure it's higher that the sill and simply put the rollers on the other side.

bp45.jpg

And here we are finally through the door.

bp48.jpg

Now that I have all of the machine in the basement. I don't want to use the pipe rollers to move the heavy parts around, table, cross slide, knee, etc. I made a "skate" using some spare casters my brother gave me. It's just a couple of 2 X 8's with two cross members screwed on.

bp49.jpg

Add 4 casters and your done. Make sure the casters can carry the weight though.

bp50.jpg

And here's the finished product carry the table.

bp51.jpg

I made one for the knee also. Here's what you'd wind up with if you constantly wanted to move this heavy item. Not much fun.

bp52.jpg

Here's the five separate parts of the mill. To the bottom left is the knee with the "skate" under it to make moving it around much easier.


bp53.jpg

One last look at all the parts. Only thing missing is the cross slide.

Well that's it for now. I hope you guys' liked seeing how I got a Bridgeport home, disassembled it and moved it down into the basement. For those of you who don't have a tractor, an engine hoist or "A" frame with chain fall would have been able to do it also. I would have used a winch to lower the parts down the ramp. Some times it doesn't take brute force to move things. Remember this is not a tutorial on how to move a Bridgeport into the basement. It just shows how I did it. If you can glean any ideas for your own move great. But remember this forum and I are not responsible if you try something like this and get hurt, hurt someone else or damage property. If your afraid to try something like this then get professional help.

Next will be the re-assembly of the mill and a fix I need to make. I'll be posting this over in the "machine modifications" sections when I get started.

Regards,
Bernd

 
Well done that man
2.gif
............ now go crack a cold one and celebrate


Must admit you had me worried after the last line of your previous post, so I'm now going to also crack open a tin and raise a glass in appreciation of a job well done 8)

CC
 
CrewCab,

I was having a cool brew while posting the last of the move. Need to go to the store and get more. :big:

Well now you guys all know that I can move something heavy safley, right? ;D I feel sorry for the guy who's going to have to figure out how to get it out after I'm gone. :big: :big:

Bernd
 
Bern,

Good work! :bow:

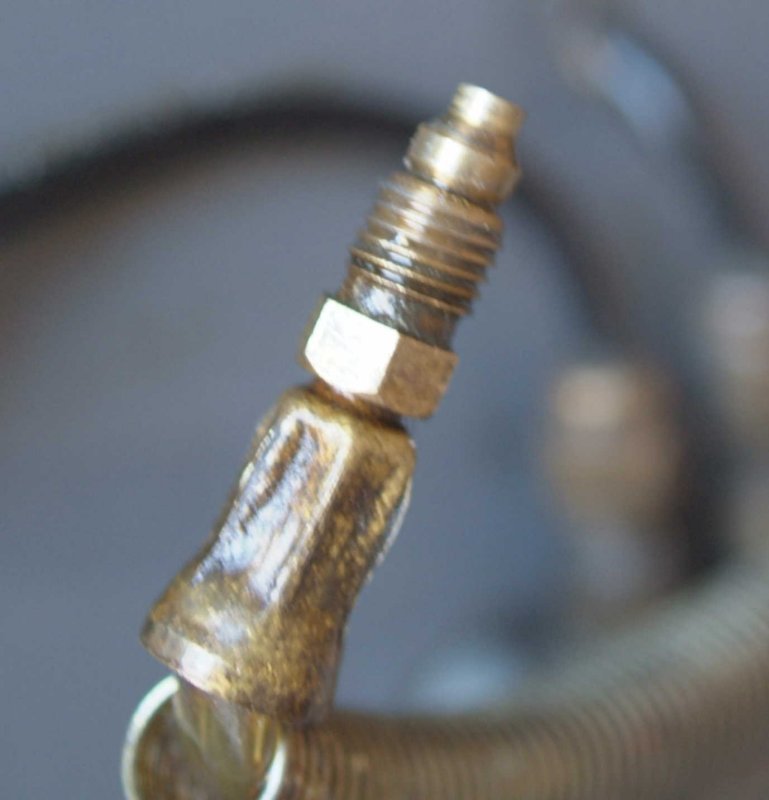
Your tube fittings look similar; here is a closup of mine.

large.jpg


Threads are 5/16-24. Could you measure yours to see if they're the same?
 
Woo Hoo! :bow:

Great job, Bernd! A most excellent outcome indeed!

Looking forward to the re-assembly and tune up!
 
You've upped the ante with that move Bernd.

I've seen a lot of heavy machinery and parts moved in my life time.
Every one of those moves involved an overhead crane or heavy moving
company coming in with small portable cranes to get the job done.

This thread shows that it CAN be done successfully and safely at home.

GREAT THREAD!

What's next?

Rick

 
kvom said:
Bern,

Good work! :bow:

Your tube fittings look similar; here is a closup of mine.


Threads are 5/16-24. Could you measure yours to see if they're the same?

Yup, they sure do. Sorry I forgot to measure the threads. Will do and get back to you.

Bernd
 
Thanks Rick. I think a majority of the small stuff like what I have can be done at home safely. I figure if the Egyptians built those pyramids I could move a machine of about 2200lbs safely. Gravity helped a lot though. :big:

What's next? Well the clean up and reassembling the machine in the basement "without" the tractor. ;D

It'll be a while before I ill get to that.

Bernd
 
Bernd, congrats on a very successful move! Ya made it look easy!! :bow: :bow:

Here's one for new horizons!
143.gif
 
kvom said:
Your tube fittings look similar; here is a closup of mine.

large.jpg


Threads are 5/16-24. Could you measure yours to see if they're the same?

I measure the same thing. 5/16 dia. and 24 threads. Seems rather odd since the block it's attached to is stamped "Made in Italy". You'd think it would be metric. If it's a pipe thread then I think European is the same as US. But we seem to agreed on 5/16-24.

Bernd
 
Excellent move Bernd...look forward to the re-build.

BTW 5/16" x 24tpi is Unified National Fine.

Best regards.

sandyC ;)
 
Thanks guys. Really appreciate the thumbs up from all of you.

Sandy, I believe 27 is the closets to pipe thread.

As I said I'll start a thread in the "Machine Modification" section when I get to put the mill back together again. I need to take care of some other stuff before I get back to the mill. I just needed to get it out of the garage so that SWMBO can park her car inside. She complains the windows are frosted over in the moring. :-\ :big:

Bernd
 
Just finished reading the whole thread in one go.
Got to admit to a bit of "pucker factor" coming down the stairs. :big:
Way to go :bow:
BR
 
Back
Top