
You are using an out of date browser. It may not display this or other websites correctly.
You should upgrade or use an alternative browser.
You should upgrade or use an alternative browser.
GEA, a 3.5'' live steam narrow gauge locomotive
- Thread starter Henk
- Start date


Help Support Home Model Engine Machinist Forum:
This site may earn a commission from merchant affiliate
links, including eBay, Amazon, and others.


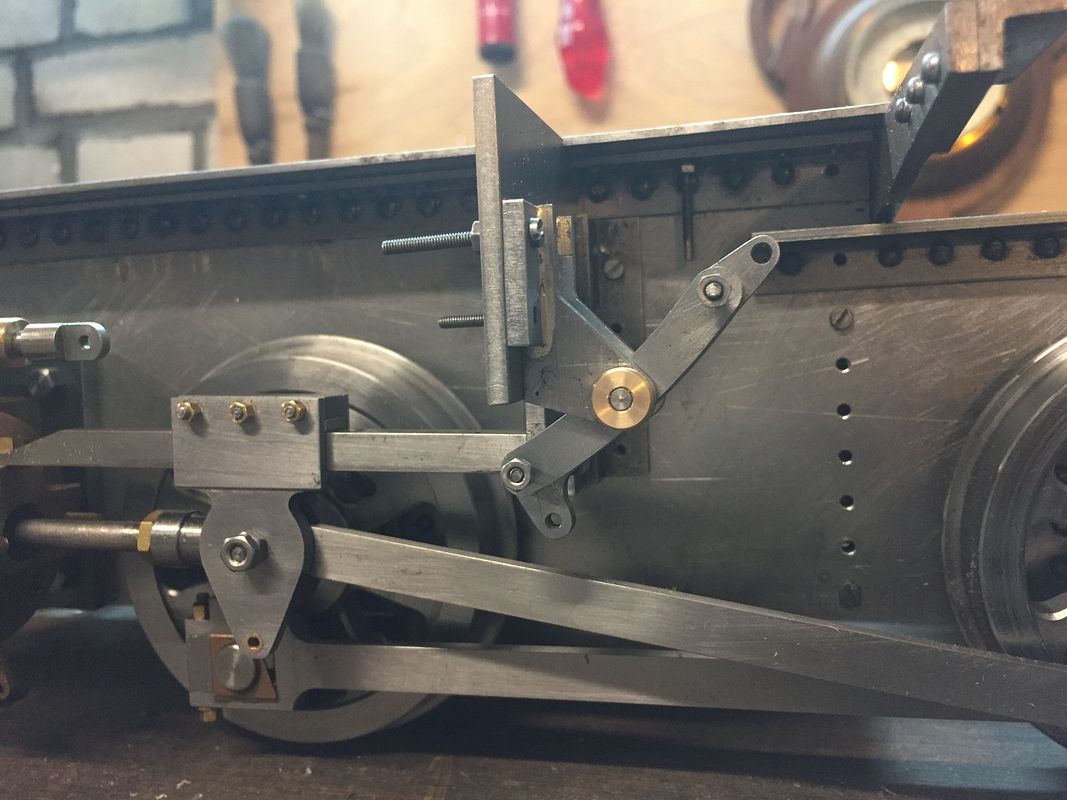
Medium fast forward: expansion link included and installed onto frame:
Btw: I am getting photobucket warnings that I am over my free bandwidth + some warning that the images will be blurred + watermarked. The good news of that is that someone might actually be looking. I can also see the watermark when I view these posts. They do not really bother me. Please do let me know if the images do not show up at all.

Btw: I am getting photobucket warnings that I am over my free bandwidth + some warning that the images will be blurred + watermarked. The good news of that is that someone might actually be looking. I can also see the watermark when I view these posts. They do not really bother me. Please do let me know if the images do not show up at all.


And then a lot of fiddling to get the motion bracket in place, and the holes tranferred to the frame. I find drilling in the frame a bit scary so i spend quite a lot of time in setting up. Innthe case that means making a large size machinist clamp and glueing a 2 mm drill into an extension:

The ancient hand held drill is ready. The wood beam should be transferring the forces to the wall. Happy to observe that the glue held.
The ancient hand held drill is ready. The wood beam should be transferring the forces to the wall. Happy to observe that the glue held.
BTW: happy to see that one can now directly paste images iso having to rely on photobucket. Is there some limit on size or number of images?
I will spare you the occasions where i had to remake stuff due to either errors on my side, or on the drawing. Most annoyingly there was an item where the actual drawing was ok, but without an actual dimension. The build instructions were ambiguous, but someone added a wrongly dimensioned drawing there. Took quite a while - and parts and time before figuring out where the error actually was.
On a related note- there are some parts where i can’t help but think that i am fabricating parts to a drawing that inherited its dimensions from a piece of scrap that happened to be in the designer’s bin. I suppose i am neither the first nor last one to notice that. But this being a freelance model anyway - i bother less with the nonfunctional shape of a part.


$45.99
Sunnytech Mini Hot Air Stirling Engine Motor Model Educational Toy Kits Electricity HA001
stirlingtechonline

$39.58
$49.99
Becker CAD 12 3D - professional CAD software for 2D + 3D design and modelling - for 3 PCs - 100% compatible with AutoCAD
momox Shop


$29.95
Competition Engine Building: Advanced Engine Design and Assembly Techniques (Pro Series)
Amazon.com Services LLC

$39.99
$49.99
Sunnytech Low Temperature Stirling Engine Motor Steam Heat Education Model Toy Kit For mechanical skills (LT001)
stirlingtechonline


$89.99
Outdoor Wood Boiler Water Treatment Rust Inhibitor- AmTech 300 & Test Kit
Alternative Heating & Supplies


$519.19
$699.00
FoxAlien Masuter Pro CNC Router Machine, Upgraded 3-Axis Engraving All-Metal Milling Machine for Wood Acrylic MDF Nylon Carving Cutting
FoxAlien Official

$25.34
$34.99
Bowl Sander Tool Kit w/Dual Bearing Head & Hardwood Handle | 42PC Wood Sander Set | 2" Hook & Loop Sanding Disc Sandpaper Assortment | 1/4" Mandrel Bowl Sander for Woodturning | Wood Lathe Tools
Peachtree Woodworking Supply Inc


$17.90
$24.95
Backyard Building: Treehouses, Sheds, Arbors, Gates, and Other Garden Projects (Countryman Know How)
Amazon.com


![DreamPlan Home Design and Landscaping Software Free for Windows [PC Download]](https://m.media-amazon.com/images/I/51kvZH2dVLL._SL500_.jpg)
$0.00
DreamPlan Home Design and Landscaping Software Free for Windows [PC Download]
Amazon.com Services LLC


$94.99
$109.99
AHS Woodmaster 4400 Maintenance Kit for Outdoor Wood Boiler Treatment
Alternative Heating & Supplies


$99.99
AHS Outdoor Wood Boiler Yearly Maintenance Kit with Water Treatment - ProTech 300 & Test Kit
Alternative Heating & Supplies


$180.50
$190.00
Genmitsu CNC 3018-PRO Router Kit GRBL Control 3 Axis Plastic Acrylic PCB PVC Wood Carving Milling Engraving Machine, XYZ Working Area 300x180x45mm
SainSmart Official
BTW: the motion bracket mounting 2 posts ago was a redo where it needed it to be shifted 3 mm due to the aforementioned instruction ambiguity. The bracket is mounted using 2 mm holes so luckily this is possible without major work.
Remounting also meant that the crosshead guide needed to be realigned. So here I mounted a straightish bar on the slide valve steamports, pressed into place by the steamchest cover. Then the crosshead guide needs to be shimmed until parallel to this bar.

And another job done.
As an aside- probably obvious, I am posting through last years’s progress. Day to day progress is not that fast
Remounting also meant that the crosshead guide needed to be realigned. So here I mounted a straightish bar on the slide valve steamports, pressed into place by the steamchest cover. Then the crosshead guide needs to be shimmed until parallel to this bar.
And another job done.
As an aside- probably obvious, I am posting through last years’s progress. Day to day progress is not that fast
After trying to assemble the complete valve gear, I found that it would foul. On multiple spots. I did two quick and dirty modifications- namely putting 2 shims of 0.5 mm beneath the steamchest and putting the union link inside out (so it is not grabbing the combination lever on both sides if you understand what i mean). Also all the pins are still just screws. Also no packing - nor packing retainer (whatever the proper word is). See below:

I tried to find whether in this case the drawings were in error, or whether I was. I could not pinpoint it. To actually find the root cause would probably require putting the drawings into a cad model. And that is learning curve I don’t want to get into now. But now ready for compressed air testing!
I tried to find whether in this case the drawings were in error, or whether I was. I could not pinpoint it. To actually find the root cause would probably require putting the drawings into a cad model. And that is learning curve I don’t want to get into now. But now ready for compressed air testing!
RReid
Member
"nor packing retainer (whatever the proper word is)."
I think the word you are looking for here is packing gland. Very nice project!
I think the word you are looking for here is packing gland. Very nice project!
Rreid- thanks. I might have known- but as I was aware of the term gland nut, I assumed the gland was an equivalent of packing.
After this milestone, i did quite an overhaul. First disassemble until bearings as these did not have oil passages yet. Also the bearings still needed the clearance to allow the axles to rock. After making some sketches I concluded that this means the bearing blocks need to be triangular shaped. I achieved this by tilting the blocks in the vice:

After refitting the amount of ‘rocking clearance’ was smaller than I had planned for, but it will have to do for now.
other items were : oil channels in the connection rods, adding the 1 mm to the steam chest, replacing ( where applicable) the screws with pins , making a crown nut for usage with a split pen, remaking the union links.
Then a bummer: the packing gland would foul the union link. Again I could not find an error in neither the drawings nor the parts. Solved it by reducing the length of nuts, packing gland and studs.
After this milestone, i did quite an overhaul. First disassemble until bearings as these did not have oil passages yet. Also the bearings still needed the clearance to allow the axles to rock. After making some sketches I concluded that this means the bearing blocks need to be triangular shaped. I achieved this by tilting the blocks in the vice:
After refitting the amount of ‘rocking clearance’ was smaller than I had planned for, but it will have to do for now.
other items were : oil channels in the connection rods, adding the 1 mm to the steam chest, replacing ( where applicable) the screws with pins , making a crown nut for usage with a split pen, remaking the union links.
Then a bummer: the packing gland would foul the union link. Again I could not find an error in neither the drawings nor the parts. Solved it by reducing the length of nuts, packing gland and studs.
As a bit of an intermezzo- but still very related to this build; I gave casting a try. I have had some delft clay for ages and did some on and off casting of tin. But it is hard to imagine casting something useful in tin. So i started reading and gathering materials. The most essential of course being a crucible.
As an exercise i built a very small furnace. After drying i told myself to gently heat it.
That proved to be too difficult : I had to go on.

So it could quite easily get to bronze melting temp (see the undefined lump in the bowl on the left). I also found it quite amazing how much moisture came out of the furnace even after drying for a few days ( also clearly visible in the image as dark stains on the floor)
As an exercise i built a very small furnace. After drying i told myself to gently heat it.
That proved to be too difficult : I had to go on.
So it could quite easily get to bronze melting temp (see the undefined lump in the bowl on the left). I also found it quite amazing how much moisture came out of the furnace even after drying for a few days ( also clearly visible in the image as dark stains on the floor)
So encouraged by molten bronze, made my first split pattern.

And after what felt was a good pour the results below:

Pattern on the left, trial in tin in the centre, bronze on the right. It looks ok, but on close inspection you can see it did not fully fill. Also the bottom plate seemed to have frozen before filling up. Still was quite satisfied with the result of this first bronze pour.
btw: this is supposed to become the boiler axle pump.
The biggest problem was actually that I my crucible was made of graphite. What I could have known, but had not realized is that at these temperatures, the graphite also just slowly burns off/ evaporates...
So this means I had to make a larger furnace supporting a clay/graphic crucible. This was my intent anyway, but hoped to get a few more trials out of the small setup. Anyway: clear what to do.
And after what felt was a good pour the results below:
Pattern on the left, trial in tin in the centre, bronze on the right. It looks ok, but on close inspection you can see it did not fully fill. Also the bottom plate seemed to have frozen before filling up. Still was quite satisfied with the result of this first bronze pour.
btw: this is supposed to become the boiler axle pump.
The biggest problem was actually that I my crucible was made of graphite. What I could have known, but had not realized is that at these temperatures, the graphite also just slowly burns off/ evaporates...
So this means I had to make a larger furnace supporting a clay/graphic crucible. This was my intent anyway, but hoped to get a few more trials out of the small setup. Anyway: clear what to do.
So off to fabricate a furnace. The outside shell is an ikea waste paper bucket. The inside mold I sized to be the middle ground between the two sizes of crucibles I got from bangood. The refractory was done in two layers/ the inside rather high temp (1100 degC), and the outside 800 degC mixed with perlite. The rationale was was that it made sense and I had used too much of the high temp stuff to completely fill the mold.

(When I insert photos directly on my mobile somehow it forgets it needs to be rotated- I apologize and am open for suggestions. I hope most of you are watching on a mobile device.) You can see the inner mold in the bottom left. Best looking part is the stainless tuyere I think that in a previous life was a electric kettle that I hoarded for more than 15 years.
It took ages to dry a bit. As you can see below that after a full week of drying and firing it up- there was literally water dribbling from the lid as evidenced by the stains on the ground:

I also thought that with this amount of fire, it was better to move outside. Result was not better than with the small furnace:


So obviously I need to pour hotter as even the large part was not fully filled. Next try better:

Still I could not get the thin part to fill (on the bottom side so not visible here). So next step is to make that one really thick
(When I insert photos directly on my mobile somehow it forgets it needs to be rotated- I apologize and am open for suggestions. I hope most of you are watching on a mobile device.) You can see the inner mold in the bottom left. Best looking part is the stainless tuyere I think that in a previous life was a electric kettle that I hoarded for more than 15 years.
It took ages to dry a bit. As you can see below that after a full week of drying and firing it up- there was literally water dribbling from the lid as evidenced by the stains on the ground:
I also thought that with this amount of fire, it was better to move outside. Result was not better than with the small furnace:
So obviously I need to pour hotter as even the large part was not fully filled. Next try better:
Still I could not get the thin part to fill (on the bottom side so not visible here). So next step is to make that one really thick
skyline1
Well-Known Member
- Joined
- Aug 6, 2012
- Messages
- 446
- Reaction score
- 153
Hi Henk
I don't think that your furnace is the problem, it is more likely that you have insufficient "head" of metal to fill the mould completely before the metal "freezes".
There are a couple of ways to get around this.
1. Use a sprue extension, when you ram up the cope "the top moulding box" before you remove the sprue stick embed a piece of metal tube slightly into the sand around the sprue stick (empty drink cans are ideal), then fill and ram the tube with sand and make a pouring cup at the top.
2. Provide a " riser" a smaller sprue opposite the pouring sprue to allow escape of gasses and hold a little more molten metal.
3, Nice big ingates so as not to impede the flow and even use two or more in a ring.
And as you have already done "superheat" your metal a little above melting point before pouring.
I had similar problems to this myself when casting (many years ago) and these techniques worked well for me.
Best Regards Mark
Last edited:
Mark,
thank you for your kind , helpful remarks. Unforunately the steps I am describing ate beginning of december. So that is why in the next steps I seem to ignore your remark as I was not aware if them. But I really do appreciate your effort and intent to help!
I think that in the end after watching lot of myfordboy/ luckygen / windyhill / swbdeep / paul’s garage I used all your remarks.
i do agree that for bronze the furnace is good enough. I just have to wait some time after the bronze is molten to really get up to temp. I did get a thermocouple but using it also takes time in which the metal cools so I stopped using it actually.
So I added a video on the furnace in action. It looks a bit violent.
https://youtube.com/shorts/vTAPdIYg1nE?feature=shareUnfortunately, as I operate alone I can’t take videos when actually casting. But when cooling down I can:
You can see two filled molds, one delft clay ( kind of petrobond I think, reddish and burning) one with bentonite ( cat litter) based. And a leftover bowl. Casting wise it was succesfull.

The smooth looking one was the delft clay.
However when I then started machining I found that I made an error in the pattern. Bummer. The long rectangular part was 5 mm short on each side.
So then had to add to the pattern (also making the lettering more blurred).

Two succesfull ( on the right side I simply ran out of material) with added pouring basin, and riser, and generous entrance into the mold. I also added a lid to the crucible to prevent charcoal into the melt. Still a bit too much in there. You may also notice there is no really smooth one as I ran out of unburnt delft clay.
So after quite a lot of effort and a total expense of a bit over 200 eur, I managed somewhat. I am not short of money, but it did illustrate to me why castings are expensive. Included in that number is also some material for practice ( the small furnace and crucible) and some leftover refractory. But I now have gained some practical knowledge and have built some essential infrastructure.
There is a visual shrink tear- let’s see whether that’s an issue. There is also considerable shrinkage so if there needs to be a next time I would include a riser on the thick central part. But unless during machining I find the need to redo- I’m ok with what I have now.
thank you for your kind , helpful remarks. Unforunately the steps I am describing ate beginning of december. So that is why in the next steps I seem to ignore your remark as I was not aware if them. But I really do appreciate your effort and intent to help!
I think that in the end after watching lot of myfordboy/ luckygen / windyhill / swbdeep / paul’s garage I used all your remarks.
i do agree that for bronze the furnace is good enough. I just have to wait some time after the bronze is molten to really get up to temp. I did get a thermocouple but using it also takes time in which the metal cools so I stopped using it actually.
So I added a video on the furnace in action. It looks a bit violent.
https://youtube.com/shorts/vTAPdIYg1nE?feature=shareUnfortunately, as I operate alone I can’t take videos when actually casting. But when cooling down I can:
You can see two filled molds, one delft clay ( kind of petrobond I think, reddish and burning) one with bentonite ( cat litter) based. And a leftover bowl. Casting wise it was succesfull.
The smooth looking one was the delft clay.
However when I then started machining I found that I made an error in the pattern. Bummer. The long rectangular part was 5 mm short on each side.
So then had to add to the pattern (also making the lettering more blurred).
Two succesfull ( on the right side I simply ran out of material) with added pouring basin, and riser, and generous entrance into the mold. I also added a lid to the crucible to prevent charcoal into the melt. Still a bit too much in there. You may also notice there is no really smooth one as I ran out of unburnt delft clay.
So after quite a lot of effort and a total expense of a bit over 200 eur, I managed somewhat. I am not short of money, but it did illustrate to me why castings are expensive. Included in that number is also some material for practice ( the small furnace and crucible) and some leftover refractory. But I now have gained some practical knowledge and have built some essential infrastructure.
There is a visual shrink tear- let’s see whether that’s an issue. There is also considerable shrinkage so if there needs to be a next time I would include a riser on the thick central part. But unless during machining I find the need to redo- I’m ok with what I have now.
Richard Hed
Well-Known Member
- Joined
- Nov 23, 2018
- Messages
- 2,759
- Reaction score
- 737
Whatever you have, there should be a rotate button.; If you have a computer, you can download "GIMP" for free and use it tor rotate and crop. Love ur stuff.So off to fabricate a furnace. The outside shell is an ikea waste paper bucket. The inside mold I sized to be the middle ground between the two sizes of crucibles I got from bangood. The refractory was done in two layers/ the inside rather high temp (1100 degC), and the outside 800 degC mixed with perlite. The rationale was was that it made sense and I had used too much of the high temp stuff to completely fill the mold. View attachment 124531
(When I insert photos directly on my mobile somehow it forgets it needs to be rotated- I apologize and am open for suggestions. I hope most of you are watching on a mobile device.) You can see the inner mold in the bottom left. Best looking part is the stainless tuyere I think that in a previous life was a electric kettle that I hoarded for more than 15 years.
It took ages to dry a bit. As you can see below that after a full week of drying and firing it up- there was literally water dribbling from the lid as evidenced by the stains on the ground:View attachment 124532
I also thought that with this amount of fire, it was better to move outside. Result was not better than with the small furnace: View attachment 124533View attachment 124534
So obviously I need to pour hotter as even the large part was not fully filled. Next try better: View attachment 124535
Still I could not get the thin part to fill (on the bottom side so not visible here). So next step is to make that one really thick
Thanks Richard,
I think the problem with the images is that when taking a landscape photo, my mobile just adds to the image metadata : ‘the camera was vertical when the image was taken’ but the actual image is still saved in landscape. And also editing does not help. However: copy, the slightly change cropping apparently does.
Anyway, enough non engineering content.
I was not yet ready to actually use the casting and did a side step to the reversing lever. I can’t get enough of the satisfying sound when it snaps in the center position:
https://youtube.com/shorts/gkWb_-3JY-4?feature=shareI was also quite happy with the spring and the way it is retained with just a 0.5 mm ridge in beneath the hexagon heads.
The large (rusty) vertical plate is probably not part of the final module. The drawing says to mount on the water tank, but I haven’t figured out how nor whether I will actually do so.
I did do a internet image survey whether the latch part should face the driver or not and found examples of both. I think this way around feels more natural to me.
The buffers was an interesting choice- the easy and fast route was to just adhere to the drawings. Problem there was that I can’t believe these would actually work in real life. The buffers extend way too much compared to the hook. It seems that the buffers were placed close together to accommodate tight curves. But if so, the chain between the hooks would foul. The drawings do show some alternatives, but that would require more thinking on my part. And as in miniature practice, the hooks will never be used anyway, I just went along.

The buffer beam was milled from solid using manual numerical control for the rounded edges.
Hook before manual filing

And final assembly:

So there will be lots of parts on this loco that I might redo. And I probably won’t.
On this one a big visual improvement would already to move the buffers out in this same buffer beam only exposing one tapped hole on each side.
The buffer beam was milled from solid using manual numerical control for the rounded edges.
Hook before manual filing
And final assembly:
So there will be lots of parts on this loco that I might redo. And I probably won’t.
On this one a big visual improvement would already to move the buffers out in this same buffer beam only exposing one tapped hole on each side.
Similar threads
- Replies
- 11
- Views
- 1K