Drill / mill dead centre on a horizontal bar?

Home Model Engine Machinist Forum

Help Support Home Model Engine Machinist Forum:

This site may earn a commission from merchant affiliate links, including eBay, Amazon, and others.

MRA

Well-Known Member
Joined
Feb 13, 2012
Messages
345
Reaction score
115
Hi all

I need to mill some splines in a bar, which means hitting it dead centre - slot drill coming down vertically, bar horizontal underneath. I have a cheap digi-vernier set up as a DRO, so I suppose I can use the Rizla method, work out where both sizes of the bar are with a plain mandrel of known diameter in the collet, and take things from there. But sometimes one needs to drill through a bar on a diameter (not an arbitrary chord!) with no DRO available. Is there a neat way of setting it up so one's centre pop is on the vertical?

(I've been wondering about trying to clamp a scrap feeler between the job and the tool and seeing how it tilts, rather like one can try for testing lathe tool centre height).
Thanks
Mark
 
MRA,

I've done it like you say, with a 6-inch scale.

I got rid of my cheap ($20.00) DRO as it was not precise and repeatable, so I would be nervous of a cheap vernier used like one (at least on a small bar).

I am used to using a wiggler, so that is my most-often-used method of finding a center.

In your situation, with the part blued, I would sneak up on the cut until it just barely marks, then measure some more before becoming committed to deeper cuts.

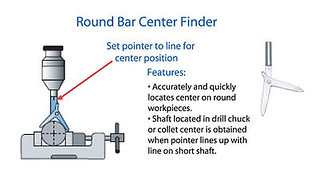
I also have one of those moving-pointer center-finders, but I don't use it for extremely detailed work like you are planning.

https://littlemachineshop.com/products/product_view.php?ProductID=2747&category=

I apologise if this is off-target. Good Luck.

--ShopShoe
 
ShopShoe said:
In your situation, with the part blued, I would sneak up on the cut until it just barely marks ...

I use this method when I cannot us an edge finder (the Starrett one is good), but if I do not want to risk marking the job I use a feeler gauge with the spindle stopped. It is as easy to set the dial at -.010 as it is to set it at zero.
 
Mark
I assume that the Ritzla method is the classic cigarette paper stuck with spit? It has been known in my workshop too.

The other 'el cheapie' to a round bar in the collet is the-----wait for it-- the half bar. That is a sort of D Bit that is finished off to 'exactly' half the diameter.

The other one--- and I have a library of other things like mikes down to a tenth and Jo blocks and the ubiquitous tide tables for HongKong Harbor is nothing more elaborate to balancing a bit of gauge plate between the bar and a pointy bit in the collet and guessing where the horizon is or getting really excited and putting a little spirit level on one end.
A copy of of the old hymn tune 'I'm forever blowing bubbles' is naturally obligatory.

If you really want to go into real engineering, I CAN do a magic act of the Euclidian act used for differential indexing.
Most of it is contained in the Gospel of George H Thomas, the Devine which comes in Model Engineers Workshop Manual and the rest in his Workshop Techniques.

Have fun

Norm

Since the above, I got an e-mail from Yahoo Groups- Quorn owners about alignment difficulties on a Unimat milling attachment. Yes, I've got a Unimat-well, a clone and a Quorn.

Worth following the postings. Not me- got an urge to clean up and use the Quorn-- which clears throat; can fit on a mill drill as grinder.

One of my really ancient mates( he's 91) is doing the same sort of lark with his Stent grinder which has- ironically, has a Quorn spindle which he tried on his Myford ML7-B with Super7 tendencies.

All go- you know!

N
 
Last edited:
I'll add a few other tricks:

Firstly for accuracy edge finding is the best - however don't trust the handle dials, screw wear and backlash throw them off a bit. Set up a indicator and measure the travel that way. While the indicator is out, check the part is in proper alignment with the ways, (ask me how I know...)

You can buy, (or make) one of these:

Center finder by DAVID BANER, on Flickr


Same principle as 'scale balancing' but a little easier to set up and maneuver. Accuracy is dependant on the quality of the tool.

You can chuck a piece of round rod the exact size of your table slots, then move the table back and forward until the rod slides into the slots. The spindle is now indexed to the slot center. The part, (assuming its round) can be clamped to the table using the table slot like V blocks. The part is now centered in the slots too. That's more complicated to explain than to do, and not without potential for error.
There's also this method, explained from 4:26 on:


There's likely plenty of others.

Dave.
 
Last edited:
All sorts of good suggestions here - thanks very much. I'll post some pics when I get somewhere, but meanwhile if folks have more suggestions, feel free. I made a big angle plate for a rotary table / chuck which is all sorted out (no dividing head at home), and I think I'm going to need to add a simple tailstock. Watch this space!
 
You can achieve very good accuracy with the steel rule and point method. In the diagram, the point is held the chuck and pinches the steel rule. If the rule is just 0.5 degrees off horizontal, the point is 0.008 times the radius of the bar. The diagram shows a 1" bar, so the error would be just 0.004".
In practise its very easy to spot 1/2 degree, and and 1/4 degree is pretty obvious - that gives an error of only 2 thou for a 1" bar.
X-Drilling.jpg


(I don't know why I got 2 diagrams)
 
Yes. Lyke Wot Oy Sed so I made the maths 'low key'
I use a spirit level to ascertain the horizon. I've also got a very useful little digital device called a GemRed

For a few quid, it saves a lot of my parallax problems

N
 
Hi Guys, Norman,

I've used the steel rule method for years, it also works for checking the tailstock to spindle alignment. Put a centre in each and nip the rule.

I needed to drill several 10mm rods for 2mm
04-04-2018-001.JPG
drive pins recently. Since I had a number to do, made a finger plate with a guide bush.
 
Probably my tiny criticism is using steel rather than a softer brass or whatever.
However, the same technique can be adopted to check the height of a lathe tool whilst- working in the round.

I now have some- not all, my rusted Quorn ball handles looking quite shiny. Almost back to shaking hands with an octopus?
In the course of conversation, my aged friend is now concentrating on even tinier his tooling. Not quite for those who think that inserted carbide is the be all and end all.

Cheers

N
 
Back
Top