Does Anyone Weld Their Own Band Saw Blades?

Home Model Engine Machinist Forum

Help Support Home Model Engine Machinist Forum:

This site may earn a commission from merchant affiliate links, including eBay, Amazon, and others.

rake60

Well-Known Member
Joined
Jul 8, 2007
Messages
4,756
Reaction score
126
I have a little 4 X 6 band saw that does one thing better than anything
else. That would be breaking blades.
Just to try it, I thought I'd attempt to weld one myself. I clamped it to
a block of brass with a slight overlap.
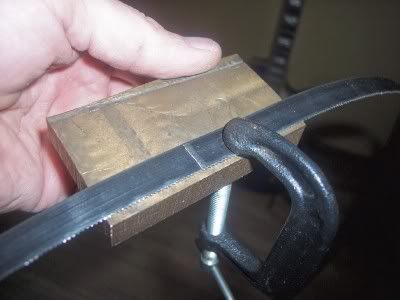
BandSawBladePrep.jpg

Then set the welder as low as it would go and gave it a few quick tacks.
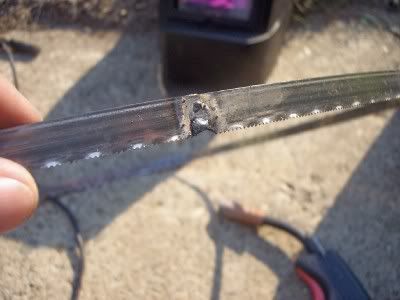
BandSawBladeWelded.jpg

Even as light as it goes I burnt it away a little. After grinding the weld flat
it made about 4 revolutions and broke again.

It's another "spend a half an hour to try to save $15" type of thing.
A guy has to play!
Any ideas?????

Rick
 
I have read that some people silver solder band saw blades back together.

At my M.E club there is a bandsaw with a ?resistance? welder on it, and a little grinder. I often use it.
 
I have done this a couple of times. The trick is not to accidently weld the teeth or the gap between. And to hit it with a torch after welding to anneal the joint. My problem is I wind up with to much weld and get it into the teeth.
Tim
 
I do all the time at school but I have a comercial butt welder. Do 1/4 up to 1" ones for the Horiz metal
cutting saw down to the 1/4 for the wood shop bandsaws. The welding is a peice of cake but then
grinding off the weld bead on both sides with a Dremel is a bit of a pain. Always re-aneal after the grinding.
...lew...
 
Rick,
I silver braze (solder) mine and have for many years. I made a jig up to scarf the ends at about a 10 to 12 degree angle and another simple jig to hold the ends in position for silver brazing. I flux the joint as I put the blade in the brazing jig and then place a about a 3/32 long piece of 3/64 silver solder on the joint. Heat from the bottom, the jig is open top and bottom, until the braze flows. The scarfing jig is just hand held on a belt sander, but produces identical angles on both ends to make a very close fitting joint. After it cools, I clean up the joint on the drum end of the belt sander.

I normally buy my blade stock in 100 foot coils and get 10 9'-9" blades out of it and then can use the left over part of the coil to repair stripped out teeth or other wise damaged sections of a blade. I have not had a joint break since I made the scarfing jig so the joint fit is tight.

Gail in NM, USA
 
GailInNM said:
then can use the left over part of the coil to repair stripped out teeth or other wise damaged sections of a blade.

Gail in NM, USA

Gail,

I like that idea. Never occurred to me to replace just the part that's bad. You just saved me a couple of bucks. I'm going to try that on my 4" X 6" saw. I took out a section of teeth on a new blade. I'll have to use the broken one and repair the one with the missing teeth. Also never tried to anneal the blade afterwards.

The new things one can learn here.

Bernd
 
Gail: I have tried the silver solder method in a purchased jig and usually the ends want to curl with the heat, making a thick spot in he blade. Some say to grab the hot joint with pliers. Do you have any comment?
 
Stan,
I have not had any problems with curling. My brazing jig has the clamps 2-1/2 inches apart on centers and the clamps are 3/4 inch wide.
This leaves about 1-7/8 inside to inside spacing on the clamps. The block that supports the blade has a 7/8 wide opening where the flame is applied from the bottom to the blade. As the blade stock has a slight curl from being on a roll, I straighten in out with my thumbs when I put it in the scarfing jig and then put a slight bend in it to hold the two ends in contact with each other when I put it in the brazing jig. I don't anneal after brazing but I pull the torch away slowly after the braze flows, say an extra 1 or two seconds of decreasing heat. Thats just a matter of habit and I don't think it is necessary. With the ends closely fitted with the scarf joint, I only use a very small amount of silver braze, so very little grinding after the braze is necessary. I used to try to align the teeth spacing and things like that, but I never could tell any difference in operation, so I just let the joint fall where it may that way now. When grinding the joint, if you touch the sides of a few teeth it is no big deal. As long as you have a few teeth in the cut you can't tell the difference when the joint passes through the work.

If you want, I will try to shoot and post a few photos of the process later today. I just tossed a worn out blade in the trash last night. It was getting so dull that it was friction cutting rather than making chips I think. I can fish it out for photos.

Gail in NM,USA
 
Silver solder mine - grind an acute angle on the ends of the blade. Made a holding jig from a piece of Al. angle with a 1/2" slot cut in one side, hold blade ends with toolmaker's clamps either side of the slot with the joint over the slot. Flux & small pellet of silver solder between the joint, torch underneath till the solder runs then (quickly) clamp joint with a pair of pliers. This ensures a close joint but does cool the joint too quickly causing the blade in the joint area to be hardened, so I reheat to just below solder melting temp. & cool slowly.
Works every time for me.
Mark
 
Photos of my blade grinding jig.
Overall view of Jig. It is made from 3/16 aluminum plate 1-5/8 wide x 9 inches long. The clamps are 1/4 x 3/4 aluminum with 6-32 clamp screws with pressed on knobs.
100_1131.JPG

End view of the grinding end of the jig. The slots are 1/2 inch wide x 0.025 deep to suit the blade stock I use. A 3/32 wide slot an additional 0.025 deep provided clearance for the teeth.The clamps are undercut so they can clamp the blade firmly. The hole for the screw is recessed to take a small spring to push the clamp away from the blade. That makes inserting the blade much easier. I put in two slots for the blade with the idea of doing both ends at the same time. Bad idea. It is much easier to do one end at a time, but the jig should still be as wide as it is to keep it aligned to the rest on the grinder when in use.
100_1134.JPG

Bottom view of the jig. The slot on the right end is a loose fit on the belt sander rest. The bevel on the end can just be sanded on like you are grinding a blade, but with no blade.
100_1135.JPG

The jig in operation. The blade is clamped with about 3/8 inch protruding from the end of the jig. Square up the end on the belt, then place the jig in position shown in photo with the notch engaging the rest on the sander. Press the blade lightly against the belt. It takes about 10 seconds on a 80 or 100 grit belt.
100_1136.JPG

What a finished end should look like. Now repeat for the other end of the blade.
100_1138.JPG
 
Now on to brazing. I use Harris Safety-Sil 56 silver brazing solder that is 3/64 inch diameter. Any good silver solder with at least 45 percent silver should work OK. For flux I use Harris Stay-Sil white brazing flux. There is nothing sacred about these. They are what I use for all by silver soldering.

My brazing jig with the first end of the blade clamped. The jig is made from 3/4 x 1-1/2 aluminum 4 inches long. The blade recess is 3/8 of an inch wide to allow the teeth to hang over the edge and is 0.025 deep. This is for 1/2 x 0.025 blade stock. A clamp bar on the bottom clamps the jig firmly to the edge of my drill press table. You don't want it moving around while you are trying to get things aligned and the solder in place. The blade clamps are relieved in the center to make sure they clamp the blade firmly. They are 1/4 x 3/4 stock mounted on 2-1/2 centers. The opening for soldering is 7/8 inch wide. The blade is pressed firmly against the back stop with the end near the center of the opening.
100_1139.JPG

After fluxing both ends of the blade, the second end is clamped so it is is good contact with the first end. It may be necessary to bend the blades ends slightly so the press against each other. When both ends are clamped, you should not feel any difference in the height of the blades when you run your finger over the joint. A small piece of silver braze is placed as shown over the exposed line of the joint. I use about a 3/32 long piece of 3/64 diameter. Thats about twice what you need to fill the joint so it has a good margin of safety. If you use more it just means you have to grind more off to finish the blade.
100_1140.JPG

Heat the joint from the bottom. I use a MAPP gas torch, but propane works OK. Propane just takes a little longer so the jig gets hotter. When the braze melts and flows into the joint remove the heat. I move the torch away over about a two second period. Thats mostly just habit and I don't think it really does any good as opposed to just taking the heat away.
100_1141.JPG

The finished joint will look something like this.
100_1142.JPG

Grind any excess material away from the joint. I use the top roller of my belt sander. Others use a hand held grinder. You can turn the blade inside out to do the other side if you need to, but I don't.
100_1143.JPG

The finished joint after grinding. In the photo it looks like a gap on the side between the tow ends. It is not. That is just the color of the braze at the interface.
100_1144.JPG

Gail in NM,USA
 
Gail: Many thanks for taking the time to do the write up and pictures. I will make your design of grinding jig and give it another try.
 
Stan,
I hope it helps. One thing I forgot (probably others too) is that if you use a belt sander like I do, be sure the belt is on the right way. There are arrows on the back to show the direction of rotation. This is to make the lap joint on the belt so it does not catch on things. It is important here because we are grinding to a sharp edge that could catch on the belt lap joint if the belt is on backwards.
Gail in NM,USA
 
Gail, since this is a lap joint also, do you have to watch out for the rotation of the saw? I
meant to say do You have to watch the splice which way it goes, left or right? not for the catch but for the flex.
Hilmar
 
Hilmar,
I never thought about it. I can't see that it would really make any difference. Years ago I hand ground the blade joint. I probably did them both ways, but as long as the joint was a close fit I never had any problems. Also my saw has 14 inch wheels so there would not be a much flex stress as on the smaller saws.
Gail
 
I silver braze mine with a lapped-scarfed joint. The secret is to grind two matched tapers when feathering the ends.
I clamp the two ends side by side and parallel with proper orientation (one end need to be lipped) and then feather them on the belt sander.
Then clamp them overlapped to a piece of ceramic with flux and a piece of silver alloy in between.
When the alloy melt I press the end against each other with a screwdriver.
If the joint is slightly thicker than the saw I hand thin it with a Dremel with a mounted point
Next break is rarely on the joint.
 
harbor freight has a bandsaw blade welder that works amazingly well old school is to break the blade insert it through a hole in the plate or whatever reweld the blade and saw out the middle , it also allow you to buy spools of blade , for the reweld of small horizontal cut off saw be sure to check the blade tensioner travel some are really short
 
I have a little 4 X 6 band saw that does one thing better than anything
else. That would be breaking blades.
Just to try it, I thought I'd attempt to weld one myself. I clamped it to
a block of brass with a slight overlap.
BandSawBladePrep.jpg

Then set the welder as low as it would go and gave it a few quick tacks.
BandSawBladeWelded.jpg

Even as light as it goes I burnt it away a little. After grinding the weld flat
it made about 4 revolutions and broke again.

It's another "spend a half an hour to try to save $15" type of thing.
A guy has to play!
Any ideas?????

Rick
I have a butt blade welder, but I have tig welded them also
 
Back
Top