You are using an out of date browser. It may not display this or other websites correctly.
You should upgrade or use an alternative browser.
You should upgrade or use an alternative browser.
A two cylinder mill engine under construction
- Thread starter Philjoe5
- Start date

Help Support Home Model Engine Machinist Forum:
This site may earn a commission from merchant affiliate
links, including eBay, Amazon, and others.
Phil, I'm sorry if I got your thread off track with my comment. It's an interesting subject that probably deserves it's own thread. Also, I hope I didn't come across as "anti-accessory", because I have seen some really NICE setups over the years -- with miniature machine shops, dynamos, etc. -- it's just that for me, it's mostly about the "prime mover". Although... I have to admit that when I see the fine work that some (like Marv, and others) have done with the PM Research mini machine tool kits, I do feel tempted. (I do wish, however that the kit makers would have used some cast iron. Something about a machine tool with aluminum ways -- even a model one -- just doesn't seem right. Still, they are endlessly fascinating (and cute!) ;D
Paula
Paula
Philjoe5
Well-Known Member
- Joined
- Jul 12, 2007
- Messages
- 1,727
- Reaction score
- 321
Paula, running accessories off of our model engines is related to our engine design so I think its completely relevant to this thread describing an engine I designed. Its a philosophical aspect to the hobby thats interesting to talk about because there are so many perspectives out there. I cant imagine anyone who makes engines to be anti-accessory because to make an engine is to be inherently fascinated by mechanical motion of any kind.
Some time ago I read a story about some wealthy guy who bought a fully loaded Harley Davidson motorcycle and put it in the living room of his 5th floor apartment in New York City probably to never see the open road. Most folks reaction to such a story is what a waste :'(. But to this guy, this motorcycle represented such a great technological achievement that its mere presence was inspiring. I can relate to both sides of this story.
Cheers,
Phil
mklotz
Well-Known Member
Being one of those people wont to over-introspection, I learned a long time ago that it's not a good idea to question why you're having fun while you're in the process of having fun.
If you simply must have an answer, just redefine your hobby to be the construction of intriguing mechanisms. That covers everything - model engines, model tools, workshop tools, cannons, fishing reels, etc..
On the notorious "Yabut, what does it do?" question, my usual answer is along the lines of:
It satisfies my innate desire to build objects of mechanical beauty, the artistry of which will be instantly recognized by anyone of even moderate intelligence.
Most of the cretins wander off shaking their heads while trying to decide if they've just been insulted.
Or, you can just ask them, "What is the utility of a plaster garden gnome?" which is something most of them can relate to more directly.
kellswaterri
Senior Member
- Joined
- Oct 14, 2007
- Messages
- 117
- Reaction score
- 6
Hi Phil, sorry for side tracking your topic a bit, but it did raise some very interesting debate did it not ;D I do like your machining methods and where did you obtain the weird milling cutter with the grooves on the flutes...Keep her cutting Phil,
All the best for now,
John.
All the best for now,
John.
Kelswaterri--You misunderstood my post. The point I was making is the same as the point that you are driving. Many people get satisfaction from building an engine "just to see if it will run". However, if there is no way to take a drive off it like the engine Philjoe is making, then you are limited to exactly that---and once you've seen it run, there is very little else that you can do with it except run it once in a while to amuse yourself, or a friend. I enjoy building an engine "just to see if I can" as much as anyone.---Its just that after I've seen it run 50 times, I want to do something else with it---i.e. power a dynamo, a sawmill, a slinky machine---whatever. And if there is no way to take a drive off it, then you are unable to do that.

$599.00
$649.00
FoxAlien Masuter Pro CNC Router Machine, Upgraded 3-Axis Engraving All-Metal Milling Machine for Wood Acrylic MDF Nylon Carving Cutting
FoxAlien Official
![DreamPlan Home Design and Landscaping Software Free for Windows [PC Download]](https://m.media-amazon.com/images/I/51kvZH2dVLL._SL500_.jpg)
$0.00
DreamPlan Home Design and Landscaping Software Free for Windows [PC Download]
Amazon.com Services LLC

$19.15
$29.95
Competition Engine Building: Advanced Engine Design and Assembly Techniques (Pro Series)
MBC Inc.

$45.99
Sunnytech Mini Hot Air Stirling Engine Motor Model Educational Toy Kits Electricity HA001
stirlingtechonline

$36.94
$49.99
Becker CAD 12 3D - professional CAD software for 2D + 3D design and modelling - for 3 PCs - 100% compatible with AutoCAD
momox Shop

$99.99
AHS Outdoor Wood Boiler Yearly Maintenance Kit with Water Treatment - ProTech 300 & Test Kit
Alternative Heating & Supplies

$49.95
$55.99
DjuiinoStar Hot Air Stirling Engine Assembly Kit: Spend 30 Minutes to Build Your Own Stirling Engine
djuiinostar

$26.89
$34.99
Peachtree Woodworking Supply Bowl Sander Tool Kit w/Dual Bearing Head & Hardwood Handle, 42 Pieces Wood Sander Set, 2 Hook & Loop Sanding Disc Sandpaper Assortment, 1/4 Mandrel Bowl Sander
Peachtree Woodworking Supply Inc
Cedge
Well-Known Member
- Joined
- Jul 12, 2007
- Messages
- 1,727
- Reaction score
- 28
Brian
You really need to meet up with www.crabfu.com . The same philosophy lead this young lad astray... in the extreme....LOL. His turbine tank project and a couple of others were sponsored by the company I'm working with.
Steve
You really need to meet up with www.crabfu.com . The same philosophy lead this young lad astray... in the extreme....LOL. His turbine tank project and a couple of others were sponsored by the company I'm working with.
Steve
BobWarfield
Well-Known Member
- Joined
- Dec 27, 2007
- Messages
- 1,151
- Reaction score
- 1
A power pickup could be as simple as the little pulley driving the ball governor in the eBay photo. Whether said pulley is there or not should not require critique or philosophical debate. People seldom do build logs because they're in search of criticism or debates, hence one should be very reluctant to dole any out, or to embark on too much of a tangent lest it driver the builder to distraction. The log is, after all, the builder's opportunity to show what they're doing and not to argue about what we'd like them to do!
Phil, pray continue with your project. I'm enjoying it with or without power pickups, and I realize the beauty is in your eye as the creator who enjoys his creation. I've already seen some great tips that I've logged for my own notebooks on this sort of work, and I like the look of the engine you've conceived.
Cheers,
BW
Philjoe5
Well-Known Member
- Joined
- Jul 12, 2007
- Messages
- 1,727
- Reaction score
- 321
BW
The beauty of the barstock engine is that the builder is under no constraints in designing its various parts to suit their particular needs. As I pointed out earlier, I had not really thought that far ahead about driving anything with this engine and likely never will do so. But now that Ive taken all of 5 minutes to think about it, sounds like much ado about nothing.
Heres where my flywheel starts with a 3/8 thick hub of any diameter you wish I make mine about 1.5 in diameter.
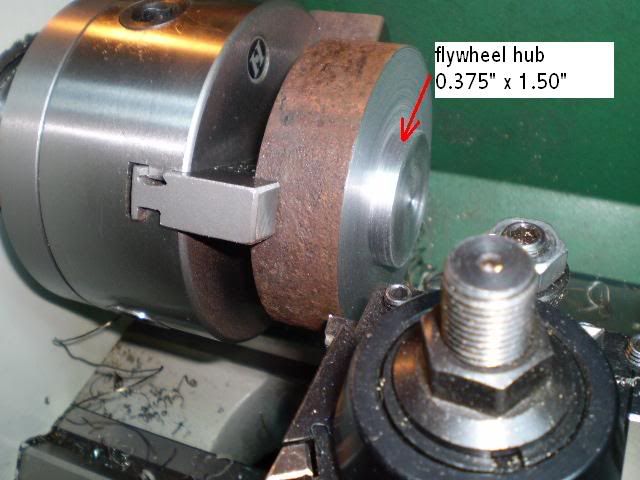
You could easily make a pulley out of this hub by making it any diameter that suited the application and then putting a little v in it for a belt drive. If you dont like a multifunction flywheel? Then make a separate pulley and bolt it to the face of the flywheel. This setup work great on the generator I built.
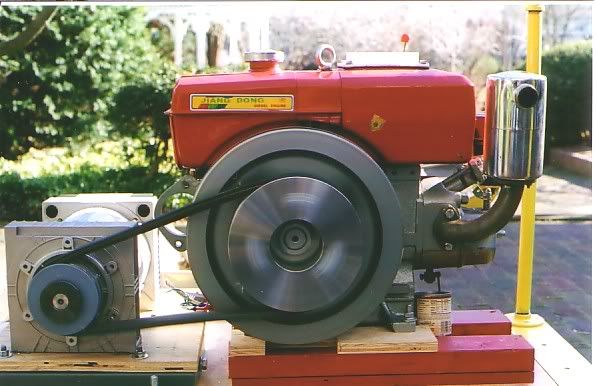
Any constraints on what you can do or drive with a barstock engine appear to me to be artificially placed there. :
Work continues on the last part, the mighty baseplate ;D
Cheers,
Phil
The beauty of the barstock engine is that the builder is under no constraints in designing its various parts to suit their particular needs. As I pointed out earlier, I had not really thought that far ahead about driving anything with this engine and likely never will do so. But now that Ive taken all of 5 minutes to think about it, sounds like much ado about nothing.
Heres where my flywheel starts with a 3/8 thick hub of any diameter you wish I make mine about 1.5 in diameter.

You could easily make a pulley out of this hub by making it any diameter that suited the application and then putting a little v in it for a belt drive. If you dont like a multifunction flywheel? Then make a separate pulley and bolt it to the face of the flywheel. This setup work great on the generator I built.

Any constraints on what you can do or drive with a barstock engine appear to me to be artificially placed there. :
Work continues on the last part, the mighty baseplate ;D
Cheers,
Phil
Enough philosiphy for one thread. Philjoe, I think you are building a great engine, and I enjoy the posts you are putting up. As I said in a much earlier post, this engine is going to blow you away with how well it runs, simply because it is a twin cylinder. Tell me, are you going to offset the crank pins at 90 degrees to make this one a self starter or at 180 degrees. When I built mine with the crank throws offset 90 degrees, I wasn't sure how that would work. I thought maybe it would cause the engine to "gallop", but it doesn'tseem to have any adverse effects that I can see.---Brian
A
artrans
Guest
my 2 cents worth here for me i love hit and miss engines and can watch run for hours and i enjoy it. However an old timer came by my shop one day and saw the hit and miss engines and said years ago he went to a lot of shows and he noticed that the engines that where
running things had the best attraction then say a perfect painted nice running engine just running. So I guess the point is its what one enjoys i like both so for me it does not matter.If I did shows I would run something for the attention. I would think must of us on this site it abort being a motor head so all is fair game. my wife says she like to strap a motor on her back to get more attention and I said make sure it runs something. that line cost me big time :big: :big:
running things had the best attraction then say a perfect painted nice running engine just running. So I guess the point is its what one enjoys i like both so for me it does not matter.If I did shows I would run something for the attention. I would think must of us on this site it abort being a motor head so all is fair game. my wife says she like to strap a motor on her back to get more attention and I said make sure it runs something. that line cost me big time :big: :big:
Philjoe5
Well-Known Member
- Joined
- Jul 12, 2007
- Messages
- 1,727
- Reaction score
- 321
This has been an interesting few months for me but the process is nearly at an end. A few of the last pieces I made were the crosshead pins and the steam inlet flanges. The inlets are temporary so I can test the engine using a Y connection off of the compressor.
I have fabricated the baseplate out of ¾ plywood for now. I used this material as a baseplate because its cheaper than aluminum and I needed to confirm my measurements for placement of the cylinder blocks and bearing blocks.
Here are all of the parts needed to make this engine:
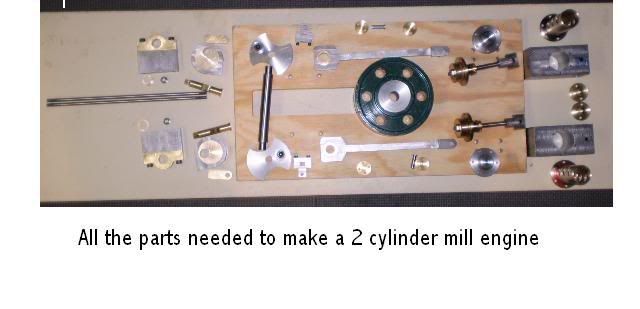
I believe an engine isn't simply the sum of its parts, so I have more work to do.
At this point Ill strip to a loin cloth and climb the highest mountain in southeastern Pennsylvania ( a hill actually, about 200 ft above sea level). There I shall enter the tweak zone and assemble this engine and try for a test run. I will either return victorious or as a babbling idiot :wall: for the rest of my life. Until my return, thanks to all for your support and encouragement,
Cheers,
Phil
I have fabricated the baseplate out of ¾ plywood for now. I used this material as a baseplate because its cheaper than aluminum and I needed to confirm my measurements for placement of the cylinder blocks and bearing blocks.
Here are all of the parts needed to make this engine:

I believe an engine isn't simply the sum of its parts, so I have more work to do.
At this point Ill strip to a loin cloth and climb the highest mountain in southeastern Pennsylvania ( a hill actually, about 200 ft above sea level). There I shall enter the tweak zone and assemble this engine and try for a test run. I will either return victorious or as a babbling idiot :wall: for the rest of my life. Until my return, thanks to all for your support and encouragement,
Cheers,
Phil
Maryak
Well-Known Member
- Joined
- Sep 12, 2008
- Messages
- 4,990
- Reaction score
- 77
Philjoe5 said:I believe an engine isn't simply the sum of its parts, so I have more work to do.
At this point Ill strip to a loin cloth and climb the highest mountain in southeastern Pennsylvania ( a hill actually, about 200 ft above sea level). There I shall enter the tweak zone and assemble this engine and try for a test run. I will either return victorious or as a babbling idiot :wall: for the rest of my life. Until my return, thanks to all for your support and encouragement.
Phil please save me a place in the "Tweak Zone"

Best Regards
Bob
rake60
Well-Known Member
- Joined
- Jul 8, 2007
- Messages
- 4,756
- Reaction score
- 126
Philjoe5 said:I will either return victorious or as a babbling idiot :wall: for the rest of my life.
Cheers,
Phil
Are you making fun me Phil?

Great looking parts!
I'm sure your return will be victorious!
I already have the "babbling idiot" title covered.
Don't try going the Village Idiot thing either.
Already own that T Shirt here as well...

Good Luck with the final assembly.
Looking forward to seeing it running!
Rick
Philjoe5
Well-Known Member
- Joined
- Jul 12, 2007
- Messages
- 1,727
- Reaction score
- 321
All metal parts have been machined and Ive made a temporary engine baseplate of plywood. The cylinder blocks were attached as well as the flywheel end of things. At this point the crank webs just slip onto the crankshaft. The dimensions of the crankshaft can be changed if needed, but I found free movement of the connecting rods on both cylinders and the crank webs could be fully rotated so alls well.
Now crankshaft is drilled/tapped 8-32, with cranks 90º out of phase.
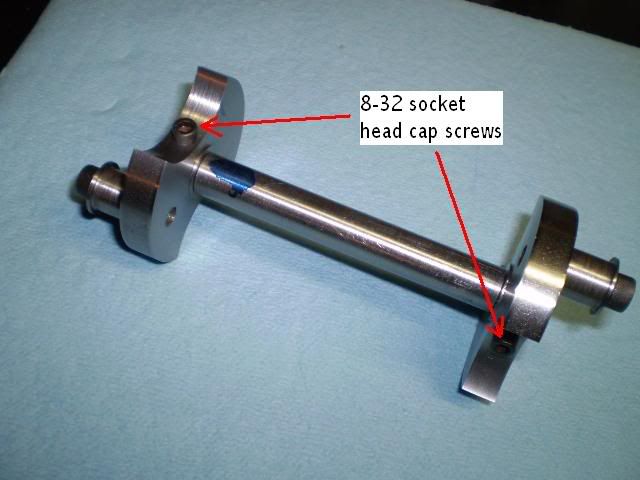
Witness marks on the crankshaft ends and the webs ensure easy assembly and disassembly. The #8 screws go all the way through the crankshaft ends into the opposite side of the crank web. This construction seems to be quite sturdy for this application.
A quick paint job on the plywood and the cylinder block and flywheel assemblies are installed. Next the valve trains are connected. The engine is in its final form and free movement of the flywheel occurs.
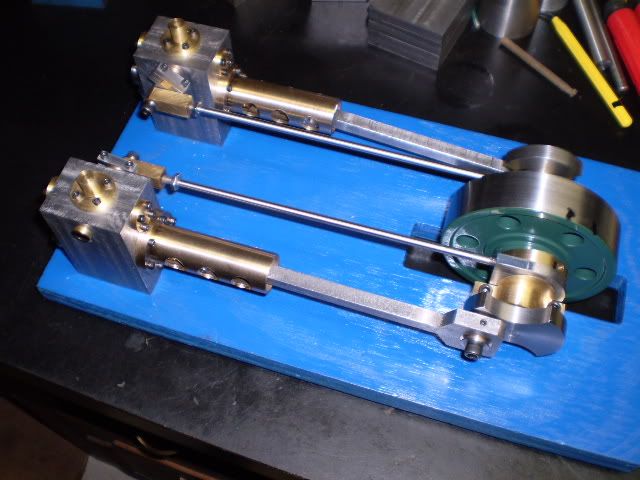
What you see at this point is an engine that runs but I want to make a baseplate out of an aluminum plate. Then based upon what I learned from this build Im going to make a few improvements to some of the older models I built. Heres a video (noisy and grainy) of its first run. I have good timing on one cylinder but the other one needs some tweaking.
[ame]http://www.youtube.com/watch?v=M1hgpYfpN4c[/ame]
Once again I must acknowledge Ray HasBrouck for the design of the mill engine #3 that served as an inspiration for this engine. The only parts I had to design were the crankshaft and baseplate.
Cheers,
Phil
Now crankshaft is drilled/tapped 8-32, with cranks 90º out of phase.

Witness marks on the crankshaft ends and the webs ensure easy assembly and disassembly. The #8 screws go all the way through the crankshaft ends into the opposite side of the crank web. This construction seems to be quite sturdy for this application.
A quick paint job on the plywood and the cylinder block and flywheel assemblies are installed. Next the valve trains are connected. The engine is in its final form and free movement of the flywheel occurs.

What you see at this point is an engine that runs but I want to make a baseplate out of an aluminum plate. Then based upon what I learned from this build Im going to make a few improvements to some of the older models I built. Heres a video (noisy and grainy) of its first run. I have good timing on one cylinder but the other one needs some tweaking.
[ame]http://www.youtube.com/watch?v=M1hgpYfpN4c[/ame]
Once again I must acknowledge Ray HasBrouck for the design of the mill engine #3 that served as an inspiration for this engine. The only parts I had to design were the crankshaft and baseplate.
Cheers,
Phil
Great work Philjoe!!! Congratulations.---Brian
dsquire
Well-Known Member
- Joined
- Mar 18, 2008
- Messages
- 980
- Reaction score
- 15
Phil
You have created another fine engine. A bit of tweaking and you will be satisfied with it. If you hadn't told us, we probably wouldn't have known about it. Sometimes we are our own worst enemy.
It is definitely a keeper. :bow: :bow:
Cheers
Don
You have created another fine engine. A bit of tweaking and you will be satisfied with it. If you hadn't told us, we probably wouldn't have known about it. Sometimes we are our own worst enemy.
It is definitely a keeper. :bow: :bow:
Cheers
Don
Do you find that it starts well by itself with the crank pins at 90 degrees? Mine does as long as there is good air pressure. After it starts, you can turn the regulator down quite a bit untill the engine is running really, really slow, but at the lower air pressure they don't self start very well.
Similar threads
- Replies
- 1
- Views
- 212
- Replies
- 36
- Views
- 3K


