1/3 Scale LS1

Home Model Engine Machinist Forum

Help Support Home Model Engine Machinist Forum:

This site may earn a commission from merchant affiliate links, including eBay, Amazon, and others.
Another short day in the shop, but productive none the less. I finished running the last few pistons and while I was waiting I cleaned up the tops of the pistons. For now they are just sanded with 400 grit sandpaper. I'll either run them on the buffing wheel to polish them or make some sort of fixture to face them off in the lathe. Since I had a couple of spare connecting rods, I ran a couple of spare pistons.
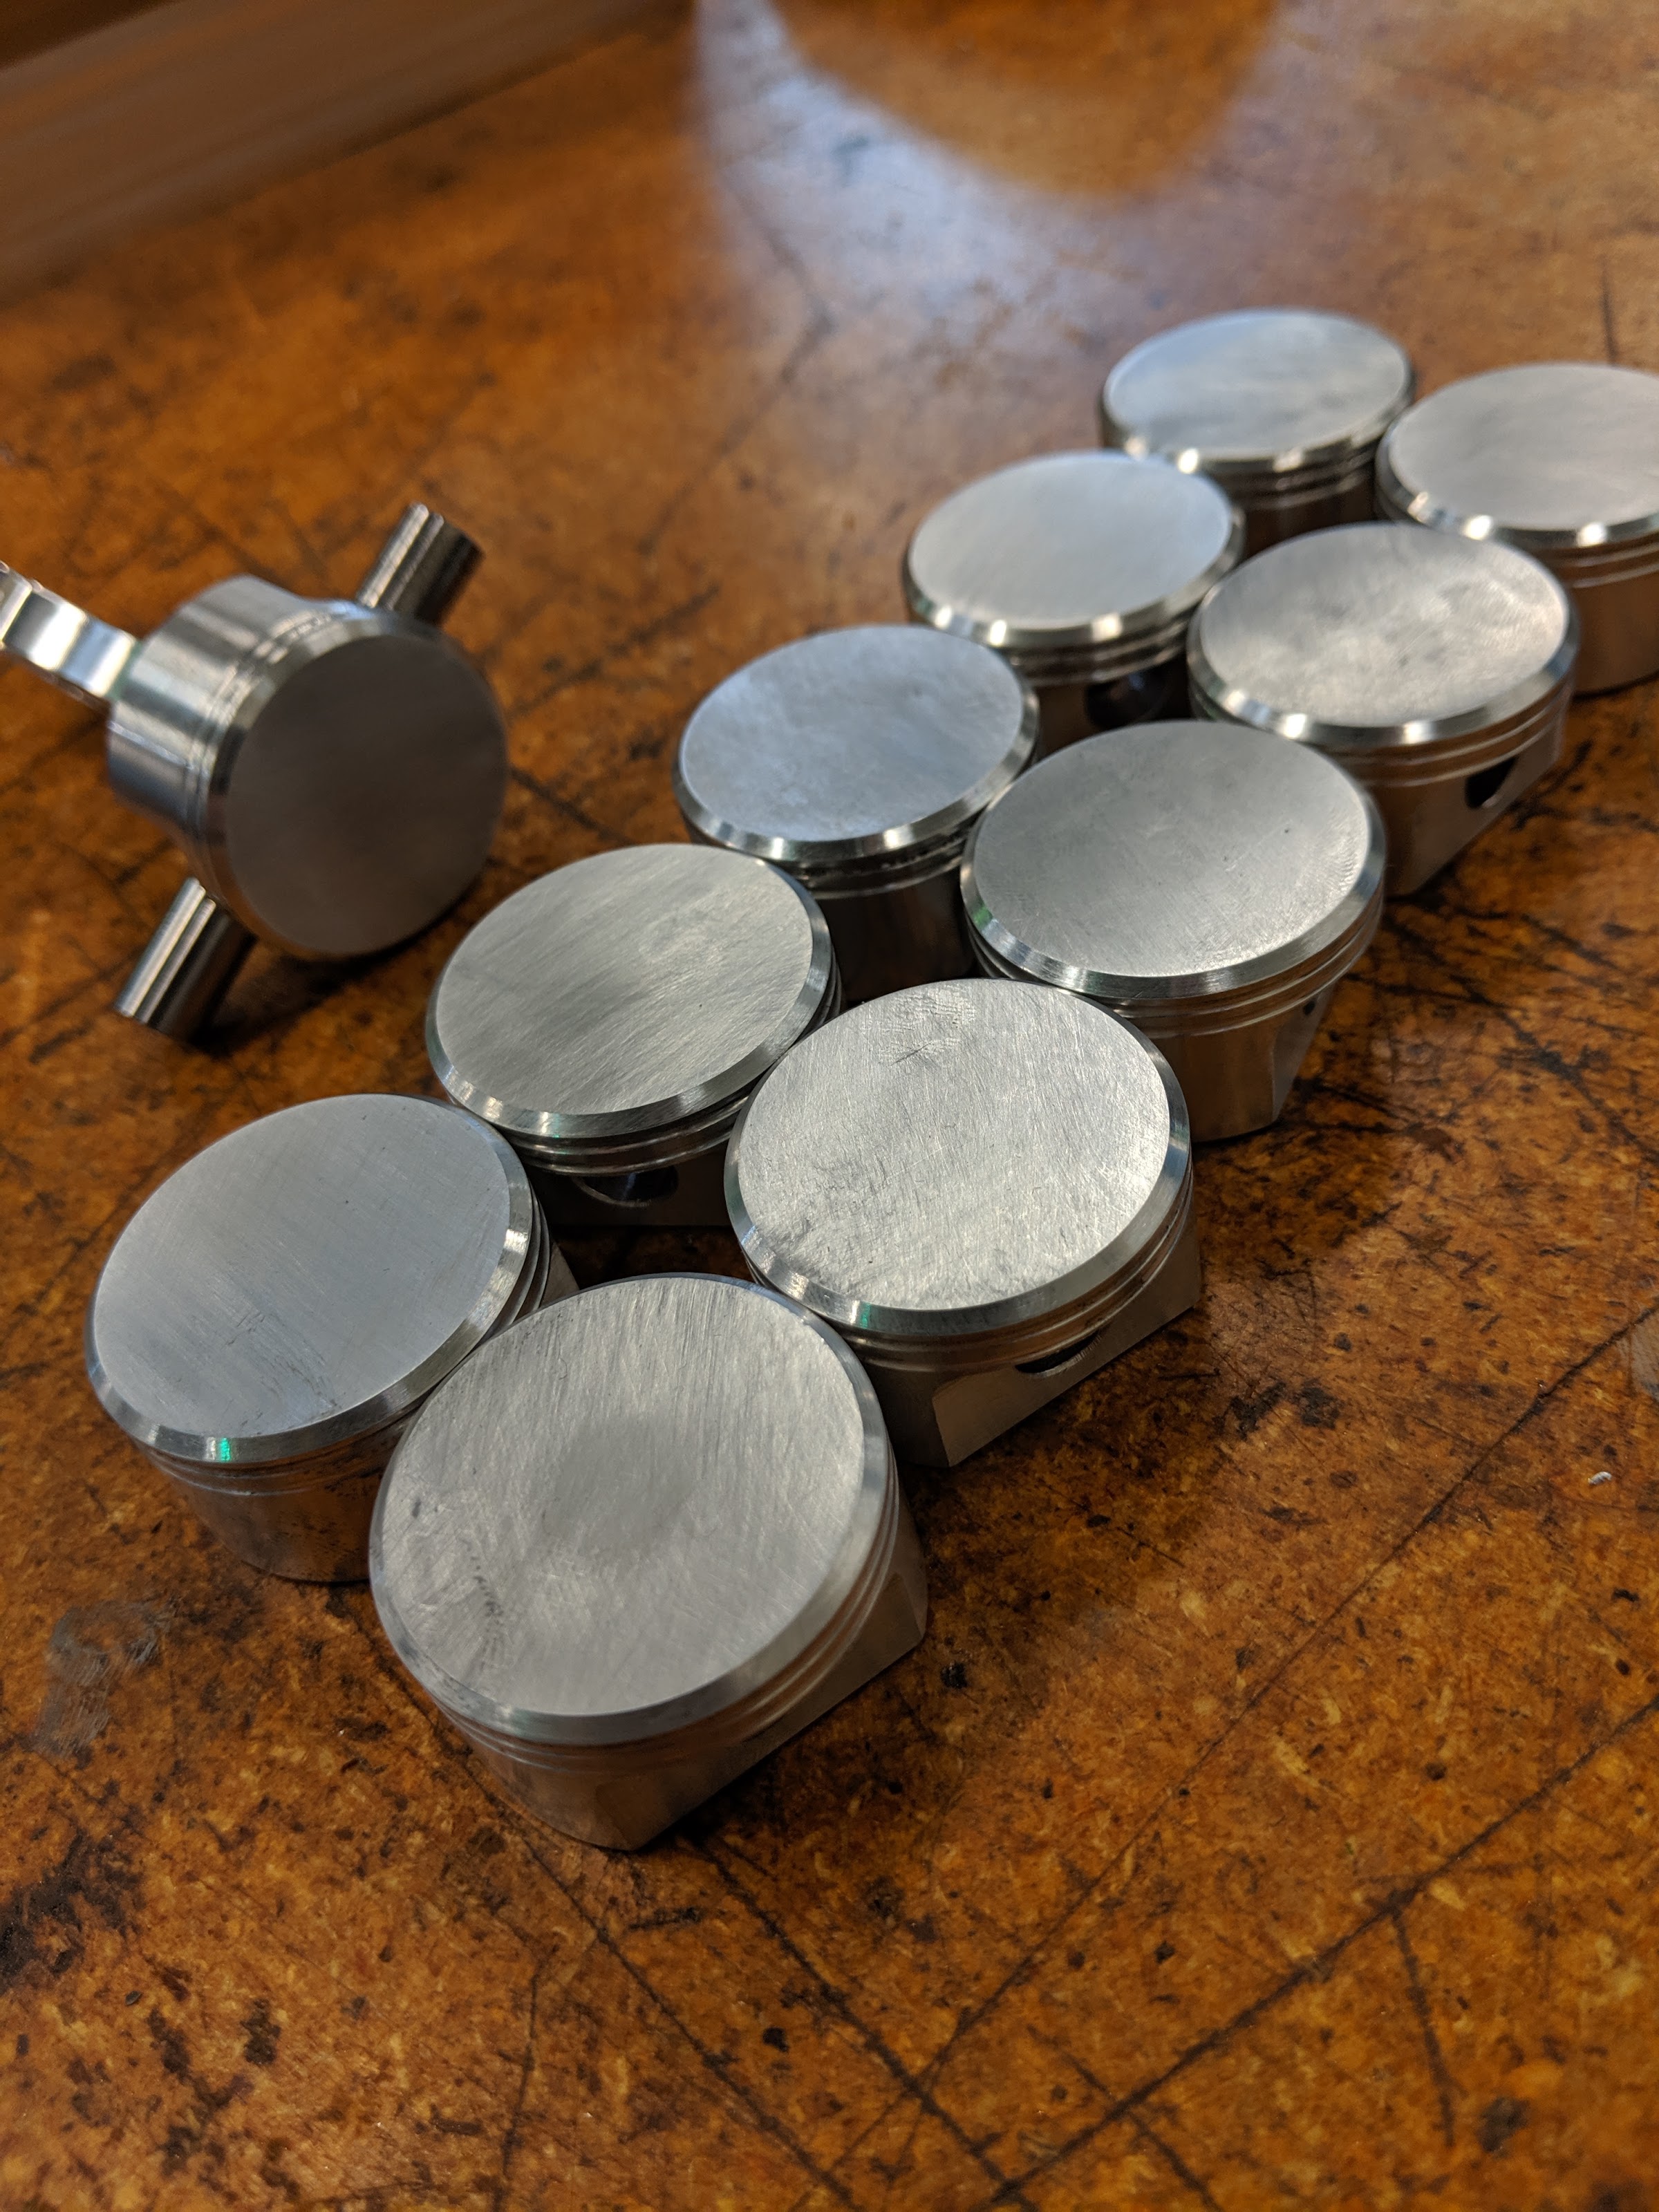
7Ih-aAVbWNc__fd6Anki9GC8Lw0eueaQP7gMs94Qoa87xXID8gZulO6f5vmCHa-AGwvF6X12l5_TSP8E_O5j5R9ZVuWNcuxQSfSfWLOWF03nawaVL5si0BvoHloLtfNcnO_3zy3oOAY=w2400


The next parts to make at the lathe are the sprockets for the timing chain. I'm using #25 chain, but wanted to try my hand at making the sprockets. It took a couple of tries, but I got one that's good. The sprocket for the camshaft should be pretty easy on Monday because it's so similar to the crank one.
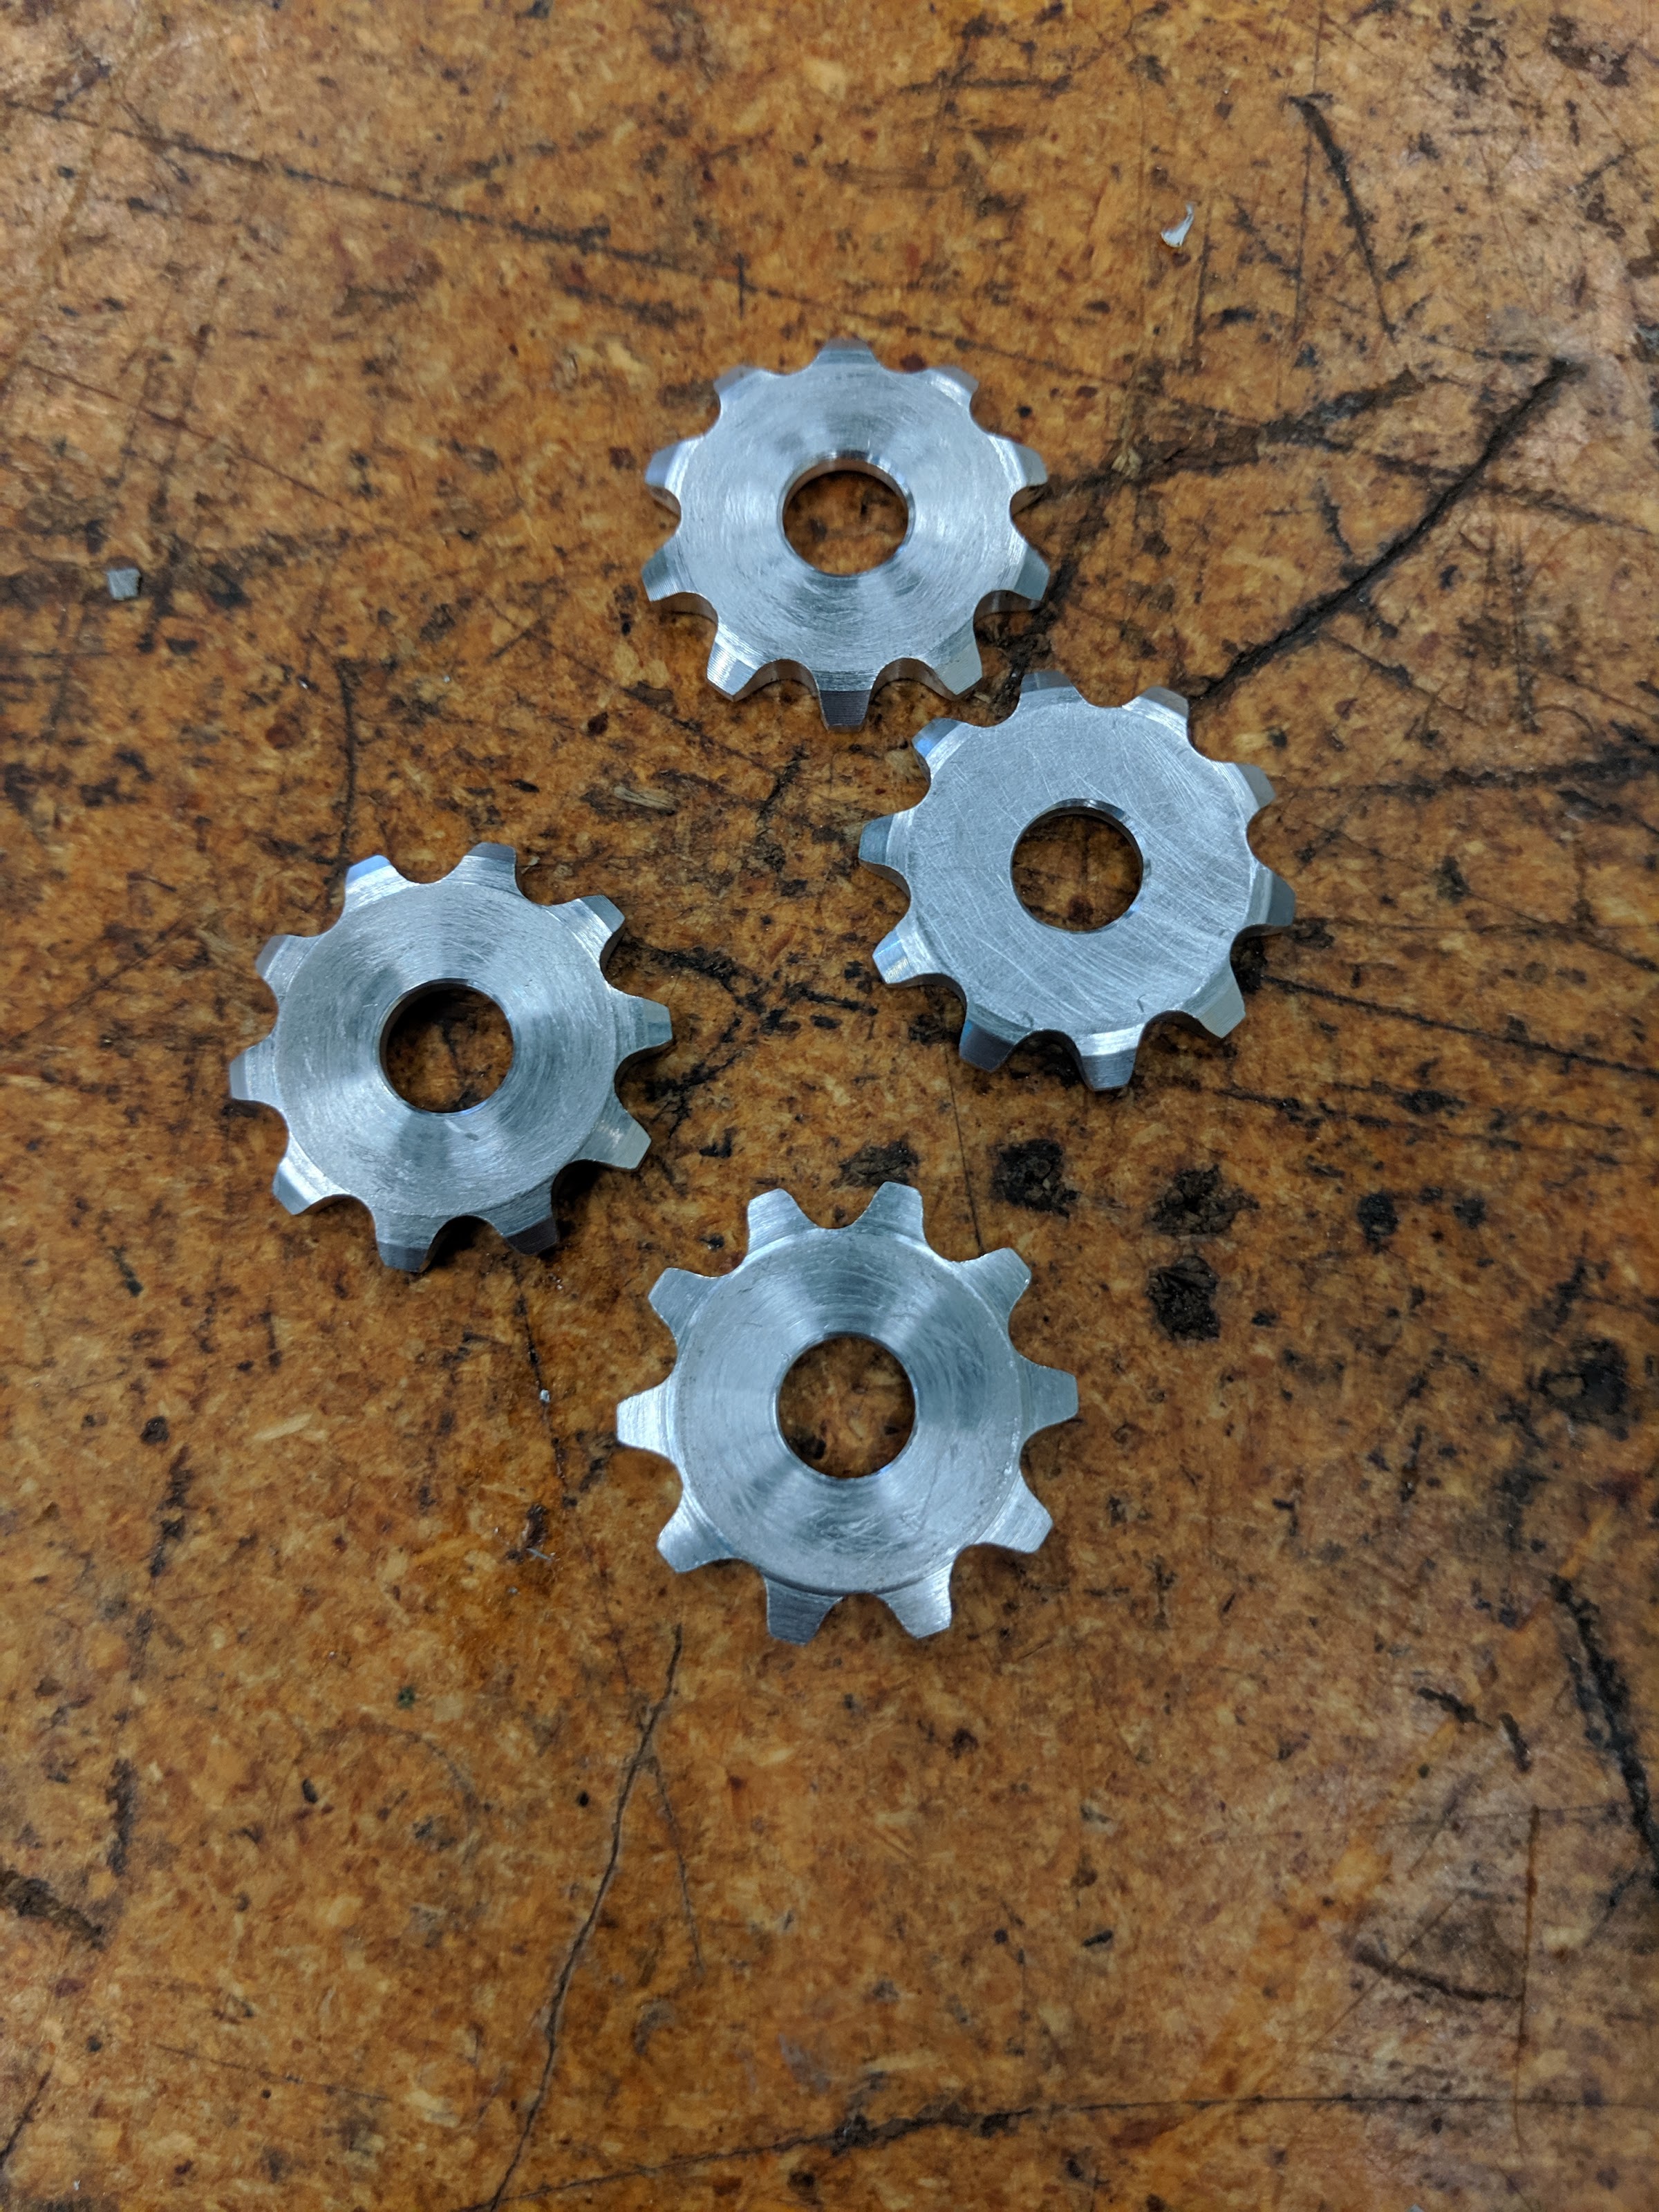
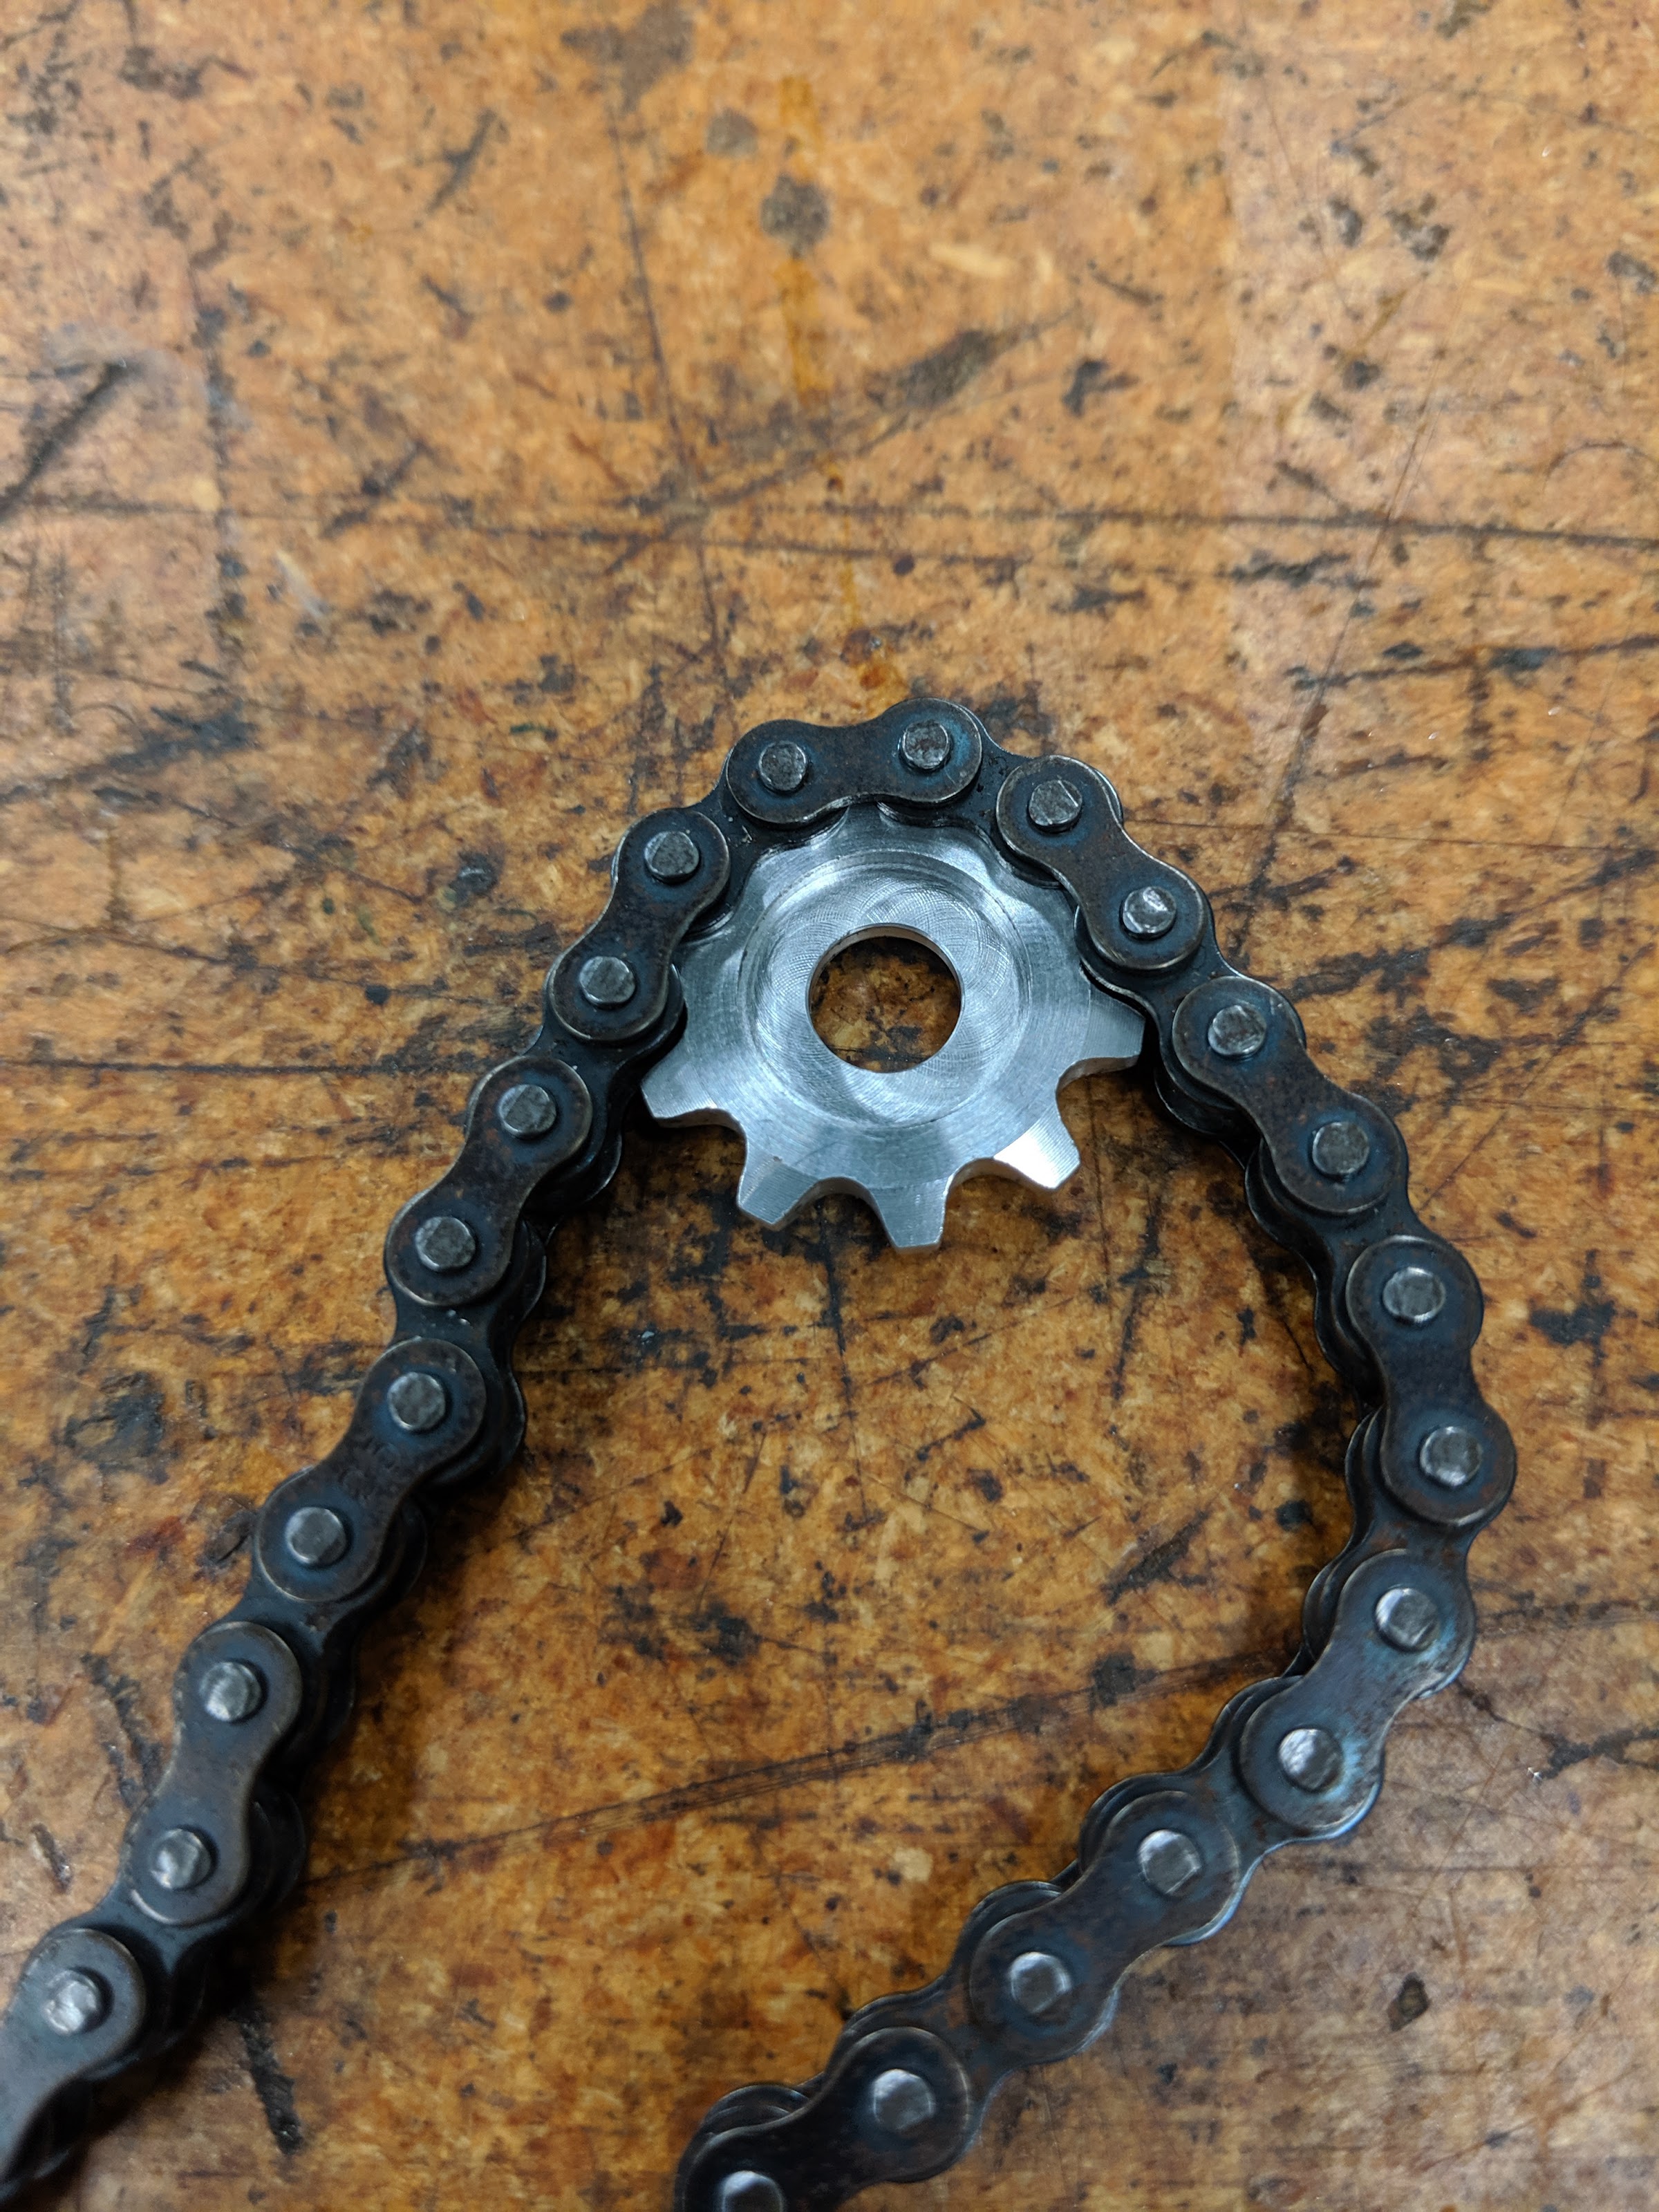
7rbuu_ejMub5fu8eUtnDXRKLraHPXgIFO16dClUC6LM6_vNMAzy4F1D0sqJla0dljfdzdN-Fj1p6Ig2Pw6JcJ_52sWzq-P4AmfNJcPmVN8s5WXwoySnagFETmj_YVg7-RElosnftCME=w2400

N_hDylldrdxrv8iisJThPBvNfH9mFxJ7vMdZKheu4nlCFgnTeYPxawA5j2nlrjPQZXBLVYfBOPwNgZfhRhjLjC9EMqhJy-jDI4i3j8cg7Xurj0C-Bhe2RUYyjx4vA3NiXnnjV_6NpR8=w2400
 
Looking good. I believe you've got this CNC work figured out.

I wouldn't say that I've figured it out as much as I can fake my way through it. Thanks though.

I did try and take a video today of the lathe running the pistons. It was a last minute idea and the phone ziptied to a mag base wasn't the best. I sped it up 8 times, and while I tried to run without coolant so that you can see what's happening, I had to pulse it on a few times to clear the chips from the center pocket.

 
Today I finished got the cam sprocket finished. I was glad to have that one done in one try. I just need to broach the keyway for the camshaft and take a couple of links out of the chain.

dajat_i7tD6L_COkuZxGM7l_0lHOHqt8Jy7UfUPOtAWGVGyLHZ4SeaXZoZ1LlFGztwH0G36NK18180Af73-NxSumMqS0B-7e1NM2BTQN9fjy9cvdcem0l9L_CF_PrTbHIFiohOSpnN4=w2400

_1jfOWafXZZLzlOBq-ENc1zGO5wu77-0OAbjeCKuq1B3JW2N6PkcBS8QWdZ8Unx4xUFLp7tJ_wg9YE0YtxCiugDdl0LIBOhnh_PTJ5UdofcR5D5QxQmWpC8BzPycG-S_soFWEjbvi_M=w2400


I decided that the sandpaper finish on the tops of the pistons had to go, so I cobbled together a stop to fit inside the collet and faced off each piston.
mOzAIuiX_mfndSHNf2oCIvFs608ii6XN-3cb4w1_0QPGvHc9HTINhaomYo5vym23Br9kv1U68Hju6oO9Ki1Oy9H7loGRaetfOyHE3sZuUvvV219snPBGhWjWqdWm4xgbtzvkHBqyuk4=w2400


The lifters were next. Because I was feeling fancy, these got made from brass.
Al4R9QQITWA1Qbka1aaqGXE9rtxBZ-_dbh2j9AAjwCxJvFmIiNhqcu6zWOk7oJc6ADaY6aSbn5oDoRIOiatqQp6JJxO81oIB2UJbPFUjXKdXBaEI03YYBHKAO7dWlqk2JSVk6FU1SE0=w2400


I'm working on wrapping my head around the 4th axis operations for machining the heads and needed a break, so I assembled more of the block. The starter is mounted and the magnets for the engine stand are bolted on.
CwgR5PA0rHaU2TGNrKluQJUT-dmH3d2ZoMBxPLzuJbyOqmBErI34QtvYuewKTz2WKvf1JbTtHdpHD_ldemOpPybtVdsW6C1kYwE0OgmSpGOvsHFw2I1o3vR7t_b1TlFaxpO-KMqB-CI=w2400


Tomorrow I'll hopefully get the valves done and then get the mill tooled up for the cylinder heads. I'm still waiting on material for the crankshaft to arrive...
 
Progress! All of the valves are completed, plus some spares. These are 17-4 stainless and my first time single point threading on the CNC lathe. I had a little challenge of not getting a taper with such a long, thin part. The first try had about .0015 taper over the length of the stem. No tailstock, so the solution was to turn it in chunks. The taper is gone, but there are some very faint lines that you can see in the picture. Nothing that you can feel and the diameter is consistent to .0005. You can also see my crude way of setting the valve lash with the end of the stem being threaded. The retainer will simply thread on.

Ld6ATFTYSwB72G0TMQAdMfGCNuWt7h1hMuWC78tFhYQol1Y8buQ69EHibOV2J2W6ZQBi_l30r4_I0o-KPLji6_UR7qOUIqeUEKzauCkSV_ZpCzke9GFtt_ceztPR1qqZa86_M3RXJbw=w2400

7Scn87LreUjMohaB5BAHTHXm5c4ej0U9FhaupdyS7b0I6iZHhAx3Nudi3ZDSUEC0rv3pWuGk1Sf3Jd9A3xV62P_6QQZtbB0SyyfuMGVT-khS9zEkKwiIlON5kA6F-5TwjKdsQE2kVKs=w2400


After cleaning up the mess of razor wire in the lathe from the valves, I got to work setting up the mill for the heads. While the machining time on the heads may be shorter than the block, there are more tools required. The plan at the moment is to secure the block to the 4th axis tombstone with a dovetail vise to machine 5 sides and then one separate operation for the back side.

tcnVKjRUteq5bCn8WrTfjYZ_ow1cAFlg8FfDNLUDOPUIGKoXFjKa4m4SWVu4oVbfmn4WuO3NwRONvWeue5i_3jBfBN5RIt4t7UE5yo4cVxRYXAI1UbFbQQ-aBQa4PxxHJL8GJ5LxSa4=w2400


Stock is cut and ready to go. I know that I only need 2, but I'll probably screw one up.
LRPdgY5aalSi6KctTKS0w37HTXTdHjxvomuLScocmQGHD7MKFwAqWLcX3pmCdEcN17dlTlKHEwGhgVlbT0QAlZKlq964AyQpTEvl2nGa7YRxsnc9UlW4ca9_Hq-udgWGBNSQmTfNFyQ=w2400


Tomorrow I hope to get everything dialed in and start making more chips. My 1144 came today and is patiently waiting to be turned into a crankshaft.
 
awesome progress grasshopper. Those "faint marks" are typically taken care of with a small scotch brite pad. Lightly chuck the head of the valve in the 3 jaw so the stem spins half way straight and pinch the stem with the scotch brite between your fingers and slide it slowly from the head to the thread. Should have a real nice brush finish for 10 seconds of effort.

If the grasshopper comment went over your head, ask your teacher. He might be old enough to remember Kung fu.
 
As Steve pointed out..Fantastic work "Grasshopper" . (Old enough to know the reference....)

You should give a shout out to your school, pretty cool that they let you take on this project.

John
 
I guess I don't have enough kung fu to get the grasshopper thing. My instructor is actually a little younger than me. I'll give that a try for blending the tool marks on the valves.

Today did not go as planned. I got the tombstone mounted on the 4th axis and dialed in (~2hrs), but had to stop there. Another student is also doing 4th axis work requiring the foot stock and apparently we only have one. My options were to make another foot stock, or to work on another part while I waited. While I considered option 1, I went with option 2. The stock for the crankshaft came in yesterday, so off I went to crankshaft land.

The stock I got for the crank is 1144 stressproof and it cuts great. I started by facing the saw cut ends of my blank and poking a center hole in each. The center hole gives me a point to dial in on the mill since the OD of the bar was too lumpy to get an accurate center from. Since I'll be turning between centers, any minor offset end to end from the 3 jaw will be eliminated.

YlSEw0BTrVUrnHbksg8zUudYVck116SWF7PY24Fq401fH1l0D0maP_MzmacqLRsCXoCuqOc4lNnXWhILzABxoTCtJvCMRB1AmpZm7_5OE0_qZ61yzjYwErereL_aDaLhmt_KOFx0V7Y=w2400


Then it was off to the mill to poke some more holes in it. Before I flipped it end for end, I milled a flat on one side of the bar. This will serve two purposes, allowing me to align the flat with the vise jaw and giving the lathe dog something better to clamp onto.
PUnSVpqgY0Wc5IiFu0taVoqdz1rSzJIDYQvI1ePpjwf7DfYlSlwvX278mqqDG3XsGKZKYNUglhXt3tZClHNFcU3YLt4tQuhDx1lCbqhqz4MLoA5rrTfADUE_LwP8Lobp45RcXBWhCbY=w2400

FTShI94AoA5--zGzemj4moLOc3_-4iPHrbt1JB2Rui33f6-rTK8eeLHWUWFCZelLUzgVWRbyRqxAgofvYMUT8ieH0ORqn2yAR1EKGmSazy-ZXLjMJF0pbpJXHOl0ETxhhFxqcqEFa34=w2400


I laid out some lines for where each of the bearings are and then the crank throws. These are mostly just witness lines to try and keep me from screwing it up. Each of the turned areas here will be a main bearing.
Vo9GCbUD9fRFAvr0LWQLhv06R1hznRRXhEl1RjtJ3OstHtjBXvu_NGnslgg2c3piEIg_zYiGmRw5NxSEBLUrwxJ_5hUwGa0gmWB7R2-b-umOlrJYiIpIOA3OLzoCJroBisKjxp3tMMA=w2400

L1SSCfES0CVpvg9s0FZ6gm-4_xemTZXK7FzRMcFiw1HyGENPE2p-wOU9H0P7lzMKXTstLyekTYpogK3t3afHaPHBhZ9HuLCDs8Kyis33banLAYweYpgqyddU6OY9WiRVYplnE-o_lgA=w2400


Now for some questions:
  1. What sort of tools to people like to use for this kind of turning? As you can see above, I've just been experimenting with a 1/8" wide HSS parting blade. I'm a little worried about using the carbide parting tool for the interrupted cut when turning off center.
  2. Is there a suggested order of operations for maintaining rigidity?
  3. I'm a little worried about keeping track of the tool position in the z-axis. The lathe doesn't have a DRO, so I usually just use a magnet backed indicator on the ways. This is limited to 1" of travel and my finished crankshaft is just over 6.1" long. Is there a better way to go about this rather than inching my way along with the indicator?
Thanks for the encouragement and help. Just a couple of weeks of class time left to get this done.
 
Your work so far looks impressive, I may be showing my ignorance about cnc machining here but is there any reason that you can't machine the crank shaft in the cnc mill or even rough it out in the mill and then take the final few thou off in the lathe ? From what I have seen in this forum many people remove as much metal as possible in the mill and then finish off in the lathe.
 
Steve, thanks for the link. I had a look though it and while it didn't necessarily address everything I wanted, it gave me the confidence to just give it a try.

The reason for doing this all on the manual lathe is that my instructor required that one major part of the project be done manually. While I could have roughed out some on the mill, I opted to just go straight for the lathe after I got the centers drilled. It was actually quite satisfying doing this manually.

I started the morning by wiping out all of the layout I had done yesterday. Not that any of this was wrong, but in the order of operations, I wanted to turn the OD of the stock down first. The stock was 2.000", but the biggest diameter on the part is 1.750". This was fun.

Cn7EooZOLdTpNnZsh3KtUGyzy5PmQfTzUDIfmANeIZ-YX5y9L-RqRYXF-05Jap7gk-0qk44bVsvTYKNJuhyz7Xe7-hcoiEtE8002Kz98Ivi09jIopyUjjd06p_3bJFpDKnhuHx4Drek=w2400


No, I did not spill Dye-Chem on the chips. I blued the stock this time and redid all of my layout. Let the cutting begin! I decided to use the carbide insert parting tool because I had better luck keeping the end of the tool square to the work. It cut well and didn't give me any issues with the interrupted cut when turning off center. Here it is after some of the roughing.

FjXzt9OPyS41XTIRQM_Zilqbtbr6wVbKFSQH4nRglDsiCQe2ODSqxhvXaPJUr21w5fe8V6qXgeGLdlU61yVz5xLLonnycpchd5BDqQRYomD7y2TKtQVM7LRiZPlusaS71kXVupjzzrI=w2400


Unfortunately I didn't take many pictures today as I was too focused on not screwing this up. Here's a quick video of what it looked like at the end of the day today. On Monday I need to finish all of the bearing journals to size and do some facing passes on the throws.
 
Sorry for the lack of updates, but progress on my engine was slow this week. It took some time to get all of the journals on the crank finished to size, but I'm proud of how it turned out. I wanted to profile the webs to look more realistic, but I'm running out of time. Since I was turning between centers, it was quite convenient to pull out out and check the fit.

XJ7edyI74RRRo_SDBsopEh75nZUwNdzKVtrkT34L-B5Y3CSjB7BaoTgfPIci1NePew0shrko1cG8pOzfmYhb5nuuznmRp-kmquFh76ylrMcJNyNt8qfAxMezLv5LH0BnSY7S6R7_ZwM=w2400


Once that part was finished, I sawed off the ends and finished them out. The front was just tapped for the timing chain and turned for some relief. The back needed to be drilled and tapped for the flywheel bolts.

GTcbXVagXcA_CJyFCOLkQZ9IymCjaDmZ9boFW36_9ehkagWZ8hAA7dl5dSRsQ5mRMfqKVwbrMaoYWawtNWJzcRkRZJ9SZSSg4am3RLVyL-tl_7y8jqUXMo1irGYGgncRiQc8ru0cuHs=w2400


Of course, the bolt I had for the front sprocket was too long, but everything else fit well. The starter gear is also installed.
Rc5sjqnsQZq-UI-Om46rNIzkwOPuUMMFbdiAi1MQyD1jqOSBT97KNIlu3A9_I4BK3LeJ8UseXETcRb7kOFkIaHYnbc7GC_b2vaBUjKSqm8KQEPTZq0wZyQbKC74lATB9BsfM4KxruAU=w2400

wHl9P0osijlr1o3eqENz4SYo5IBWgRzGuRsnmef9srdzNG6Etjrlk2fKvVtrhlbdWEGF9l1BI_2VeP9JzpMug_AepCTy5VvNrppe_avvpmF5IxDVU2WceFeHVfni7qW9JibIiep-V-g=w2400

PR6Qdr2HtvsWOD-unZYCxL-35C0exfuQY3N45qmGb1sD8ArHYcXsDIfo6SdK1bWIuaP6-KxxsSF3mt5erQvKZ9rR-hNE18x2WnOcxdWe_v_IKw6248RoWYclk4L2cnCsi8R8hG7t6NM=w2400


Hopefully more progress to show on Monday. This is the last week that I have in the shop to get it done.
 
so you have one week left. what parts need to be completed in that week?

Good question. Here's what's left:
  1. Cylinder Heads
  2. Spring Retainers
  3. Rocker Arm Pivots
  4. Engine Stand Mounts
  5. Push Rods
The cylinder heads are obviously the most complicated of these and probably where I'll focus my time for next week. If necessary I could make the other parts on my little 12" Atlas lathe that I've been fixing up at home. There's also the possibility that they will let me use the shop after the end of the quarter.
 
awsome progress, I looks great !

Where did you get the gears for the starter and flywheel?

The gears for the starter and flywheel as well as the motor came from ServoCity. They supply lots of parts for the robotics team that I coach and so I already was familiar with them.
 
More progress has been made on the heads. I got my dovetails milled first thing and did a dry run. Everything looked good, so I went for it.

Here we are part way into the roughing operations:
m7i5P48vCPJ-5KJw5y6-Vvv0M2Mrqt4E8zmNFftEG_ehq7z714yrRG9cccoUSb3NfRtjXiR7Ej6_6i8ZNd_uW1jXM92EkiQAiB7-X931ouZBArT5hBTUChXJ_51KeI31UGOAbKSkfOg=w2400


After drilling some more holes in it:
cg9a2DJ-h7LOlePdQQSSJzqdNPssfkCcciyWRQMyiKL52G8h1B5PEB8fsJnGskDePa7wu4sPLTjG-Eu2TR9eyBBS1094X-Akg-sRdpCSkhPyOVvKMagtyqLNh-B8eShpI8MxIMf3fI8=w2400


The next step is to rough out the inside for the rockers and then finish out the exhaust runners. Hopefully I'll have pictures of a completed head tomorrow.
 
Almost there! I've finished both heads and begun the assembly process. I still have yet to make the spring retainers, pushrods, and rocker pivots. Tomorrow is the last day in the shop and most of that is dedicated to cleanup. I'll have to finish the remaining parts on my own.

I'm proud of how the heads turned out. They certainly look the part. To hold the heads for the last operation I drilled and tapped 6 holes in the tombstone on the 4th axis. This way I could easily index it to the angle necessary for the intake side of things.
yM4g64G3rF6kYBCpCr_ab2uOrFNzBZVWwpFXS7suIV9uMbAXnPwf-I-vKYEyv5L_I945cL2MB4-r7DeZx9ESpjeySQqCzqWhJimAyGPbG2Z1icapQCoXovshLbYdst4Ge7Sm7R8ymuEI2y2h4izs5FTiAPw-n0H07DZq-p4LsSfl3ZZEZfYG2IP_r11T7iWH2pa_A8CuoQEei01pYlrSRggd2orhTnedcwICEjZmC1KDn6ijc-PAk79ZVM2YEhQFTw9zTCU8bugk_PWkg1nsNY2c41C-6NR0Rf6pDdSmzzFye5jAE2350SBFjq14p-iB_b7zV3Vr3l2cbPADgTK53Ubg9qMW54efK-7iSmWlFdc6MFnu3x8OuSC8padQK9VOgO0KvPEO9GNhPnlGNHDfTYjCRsKyG_2MaZF_phwzF64BnSzweKHqPjcyisGdkCGwITOjJsCzJmYIXQBqdtX9otN3kCYhai54EoahBtZh-5Y7T_-NP9T33O3yPJiRdGcxZYyGFgNkDbt1V6Uq9aIp8Or92E-CEVl3mpX_q0BP_SptXEoJ1G8kJht5OkLHnFwx0ZORUml6mi-uJx5rx4vhR6G7r2bqDcGEKT_kDmMsYoQkE55P7MbD8qsp1Wq3-6DAvX6NFHhSvokJH6coKqhmBDYEjP4sc2sb=w1214-h910-no


I milled down as far as I could for the intake runners. They are close, but I'll need to finish them by hand with the die grinder and files.
a_OoMJ8zby9QLO_ZDgniqUax5-HY3WQwvGc2s2GK6bmUf-_qmH7n927s7D-VaMO4kkiXhyjZ_lCgsgHg0lIvyXcAWjL-LVmTPdDVeq5hqvRnfm6pFgkalj6VI0O3VWTs6nHqD0jdYB2o1Gn9hcQVIZGUynWcTJimcVXpAGQV0D5mSG_gEhYClBdmTiPrcP_KnpsLFTIeewmOD1wWlWyaRPPKfnjHYXI80XYhje-iwRYyCTatRvP00ypynnyaUWyDg5gN7pGm0R0Fhr3HG8UFfPAbCb5gTgbf3yljh4Qq-9BJQk14gesrIxLljwOsOibm4rlb8itXUo72P0u_dka12qGrTuv24G-6KlwWSDBnzk4CMw9XcJkUUwLsgP4NeuKW5fgnciZkKmCenzNSdNJ0eH-bZ8KjWr1NxMC2SeX32QwzC5PCs79Bgpry9rvhkFSC7F7m4zmnlu651gPT4LOodqCVx1ZW68N1p_uejosYlbpPnNBLySQkkHAIUDlayNgsupMOcoNyB4SuKO0QZgo1MlDkfMjqJVWvnoWt8pkLYr55rQzlk5fWaJRzF7kTTo4o-77LngkC-C9bUkVW-oGSahsoFk5gPmiX_L3X7ZOUmmT2R5ulbiarocxXerHh9jgYEA2aXYuxCDQmBLc-KDD4Ko6EgOjVPBlb=w1214-h910-no


oaTw9BoPkZ0A84QP5HKXNVPl9s0khYrpyiOfl1F_uq2hNugjdLXPI8y8L62qG7hil3mpsIu58NhDWuo8FB9kWrNF1xdIGN-Odnnpo88I0znXVv_WMqHScu1yd6mcc3w4m_jHWv6qi2FRCKUyqXWULVXzbHf8OWq3okMlIGN09dn72eoJ6UaaDwz0DaDOzA9MunRaKw66nI1AGaCkas-wf7HDgoB1k5vgipvTDqcy9I-IPb8iQho-BwopJa8bmPkQpOLa2M5QCpDufHXECcGqzHwIRNSQ5i4Mgjl0ZrsimB8UexQZOlj4XB1P9jDsRUhOFyH2uQJtvGcgD5VZyR8Que241kI4BY6HySWgBOQ7-mhZal8LQwMfggx3fdYoB-4QWAbe2ieKWDlDATe6RdEpauJ9mUpC7mh-oLb88Oset9k9dZJJWuhYNMR705g9hREeVF_gJU8EdFEExceKZL7BgevFIJDHFqSChubj3tt3NLBg-W2PHdhVVd-YRwR4sWPjyTRn9teFdP_S4-l2N4-TLNAzBBAueqAXjTx0Cct5z9osJ3AnpAgx3dZQ2L8uXJHCXvPd1ppkfEyW45caqV_KbULLzIvraNSKUDoYQW_PcuQQVMLK4McBRf9B9FcVO-gh2_wF0XIc-ZYVheNi6LmpqDtynu-TIHw_=w1214-h910-no


I still need to do some de-burring on the heads, but I couldn't resist the opportunity to start putting things together.
CIsHZEjlhuhWChEGPLNlCoVIQqYGr4mueogmo4-yTKngD39Bh-Qqs31QVz_nG_ozBWK7XrHji61mLqp8oKmrYkRhUSMSgWrJbr_8wWqlfmL3PdFDzJ856-2dXgikuVWuGfoSwwkUc7NPIeH7rkfoffqY1bQdTCl8zHI_MPiBgO8aLf3OeAKmkMswBJm9C4udHeHP1T9W-_7Q1PijBje_PUZvs1WgLFWnlGw0rooqMyORmp42iRmDvgI5A6F1nUL_7DVGs5_s9a1rXMhmzdK3i_UWSN6LInSqTOqNhoG3ILKcRrSiJb5r0GtdinUdnyc6wmHVasslYrVrdzj60-MXdinSOXd38DIgVHh8uNHgTV6QDI9G3sHjjG4S3wvOY7FuFagzsd7WK6r-0wuFPg54JbblHVWMX7ekNfYLM0O_7S1O-V58jiXoY1dnBewT2NgeHEL0MK7ht-X5tDt957eOqcG6mQp25bSdrnmswxI6HaZCcmb4XhP_ILCwLNsGlRQD8sMP19AhGkcqfzbG1e60vsFtdbeFyqHnnBv00WPeJkQu7Bh8EtVDaYiPatIk2o-uwxzCk07FZb9Y1SpkgJ8eyQCgobmfYoH-fo0EwNDyRvtxQh_RAMBKm29IpdM1xjQ3xiceljkljSyQmUsqZzbZDjwtmx_fs5Ph=w683-h910-no

b0JByErG9e-M3Rq_Qdb56CnhGBFE34zCJTibLvTeohs25jeVM-aaz6cCsl37s_wo5Ay7DqHl03Z51GP0-Pjsa4U6kQVqMpPmz3hDS01i5LMmoxgP9uHx_OXv_p_jyritDsoYd0CljzUzbREtgoWg3IxJBxs9nA1miEdCdo8U7HqdUOLZI36UIdMcvukPxtXB6NX3nkN2mx-Dp_nXrBNMxzwjSpndntzMAcQ8LBoyW14NJEHhKu290OgSXuAVciizC6rHrHJc75Zi_c-Iml4ZIk1uk_fFREz2kx7jyVTEuAkHcB-abPb2ppzOtxXVI4O-AqCtb4rwtp3KKD3ph4KJDTnRuPa8c7h4L2uT58ffRjANNGjqXMmv6hc5SFYBcUMybpG5qP3fXFACJxhf0_oWgrkEc-3IGx4TOEb3ud9dk0r_WiZ5wesGH84X-_TWJ71JKSMWyl4pX3IT27bn6hvvYdHvwp7d3aEOM9gj2NsO5N9uQEgQzxlB6itoQXpD1T2JM5jDqTq1ZL2osr9fULiPTnywxKZMl0bihyFPR05QClhm1HPlRqkHticBNmBVgpUm59gkNE28_Ie0k02Pf_4HNeSmCvHP82-3ygl_RK_tyS8b0BO3cuFTG0z4vdgiOfiNypFoUEhflkp3W-IhUTgwRVLrgMZOvrkl=w1214-h910-no

HHZqvQfiK0Te7qyNGTi-MJfI81UPajMhtV46fdXvaO3YcGWiMgHe5s9i7gasgvaT8gCTmVPaGeNDeHkBMCURSEhBcSYEpbbgOmwY3UiMzMi0lW94miC6Lgyg50Kuu99DBMAnaVNB01s56L09Y5iIbN3ZQavjfXBN4UQRizB6zb5hcqKz0cBLJrmh47di5mGedOv2-yJXfQpduekeidOGu1NqHFYtyoTYaUmlL5xVMMkYeP2LAWPvCFGbN6aAkIXLeSSn9e3EBACJiVg3t7l2JZEg60ss-PhFVNRZ0FP4WwINjYEf1DcGgKq2xlSHkh3Ee6xSgX9MWuAGZ1oQSAHpFWzKdhRe5Cx9LSNLNonpvTtBZRqJMzyqdhnJzJXcZDADPQSM_cZDBMScwjxBklW9-msBLyojLL0LMGcsrnRwJSotpzN8LfcPCsLDD4m66J7KvrLCMsuK6Nh_Dw0dhFKFJ_YNPoI2GGc66R-bXbY3AZTj_uDTVQEPcmi8hbDIHo2umjOijCAG6iehY7xV1xrOZ08dp5imRTcJwquL1UvYW25sZ8taCsJnahv-YrDAGlWWR2HE3-QB1dsdehNBz5VoxZ1xd_VpAMek0LEf46S4E3oKNz9iTqxbWLFeTPYa4CWuflBaMFWSFLsh3sz_LdZOEpamOPnvAdna=w1214-h910-no
 

Latest posts

Back
Top