Wow that looks great!
You are using an out of date browser. It may not display this or other websites correctly.
You should upgrade or use an alternative browser.
You should upgrade or use an alternative browser.
1/20th Scale Burrell
- Thread starter glue-itcom
- Start date

Help Support Home Model Engine Machinist Forum:
This site may earn a commission from merchant affiliate
links, including eBay, Amazon, and others.
glue-itcom
Well-Known Member
- Joined
- Apr 10, 2013
- Messages
- 216
- Reaction score
- 301
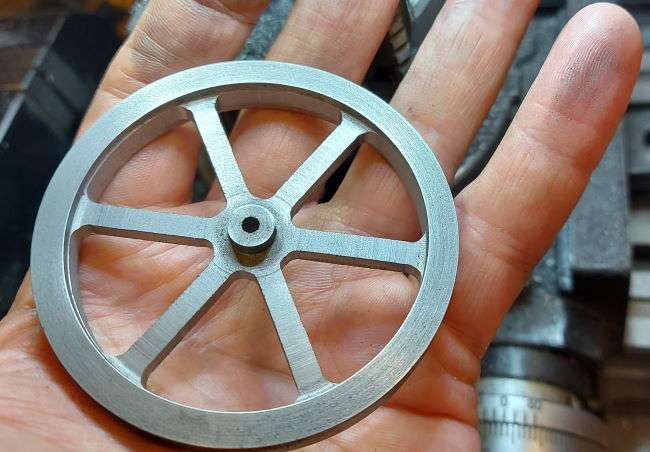
I just couldn't find a flywheel that was even roughly the right size, so had to make one from solid cast iron.
At first it was a tad thick on the rim
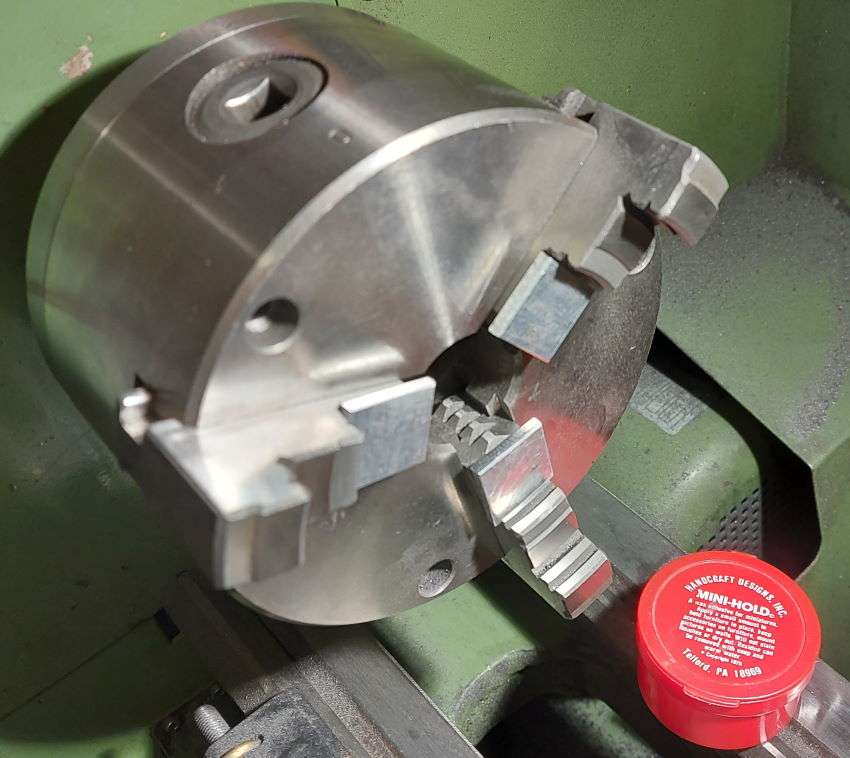
so, back in the chuck...at only 9mm thick I needed some spacers. Don't know about you, but I find it difficult to get all 3 in at once. My solution was to use a sticky wax to hold the spacers.
In the end I got a thinner edge flywheel, round spokes and was really happy with the blending
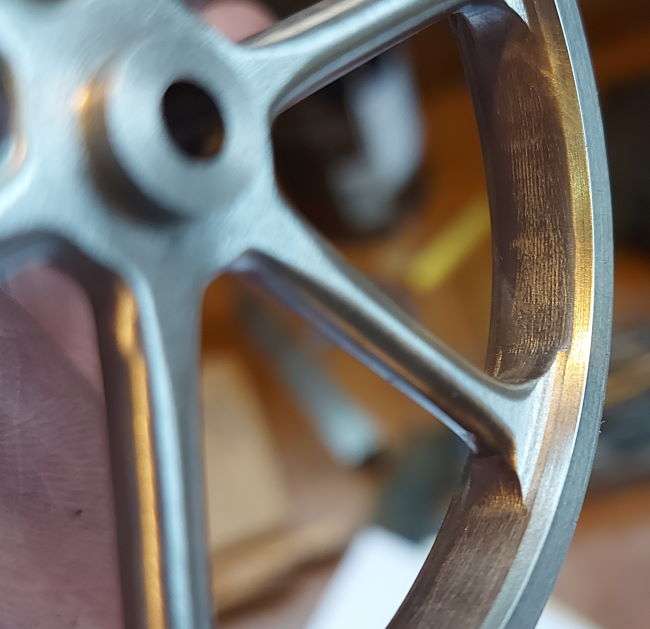
72mm OD and 9mm wide
At first it was a tad thick on the rim

so, back in the chuck...at only 9mm thick I needed some spacers. Don't know about you, but I find it difficult to get all 3 in at once. My solution was to use a sticky wax to hold the spacers.

In the end I got a thinner edge flywheel, round spokes and was really happy with the blending

72mm OD and 9mm wide
glue-itcom
Well-Known Member
- Joined
- Apr 10, 2013
- Messages
- 216
- Reaction score
- 301
A bit of video showing the anvil I made to support the other end of the rivet
Beautiful work! Better than a casting in appearance. You have gone the extra mile with the blending and large radii, so it looks "Cast". Well done!
K2
K2
Hi Glue-it. All you need do now is dip it (cold) into hot wax (melted candles) to give it an extra 1/16in. overall, than make a plaster mold and cast an aluminium, or zinc/mazac, or resin, pattern that you can keep for making "cast-copies" when you need them in future! Flywheels (being "precision located mass") don't need to be Cast Iron or Brass, but just a dense material - like Mazac (from scrap castings from car scrap-yards) does a good job at a lower melting point when making castings. - Looks like steel (grey) when finish machined. After making a pattern, the wax on your nice machined part can easily be broken of and cleaned with spirit before painting.
K2
K2
glue-itcom
Well-Known Member
- Joined
- Apr 10, 2013
- Messages
- 216
- Reaction score
- 301
Hi K2, that's a nice idea, I like the method. I will have a go. Best regards, NigelHi Glue-it. All you need do now is dip it (cold) into hot wax (melted candles) to give it an extra 1/16in. overall, than make a plaster mold and cast an aluminium, or zinc/mazac, or resin, pattern that you can keep for making "cast-copies" when you need them in future! Flywheels (being "precision located mass") don't need to be Cast Iron or Brass, but just a dense material - like Mazac (from scrap castings from car scrap-yards) does a good job at a lower melting point when making castings. - Looks like steel (grey) when finish machined. After making a pattern, the wax on your nice machined part can easily be broken of and cleaned with spirit before painting.
K2

$25.34
$34.99
Peachtree Woodworking Supply Bowl Sander Tool Kit w/Dual Bearing Head & Hardwood Handle, 42 Pieces Wood Sander Set, 2 Hook & Loop Sanding Disc Sandpaper Assortment, 1/4 Mandrel Bowl Sander
Peachtree Woodworking Supply Inc

$40.02
$49.99
Becker CAD 12 3D - professional CAD software for 2D + 3D design and modelling - for 3 PCs - 100% compatible with AutoCAD
momox Shop

$99.99
AHS Outdoor Wood Boiler Yearly Maintenance Kit with Water Treatment - ProTech 300 & Test Kit
Alternative Heating & Supplies
![DreamPlan Home Design and Landscaping Software Free for Windows [PC Download]](https://m.media-amazon.com/images/I/51kvZH2dVLL._SL500_.jpg)
$0.00
DreamPlan Home Design and Landscaping Software Free for Windows [PC Download]
Amazon.com Services LLC

$39.99
$49.99
Sunnytech Low Temperature Stirling Engine Motor Steam Heat Education Model Toy Kit For mechanical skills (LT001)
stirlingtechonline
glue-itcom
Well-Known Member
- Joined
- Apr 10, 2013
- Messages
- 216
- Reaction score
- 301
The crankshaft for the Burrell in my design is rather tight to the top of the firebox. I might just raise the bearing blocks slightly to make this work.
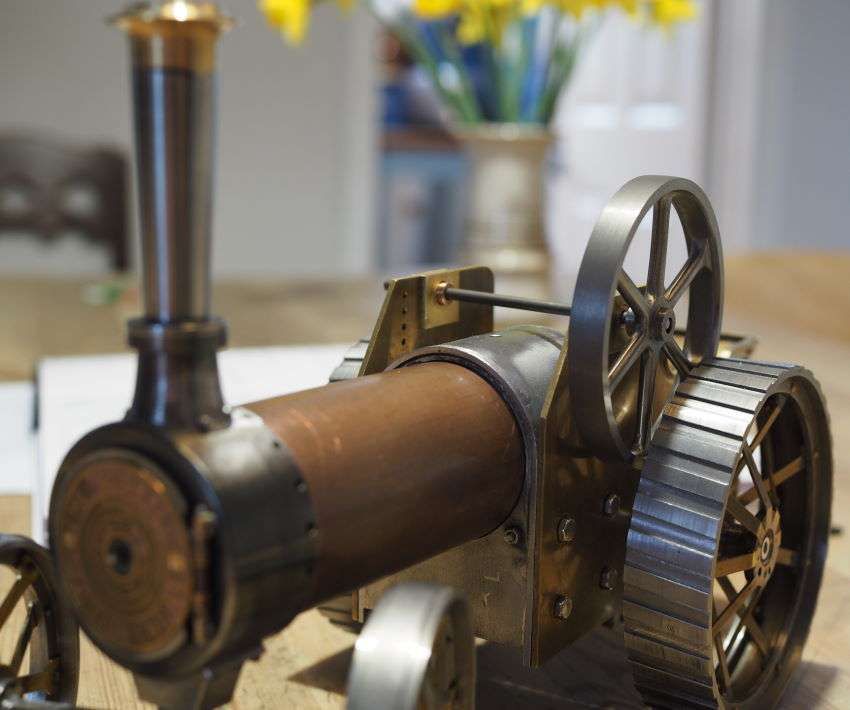
I will make up the crankshaft and then I can have a play. Against the original drawings it is looking quite close, as someone pointed out though the drawings are for the compound version. I'm building a single cylinder engine.
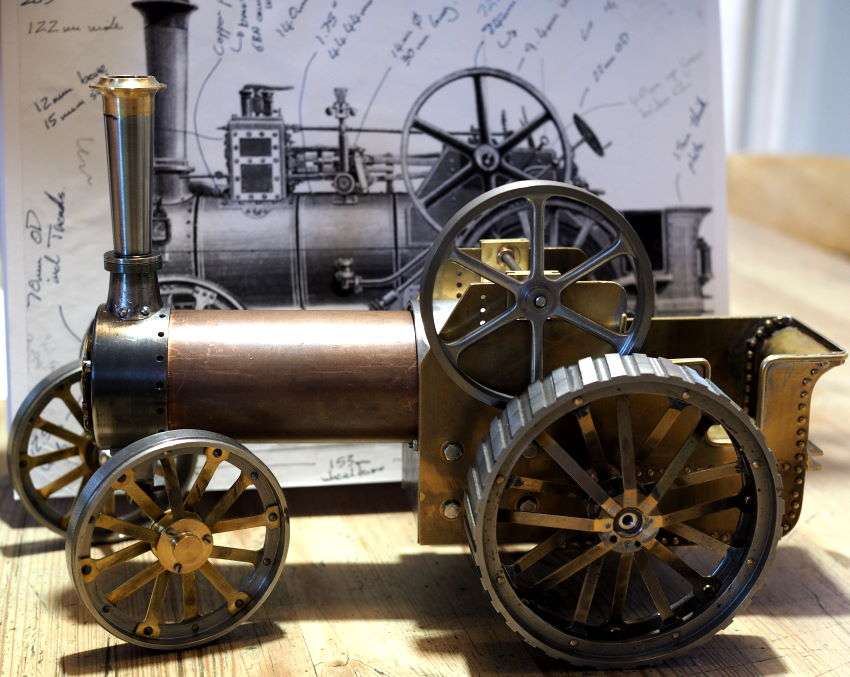
Being a single cylinder version I will get a bit more room to play with.

I will make up the crankshaft and then I can have a play. Against the original drawings it is looking quite close, as someone pointed out though the drawings are for the compound version. I'm building a single cylinder engine.

Being a single cylinder version I will get a bit more room to play with.
glue-itcom
Well-Known Member
- Joined
- Apr 10, 2013
- Messages
- 216
- Reaction score
- 301
This image shows the detail. This is not a perfect build and wish my skills were that bit more finessed, but hopefully this looks the part.
I added multiple towing locations after talking to my brother. He worked on a farm for many years and his opinion was that this would be a real benefit for towing offset trailers and for maneuvering trailers in yards.
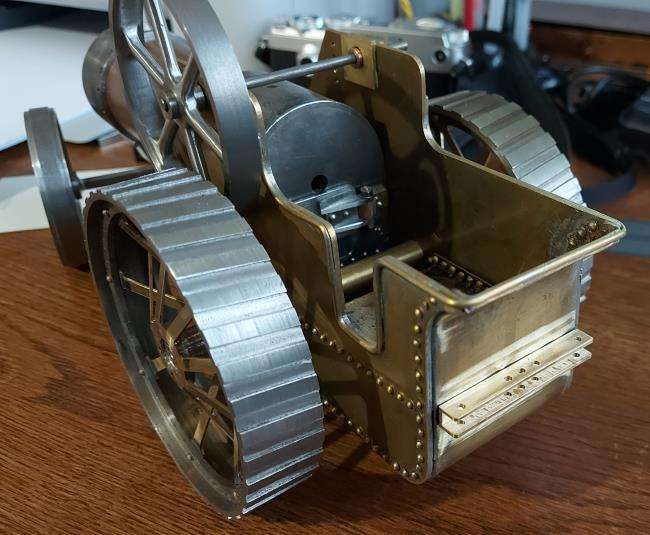
I added multiple towing locations after talking to my brother. He worked on a farm for many years and his opinion was that this would be a real benefit for towing offset trailers and for maneuvering trailers in yards.

glue-itcom
Well-Known Member
- Joined
- Apr 10, 2013
- Messages
- 216
- Reaction score
- 301
The boiler for the Burrell is just a set of parts. However, before finalising this design I thought I should make a boiler and see how easy or difficult it is to do. So using the same outer copper tube I designed a simple vertical boiler. This boiler is very small.

The centre tube has 6x small 5/32 inch cross tubes and it was silver soldered in 2 stages using easyflo 24 and then using easyflo 55.
The hydraulic pressure testing was done with a simple garden plastic sprayer with a modified outlet nozzle.

I pumped the boiler up to just over 2x working pressure (my design is for 50psi) and then locked it off. The pressure dropped by 10psi over an hour, appears that I have a slight weeping around the pressure gauge joint. I will seal this better today and run this test again before running a steam test at 1.5x working pressure.

The centre tube has 6x small 5/32 inch cross tubes and it was silver soldered in 2 stages using easyflo 24 and then using easyflo 55.
The hydraulic pressure testing was done with a simple garden plastic sprayer with a modified outlet nozzle.

I pumped the boiler up to just over 2x working pressure (my design is for 50psi) and then locked it off. The pressure dropped by 10psi over an hour, appears that I have a slight weeping around the pressure gauge joint. I will seal this better today and run this test again before running a steam test at 1.5x working pressure.
glue-itcom
Well-Known Member
- Joined
- Apr 10, 2013
- Messages
- 216
- Reaction score
- 301
Someone (not sure who now) asked me how this 1/20th scale Burrell compares to a Mamod. Some pictures comparing it to the Mamod steam wagon


Makes me realise how much work I still have left to do.


Makes me realise how much work I still have left to do.
Your Burrell compares to a Mamod in the same way that a Brough Superior compares to a Chinese moped. 
glue-itcom
Well-Known Member
- Joined
- Apr 10, 2013
- Messages
- 216
- Reaction score
- 301
Thanks Pete, at the moment though it is just an outline. I'm sidetracked by the vertical boiler at the moment as I have to understand the boiler thoroughly to enable me to get to the next level of design.Your Burrell compares to a Mamod in the same way that a Brough Superior compares to a Chinese moped.
The boiler surface area to volume is quite high and so heat loss is going to be an issue and I will need to get a good fire going. Plus I need to find a routing for the water gauge - at the moment this doesn't appear trivial.
Thanks, Nigel
glue-itcom
Well-Known Member
- Joined
- Apr 10, 2013
- Messages
- 216
- Reaction score
- 301
I'm probably going to end up running the traction engine on methylated spirits, but Would like to try and fire it with coal. Therefore, I've made two different bases for the vertical boiler. Really just learning about firing, airflow etc.
This also meant I needed to make a grate. As this is only 42mm in diameter I decided to machine it from solid cast iron.
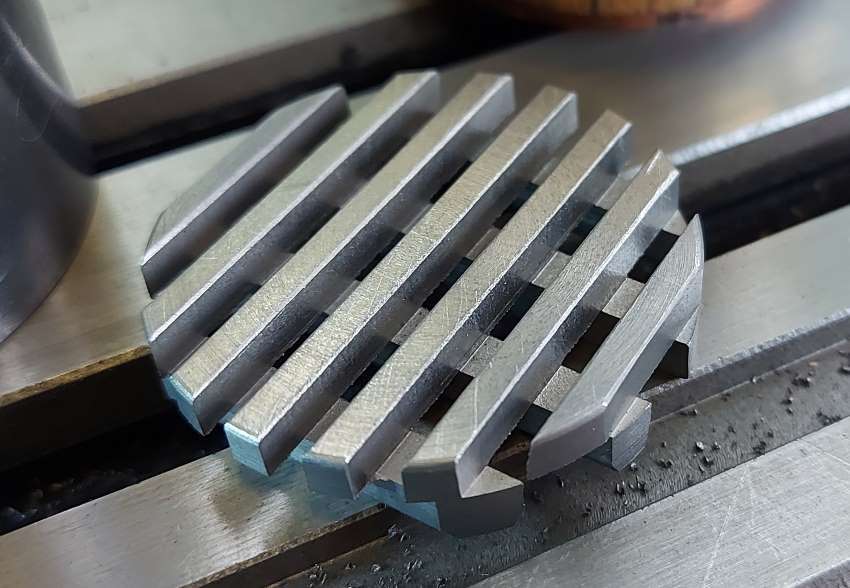
I made an aluminium jig so that I could grip the edges gently in the mill vice and so that I could flip it over and machine the underside.
This also meant I needed to make a grate. As this is only 42mm in diameter I decided to machine it from solid cast iron.

I made an aluminium jig so that I could grip the edges gently in the mill vice and so that I could flip it over and machine the underside.
glue-itcom
Well-Known Member
- Joined
- Apr 10, 2013
- Messages
- 216
- Reaction score
- 301
This small boiler is driving me a bit mad, I'm struggling to get the heat into it. It gets to temperature and pressure, but it takes ages considering the meths burner I'm using.
So I decided to instrument the boiler with thermocouples and to then do some measurements. Using silver thermal compound that you use on PC cpu's to connect them to a heatsink to attach the thermocouples.
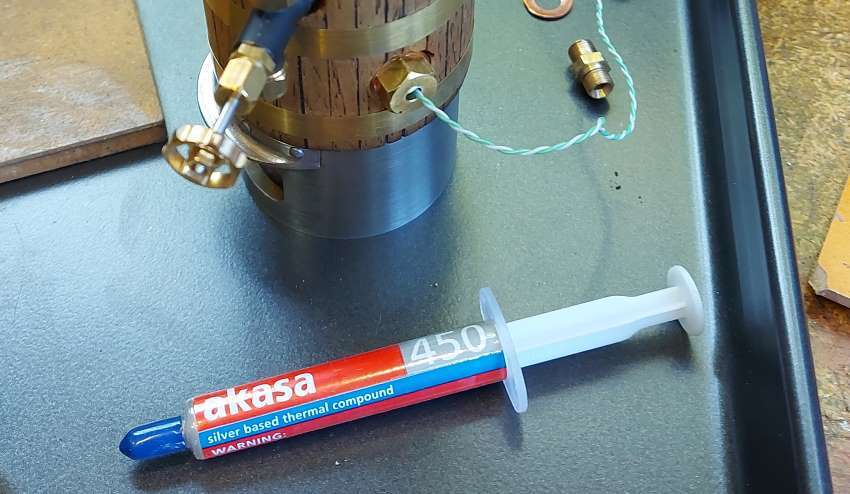
I'm using a Pico Technology measurement board and software, very easy to use. I will share the data and my analysis.
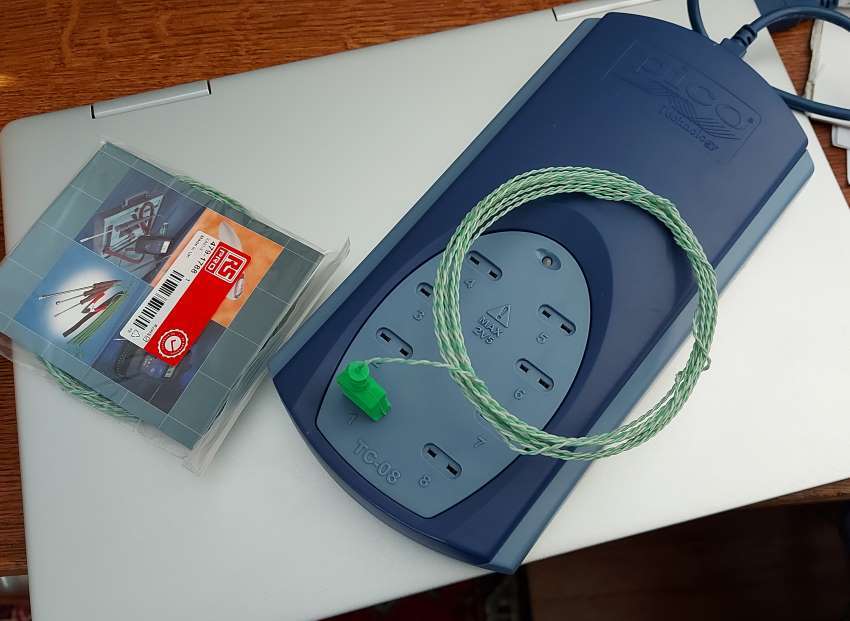
So I decided to instrument the boiler with thermocouples and to then do some measurements. Using silver thermal compound that you use on PC cpu's to connect them to a heatsink to attach the thermocouples.

I'm using a Pico Technology measurement board and software, very easy to use. I will share the data and my analysis.

glue-itcom
Well-Known Member
- Joined
- Apr 10, 2013
- Messages
- 216
- Reaction score
- 301
I measured the cooling curve for the boiler with and without cladding, surprisingly not that different.
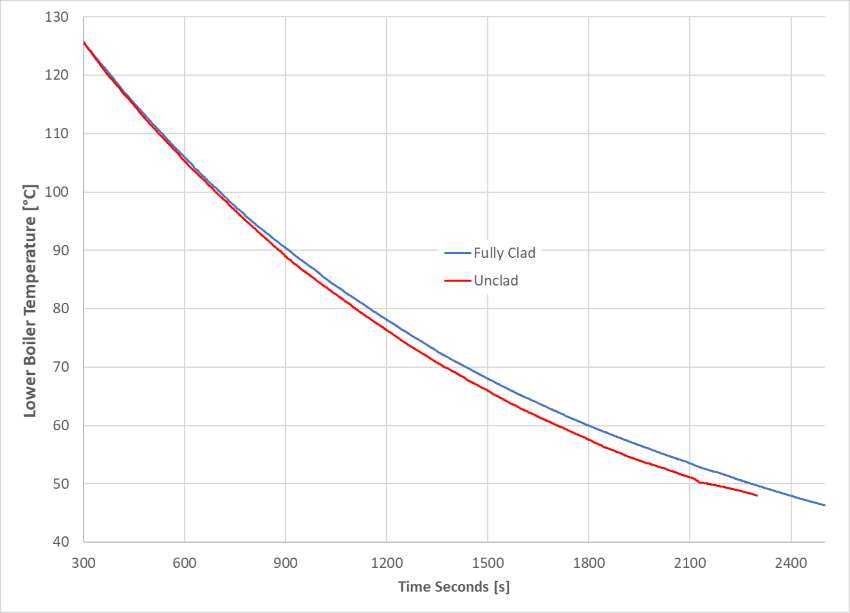
I will calculate the area that is clad versus unclad as I think this will shed some light on how effective this cladding is.
From my simple calculation it appears that the boiler is losing around 40W of heat at 140°C and 40psi (this is my design operating point).

I will calculate the area that is clad versus unclad as I think this will shed some light on how effective this cladding is.
From my simple calculation it appears that the boiler is losing around 40W of heat at 140°C and 40psi (this is my design operating point).
I hope you have just put the rear wheels on for the photo as they are the wrong way round. The strakes should lead on the inside of the wheel.Someone (not sure who now) asked me how this 1/20th scale Burrell compares to a Mamod. Some pictures comparing it to the Mamod steam wagon
View attachment 123985
View attachment 123986
View attachment 123987
View attachment 123988
Makes me realise how much work I still have left to do.
glue-itcom
Well-Known Member
- Joined
- Apr 10, 2013
- Messages
- 216
- Reaction score
- 301
yes, just propped on. Thanks for being the nerd who noticed.I hope you have just put the rear wheels on for the photo as they are the wrong way round. The strakes should lead on the inside of the wheel.
glue-itcom
Well-Known Member
- Joined
- Apr 10, 2013
- Messages
- 216
- Reaction score
- 301
I've now created a very simple model of the boiler based on a lumped copper and water assumption.
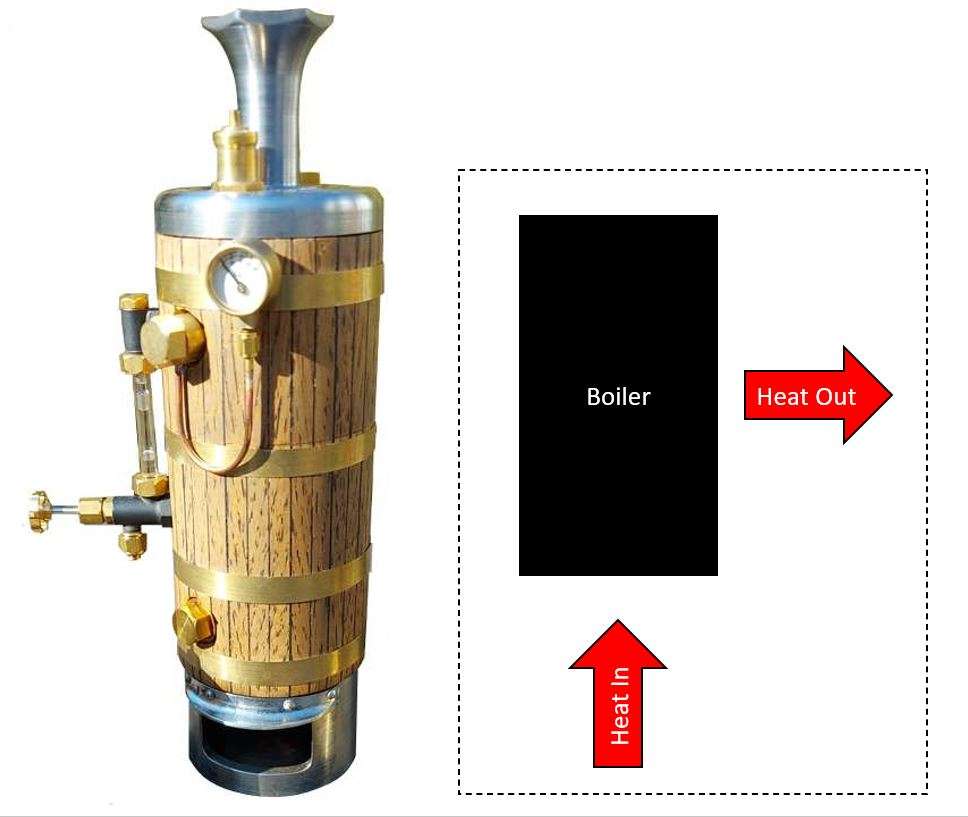
Using the cooling curve I've estimated the heat loss to be ~35W at the operating pressure and temperature and my first design of meths burner and firebox produces 54W of heat input.

Using the cooling curve I've estimated the heat loss to be ~35W at the operating pressure and temperature and my first design of meths burner and firebox produces 54W of heat input.
glue-itcom
Well-Known Member
- Joined
- Apr 10, 2013
- Messages
- 216
- Reaction score
- 301
I've now measured and processed the data looking at the heat output of the burner as I change the burner to boiler distance
Using the instrumented boiler I heated it up for each test distance from around 50°C water temperature to >120°C. Thus giving me enough data to estimate the heat input power. I also measured a new cooling curve for this firebox and boiler setup so that I got an accurate heat loss estimate versus temperature.
Once I had processed the data I could then plot the burner heat input to the boiler versus distance.
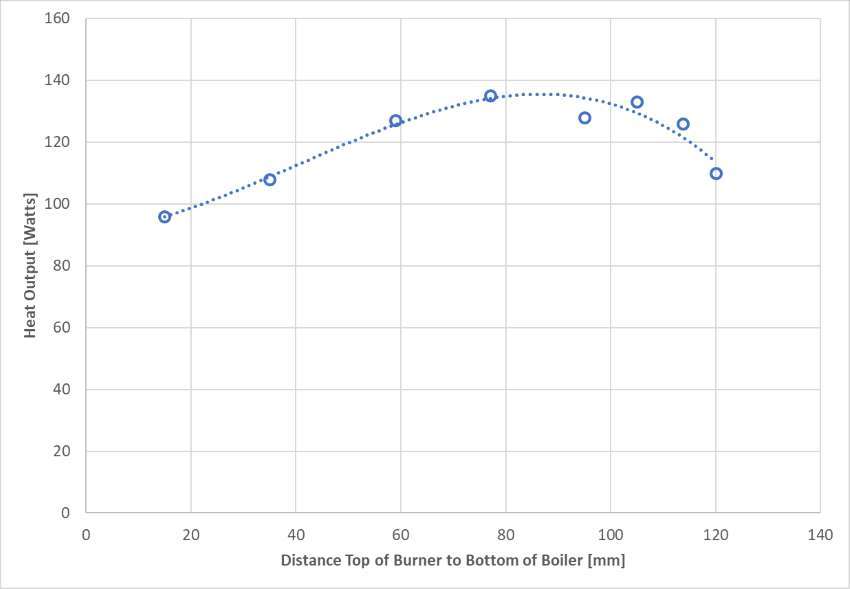
This plot shows that the peak in heat output is when the burner is around 85mm from the base of the boiler. Also, it shows that this firebox and burner is producing nearly double the amount of heat that the original design generated.
Using the instrumented boiler I heated it up for each test distance from around 50°C water temperature to >120°C. Thus giving me enough data to estimate the heat input power. I also measured a new cooling curve for this firebox and boiler setup so that I got an accurate heat loss estimate versus temperature.
Once I had processed the data I could then plot the burner heat input to the boiler versus distance.

This plot shows that the peak in heat output is when the burner is around 85mm from the base of the boiler. Also, it shows that this firebox and burner is producing nearly double the amount of heat that the original design generated.
glue-itcom
Well-Known Member
- Joined
- Apr 10, 2013
- Messages
- 216
- Reaction score
- 301
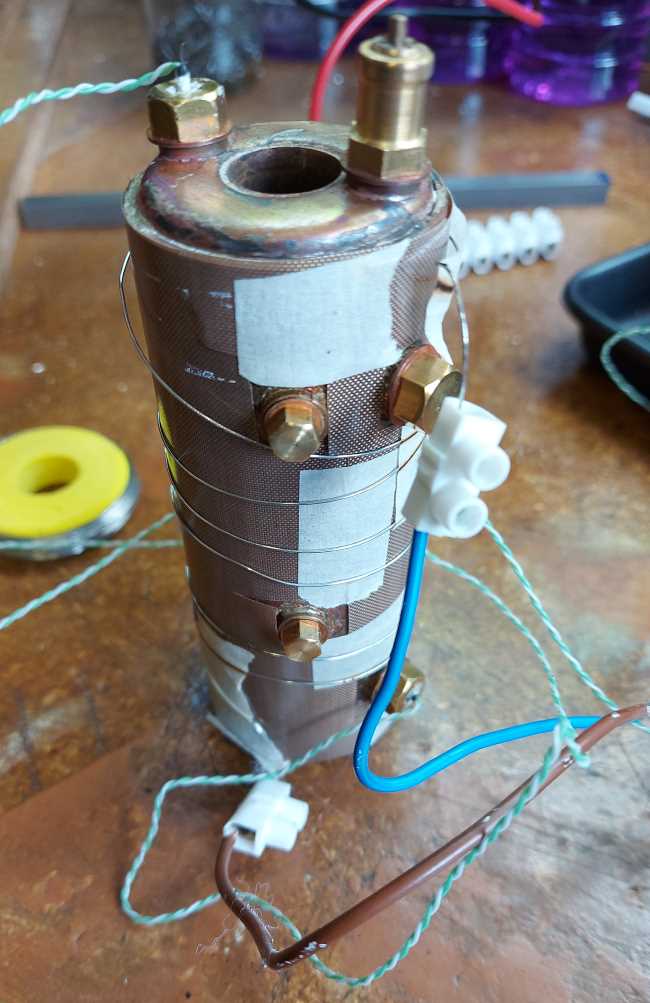
This is my first attempt at making an electrical heating system for the boiler.
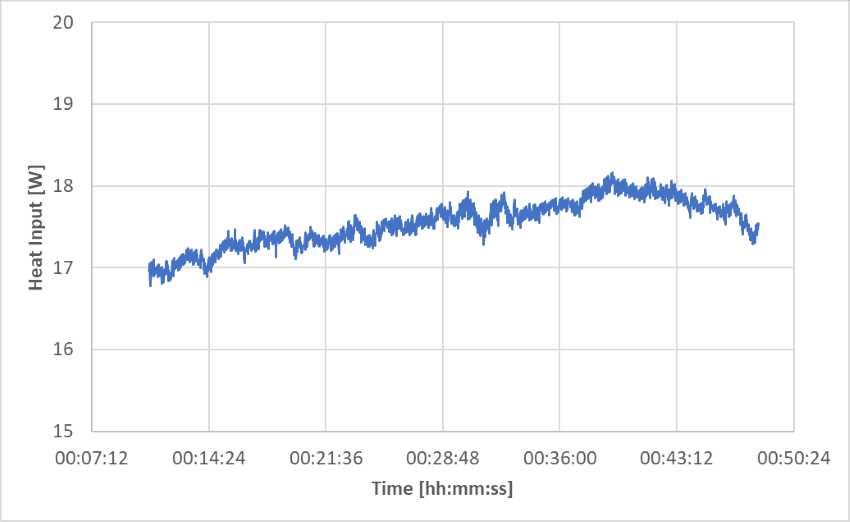
The mathematical model shows that after applying the layers of insulation on top of the heating wires the heat input was between 17W and 18W.
The power supply shows 20.2W of electrical output, but we lose 0.3V in the cables and connectors. So input to heating wire around the boiler is 19.7W
This gives me a system now where I can do some more experiments to understand the insulation of the boiler.

The mathematical model shows that after applying the layers of insulation on top of the heating wires the heat input was between 17W and 18W.

The power supply shows 20.2W of electrical output, but we lose 0.3V in the cables and connectors. So input to heating wire around the boiler is 19.7W
This gives me a system now where I can do some more experiments to understand the insulation of the boiler.
Similar threads
- Replies
- 26
- Views
- 2K
- Replies
- 4
- Views
- 2K


![MeshMagic 3D Free 3D Modeling Software [Download]](https://m.media-amazon.com/images/I/B1U+p8ewjGS._SL500_.png)


