Seeking Advice on Liquid Silicone Rubber Injection Molding

Home Model Engine Machinist Forum

Help Support Home Model Engine Machinist Forum:

This site may earn a commission from merchant affiliate links, including eBay, Amazon, and others.

scottmartin

New Member
Joined
Dec 24, 2023
Messages
3
Reaction score
0
Location
United States
Hello everyone,

I’m currently working on a project involving liquid silicone rubber (LSR) injection molding and could use some guidance.

I’m struggling with optimizing the curing process to ensure consistent quality and minimize defects.

My current challenge is balancing the curing time and temperature to achieve the best results without overcomplicating the setup.

I’d love to hear any tips on mold design considerations for LSR.

If anyone has experience with this and could share their insights or best practices, it would be greatly appreciated!
 
Hello everyone,

I’m currently working on a project involving liquid silicone rubber (LSR) injection molding and could use some guidance.

I’m struggling with optimizing the curing process to ensure consistent quality and minimize defects.

My current challenge is balancing the curing time and temperature to achieve the best results without overcomplicating the setup.

I’d love to hear any tips on mold design considerations for liquid silicone rubber injection molding.

If anyone has experience with this and could share their insights or best practices, it would be greatly appreciated!
thanks in advance for any help
 
Thanks Greentwin.
I corrected the link. It points to the first post in the thread. The link you posted picks up a little later in the thread. Either will work now.
Gail
 
Hello everyone,

I’m currently working on a project involving liquid silicone rubber (LSR) injection molding and could use some guidance.

I’m struggling with optimizing the curing process to ensure consistent quality and minimize defects.

My current challenge is balancing the curing time and temperature to achieve the best results without overcomplicating the setup.

I’d love to hear any tips on mold design considerations for LSR.

If anyone has experience with this and could share their insights or best practices, it would be greatly appreciated!

I can't offer much advice about "injecting" but I've played with liquid silicone a bit. Make a good strong smooth mould with some draft and use a release agent.
PIC 01 - (sorry it's blurry) I use a 2 part silicon mix (get a postal scale). Mix an appropriate amount. I got a cheap vacuum chamber (orange) to get rid of entrapped air. In this case I was using a 3d printed (PLA) mould I designed (vise gripped behind the cup). The mould was a bit brittle and "steppy" (3D print). You can see that reflected in the part (next pic).
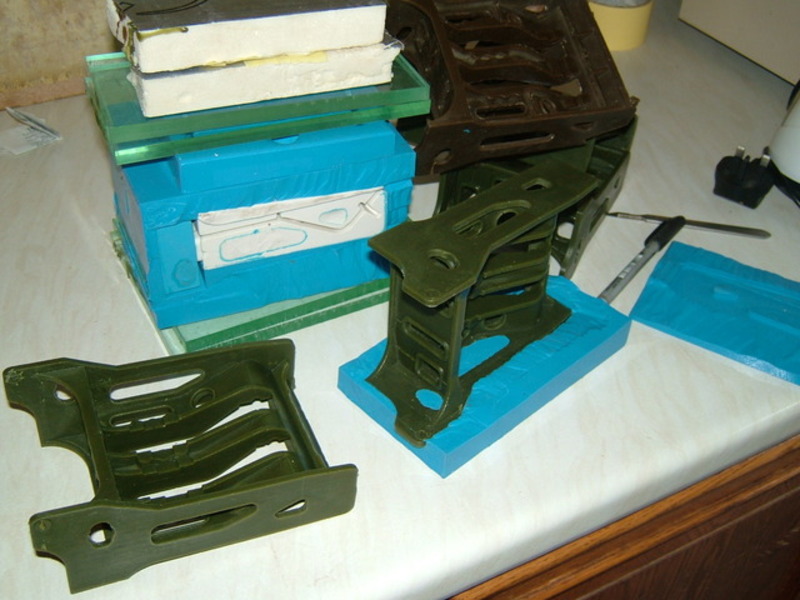
PIC 02 - My part (left) vs the original. This was the plastic jaws of a Parks Bike Service clamp. I wanted to grab hot objects so I cloned the plastic originals out of silicone (in use the plastic melted). This mould got me the two halves I needed but was "tired" after that. Despite release agent the silicone grabbed the coarse printed mould rather well. The green is the natural colour of the silicone. A lot of fun, and learning, designing this mould on Wildfire 4 using a subtractive merge process.
PIC 03 - Another part made from a 3-part Shapeways 3D printed mould (high res & smooth). Two halves and a core. On the left is the full "just cast" view while on the right the mould & part are disassembled. This mould worked very well and always released easily. These "retainer" parts slide onto the end of a 3/4"x3/4" wood arm and are held on by a 1/4 dowel peg (the side hole).
PIC 04 - Two of the parts produced by the mould. I used black colorant on this silicone batch. Note I even cast a side hole in!
PIC 05 - A big mould in the form of a wood box. In this case the mould was just a container so size, not cosmetics, was important.
PIC 06 - Box removed but before splitting. A the winged head of a 1928 Buick Rad Cap (hood ornament) is being captured.

Net-net, liquid silicone is pretty straight forward and results depend on the quality of your mould. Usual casting rules apply (draft etc). I was told, and have always used, a vacuum. I don't know if this is absolutely necessary but my results are good solid consistency throughout. You might try without a vacuum first if you find the vacuum chamber expensive. Hope that helps.

My $0.02
 

Attachments

  • 01 Mixing & Vacuum.jpg
    01 Mixing & Vacuum.jpg
    104.9 KB · Views: 0
  • 02 Cast vs Real.jpg
    02 Cast vs Real.jpg
    217.6 KB · Views: 0
  • 03 Mould & Part - As Cast vs Dissassembled.jpg
    03 Mould & Part - As Cast vs Dissassembled.jpg
    179.7 KB · Views: 0
  • 04 Cast Parts.jpg
    04 Cast Parts.jpg
    183.9 KB · Views: 0
  • 05 Big Mould.jpg
    05 Big Mould.jpg
    171.4 KB · Views: 0
  • 06 1928 Buick Rad Cap Capture.jpg
    06 1928 Buick Rad Cap Capture.jpg
    186.5 KB · Views: 0
There are scads of YouTube videos regarding 'ambient pour or mild vacuum draw' silicones for molds & part replication ranging from formulators like Smooth-On, to hobbyists to professionals. I had to Google 'LSR' - guessing that is relatively high end fabrication process you are involved with?
 

Attachments

  • SNAG-26-07-2024 10.03.49 AM.jpg
    SNAG-26-07-2024 10.03.49 AM.jpg
    93.2 KB · Views: 0
...snip ..expensive. Hope that helps.

My $0.02
Sorry for replying to my own post but I remembered a few more points and found the mould drawings I did for the PICs above. Things I forgot to mention - It's good to calculate the volume & weight of the silicone you'll need in the mould. This is so you mix only what you need and eliminates a tremendous mess if you make too much. You can see I have this on the drawings and on the bigger "clamp" mould (lower half) I put an external marker (line) at the fill level. Note how non-intuitively low it is! If you're filling several moulds at a time you'll know how much to mix at the start and when to stop pouring into each. Another good thing to do is build in keys or registrations or tongue & grooves so when you assemble the mould halves they find their proper positions. Things get wet and slippy during the pour.

The big "clamp" mould was my second version and I found separating the mould halves was very difficult since one went way inside the other so on the second version I just used angle iron for the sides. You'd fill the bottom half to the mark then press down the top half (slight back-pressure as the silicone filled the mould) and any slight excess came out the tiny vent holes on the two top pins and got trimmed off when solid. It was easier to peal the angle iron away from the sides compared to the shear force needed on the original mould - pulling one "box" out of another "box" with a very thin film of leaked silicone between the two. The angles being smooth steel also allowed the release agent to do it's thing compared to a rough 3D print with a large shear surface of leaked silicone, thin as it was.

Again, hope this helps!
 

Attachments

  • clamp_mould_version_2.pdf
    983.7 KB · Views: 0
  • rubber_retainer_mold.pdf
    1.2 MB · Views: 0
Silicone rubber , always expensive , has shown a large increase in price over the last year or so and,having purchased and used many kilos over the years, I thought someone might be interested to know that it can be re-used.
Although it is usual to cut cured silicone moulds with a scalpel to remove the pattern , it can be sometimes be necessary to make multi-pour moulds where large volumes of rubber are required or cutting would be difficult.
DSCF5504-resize.jpg

this mould for wax replicas was made from several separate pours and different hardness grades of silicone.
What I discovered early on that if a cured silicone rubber comes into contact with fresh liquid silicone the two will bond as one.
Using silicone spray mould release doesn't prevent this , fortunately PTFE does.
Being very budget conscious when I started in business I would usually mix insufficient rubber to completely fill a mould.
Most of my early business was for one-offs so I had a large stock of moulds which would never be used again.
I found that by cutting these old moulds into small pieces I could push them into the still liquid rubber and thus increase the volume.
This practice evolved , and I discovered that the cut pieces could be passed through a hand driven meat mincer to produce a fine silicone rubber flock.
Lubrication with silicone oil greatly eases the process.
The flock mixed with fresh liquid makes for a huge cost saving when used for the bulk of a mould, however I did find out that immediate contact with the pattern is not recommended as surface detail can be compromised.
Hope this is of interest.
Dan
 
Dan-
That is a very interesting process, especially the reuse of the old molds.
I generally save my bound sand molds, and hope to work out a method of recycling that material.
Using new clean facing sand would be critical to get a good surface finish, but the backing sand could be made of previously used bound sand, where quality and strength are not that important.

Thanks for the great summary of your process.
That gives me a lot of ideas.

Pat J

Edit:
I have seen foudries use new petrobond (tm) for facing sand, and used petrobond to fill the remainder of the flask, so the concept is not really new.
.
 
Last edited:
I am referring to cured silicone rubber moulds , not sand ! I don't really see the comparison.
Dan.
 

Latest posts

Back
Top