Troubles... Troubles... Troubles

Home Model Engine Machinist Forum

Help Support Home Model Engine Machinist Forum:

This site may earn a commission from merchant affiliate links, including eBay, Amazon, and others.

cfellows

Well-Known Member
Project of the Month Winner
Joined
Aug 25, 2007
Messages
3,890
Reaction score
715
My relationship with internal combustion engines may be coming to an end. I dusted off this project which I had started (and almost finished) a couple of years ago. I put the project aside because I had no compression in either cylinder and other things in my life were making demands on my time.

Manifold_Carb.jpg


So today, while waiting on parts and tools for other projects, I decided to see what I could do with this engine. I spent the entire day (and most of yesterday) on it and still have problems. I made new valve cages for it and pressed them in. I lapped the valves. And, I flattened and trued the spark plug base, which I discovered was not quite square with the axis of the plug. I've got pretty good compression in one cylinder but still have a bit of a leak around the plug. And, I still have to work on the other cylinder. Never had this many problems with an engine before!

Chuck
 
Been there!!!! Heck----Thats where I am right now!! This Kerzel engine which has the valve seats in the head seperate from the valve guides is giving me fits. Chuck, that looks fabulous. Carry on------Brian
 
Hi Chuck, That's a really neat looking engine, sorry to hear you having troubles. :(

I'm going to make my first attempt at C.I. piston rings in the next few days, and your post is reaffirming one my fears! Others have done it, so its time for me to face the unknown. I hope you solve your problems. I would love to see your engine run, and maybe build one like it since I like its looks so much!

-MB
 
Brian Rupnow said:
Been there!!!! Heck----Thats where I am right now!! This Kerzel engine which has the valve seats in the head seperate from the valve guides is giving me fits. Chuck, that looks fabulous. Carry on------Brian

Brian,

My H&M is the same deal. If I have this problem I intend to make a press fit cage which back seats on the valve seats and then fit the valves to the cages before I press them into the head. Do you think this is a reasonable approach. ???

Best Regards
Bob
 
I mentioned this not long ago. But I can't remember if it was on here or another site.

It is a few years since I built ic engines but I never suffered from valve seating problems. Next year I will be building another ic engine and I will be following the full sized practice of having a 1 degree split between the seat (cut at 45 degs) and the valve (cut at 46 degs).

This allows a super narrow seat to be ground, which seals a lot better than the wide seats formed when cutting each at 45 degs. Maybe on a small engine, the seat should ideally be about 1/32" wide, or maybe even a bit narrower. You normally cut a seat with say a 90 deg countersink and the valve by swinging the topslide to 45 degs, so just swing it another degree. I will be toolpost grinding mine.

The finest grinding paste that comes from an auto factor for doing auto valves is usually too coarse for grinding these tiny seats, when you magnify them, they look like screw threads have been cut into the faces, they should be a velvety matt finish with no signs of scoring at all. It is that fine scoring that causes the leaks.
So really you might be better looking to lapidary supplies, or breaking down your normal fine grinding paste by rolling it between a steel roller and a steel flat plate for a few minutes or so (take it out of the jar first). You should be able to break it down so that when you roll it between your finger tips, it doesn't feel 'gritty'. You have no need to make pounds of the stuff, just a tiny dab on each seat should be enough.

I will be using a super super fine diamond paste (made from diamond dust that features talcum powder, then mixed with a tiny bit of oil), and I can almost guarantee that within half a dozen 'swizzles' I will have a perfect sealing valve.

Bogs
 
Maryak said:
Brian,

My H&M is the same deal. If I have this problem I intend to make a press fit cage which back seats on the valve seats and then fit the valves to the cages before I press them into the head. Do you think this is a reasonable approach. ???

Best Regards
Bob

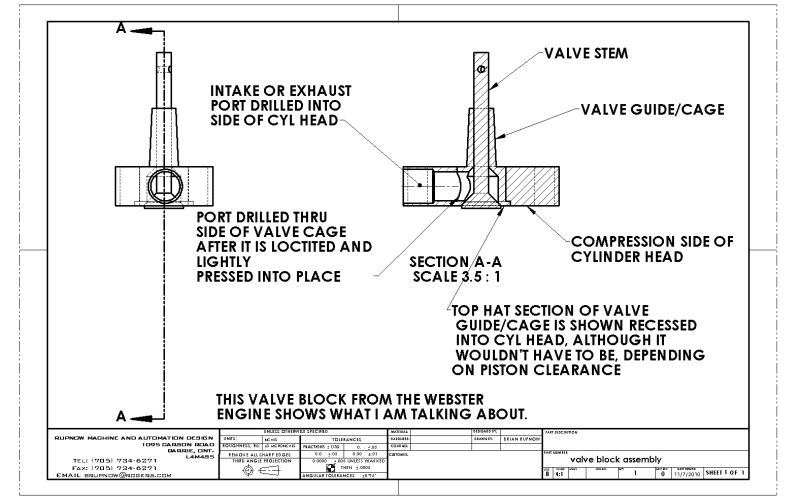
Maryak--I am still new enough at I.C. engines to be searching for the "perfect way". Right now, based on my previous experience and wisdom gained from others, I think the BEST way is to make the valve guide as a "cage format" whereby the outer part of the guide has a slightly larger but short "top hat" to it. This "top hat" will be at the end which has the valve seat cut in it. The guide gets drilled and reamed for the stem and has the 45 degree valve seat cut in one set-up. After a perfect "seal" is achieved between the valve and the seat, then the cage is LIGHTLY pressed into the cylinder head from the compression side of the head with a coating of loctite (Very light press, so as not to distort the cage/guide and the valve which now has a perfect seal on it) . This of course makes the assumption that their is enough clearance between the piston and cylinder to clear the "top hat" section when the piston is at top dead center. After the Loctite has set up for 24 hours, then drill thru the pre-existing ports in the side of the piston thru the wall of the valve cage. The "top hat" section guarantees that the cage isn't going to blow out of the cylinder head while the engine is running.----hope this makes sense.---Brian.
DRGSHOWINGVALVECAGE.jpg


View attachment DRG OF VALVE CAGE.pdf
 
What, no 3 angle valve jobs in model engineering? :big: :big:

Kel
 
Thanks Brian,

Your drawing sorted it out for me. :bow:

Best Regards
Bob
 
After another day of not being able to get good compression with the second cylinder, I decided to remake the valve cages. I had made several changes to the existing cages to get them to seal and no longer knew how true and accurate they were.

The holes in the head are about a tad under 3/8" and since I wanted a flange on the combustion chamber side, I started with a 7/16" brass rod. Here you can see where I'm turning the diameter above the flange to 3/8".

e10a34c4.jpg


After cutting off the blank just below the flange, I re-chuck the piece in a 3/8" collet and face off the bottom end.

aaf1d4df.jpg


Next I drill a 1/8" all the way through the blank

af12613c.jpg


Then I used a 5/16 end mill to enlarge the hole in the bottom end of the blank. A ball end mill would have been better, but haven't had a need to buy one, yet... Before moving on, I also enlarge the 1/8" hole to 5/32, the diameter of the valve stem.

0bdefa4c.jpg


Using a boring bar, I cut a narrow, 45 degree valve seat in the blank.

dc16192d.jpg


After reversing the blank in the collet, I shoulder down the top end where the valve spring will sit.

66cb5182.jpg


Here is the completed valve cage, ready to be pressed (and loctited) in.

7a44fec1.jpg


And the valve cage pressed into place

40f564b6.jpg


5dc5e2a0.jpg


After it sets up for 24 hours, I'll drill out the intake and exhaust ports and see if it works any better...

Chuck
 
Chuck--This is hilarious serendipity!!! Your post couldn't have came at a better time. I'm over on the Kerzel post designing it and you're over here building it. ---Brian
 
Bogstandard---I am very interested in what you have to say on this issue, about cutting the valve seat at 45 degrees and the valve itself at 46 degrees. I have read about doing it this way in the distant past, before I took up machining as a hobby. Chuck and I are both going through the same headaches right now, albeit on different engines. Seeing that Chuck is using a boring tool set over at 45 egrees to cut the seats in his cages (something I wouldn't have thought of) has got me thinking---I would like to keep the valves I have already made for my Kerzel build, which are already cut at 45 degrees. If I use Chucks method of cutting the seats into new cages, then surely I could cut the seats at 44 degrees and have the same net results-----Right?? I have failed miserably in getting the valves on my build to seal, and right now I'm watching Chucks posts very closely so that I might follow in his (hopefully succesfull) footsteps.----Brian
 
Funny, Brian. I'm pretty sure these two cages are as close to perfect as I can get. If it still won't seal I will try remaking the valves.

Chuck
 
Brian,

The 45 deg method for both seat and valve has been used from day one by model engineers, and I think if care is taken then most people don't have a problem.

I was not trying to tell everyone that their methods were incorrect, far from it, more of showing an alternative method if sealing problems did occur. All based around my personal experiences making small ic engines a few years ago and experiences in large engine refurbs many years before that.

I can't see any problem in you cutting the seat to 44 and valve to 45, as all you are trying to achieve is the 1 deg split to allow that very narrow seat to be finely ground.


Bogs
 
Just to add to the debate on valve seat angle having a 1 deg difference, my Old Dad was a trained motor mechanic with the Army in WW2, and in the 1950 spent a lot of time keeping, old bangers on the road for him self and for other people, he made a set of seat cutters for recutting valve seats and I can remember him explaining to me the need to have a slight difference in seat angle and him showing me a cylinder head that he had recut and fitted valve to, the valve mated to give just a pencil thin line of contact, its one of those things that stuck in my head as a kid:-

School was not my idea of heaven but spending time with my Old Man under a Car was.

Happy Memories :) :) :) :)

Stew

 
This morning, I wanted to check to see if the valves were seating all the way around, so I used a blue felt tip pen to color the seat then inserted the valve and twisted it with the stem while pressing it against the seat. Much to my chagrin, I discovered that about 20% of the seat on one side was still blue. After several more spins, it became apparent that the valve isn't seating on that side. Apparently the plane of the valve seat is not 90 degrees to the axis of the valve stem. I guess the drill bit must have wandered to one side when I was drilling the initial 1/8" pilot hole in the blank.

So, to fix the problem, I decided to make a valve seat cutter. Been dreading doing something like this but, it turned out not to be too bad. I used a piece of 1/2" ground, pretty hard steel, chucked it up in the lathe, faced it off, then drilled and reamed a 5/32" hole in the center (hopefully). Then I used an indexable carbide bit to cut a 45 degree chamfer on the front, down almost to the center hole. I removed the piece from the lathe and secured it in my square, 5C collet holder. Moving over to the milling machine, I locked the collet holder in the vice and used a 3/8" solid carbide bit to mill the teeth. I used the collet holder as an indexing device, rotating it 90 degrees for each cut. I also used a stop in the vice to make sure the collet holder was positioned in the same place for each tooth.

Here's a picture of my finished cutter, before I did a somewhat crude job of relieving the back of each tooth with my grinder. I was afraid of getting too close to the cutting edge, so there is a bit of an unrelieved lip behind each cutting edge.

464c9418.jpg


To use the cutter, I inserted the valve into the guide backward, so the top end of the stem was sticking out through the valve seat. The stem was used as a guide to slip the cutter down over where it was a close, but free sliding fit. I used my 1/2" cordless drill (low speed) to spin the cutter and cut the valve seat. Seemed to work pretty good.


After cutting the seats, I put the cylinder and head back together. I still don't have as much compression as I should, but I can't detect any air leaks when I slowly turn the engine over. Might have to check the new viton o-rings to see if they need more clearance.

Chuck
 
I never heard of cutting the valve and seat angles differently. The seat is what cools the rim of the valve when closed, if the angles are different and the contact patch is very small the valve might not get cooled properly.


Hi Peter,
In the auto trade it is merely an easy way of grinding in or lapping in new or re-cut valves or seats. Fear not, in short order the full width of the seating will bed itself in.
Exhaust seatings were usually wider than inlet for the reasons you mention.
Ned
 
Chuck---I was just looking over my build of the Webster and I see that you posted that you make your valves out of drill rod. How hard is that stuff? Do you use carbide or HSS. If you use carbide, how on earth do you get a good finish with it? The Kerzel valves I built are two peice valves, partly because he calls for it, and partly because I have problems turning 1/4" stock down to .094" dia. x 1.2" long without the material breaking off when I am just about down to the correct diameter. I haven't checked yet, but I suspect my valves aren't up to snuff. Any advice would be appreciated, thanks.---Brian
 
Brian, yes, I use drill rod for valves. It's a little bit harder than cold rolled steel, but not much. I do use carbide lathe bits and I do have a hard time getting a good finish. I usually try to get down to within .001 of finish size with the carbide tooling. Then I use a file at 70 -100 RPM to smooth away the carbide marks. Finally, I use a strip of 400 grit wet or dry sand paper at a very high RPM to get the finish OD.

When I turn the valve stem I take the diameter down a quarter inch section (or less) at a time, .020" per pass to get to a little over finish OD. Before starting with the file and sand paper, I use the compound to cut the 45 degree bevel on the valve. After I finish with the file and sand paper, I cut the valve loose from the rod stock it's turned from then rechuck it by the stem and face off the valve.

I seldom make valve stems smaller than .125 although I have gone down to .0625" just to see if I could do it. That valve never found its way into an engine so although t looked OK, don't know if it would have worked or not.
Chuck
 

Latest posts

Back
Top