Steam Powered Vehicle

Home Model Engine Machinist Forum

Help Support Home Model Engine Machinist Forum:

This site may earn a commission from merchant affiliate links, including eBay, Amazon, and others.

cfellows

Well-Known Member
Project of the Month Winner
Joined
Aug 25, 2007
Messages
3,890
Reaction score
715
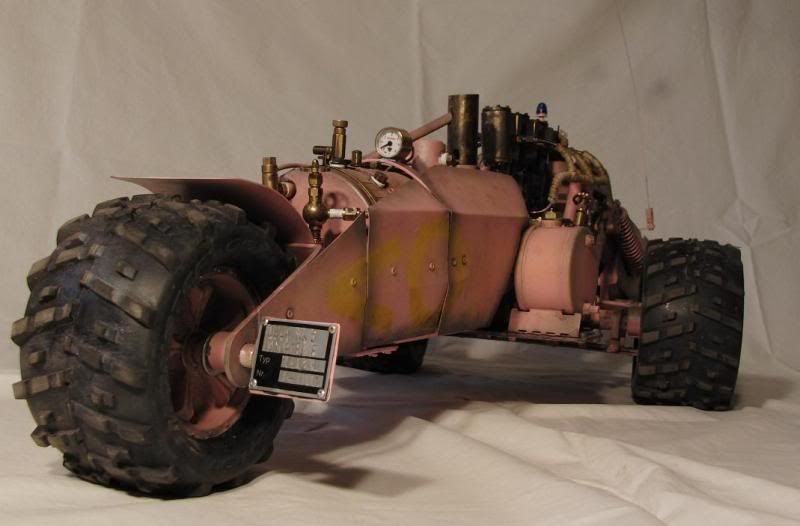
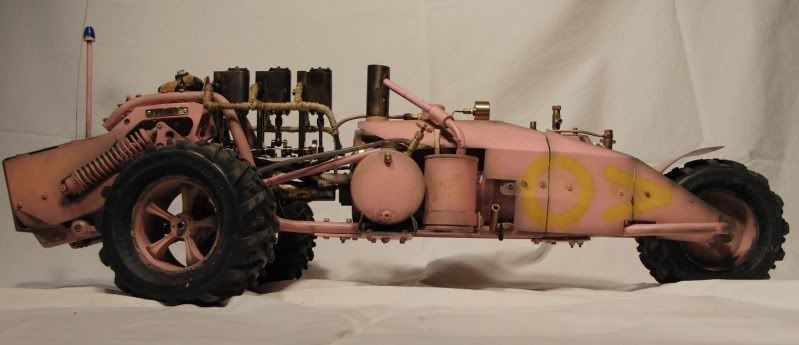
This is a continuation of my double acting oscillating steam engine and boiler build which is going into a vehicle. Il liked the looks of the vehicles built by this fellow. Take a look around his channel. Some interesting vehicles and engines, including a V8 oscillator!

http://www.youtube.com/user/prallplatte


I will be building something similar this model of his...
Unbenannt1-1.jpg


Unbenannt-1.jpg


The overall width to the center of the tread will be around 10". Length of the vehicle probably around 18", maybe more.

I figured a good start would be a complete RC Front Axle assembly so I found this on Ebay (darn, these parts are not cheap!).

a0d0d516.jpg


This will add a bit of realism and will simplify the drive mechanism which leaves plenty of other hard parts to design and make! Hope I have enough years left to complete this thing!

Chuck
 
Looks like a very interesting project Chuck. Be looking for the progress reports.

Ray
 
Chuck I am sitting here in my LazyBoy chuckling to myself. What a delight you are. I/we never know what to expect when we open your threads. Well, my fellow model maker, if anyone can pull this project off, it is you. Thanks for sharing the fun with all of us.

 
steamin said:
Chuck I am sitting here in my LazyBoy chuckling to myself. What a delight you are. I/we never know what to expect when we open your threads. Well, my fellow model maker, if anyone can pull this project off, it is you. Thanks for sharing the fun with all of us.

Thanks, Steamin! High praise indeed. I do get excited about building the darn'dest things! ::)

Brian Rupnow said:
Mad Chuck at Thunderdome ;D ;D ;D ;D ;D

Thanks, Brian, I was kind of aiming for that kind of effect. I like the looks of things made from junk that have an appealing, overall look.

ironman said:
Looks like a very interesting project Chuck. Be looking for the progress reports.

Ray

Thanks, Ray, I'm sure it will be as exciting a ride for me as for the onlookers. So far I've learned such things as how to make a simple u-joint, how to make a ball differential, axles and driveshafts, etc. Still, I wound up buying a commercial axle assembly with all that stuff included. I still have to build the boiler and I haven't figured out the burner yet. I'm leaning toward simple propane for the latter. I have a nice set of tires, but will have to turn some aluminum rims for them and also find some foam inserts to stiffen them up some. And, of course, fitting the servos and electronics as inconspicuously as possible. Building an engine is one thing... building a working vehicle around it adds a whole new dimension! But it's fun.

Chuck

 
OK Chuck I'm signed up for this one. I assume that transaxle is metal and not a plastic Tamiya job?

Pete
 
Looking forward to this build Chuck.
Brock
 
Hello Chuck!

You know how i love when someone thinks outside the box. This is no exception.

I'm not sure what direction you are going or to what scale but I have had 4 NASCAR tires laying around the garage. They fit on 2.2 wheels and are 1-5/8 wide and about 2-3/4 tall. If you decide to go "race car" you are welcome to them for shipping. If you go "pro street" a pair in the rear would also look good.


DSCN2279s.jpg
 
Thanks for the offer, Steve, I do appreciate your generosity. But I already have some tires I picked up cheap on Ebay that will fill the bill.

Chuck
 
Chuck---I thought of you the other day. Some Scientific equipment for schools/teachers sent me a brochure, and one of the things in it was a model sized chassis with treads like a tank. Have you given up on that aspect of the build and are now going with wheels instead?
 
Brian, I have decided to go with the wheeled model for simplicity. Steering on tracked vehicles with electric motors are easy because you just run one or both motors. With a single engine you have to use clutches and that is a bit beyond me at the moment. Also, I prefer the looks of then wheeled vehicles.

Thx... Chuck
 
No real progress other than continued research. I dissected one of the Harbor Freight pencil torches today. Turns out both the Ronson style filler valve assembly and the torch assembly have 5mm x 0.5mm threads. I was able to order both taps and dies in those sizes from Victor tool supplies. The tube which leads from the torch body to the torch head is 3mm diameter with a 1mm inside diameter. I'm assuming this is more than adequate for any Jet size I might require for the finished burner. Anybody think that is too small?

I'm unable to determine the jet hole size. I can only say that it is smaller than my smallest drill bit which is .0135 inches in diameter. I'm guessing I can't just bore out the jet size to make a larger burner?

At $6.00 apiece, the Pencil Torches are a good source of parts, including the o-rings.
 
Chuck,

The standard fitting for Ronson valves in the UK is 4.5mm metric fine.

Gas jets (Calor) come in the following sizes for our type of general use

Number 3 which has a 0.15mm dia jet bore

Number 5 which has a 0.2mm dia jet bore

Number 8 which has a 0.25mm dia jet bore

Number 12 which has a 0.3mm dia jet bore

Number 16 which has a 0.35mm dia jet bore

All have 1BA thread.

#5 & #8 are the most used ones.

Attached is a combined gas valve (modify to fit your type of gas tank) and regulator by Malcolm Beak.

At this very time, I am gathering together the parts needed to make demand valves. These are for a safety feature that if the gas flame is extinguished, the gas supply is cut off. I have shown a credit sized card to show how small they are, about 2" square by 1" thick is the size of the finished article.

Demandvalvebits.jpg


I have bought enough from the US to make 10 of the units, and it all came to about 50 bucks including shipping.

I can't show the plans online, but if anyone would like a copy, just send me an email.

I would recommend people to download this catalogue. Contained within are all the correct jets, fillers and materials to make ceramic burners, plus loads of kits to drool over.

http://www.pollymodelengineering.co.uk/sections/bruce-engineering/price-list.asp


I hope this helps.

John

View attachment GasValveAndRegulator.pdf
 
Chuck

Have a trawl through this thread of mine. http://www.homemodelenginemachinist.com/index.php?topic=10883.0 There may be something useful for you in there. If you go ahead with the vertical boiler and use the Sandy C design round burner the link John gave you will provide all the parts. (ceramic and jets)

Also take a look at the regulator I used on the mapp/propane cylinders. They are available off ebay but the guys at Ultimate Spud Gun in Hawaii does them cheaper. http://ultimatespudgun.com/propane-mapp-regulator-p-220.html 0-40psi regulator, that with the propane cylinder you'll get more than enough heat.

At risk of stating the obvious jet size and pressure determine how much gas gets into your burner, if you then add 97% air mixed with that gas (3%), that determines how much heat you'll get. Larger jet with the same pressure more heat, more pressure with the same jet, more heat. I cant imagine that the bits from one of those mini torches would generate enough heat to keep your engine going unless you had a high pressure, then the probably burner won't work as the gas velocity would be too high.

I can run my loco on one of those cylinders, 30psi and a #12 jet. Bottle freezing is the only issue as its pushing the gas out so fast. You'll also see in the link the Cris in Belgium running his loco on a similar setup (same bottle, regulator and a copy of the ceramic burner I made)

I'd imagine something like a #8 jet would do you.

Hopefully that will help

Pete

Pete
 
At a risk of stating the obvious, it isn't just a matter of firing the gas up a tube from a jet. It has to pass through a venturi to accelerate the gas before it gets to the burner. That is normally placed around 25mm to 30mm (1" to 1.25") from the jet, up the pipe.

Also, running from a large tank can cause problems with location in the model, so for a model such as yours, a rechargeable gas tank is almost a necessity, built to the plans I have already sent you. Using one of those also eliminates the need for a regulator, as you control the gas flow with the gas valve on the unit. BTW, that just won't be a normal on/off valve as you would use with steam or water, it HAS TO BE one specifically for gas control, they have much tighter tolerances and sealing methods built into them.

We actually used to run a copper pipe from the engine exhaust and wrap it around the rechargeable tank to stop the freezing, and so less drop in pressure. A couple of coils of 1/8" diameter tubing around the tank was more than enough, then the exhaust was sent to where it can be of most use, overboard. There is a large difference between running inside your shop and a cold day outside.

John
 
Thanks, John and Pete, for your input. I'm going to need all the help I can get on this burner project. Nice to have some folks available who have "Been There and Done That"!

I bought some tires (with wheels) on Ebay that I like. I'm sure no one will be surprised that the Wheels will not work with the Axial Axle & Differential that I bought. RC vehicles seem to have several different standards. Anyway, the wheels that came with the tires were cheap, thin plastic, not at all suitable for a manly steampowered trike, so I'm making new rims from aluminum. The rims will be made from 2.5" diameter, 1/4" wall aluminum tubing. Each rim will be 2" long and fitted with a 1/4" thick disk for the center. I haven't decided whether to leave the center disk solid or make some holes... we'll see.

Here is a picture of the tires, the plastic wheels, and the soon to be new aluminum rims. The soda can is there for size reference. The tires are almost 5" diameter and 2.25" wide.

05dd5637.jpg


Chuck
 
I've finally reached a point where I can start putting some things together to work out a prototype for this thing. I've finished the front wheels, for now. I have a couple of somewhat smaller tires and wheels that I'm going to try in tandem for the rear end. If I don't like those, I'll have to find another tire like those on the front.

Here's some pictures:

c331b063.jpg


And the assembly from the front. My current preference is to mount the engine in front of the front axel. I think it would look cool and leave more room behind the axle for other necessary stuff.

07f2fe95.jpg


10f112d6.jpg


Chuck
 
Hi,

I have somewhere plans for a steam pressure controlled gas regulator. When the steam pressure reaches the set value, it cuts the gas to a minimum. If you want these plans I can take the effort of finding them. ;)
 
Caffeine free diet coke? not quite red-bull chuck!
 

Latest posts

Back
Top